Coweb Swirls or Tick Marks?

bigbean17

New member
Joined
Mar 9, 2014
Messages
9
Reaction score
0
Hey guys, need a little help determining if the imperfections in the attached pictures are regular cobweb swirls or Tick marks. I have looked at the thread linked below but am having difficulty, any help would be appreciated. This will help me determine if i need to step up my compounding or finish with a less aggressive polish.

http://www.autogeekonline.net/forum...-swirls-micro-marring-da-haze-tick-marks.html

Marks in question:
 
Yup, i am currently using the meguiars da power system. I have watched most of the vidoes and have been doing my best to follow the proper techniques but i always end up with these swirls.
 
Yup, i am currently using the meguiars da power system.


If these pictues were taken AFTER buffing then what you're seeing is micro-marring.

There are three common ways people describe micro-marring,

Micro-marring
DA Haze
Tick Marks

These all mean the same thing.


What pad are you finising with?
What product or chemical are you buffing with?


:)
 
Mike, a little more background info:

Im using the da power system on a test spot before i tackle the rest of the car.

1. Clean
2. Car was recently clayed
3. Red compound foam pad with M105
4. Yellow polish foam pad with M205
5. Yellow polish foam pad with GG one step sealant

I also tried using the sealant with the black wax foam pad but still ended up with the pictures attached in my original post. I'm doing a small section with a couple section passes of each M105 and M205. Also using overlapping passes and trying to keep the pad moving about an inch per second.

Thanks for the help
 
Usually after the M205 step i can still see some marks using an LED flashlight. It may not be a bad as after the griots but they are still there. Not sure if it matters but the car is a 2012 dodge charger super bee which has had swirls since the day i bought it.
 
What I usually do when I'm running into an issue is troubleshoot.

To troubleshoot, place a tape line down across a section of paint where you see the micro-marring.

Then only buff on one side of the tape-line to see if you're improving the paint, staying the same or making it look worse.

Use the M205 with the yellow pad over a section buffed with the GG one step sealant.


Here's a couple more suggestions.

Get the black foam finishing pad. Could be the yellow foam isn't soft enough to finish out with.

Make sure you're cleaning the face of the pad after each section you buff. I you don't clean the face of the pad you'll be grinding the old polish and any removed paint back over the paint and this could cause marring.

Use a different sealant. Products called "One Step" are usually cleaner/waxes. and since you're already "cleaning" the paint with the compound and the polish by following these steps with a cleaner/wax or cleaner/sealant, you're technically working backwards.

Get a pure sealant, that is a non-cleaning sealant or non-cleaning wax.


:)
 
Thanks for the help Mike, I will re try a section with the tips you suggested. I do have the black foam pad which i tried with the GG one step sealant. The original pictures are after using the black pad with GG one step. I will report back once ive had a chance to try again.
 
I personally find it difficult to finish out perfect on clear coat paints using one-steps type products. Seems most every brand will leave some type of haze behind.

I explain this and then show how I use a fine cut polish and a non-cleaning wax for doing production work in this thread,


High quality production detailing by Mike Phillips


I explain the problem and the solution in the first post of the above thread but the entire thread has a ton of good info.


:)
 
So you plan on polishing the whole car with only four inch pads? Are you reducing speed and or pressure when using 205/yellow pad? I would try spritzing some water or QD on the cutting pad to extend the buffing cycle of 105. Well, that is assuming that the paint even needs 105. Did you do a test spot to see what 205/yellow pad would correct before going straight to 105/maroon cutting pad? From 205/yellow pad I would go to the maroon pad/205 before 105. Seems that the paint isn't a fan of an aggressive pad and compound. Also, how many passes are you doing on the cutting step? Are you priming the pad before putting it contact with the paint? How big of an area/section are you working at a time? Definitely follow Mike's recommendations and do a tape line and see what step is make a difference, good or bad.
 
So you plan on polishing the whole car with only four inch pads? Are you reducing speed and or pressure when using 205/yellow pad? I would try spritzing some water or QD on the cutting pad to extend the buffing cycle of 105. Well, that is assuming that the paint even needs 105. Did you do a test spot to see what 205/yellow pad would correct before going straight to 105/maroon cutting pad? From 205/yellow pad I would go to the maroon pad/205 before 105. Seems that the paint isn't a fan of an aggressive pad and compound. Also, how many passes are you doing on the cutting step? Are you priming the pad before putting it contact with the paint? How big of an area/section are you working at a time? Definitely follow Mike's recommendations and do a tape line and see what step is make a difference, good or bad.

Yup, i do plan on doing the whole car slowly but surely. I have tried varying degrees of pressure and speeds with the yellow pad and 205, but it hasnt made much of a difference. I did try first with 205 and the yellow pad but i didn't see much improvement. I will try using the 205 with the red pad to see if that helps. On the cutting step i usually do a section pass (4 passes) and then take a look and see if the marks are gone. If not, i usually go at it again. I do prime the pads and i am working on about a 1 ft by 1.5 ft section.
 
Yup, i am currently using the meguiars da power system.


Just to make sure, you're talking about their G110v2 dual action polisher, looks like this?


Jeff working with the G110v2...
1999_Trans_Am_M101_Finished_034.jpg


I have tried varying degrees of pressure and speeds with the yellow pad and 205, but it hasnt made much of a difference.


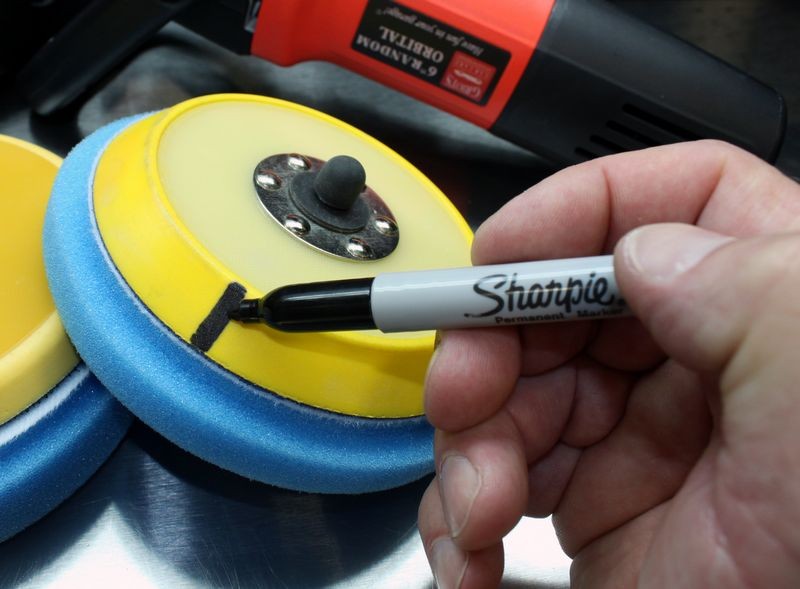
You want to be on the 5-6 seed setting and mark your backing plate so you can be sure the pad is rotating.

IF the pad is NOT rotating you will not remove swirls.

Video: Mark your backing plate to make it easy to see pad rotation


MarkYourBackingPlate01.jpg


Here's a quick video that show how and why to mark your backing plate to see and monitor pad rotation while doing any correction or polishing steps.


:)
[video=youtube_share;QM8PnDooZP8&hd=1"]How To Check Pad Rotation on a DA Polisher -...[/video]​
 
Read this too....


DA Polisher Trouble Shooting Guide


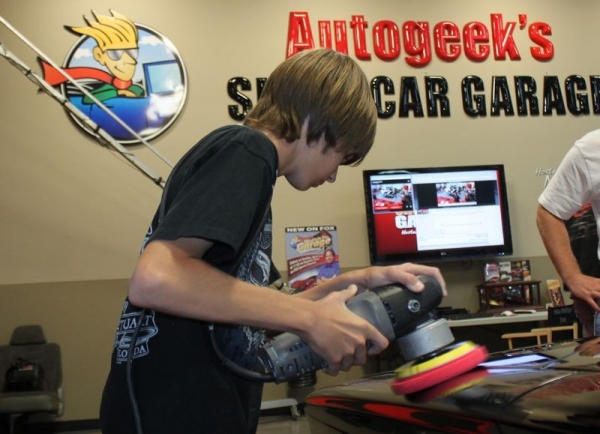
Tyler, age 15 removing swirls using a Porter Cable 7424XP Dual Action Polisher
1965Plymouth035.jpg


When you're first starting out machine polishing and learning to use a DA Polisher it's common to have questions about your results and your results are directly tied to your technique.

Here's a list of the most common problems,

1. Trying to work too large of an area at one time.

2. Moving the polisher too fast over the surface.

3. Using too low of speed setting for removing swirls.

4. Using too little downward pressure on the head of the polisher.

5. Using too much downward pressure on the head of the polisher so the pad quits rotating.

6. Not holding the polisher in a way to keep the pad flat while working your compound or polish.

7. Using too much product or using too little product.

8. Not cleaning the pad often enough.


Here's a list of the solutions in matching order,

1. Trying to work too large of an area at one time.
Shrink the size of your work area down. You can't tackle to large of an area at one time. The average size work area should be around 20" by 20". Most generic recommendations say to work an area 2' by 2' but for the correction step, that's too large. You have to do some experimenting, (called a Test Spot), to find out how easy or how hard the defects are coming out of your car's paint system and then adjust your work area to the results of your Test Spot. The harder the paint the smaller the area you want to work.


2. Moving the polisher too fast over the surface.
For removing defects out of the paint you want to use what we call a Slow Arm Speed. It's easy and actually natural for most people new to machine polishing to move the polisher quickly over the paint but that's the wrong technique. One reason I think people move the polisher too quickly over the paint is because they hear the sound of the motor spinning fast and this has psychological effect which causes them to match their arm movement to the perceived fast speed of the polisher's motor.

Another reason people move the polisher too quickly over the paint is because they think like this,

"If I move the polisher quickly, I'll get done faster"

But it doesn't work that way. Anytime you're trying to remove swirls, scratches, water spots or oxidation using a DA Polisher you need to move the polisher s-l-o-w-l-y over the paint.


3. Using too low of speed setting for removing swirls.
When first starting out many people are scared of burning or swirling their paint, so they take the safe route of running the polisher at too low of a speed setting but this won't work. The action of the polisher is already g-e-n-t-l-e, you need the speed and specifically the pad oscillating and rotating over the paint as well as the combination of time, (slow arm speed), together with the abrasives, the pad aggressiveness, and the downward pressure to remove small particles of paint which is how your remove below surface defects like swirls or scratches.

Removing below surface defects is a leveling process where you need the abrasives to take little bites out of the paint and to get the abrasives to take these little bites with a tool that uses a Free Floating Spindle Bearing Assembly you need all of the above factors working for you including a high speed setting.


4. Using too little downward pressure on the head of the polisher.
For the same reason as stated in #3, people are scared, or perhaps a better word is apprehensive, to apply too much downward pressure to the polisher and the result of too little pressure is no paint is removed thus no swirls are removed.


5. Using too much downward pressure on the head of the polisher so the pad quits rotating.
If you push too hard you will slow down the rotating movement of the pad and the abrasives won't be effectively worked against the paint. You need to apply firm pressure to engage the abrasives against the paint but no so much that the pad is barely rotating. This is where it's a good idea to use a permanent black marker to make a mark on the back of your backing plate so your eyes can easily see if the pad is rotating or not and this will help you to adjust your downward pressure accordingly.

Correct technique means finding a balance of applying enough downward pressure to remove defects but not too much downward pressure as to stop the rotating movement of the pad.

This balance is affected by a lot of factors like the lubricity of the product you're using, some compounds and polishes provide more lubrication than others and this makes it easier to maintain pad rotation under pressure.

Another factor that can affect pad rotation are raised body lines, edges and curved surfaces as anytime you have uneven pressure on just a portion of the face of the pad it can slow or stop pad rotation. This is where experience comes into play and experience comes from time spent behind the polisher.


6. Not holding the polisher in a way to keep the pad flat while working your compound or polish.
Applying pressure in such a way as to put too much pressure to one edge of the pad will cause it to stop rotating and thus decrease abrading ability.


7. Using too much product or using too little product.
Too much product hyper-lubricates the surface and the result is that abrasives won't effectively bite into the paint but instead will tend to skim over the surface. Overusing product will also accelerate pad saturation as well increase the potential for slinging splatter onto adjacent panels.

Too little product will means too little lubrication and this can interfere with pad rotation.

Again there needs to be a balance between too much product and too little product and finding this balance comes from reading articles like this one, watching videos an most important, going out into the garage and putting in time behind the polisher and as you're buffing with specific product and pad combinations, pay attention to pad rotation.


8. Not cleaning the pad often enough.
Most people simply don't clean their pad often enough to maximize the effectiveness of their DA Polisher. Anytime you're abrading the paint you have two things building up on the face of your buffing pad,
  • Removed paint
  • Spent product

As these to things build up on the face of the pad they become gummy and this has a negative affect on pad rotating plus makes wiping the leftover residue on the paint more difficult. To maintain good pad rotation you want to clean your pad often and always wipe-off any leftover product residue off the paint after working a section. Never add fresh product to your pad and work a section that still has leftover product residue on it.


Pad Cleaning Articles

Why it's important to clean your pads often...

How to clean your foam pad on the fly

How to use the Grit Guard Universal Pad Washer


Tyler, age 15 machine applying a paste wax using a Porter Cable 7424XP Dual Action Polisher

1965Plymouth067.jpg


1965Plymouth071.jpg


buffing.gif
 
Nope, i am talking about the drill attachment da power system. Thanks for the additional info i will check it out.

Just to make sure, you're talking about their G110v2 dual action polisher, looks like this?


Jeff working with the G110v2...
1999_Trans_Am_M101_Finished_034.jpg


You want to be on the 5-6 seed setting and mark your backing plate so you can be sure the pad is rotating.

IF the pad is NOT rotating you will not remove swirls.

Video: Mark your backing plate to make it easy to see pad rotation


MarkYourBackingPlate01.jpg


Here's a quick video that show how and why to mark your backing plate to see and monitor pad rotation while doing any correction or polishing steps.


:)
 
So i had a chance to go back out and try again using some of the tips given and the attached pictures show the results. Not sure how much better it came out. I did not use the one step sealant this time instead i used the meguiars liquid wax that came with the black finishing pad.

New things tried.

-used M205 with red pad....didnt remove swirls
-used Ultimate compound with red pad, seemed to reduce swirls (2 passes)
-used M205 with yellow pad (still swirls present)
-used M205 with black wax pad (still swirls present)

I did clean that pads between passes but after looking at the link Mike posted above maybe im not cleaning them well enough. Other than that im not sure what else to change unless my clear coat is just really hard and i need to do more work with the red pad. In the meantime, i will check out the videos/link that were posted above. Thanks for the help guys.
 
-used Ultimate compound with red pad, seemed to reduce swirls (2 passes)


The above is the ticket only you need to make a lot more passes.

Read what I wrote in this article about how to do a "Section Pass".


Show Car Garage Video: How-To do a "Section Pass" when Machine Polishing with a DA Polisher


Here's how to do a "Section Pass" when trying to remove swirls, scratches and other below surface paint defects.


How to do a Section Pass
[video=youtube_share;Q70g83mnTn4"]YouTube- How to do a "Section Pass"...[/video]​


When talking about machine polishing on discussion forums or even in detailing classes, the below questions always comes up,
  • What's a pass?
  • How many passes do I make?
  • What's a section pass?

The definition of a pass
There are two definitions of the word pass as it relates to machine polishing with any type of machine.


Single Pass
A single pass is just that. It's when you move the polisher from one side of the section you're buffing to the other side of the section you're buffing. That's a single pass.


Section Pass
A section pass is when you move the polisher back and forth, or front to back with enough single overlapping passes to cover the entire section one time. That's a section pass.

In most cases if you're removing any substantial below surface defects you're going to make 6-8 section passes to the section you’re working before you either feel comfortable you've removed the defects or you're at the end of the buffing cycle for the product you're using.


Buffing Cycle
The buffing cycle is the amount of time you are able to work the product before the abrasives have broken down, (if you’re using a product that uses diminishing abrasives), and/or the product begins to dry and you lose the lubricating features of the product. Different products have different buffing cycles depending upon the type of abrasives used in the formula and the different ingredients used to suspend the abrasives and provide lubrication.


Factors that affect the buffing cycle include,
  • Ambient temperature
  • Surface temperature
  • Size of work area
  • Type of machine
  • Type of pad material
  • Humidity
  • Wind or air flow surrounding the car
  • Amount of product used
  • Technique

Wet buffing technique
Most compounds and polishes should be used so that there is enough product on the surface to maintain a wet film while the product is being worked. The wetness of the product is lubricating the paint as the abrasives abrade the paint and cushion or buffer the abrading action so the abrasives don’t simply scour the finish leaving behind swirls and scratches.


Dry Buffing Technique - Buffing to a dry buff
There are some products on the market where the manufacture recommends buffing the product until it dries. As the product dries you’ll tend to see some dusting as the product residue becomes a powder and the paint will have a hard, dry shine to it.

Although some manufactures recommend this, it’s important to understand what’s taking place at the surface level as you buff to a dry buff. As the product dries, in essence you are losing the lubricating features of the product and as this happens friction and heat will increase. As friction and heat increases, so does the risk of micro-marring the paint or instilling swirls either by the product residue or the pad material and/or a combination of both.

While we trust that the manufacture knows their products best, when we take a close look at what it means to buff on a delicate surface like an automotive clear coat, it doesn’t make sense to run a buffing pad on top of the paint without some kind of wet film to lubricate the paint at the same time. We always recommend that you follow the manufacturer's recommendations and use your own judgment.

Everyone new to buffing wants to be told some easily identifiable sign that they can use to tell when it's time to stop buffing and it's not that simple, so here's an indicator I've always used and taught to others,

Wet film behind your path-of-travel
As you're making a single pass with the polisher, the paint behind the path of travel of the buffer should have a visible wet film on it. If the paint behind the pad is dry and shiny, you've run out of lubrication and you're dry buffing. Turn the polisher off. Wipe the residue off and inspect using a Swirl Finder Light to make sure you didn't dull or mar the paint, you usually won't cause any harm, but pay attention when your running the polisher and don't buff to a dry buff. If you do, you can quickly re-polish that section by cleaning your pad and adding a little fresh product and making a few new section passes.


UMR
Remember, in most cases the goal is UMR or Uniform Material Removal. The reason for this is so that you remove an equal amount of paint over each section and in turn over the entire car. In order to do this you need a method that you can control and duplicate and for most people following a back and forth, side-to-side pattern works because it’s easy to remember, easy to do and easy to duplicate.


Resources
The above video segment is a 4 minute clip filmed during the extended version of How To Remove Swirls using any Dual Action Polisher like the Meguair's G110v2 and the Griot's Garage ROP and all models of he Porter Cable Dual Action Polisher, including the PC7424XP, PC7424, PC7336, G100


You need to do about 6-8 section passes and with a small diameter pad this is going to take you a long time.

If you think you might want to get into buffing out your own cars or detailing cars for money, I would strongly suggest getting a real polisher like the Meguiar's G110v2 or a Porter Cable 7424XP or a Griot's DA polishers.

Then you can start doing some serious correction work....


:)
 
Thanks Mike, next time i will do more section passes with the red pad and either the m105 or ultimate compound. Hopefully i can get to the point where all the swirls are gone. Im not really planning to detail for money, i just want to get rid of the swirls on my car. Not too concerned how long it takes me just want to do it right. Thanks for all the help.
 
Back
Top