Navigation
Install the app
How to install the app on iOS
Follow along with the video below to see how to install our site as a web app on your home screen.
Note: This feature may not be available in some browsers.
More options
Style variation
You are using an out of date browser. It may not display this or other websites correctly.
You should upgrade or use an alternative browser.
You should upgrade or use an alternative browser.
DFB's Garage
- Thread starter DFB
- Start date

DFB
Well-known member
- Aug 12, 2019
- 5,081
- 3,361
- Thread starter
- #2,382
Something completely foreign was falling from the sky today............... a clear liquid called rain. It was a very dry summer, as has been the start to autumn, everything is crispy brown and super dusty. The rain will hopefully green things up and put some freshness in the air.
So, a wet day meant getting started on a little project I've been plotting for a week now. You know how it goes, to move ONE thing means having to move EVERYTHING.
 IMG_4678 by D B, on Flickr
That one thing being the fridge, which I wanted to move to gain space on the workbench. With just about every inch of floorspace being used, and the need for a power point, the only place for the fridge was to say on this shelving unit. That meant moving the two upper shelves up a few pegs to accommodate the height of the fridge.
 IMG_4680 by D B, on Flickr
I had to cut two pieces of timber to add some stability for the fridge, which tended to wobble on the thin shelf material. On these long-span units, the shelf cladding is actually quite thin, which is fine for storage but not ideal for a workbench...................which is the clue as to what this project is about. Also note I've moved the signs around too.
 IMG_4682 by D B, on Flickr
 IMG_4684 by D B, on Flickr
 IMG_4686 by D B, on Flickr
Ignoring the backpack blower, I now have some extra bench space to work on. The next step involves some carpentry...............which I'm really looking forward to, I love working with timber.
So, a wet day meant getting started on a little project I've been plotting for a week now. You know how it goes, to move ONE thing means having to move EVERYTHING.
IMG_4678 by D B, on FlickrThat one thing being the fridge, which I wanted to move to gain space on the workbench. With just about every inch of floorspace being used, and the need for a power point, the only place for the fridge was to say on this shelving unit. That meant moving the two upper shelves up a few pegs to accommodate the height of the fridge.
IMG_4680 by D B, on FlickrI had to cut two pieces of timber to add some stability for the fridge, which tended to wobble on the thin shelf material. On these long-span units, the shelf cladding is actually quite thin, which is fine for storage but not ideal for a workbench...................which is the clue as to what this project is about. Also note I've moved the signs around too.
IMG_4682 by D B, on FlickrIMG_4684 by D B, on FlickrIMG_4686 by D B, on FlickrIgnoring the backpack blower, I now have some extra bench space to work on. The next step involves some carpentry...............which I'm really looking forward to, I love working with timber.
Last edited:
Tasmania
Well-known member
- Jan 12, 2017
- 1,628
- 970
Was this wet stuff you speak of from the sky clean or dirtySomething completely foreign was falling from the sky today............... a clear liquid called rain. It was a very dry summer, as has been the start to autumn, everything is crispy brown and super dusty. The rain will hopefully green things up and put some freshness in the air.
So, a wet day meant getting started on a little project I've been plotting for a week now. You know how it goes, to move ONE thing means having to move EVERYTHING.
That one thing being the fridge, which I wanted to move to gain space on the workbench. With just about every inch of floorspace being used, and the need for a power point, the only place for the fridge was to say on this shelving unit. That meant moving the two upper shelves up a few pegs to accommodate the height of the fridge.
I had to cut two pieces of timber to add some stability for the fridge, which tended to wobble on the thin shelf material. On these long-span units, the shelf cladding is actually quite thin, which is fine for storage but not ideal for a workbench...................which is the clue as to what this project is about. Also note I've moved the signs around too.
Ignoring the backpack blower, I now have some extra bench space to work on. The next step involves some carpentry...............which I'm really looking forward to, I love working with timber.


DFB
Well-known member
- Aug 12, 2019
- 5,081
- 3,361
- Thread starter
- #2,385
Old Blue's turn today...................
Carpro Reset teamed with the Carpro DabDab.
 IMG_4689 by D B, on Flickr
After blow drying, I decided to apply ADS Ceramic Sealant. This stuff couldn't be easier to apply, no streaking, no excessive buffing, no hokey pokey application method...................just spray, wipe, done. You then end up with lovely gloss and slickness. I'd say something like Carpro Reload has more slickness, but the easy application counts for A LOT.
 IMG_4696 by D B, on Flickr
For some reason, I had a hankering for some AMMO Mud today, which smells delightful, is easy to apply and looks fantastic.
 IMG_4699 by D B, on Flickr
 IMG_4703 by D B, on Flickr
Somewhere in my travels over the last week, I managed to lose a valve cap.................
 IMG_4701 by D B, on Flickr
Now, this is a perfect example to describe the thought process that goes through an OCD mind. A seemingly insignificant, tiny little detail that in no way will stop the world from spinning................and yet it will eat away at me until I have the problem sorted. Yep, a valve cap can cause that sort of thought process. It's both a blessing and curse.
Anyway, I replaced all four with some black anodized items from Repco, of which I bought two different sets because I couldn't decide which to buy.
 IMG_4706 by D B, on Flickr
Halfway through the detail, I had to stop and wonder how long I have been washing this car....................17 years this June. That also means 17-years washing F-series Falcon sedans. I don't know if this applies to others, but I tend to end up with a specific routine with each vehicle. As in, you know where the water collection points are, what areas trap soap and need to be flushed out during the final rinse, drying door jambs a certain way, which exterior surfaces that collect grime, needing a specific brush for the wheels, and so on and so on. Well, on I have washing these cars down to a fine art. If someone was watching me move around an F-series sedan, you'd witnesses something close to auto-pilot.
Carpro Reset teamed with the Carpro DabDab.
IMG_4689 by D B, on FlickrAfter blow drying, I decided to apply ADS Ceramic Sealant. This stuff couldn't be easier to apply, no streaking, no excessive buffing, no hokey pokey application method...................just spray, wipe, done. You then end up with lovely gloss and slickness. I'd say something like Carpro Reload has more slickness, but the easy application counts for A LOT.
IMG_4696 by D B, on FlickrFor some reason, I had a hankering for some AMMO Mud today, which smells delightful, is easy to apply and looks fantastic.
IMG_4699 by D B, on FlickrIMG_4703 by D B, on FlickrSomewhere in my travels over the last week, I managed to lose a valve cap.................
IMG_4701 by D B, on FlickrNow, this is a perfect example to describe the thought process that goes through an OCD mind. A seemingly insignificant, tiny little detail that in no way will stop the world from spinning................and yet it will eat away at me until I have the problem sorted. Yep, a valve cap can cause that sort of thought process. It's both a blessing and curse.
Anyway, I replaced all four with some black anodized items from Repco, of which I bought two different sets because I couldn't decide which to buy.
IMG_4706 by D B, on Flickr Halfway through the detail, I had to stop and wonder how long I have been washing this car....................17 years this June. That also means 17-years washing F-series Falcon sedans. I don't know if this applies to others, but I tend to end up with a specific routine with each vehicle. As in, you know where the water collection points are, what areas trap soap and need to be flushed out during the final rinse, drying door jambs a certain way, which exterior surfaces that collect grime, needing a specific brush for the wheels, and so on and so on. Well, on I have washing these cars down to a fine art. If someone was watching me move around an F-series sedan, you'd witnesses something close to auto-pilot.
DFB
Well-known member
- Aug 12, 2019
- 5,081
- 3,361
- Thread starter
- #2,386
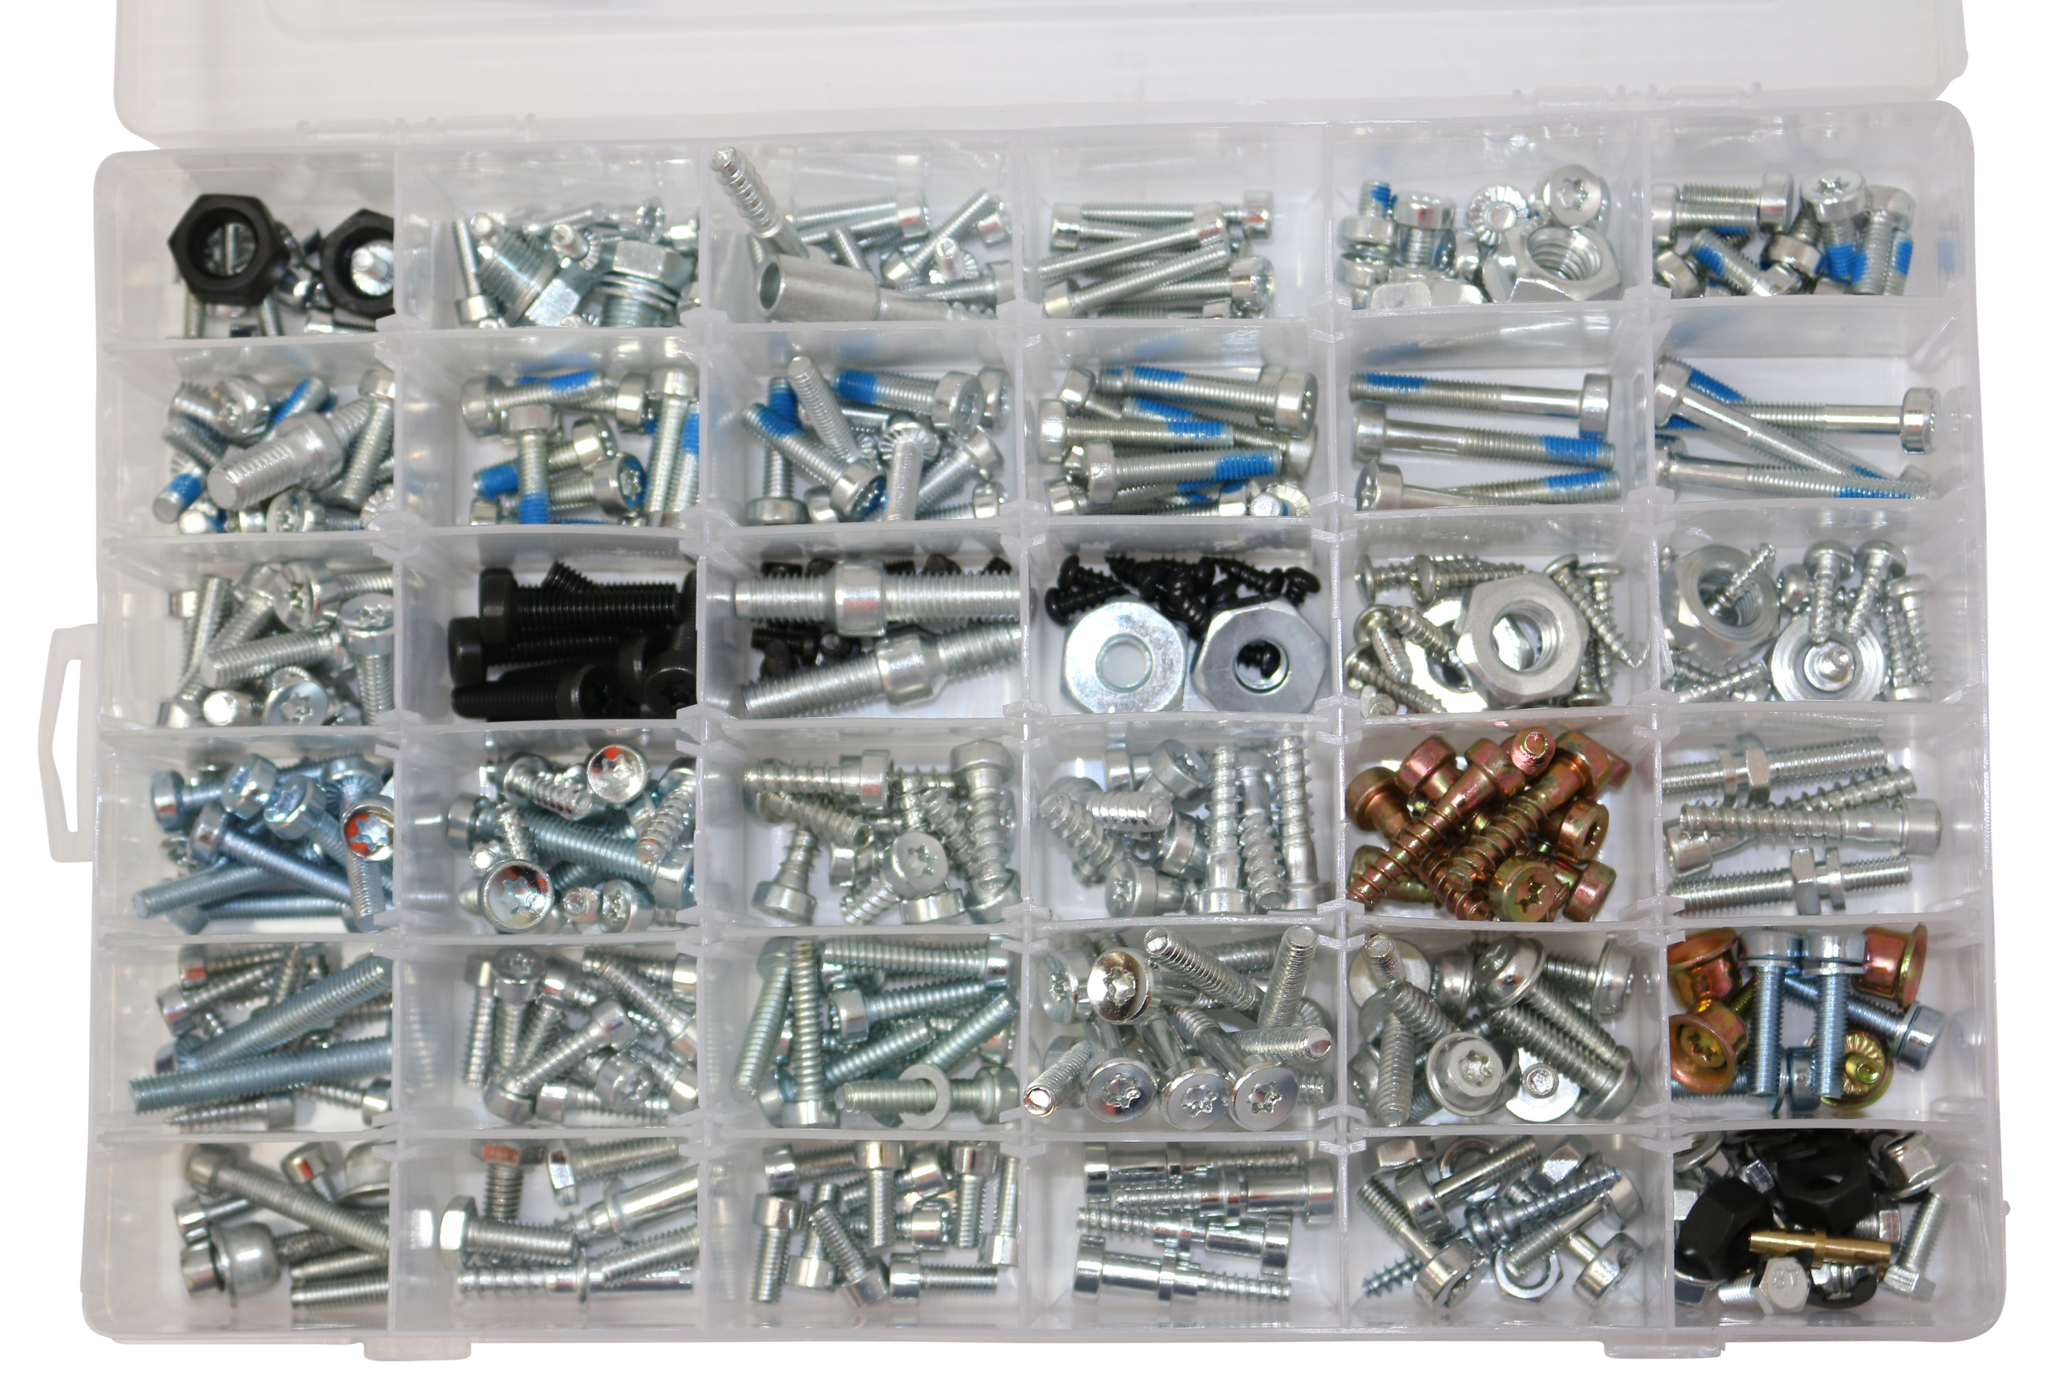
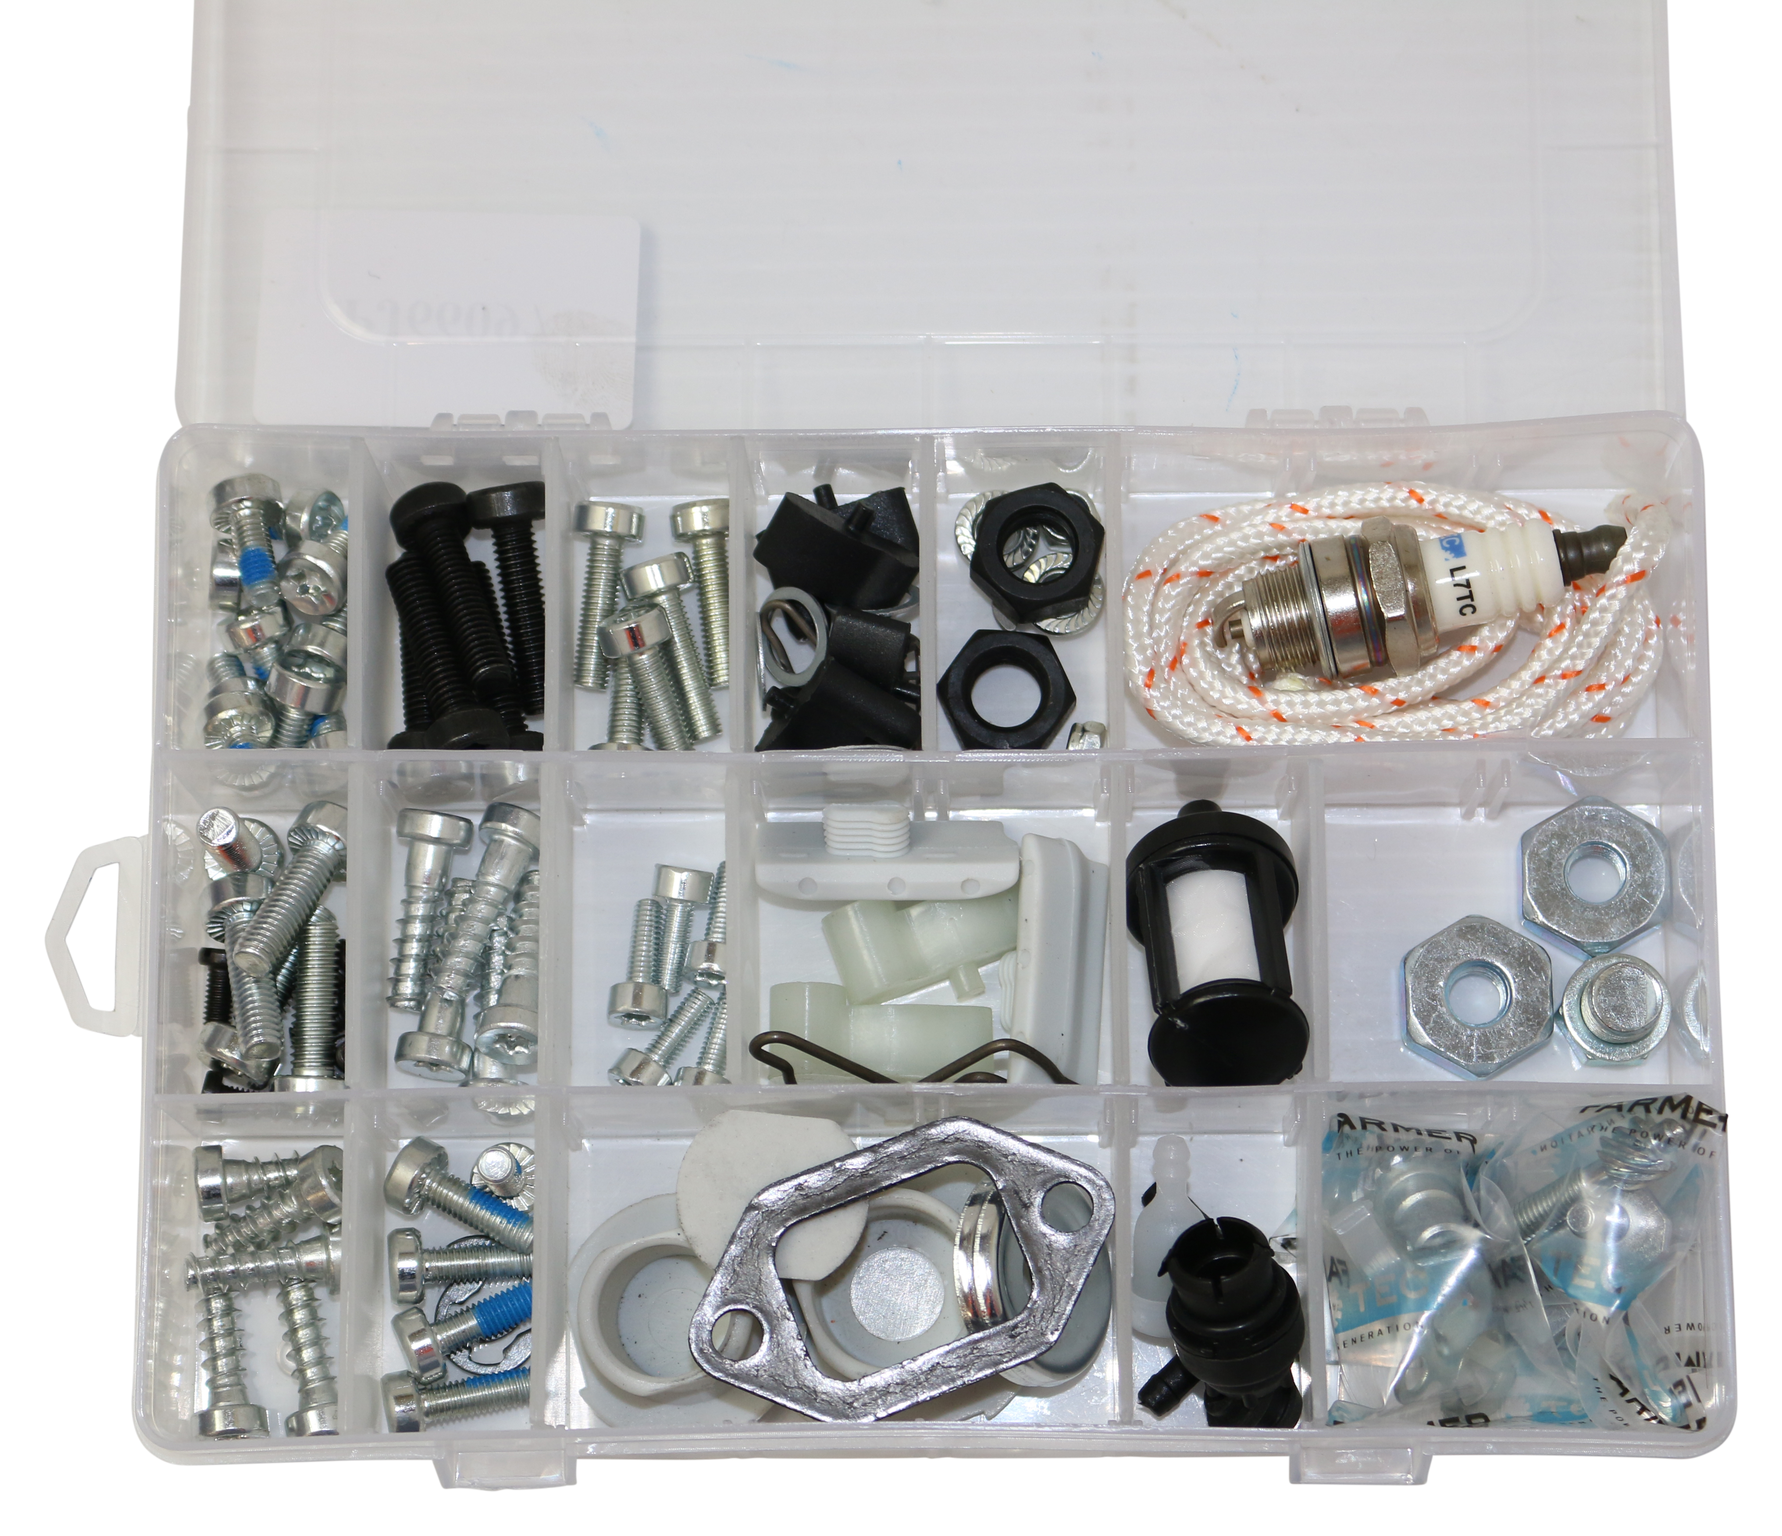
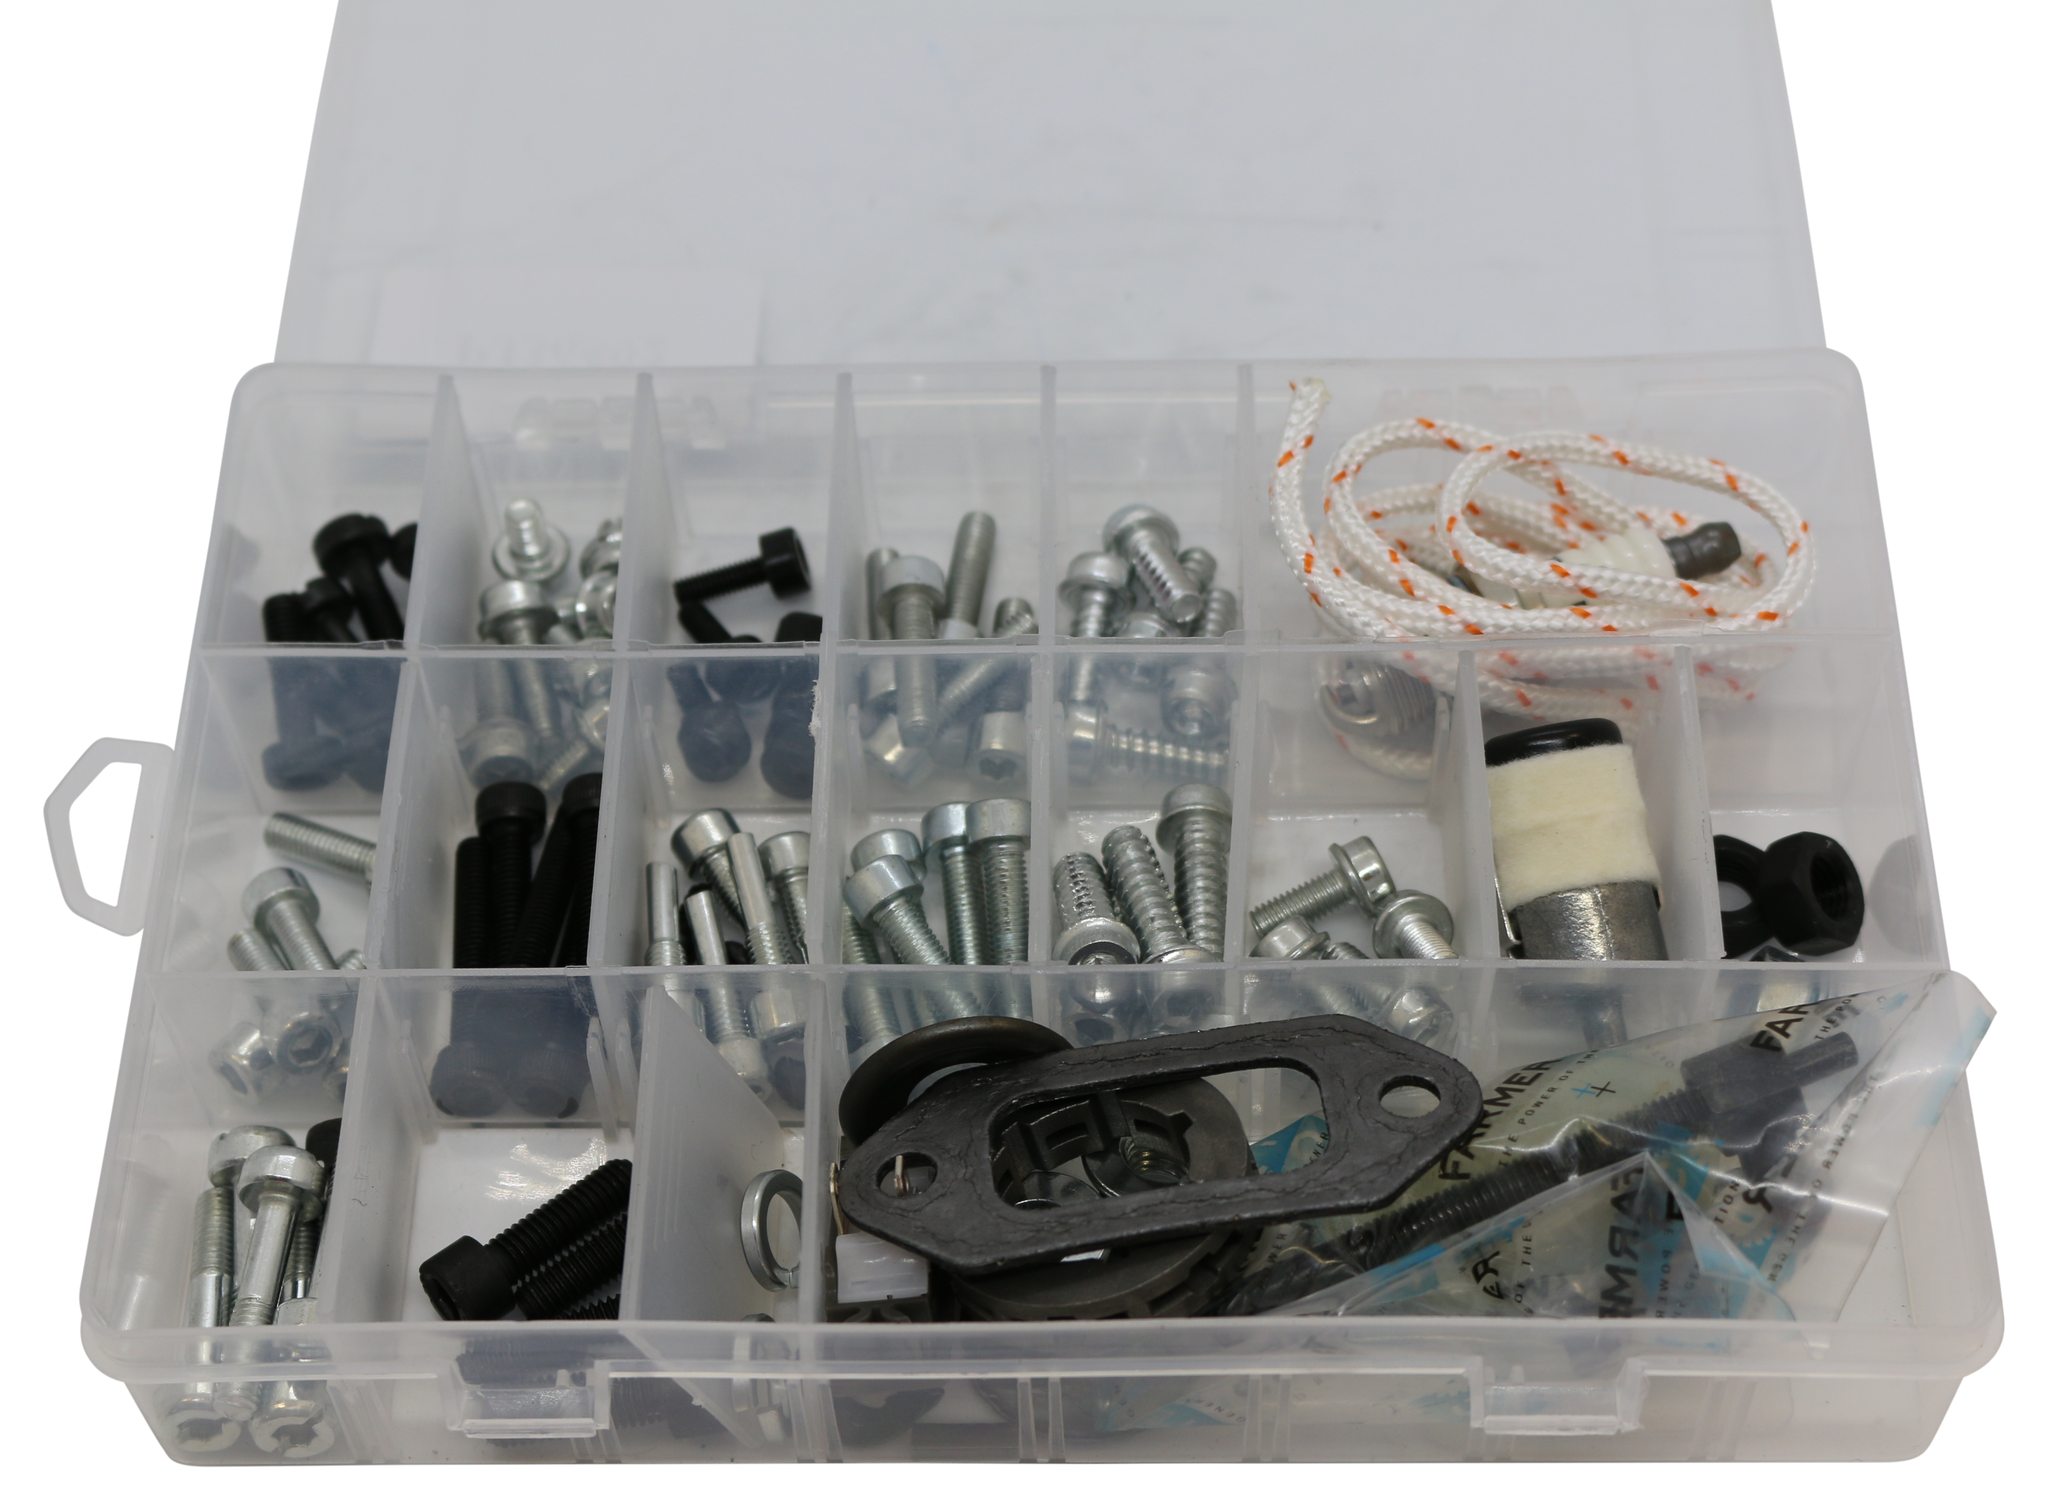
Spent far too long searching for a suitable replacement for a very specific Stihl fastener the other day. In the end, I landed on a random Phillips head screw, but then went online to see if I could find what I needed. So, instead of buying one screw, I overreacted and bought this 360 piece assortment kit instead..................
 www.chainsawspares.com.au
 IMG_4711 by D B, on Flickr
 IMG_4710 by D B, on Flickr
Actually, the above is take two after the supplier sent me the smaller 92-piece set instead. In addition to the Stihl set, they also do a Husqvarna equivalent as well.
 www.chainsawspares.com.au
 www.chainsawspares.com.au
 IMG_E4644 by D B, on Flickr
360 IN 1 Screws Bolts Nuts Clips Set Kit For Most of STIHL Chainsaws
Buy 360 IN 1 Screws Bolts Nuts Clips Set Kit for STIHL Chainsaws at Jono & Johno. Get the best deals on chainsaw spare parts online. Shop now!
IMG_4711 by D B, on FlickrIMG_4710 by D B, on FlickrActually, the above is take two after the supplier sent me the smaller 92-piece set instead. In addition to the Stihl set, they also do a Husqvarna equivalent as well.
92 in 1 Small Parts Kit For STIHL MS660 MS461 MS460 MS440 MS441 MS361 MS360 MS260 066 046 044 036 02
92 in 1 Small Parts Kit For most Stihl chainsaw models MS660 MS461 MS460 MS440 - JONO & JOHNO
92 IN 1 Small Spare Parts Kit For Husqvarna 362 365 371 372XP Chainsaw
92 IN 1 Small Spare Parts Kit For Husqvarna 362 365 371 372 XP Chainsaw - JONO & JOHNO
IMG_E4644 by D B, on FlickrBig Dave
Well-known member
- Jan 7, 2018
- 4,051
- 2,771
I had blue anodised caps on my blue Commodore, then 2 got stolen while parked at work, later I found out the guy that parked behind me had 2 silver aluminium caps stolen off his Focus. Damn kids. I still have the remaining 2 in my toolbox of course.Old Blue's turn today...................
Carpro Reset teamed with the Carpro DabDab.
After blow drying, I decided to apply ADS Ceramic Sealant. This stuff couldn't be easier to apply, no streaking, no excessive buffing, no hokey pokey application method...................just spray, wipe, done. You then end up with lovely gloss and slickness. I'd say something like Carpro Reload has more slickness, but the easy application counts for A LOT.
For some reason, I had a hankering for some AMMO Mud today, which smells delightful, is easy to apply and looks fantastic.
Somewhere in my travels over the last week, I managed to lose a valve cap.................
Now, this is a perfect example to describe the thought process that goes through an OCD mind. A seemingly insignificant, tiny little detail that in no way will stop the world from spinning................and yet it will eat away at me until I have the problem sorted. Yep, a valve cap can cause that sort of thought process. It's both a blessing and curse.
Anyway, I replaced all four with some black anodized items from Repco, of which I bought two different sets because I couldn't decide which to buy.
Halfway through the detail, I had to stop and wonder how long I have been washing this car....................17 years this June. That also means 17-years washing F-series Falcon sedans. I don't know if this applies to others, but I tend to end up with a specific routine with each vehicle. As in, you know where the water collection points are, what areas trap soap and need to be flushed out during the final rinse, drying door jambs a certain way, which exterior surfaces that collect grime, needing a specific brush for the wheels, and so on and so on. Well, on I have washing these cars down to a fine art. If someone was watching me move around an F-series sedan, you'd witnesses something close to auto-pilot.
DFB
Well-known member
- Aug 12, 2019
- 5,081
- 3,361
- Thread starter
- #2,388
I had blue anodised caps on my blue Commodore, then 2 got stolen while parked at work, later I found out the guy that parked behind me had 2 silver aluminium caps stolen off his Focus. Damn kids. I still have the remaining 2 in my toolbox of course.
Why on earth would someone go to the effort to steal a valve cap? It's not like they are valuable, I guess from a lack of brain capacity?
Last edited:
Big Dave
Well-known member
- Jan 7, 2018
- 4,051
- 2,771
I was perplexed myself, even more when I found out the other guy had his stolen, I couldn't figure out why only two off of each car were taken, then we realised, it was for their push bikes. Whenever I saw kids on bikes in the area, I was always checking the valve caps on them. Unfortunately it was an open carpark that the locals used as a short cut. I'll say this though, the kid was game, my car was parked within 2 metres of the main door to the warehouse.Why on earth someone go to the effort to steal a valve cap? It's not like they are valuable, I guess from a lack of brain capacity?
Tasmania
Well-known member
- Jan 12, 2017
- 1,628
- 970
Just make sure Deyon that the valve cap metal doesn't lock on to the valve thread I've heard stories of this happening.Why on earth would someone go to the effort to steal a valve cap? It's not like they are valuable, I guess from a lack of brain capacity?
I put a set of VW caps on the Amarok and Im always looking to see if they are still there.
Dirty Harry
Member
- Aug 28, 2023
- 68
- 40
At least it would eliminate the chance of theftJust make sure Deyon that the valve cap metal doesn't lock on to the valve thread I've heard stories of this happening.
")
Karl_in_Chicago
Well-known member
- Jun 9, 2007
- 511
- 326
I dunno, seemed to be a thing back in the 80's - people were stealing the caps off my Rabbit Diesel, of all things. 40 year younger me decided to amp it up and "painted" my caps with one of those hot sauces that's primarily capsaicin extract. Whether my caps stopped being stolen as a result or not I couldn't say, I figure the fad just passed or they upped their game to higher quality valve caps.Why on earth would someone go to the effort to steal a valve cap? It's not like they are valuable, I guess from a lack of brain capacity?
Karl_in_Chicago
Well-known member
- Jun 9, 2007
- 511
- 326
Do the valve caps on *that* wheel match the other wheels?Old Blue's turn today...................
Somewhere in my travels over the last week, I managed to lose a valve cap.................
Now, this is a perfect example to describe the thought process that goes through an OCD mind. A seemingly insignificant, tiny little detail that in no way will stop the world from spinning................and yet it will eat away at me until I have the problem sorted. Yep, a valve cap can cause that sort of thought process. It's both a blessing and curse.
Anyway, I replaced all four with some black anodized items from Repco, of which I bought two different sets because I couldn't decide which to buy.

")
Just make sure Deyon that the valve cap metal doesn't lock on to the valve thread
X2. If the caps are Aluminum and the stems are Brass they can corrode/fuse together. Maybe not in a dry climate but they fuse together around here.
DFB
Well-known member
- Aug 12, 2019
- 5,081
- 3,361
- Thread starter
- #2,396
Went shopping at Bunning's (our version of Home Depot) after 6pm last night to beat the usual weekend rush, grabbing some suppliers to make a start on my new project. This included some satin finish external polyurethane. However, the timber shop was closed and what I needed was on the top shelf out of reach, which meant another trip this morning to battle it out with the tradie rush. Anyway, 30-minutes later I had the required sheet of marine plywood.
For what I have in mind, this 2440mm x 1220mm sheet of plywood needs to be split into two 600mm halves, then sliced to 1840mm lengths. While I have a circular saw, I don't have a straight edge long enough and I don't trust my freehand saw skills. I know a cabinet maker who can make these three cuts in 30-seconds..................but he wasn't in his shop today. So, to make use of the time, I decided to sand both sides of the sheet and make a start on applying the polyurethane on the bottom side.
 IMG_4718 by D B, on Flickr
More to come.......................
For what I have in mind, this 2440mm x 1220mm sheet of plywood needs to be split into two 600mm halves, then sliced to 1840mm lengths. While I have a circular saw, I don't have a straight edge long enough and I don't trust my freehand saw skills. I know a cabinet maker who can make these three cuts in 30-seconds..................but he wasn't in his shop today. So, to make use of the time, I decided to sand both sides of the sheet and make a start on applying the polyurethane on the bottom side.
IMG_4718 by D B, on FlickrMore to come.......................
DFB
Well-known member
- Aug 12, 2019
- 5,081
- 3,361
- Thread starter
- #2,397
Geez this thing cuts nice.
 IMG_4723 by D B, on Flickr
 IMG_4721 by D B, on Flickr
I do wonder if the thinness of the blades helps cut the grass cleaner and finer. The blades shown below are all 18-inch blades, the one of the left is for the Victa 18, the middle one is for a standard 18-inch cut & catch model, and the one on the right is for a MasterCut utility.
 IMG_4727 by D B, on Flickr
 IMG_4730 by D B, on Flickr
It was hard getting an image that clearly shows what I'm talking about here. A rough measurement has the Victa 18 blade at just above 1mm, the other two are just under 3mm. Might not sound a lot, but it's very noticeable in your hands.
 IMG_4734 by D B, on Flickr
Now, having said that, Victa offered three different blades for these mowers, Fine (22 gauge / 0.759mm), Medium (20 gauge / 0.911mm) and Extra Heavy (18 gauge / 1.214mm). Goin off that, I have the Extra Heavy set fitted. Frankly, even these thicker blades are pretty dicey, no wonder they would slice people up.
The following is from the small paper slip with a set of complimentary 'MEDIUM" blades, all in 1950's speak..........................................
-------------------------------------------------------------------------------------------------------------------------------------
-------------------------------------------------------------------------------------------------------------------------------------
 Screenshot (354) by D B, on Flickr
IMG_4723 by D B, on FlickrIMG_4721 by D B, on FlickrI do wonder if the thinness of the blades helps cut the grass cleaner and finer. The blades shown below are all 18-inch blades, the one of the left is for the Victa 18, the middle one is for a standard 18-inch cut & catch model, and the one on the right is for a MasterCut utility.
IMG_4727 by D B, on FlickrIMG_4730 by D B, on FlickrIt was hard getting an image that clearly shows what I'm talking about here. A rough measurement has the Victa 18 blade at just above 1mm, the other two are just under 3mm. Might not sound a lot, but it's very noticeable in your hands.
IMG_4734 by D B, on FlickrNow, having said that, Victa offered three different blades for these mowers, Fine (22 gauge / 0.759mm), Medium (20 gauge / 0.911mm) and Extra Heavy (18 gauge / 1.214mm). Goin off that, I have the Extra Heavy set fitted. Frankly, even these thicker blades are pretty dicey, no wonder they would slice people up.
The following is from the small paper slip with a set of complimentary 'MEDIUM" blades, all in 1950's speak..........................................
-------------------------------------------------------------------------------------------------------------------------------------
Dear Victa Owner,
Your Victa Mower is at present fitted with Victa "FINE" blades (22 gauge). Continuous research has proved that these "FINE" blades give fine lawns that velvet finish.
For your particular purpose, you may find greater satisfaction and obtain longer blade life by using the Victa "MEDIUM" blades (20 gauge) as enclosed and which we ask you to accept with our compliments.
"EXTRA HEAVY" blades (18 gauge) are also available from all Victa Agents for use on your Victa when clearing very heavy undergrowth.
Genuine Victa Blades, which are made from specially rolled crinoline spring steel, sell at the one standard price, irrespective of thickness.
Ask your Victa agent for the blades you prefer:
"FINE" - "MEDIUM" - "EXTRA HEAVY"
BUY ONLY GENUINE VICTA SPARES
VICTA MOWERS PTY. LTD.
a division of
VICTA CONSOLIDATED INDUSTRIES PTY. LTD. MILPERRA, NSW.
-------------------------------------------------------------------------------------------------------------------------------------
Screenshot (354) by D B, on FlickrTasmania
Well-known member
- Jan 12, 2017
- 1,628
- 970
I thought you said it was dry, Nature strip is lush and greenGeez this thing cuts nice.
I do wonder if the thinness of the blades helps cut the grass cleaner and finer. The blades shown below are all 18-inch blades, the one of the left is for the Victa 18, the middle one is for a standard 18-inch cut & catch model, and the one on the right is for a MasterCut utility.
It was hard getting an image that clearly shows what I'm talking about here. A rough measurement has the Victa 18 blade at just above 1mm, the other two are just under 3mm. Might not sound a lot, but it's very noticeable in your hands.
Now, having said that, Victa offered three different blades for these mowers, Fine (22 gauge / 0.759mm), Medium (20 gauge / 0.911mm) and Extra Heavy (18 gauge / 1.214mm). Goin off that, I have the Extra Heavy set fitted. Frankly, even these thicker blades are pretty dicey, no wonder they would slice people up.
The following is from the small paper slip with a set of complimentary 'MEDIUM" blades, all in 1950's speak..........................................
-------------------------------------------------------------------------------------------------------------------------------------
Dear Victa Owner,
Your Victa Mower is at present fitted with Victa "FINE" blades (22 gauge). Continuous research has proved that these "FINE" blades give fine lawns that velvet finish.
For your particular purpose, you may find greater satisfaction and obtain longer blade life by using the Victa "MEDIUM" blades (20 gauge) as enclosed and which we ask you to accept with our compliments.
"EXTRA HEAVY" blades (18 gauge) are also available from all Victa Agents for use on your Victa when clearing very heavy undergrowth.
Genuine Victa Blades, which are made from specially rolled crinoline spring steel, sell at the one standard price, irrespective of thickness.
Ask your Victa agent for the blades you prefer:
"FINE" - "MEDIUM" - "EXTRA HEAVY"
BUY ONLY GENUINE VICTA SPARES
VICTA MOWERS PTY. LTD.
a division of
VICTA CONSOLIDATED INDUSTRIES PTY. LTD. MILPERRA, NSW.
-------------------------------------------------------------------------------------------------------------------------------------

Big Dave
Well-known member
- Jan 7, 2018
- 4,051
- 2,771
Rain on and off for the last few weeks, the grass is loving it, and so are the choko vines, I mowed less than a week ago.That soaking rain we had last week has made the Kikuyu go nuts!
