Drysanding?

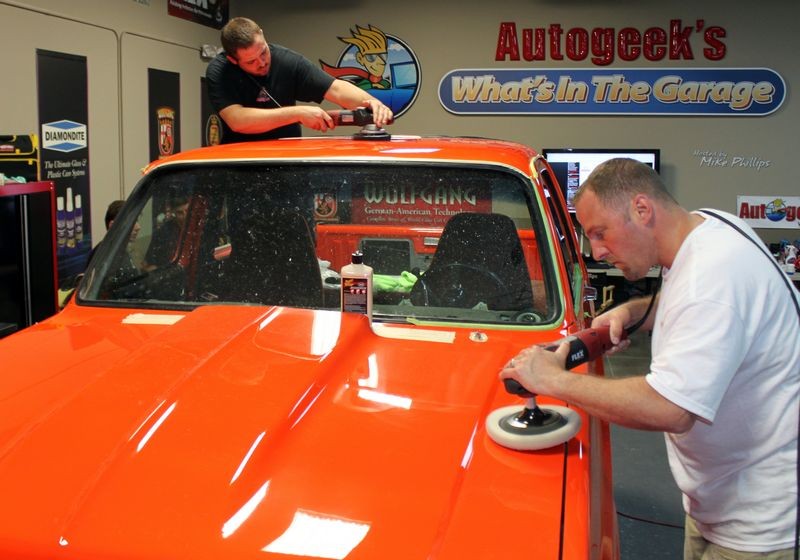
The purpose of the reply was to point out it really doesn't matter whether you start out dry sanding or wet sanding to obtain a great finish. Starting with dry sanding is prefered by highend detailers for the fact you can see what is being done. Your work is not "Hidden" by the slurry of the wet sanding process during the critical process of removing the scratches/orange peel. Starting off dry is quicker than wet and the end results are the same.


Ok. That is your point of view for "high end detailers" I guess, but like I said in my original post from my experience at hot rod shops and for show cars... the final product needs to be wet sanded to get the highest gloss. This is what I have seen by most body shops that do show cars. I think you are trying to say the same thing. I will leave it at that.
 
Ok. That is your point of view for "high end detailers" I guess, but like I said in my original post from my experience at hot rod shops and for show cars... the final product needs to be wet sanded to get the highest gloss. This is what I have seen by most body shops that do show cars. I think you are trying to say the same thing. I will leave it at that.

I believe you're right! We're saying the same thing in different ways. And like you said, the final sanding should be wet sanded prior to compounding/polishing.
Happy Detailing :autowash:
 
I guess dry sanding is the same as wetsanding except in dry, you can see the results on the fly, possibly cut faster!
But paper might get clogged quick and needed to be washed frequently!

In wetsanding, the slurry that flows down keeps the field and the paper clean!

Never thought of slurry as a polishing agent! lol

I'll try dry sanding next time I'm removing orange peel and follow it with fine wetsanding as Midnight1700 and 14automobiles were discussing!
 
I know guys that dry sand and guys that wetsand, done correctly it can come down to personal preference.

If you're going to dry sand though take caution to wear some type of dust mask so you don't breathe in the dust. Not an issue if you're just doing a spot but if you're going to sand down an entire vehicle you're going to create a lot of dust and you don't want to be breathing this in.

Also, with dry sanding your sanding papers are going to tend to load up and stop cutting effectively and this can also lead to an increase in Tracers or Pigtails depending upon if you're hand sanding or machine sanding.

You can clean your machine sanding discs the same way you clean your foam pads on a DA Polisher using the clean your pad on the fly technique using at terry cloth towel but it's not a perfect way to remove all the build-up off the face of the disc.

Next time you're sanding down a paint job, try both ways and see which way you prefer.

As for me... I'll stick with machine dampsanding whenever I can...


:)
 
Except for a few areas we hand sanded, the majority of the panels were machine dampsanded.


Sign-up - 1989 K5 Blazer - Wetsand, Cut and Buff - Saturday February 4th


Before - There are sections with clear coat failure

1989Blazer01.jpg


1989Blazer02.jpg


Starting the body work...
1989K5BlazerWetSand004.jpg


New rocker panels welded in...
1989K5BlazerWetSand001.jpg


Doors, hood, tailgate have all been removed...
1989K5BlazerWetSand002.jpg


Sealer on, then colored primer to sand high spots...
1989K5BlazerWetSand003.jpg


jaysk501.jpg


jaysk502.jpg


We did the wetsand, cut and buff last weekend on the Blazer last Saturday, I've been offline for a while and playing catch-up so I'll try to get the rest of the pictures up but here's a few teasers...

MorePeopleMoreBuffers001.jpg


MorePeopleMoreBuffers002.jpg


MorePeopleMoreBuffers003.jpg


MorePeopleMoreBuffers004.jpg


jaysk507.jpg


jaysk508.jpg


jaysk509.jpg


jaysk510.jpg


:)
 
Wow when my bro gets back from bootcamp I am going to show him this Blazer. Since he wants to redo his 92.
 
Funny this thread popped up again. Just last night I tried dry sanding a huge deep RID on the hood of my practice car (1995 Honda Accord. The hood is a repaint with very thick paint - 1200 micrometers in some spots.) I used Norton Dry Ice 3 in discs, 1500 grit on my GG3 in. I actually loved it. You could clearly see the RID in the middle of the working area and it got lighter as the work progressed. You could tell how long to work it quite easily.

I tried going straight to rotary/wool/M105. Didnt quite clear it up. So, I then wetsanded with a 3000 grit Megs disc. Then followed with rotary/wool/M105, then 3401 with white CCS pad and M205. Then GG6 with grey CCS pad and PO85rd.

SCratch gone, finish looks marvelous. No sun here today to really see my work. Supposed to be sunny tomorrow. Gonna IPA wipe and pull it in the sun. Good thing is there are many, many more RIDS to keep learning this technique on. I will try to photograph and write up.
 
Back
Top