Laura
New member
- Aug 2, 2009
- 299
- 0
THE HISTORY
It’s been about 6 months since I’ve posted anything here. I’d gotten a little lazy and un-obsessed. Actually, I’d been distracted. I live in Tuscaloosa, Alabama – home of the University of Alabama Crimson Tide. And I have a friend who gave me an option; I could either spend every Saturday detailing my Audi as I had done for the previous two years, or I could watch our football games...from a skybox.
I chose the skybox…

(As a side note, I’d highly recommend this to anybody given a similar option!)
The Audi remained in very good condition – when you’re detail oriented, it’s in your blood and no matter what, clean and clear paint will override other responsibilities (just not unparalleled fun!). I found some shortcuts that I could live with. When it needed it (after a rain, after the pollen, etc), I had a 1 ½ hour process that kept it looking really good inside and out, and about every 4 weeks I’d put on a coat of Poorboy’s Black Hole that filled the swirls and mars it had. I’d learned to be content with that.
However, my Optimum Spray Wax didn’t protect me from Suicide Bambi.

***I need to mourn here a moment with those who understand, so anybody just wanting to see 50/50 correction pics can feel free to scroll on down to the truck***
I’m the kind of person who loves detailing because I love my car. We are a select group of people. Our vehicle is an extension of our personality; a door ding or scratch on it is like a personal wound. When I got out to see the damage after hitting the deer, it was hemorrhaging what I later learned was washer fluid but at the time thought was coolant. It might as well have been bleeding because that’s how I felt. Overall it was minor damage, but that didn’t matter. Considering the time, effort, and money that I’d put in to keeping it glistening, this was sole crushing. Just as the initial shock was settling in, the wrecker got there and turned anxiety into shear horror. Nobody drives my car except me. I understand how uppity that sounds to most people, but that’s just the way I am about this car. And “Butch, the tow-guy” trying to figure out how to get it loaded on the truck was causing me more pain than the deer. I guess it’s just hard for the average person to show respect to a car with pieces falling off of it. He was beating it with just tossing the straps around; molesting it by putting his hands all over it. It was gut-wrenching. Finally, he had it secured on the flat-bed, and he drove off – that was one of the most pitiful sights I’d seen; it was agonizing. And all those words from friends and family intended to offer support and comfort, just fell short. “At least no one was hurt.” “You’re really lucky, it could have …..” “It’s just a car; you can replace that.” “I’m jealous; you got a deer this season before I did!” My logical and practical mind knew they were right and that I should be grateful it wasn’t any worse, but my heart was hurting. However, those of us who truly love our car will always find a way to cope with disappointment and remain proud to call it our own. My moment came the next day when I saw that I had the best beading in the collision center lot…


(As a side note, I’d highly recommend checking the details of your insurance policy and if you don’t see a $2.50/month line with words like rental or replacement or something similar, chances are you are on your own for transportation until your damaged vehicle is fixed)
And that’s how I got Paw Paw, a green metallic 1998 Chevy S10 POS. My friend with the box seats had Paw Paw for a work truck and offered him to me until I got my car back.

THE STORY
I have never been as thankful for a vehicle as I was this one. And on occasion I had mentioned how I enjoyed detailing and was pretty decent at it, but since the typical detailer isn’t an Audi-driving girl, I got the charity smile and nod then the topic was dropped. So I took this as my chance to not only show my gratitude, but also show off my ability. Plus, I just can’t drive a dirty vehicle – I don’t care what it is, it has to be shiny.
In addition, I also decided this could be an interesting show and shine thread because this was a little different than most. This forum is filled with threads of awesome corrections where people a whole lot better than me document everything they did to totally restore a perfectly flawless finish. But I wondered how many others have had a similar situation to this one – a totally neglected vehicle that will more than likely continue to be neglected; and where your personal expectations are higher than the owner’s, so you want to do an excellent job, but you don’t want to waste your time and products.
At the same time, I don’t know how many times I’ve read (and written), that the best way to get better is to practice, and as I looked over Paw Paw, I saw one excellent practice vehicle!
Given the circumstance, instead of developing a correction plan with “what do I do” in mind, I took a different approach…. I had to determine what NOT to do.
WASHING
To say it was dirty was an understatement; I’m not sure if it had ever been washed. I think God was its only detailer. It was covered with everything rain wouldn’t wash off; dirt, bird droppings, bugs, sap, and other unrecognizable “substances”.
General dirt...


I did NOT use the two bucket method. I didn’t really see much point in taking the time to carefully wash it trying not to instill swirls. I knew I was going to be getting the PC after it, so my main objective was to get as much off as possible and see the true condition of the surfaces. I used the pressure washer, my Boars Hair brush, the generic green tire brush, and Megs Gold Class Wash.
I did NOT use the leaf blower. I tried, but the water stuck to the paint. I used my waffle weave towels instead to get it as dry as possible.
The pictures don’t do it justice, but there was actually quite a difference just from the wash. Until this point I’d thought it was teal. Now I could see a deep metallic green with some potential.

CLAYING
I did NOT clay the tires. Aside from that, everything else got clayed. I didn’t have any claying short-cuts.
This is the windshield, and although it’s before I washed it, the spots you can see here were indicative of the water spots on the entire truck.

When I wiped a damp cloth over the glass, the remaining contaminates would haze. So I’d continue claying until the glass wiped clean – it took forever!!
After the wash, there was still caked on dirt in every groove. I tried various APC’s and a toothbrush, but it was just as quick to use clay on this.

I went through 4 clay “patties”. Yuck!

CORRECTING
I did NOT tape anything off. The trim was so bad that I didn’t think I could do any more damage. I wasn’t overly concerned about leaving polish or wax behind because I was going to spend some time working on the trim. So the only thing I used tape for was the 50/50 pictures and sectioning. I have a tendency to work too large an area, so I use tape markers to help guide me. Here’s how I divided the cab into nine sections.

(You can see my apprentice at the top of the pic hard at work)
I did NOT use my test spot to dial in a process I would use on the rest of the truck. I used the test spot to get a realistic idea of the true potential of the paint. No matter what I did, it was going to make a vast improvement. But at the same time, I knew I wasn’t trying for a perfect show car finish. I’m a true believer in the law of diminishing returns, so when I did my test spot, I was looking for that break-even point. I learned through the test spot what I should and should not spend my time and effort focusing on; otherwise, I would still be out in the garage working. I also had some different products that I wanted to play with, so I went through several different combinations until I found what I wanted to use for the first step; I ended up going with the Megs MF System.
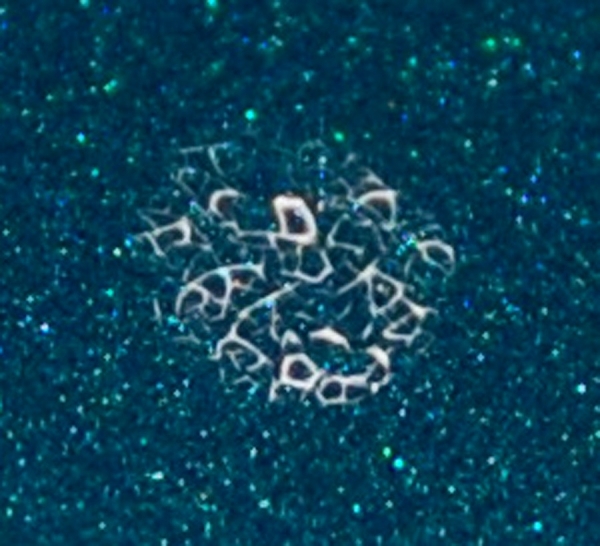
I did NOT try to get rid of the type 2 bird droppings. These were horrible, and they were all over the hood … made me sick

Here’s a close-up (I had to use my flash for this picture, and it made the paint look blue instead of green. Not really sure why). I tried to remove this with my finger and some Megs UC on a regular terrycloth towel and it didn’t do a thing. I eventually took a corner of a steel wool pad and tried to scratch it out, but that didn’t really do anything either. I honestly believe these would have to be sanded out - something I’ve never done - so my time and effort would be better spent elsewhere. This is such an excellent example of why bird droppings need to be removed immediately!
Hopefully you can see in this picture that the swirls and scratches weren’t as deep as the bird dropping spots. That’s what I was focusing on removing with my first step.

Here’s how the hood ended up . Overall it still looks atrocious - the 50/50’s show that there was some improvement - but it was extremely hard to step back and call this good!!! However, with everything else in bad shape too, I had to move on.

Here are the hood 50/50’s…with those awful spots…


I did NOT try to remove deep scratches. I got a lot of them out, I improved some, but others remained. Again, I could have spent my time and effort working each one, but with those horrid bird etchings, why bother. There were many other things that would make a bigger difference.
This is an example of scratches I WAS able to remove…


I did NOT do a second polish step on the fenders. I compounded them, but I didn’t think it was worth changing back to the 4” pad just to do these.

I did NOT skip the polishing step entirely. Even though I left defects behind, I was able to remove a substantial amount of minor scratching, marring, and water spots. There was such a huge improvement in the paint overall that a part of me was wondering if I should even worry with polishing or not. I’ve read several other threads where people have made such a difference with the first step that they are tempted to wax it and call it done. This thought crossed my mind because by the time I had completed the first step, I was beat. However, this just being practice and having several products I wanted to try, I played around to see just what a difference polishing could make. Actually, I was really surprised. This solidified my love for Menzerna P85RD. Not all products made this kind of difference, but 85RD did on either a white LC flat pad or a tangerine flat hydro-tech – I couldn’t tell a difference between the two pads. Here are some examples I was able to capture of how the polishing step can really clarify the paint.


I did NOT do anything about what I think is clearcoat failure. As I buffed over this, my pad turned green so I’m assuming that’s what’s happening here.


It’s been about 6 months since I’ve posted anything here. I’d gotten a little lazy and un-obsessed. Actually, I’d been distracted. I live in Tuscaloosa, Alabama – home of the University of Alabama Crimson Tide. And I have a friend who gave me an option; I could either spend every Saturday detailing my Audi as I had done for the previous two years, or I could watch our football games...from a skybox.
I chose the skybox…
(As a side note, I’d highly recommend this to anybody given a similar option!)
The Audi remained in very good condition – when you’re detail oriented, it’s in your blood and no matter what, clean and clear paint will override other responsibilities (just not unparalleled fun!). I found some shortcuts that I could live with. When it needed it (after a rain, after the pollen, etc), I had a 1 ½ hour process that kept it looking really good inside and out, and about every 4 weeks I’d put on a coat of Poorboy’s Black Hole that filled the swirls and mars it had. I’d learned to be content with that.
However, my Optimum Spray Wax didn’t protect me from Suicide Bambi.
***I need to mourn here a moment with those who understand, so anybody just wanting to see 50/50 correction pics can feel free to scroll on down to the truck***
I’m the kind of person who loves detailing because I love my car. We are a select group of people. Our vehicle is an extension of our personality; a door ding or scratch on it is like a personal wound. When I got out to see the damage after hitting the deer, it was hemorrhaging what I later learned was washer fluid but at the time thought was coolant. It might as well have been bleeding because that’s how I felt. Overall it was minor damage, but that didn’t matter. Considering the time, effort, and money that I’d put in to keeping it glistening, this was sole crushing. Just as the initial shock was settling in, the wrecker got there and turned anxiety into shear horror. Nobody drives my car except me. I understand how uppity that sounds to most people, but that’s just the way I am about this car. And “Butch, the tow-guy” trying to figure out how to get it loaded on the truck was causing me more pain than the deer. I guess it’s just hard for the average person to show respect to a car with pieces falling off of it. He was beating it with just tossing the straps around; molesting it by putting his hands all over it. It was gut-wrenching. Finally, he had it secured on the flat-bed, and he drove off – that was one of the most pitiful sights I’d seen; it was agonizing. And all those words from friends and family intended to offer support and comfort, just fell short. “At least no one was hurt.” “You’re really lucky, it could have …..” “It’s just a car; you can replace that.” “I’m jealous; you got a deer this season before I did!” My logical and practical mind knew they were right and that I should be grateful it wasn’t any worse, but my heart was hurting. However, those of us who truly love our car will always find a way to cope with disappointment and remain proud to call it our own. My moment came the next day when I saw that I had the best beading in the collision center lot…
(As a side note, I’d highly recommend checking the details of your insurance policy and if you don’t see a $2.50/month line with words like rental or replacement or something similar, chances are you are on your own for transportation until your damaged vehicle is fixed)
And that’s how I got Paw Paw, a green metallic 1998 Chevy S10 POS. My friend with the box seats had Paw Paw for a work truck and offered him to me until I got my car back.
THE STORY
I have never been as thankful for a vehicle as I was this one. And on occasion I had mentioned how I enjoyed detailing and was pretty decent at it, but since the typical detailer isn’t an Audi-driving girl, I got the charity smile and nod then the topic was dropped. So I took this as my chance to not only show my gratitude, but also show off my ability. Plus, I just can’t drive a dirty vehicle – I don’t care what it is, it has to be shiny.
In addition, I also decided this could be an interesting show and shine thread because this was a little different than most. This forum is filled with threads of awesome corrections where people a whole lot better than me document everything they did to totally restore a perfectly flawless finish. But I wondered how many others have had a similar situation to this one – a totally neglected vehicle that will more than likely continue to be neglected; and where your personal expectations are higher than the owner’s, so you want to do an excellent job, but you don’t want to waste your time and products.
At the same time, I don’t know how many times I’ve read (and written), that the best way to get better is to practice, and as I looked over Paw Paw, I saw one excellent practice vehicle!
Given the circumstance, instead of developing a correction plan with “what do I do” in mind, I took a different approach…. I had to determine what NOT to do.
WASHING
To say it was dirty was an understatement; I’m not sure if it had ever been washed. I think God was its only detailer. It was covered with everything rain wouldn’t wash off; dirt, bird droppings, bugs, sap, and other unrecognizable “substances”.
General dirt...
I did NOT use the two bucket method. I didn’t really see much point in taking the time to carefully wash it trying not to instill swirls. I knew I was going to be getting the PC after it, so my main objective was to get as much off as possible and see the true condition of the surfaces. I used the pressure washer, my Boars Hair brush, the generic green tire brush, and Megs Gold Class Wash.
I did NOT use the leaf blower. I tried, but the water stuck to the paint. I used my waffle weave towels instead to get it as dry as possible.
The pictures don’t do it justice, but there was actually quite a difference just from the wash. Until this point I’d thought it was teal. Now I could see a deep metallic green with some potential.
CLAYING
I did NOT clay the tires. Aside from that, everything else got clayed. I didn’t have any claying short-cuts.
This is the windshield, and although it’s before I washed it, the spots you can see here were indicative of the water spots on the entire truck.
When I wiped a damp cloth over the glass, the remaining contaminates would haze. So I’d continue claying until the glass wiped clean – it took forever!!
After the wash, there was still caked on dirt in every groove. I tried various APC’s and a toothbrush, but it was just as quick to use clay on this.
I went through 4 clay “patties”. Yuck!
CORRECTING
I did NOT tape anything off. The trim was so bad that I didn’t think I could do any more damage. I wasn’t overly concerned about leaving polish or wax behind because I was going to spend some time working on the trim. So the only thing I used tape for was the 50/50 pictures and sectioning. I have a tendency to work too large an area, so I use tape markers to help guide me. Here’s how I divided the cab into nine sections.
(You can see my apprentice at the top of the pic hard at work)
I did NOT use my test spot to dial in a process I would use on the rest of the truck. I used the test spot to get a realistic idea of the true potential of the paint. No matter what I did, it was going to make a vast improvement. But at the same time, I knew I wasn’t trying for a perfect show car finish. I’m a true believer in the law of diminishing returns, so when I did my test spot, I was looking for that break-even point. I learned through the test spot what I should and should not spend my time and effort focusing on; otherwise, I would still be out in the garage working. I also had some different products that I wanted to play with, so I went through several different combinations until I found what I wanted to use for the first step; I ended up going with the Megs MF System.
I did NOT try to get rid of the type 2 bird droppings. These were horrible, and they were all over the hood … made me sick
Here’s a close-up (I had to use my flash for this picture, and it made the paint look blue instead of green. Not really sure why). I tried to remove this with my finger and some Megs UC on a regular terrycloth towel and it didn’t do a thing. I eventually took a corner of a steel wool pad and tried to scratch it out, but that didn’t really do anything either. I honestly believe these would have to be sanded out - something I’ve never done - so my time and effort would be better spent elsewhere. This is such an excellent example of why bird droppings need to be removed immediately!
Hopefully you can see in this picture that the swirls and scratches weren’t as deep as the bird dropping spots. That’s what I was focusing on removing with my first step.
Here’s how the hood ended up . Overall it still looks atrocious - the 50/50’s show that there was some improvement - but it was extremely hard to step back and call this good!!! However, with everything else in bad shape too, I had to move on.
Here are the hood 50/50’s…with those awful spots…
I did NOT try to remove deep scratches. I got a lot of them out, I improved some, but others remained. Again, I could have spent my time and effort working each one, but with those horrid bird etchings, why bother. There were many other things that would make a bigger difference.
This is an example of scratches I WAS able to remove…
I did NOT do a second polish step on the fenders. I compounded them, but I didn’t think it was worth changing back to the 4” pad just to do these.
I did NOT skip the polishing step entirely. Even though I left defects behind, I was able to remove a substantial amount of minor scratching, marring, and water spots. There was such a huge improvement in the paint overall that a part of me was wondering if I should even worry with polishing or not. I’ve read several other threads where people have made such a difference with the first step that they are tempted to wax it and call it done. This thought crossed my mind because by the time I had completed the first step, I was beat. However, this just being practice and having several products I wanted to try, I played around to see just what a difference polishing could make. Actually, I was really surprised. This solidified my love for Menzerna P85RD. Not all products made this kind of difference, but 85RD did on either a white LC flat pad or a tangerine flat hydro-tech – I couldn’t tell a difference between the two pads. Here are some examples I was able to capture of how the polishing step can really clarify the paint.
I did NOT do anything about what I think is clearcoat failure. As I buffed over this, my pad turned green so I’m assuming that’s what’s happening here.


 rops:
rops:") I like that you keep things lighthearted and in perspective. I hope your Audi is mended soon
I like that you keep things lighthearted and in perspective. I hope your Audi is mended soon 
 for many many years. I called him once done with it and told him I was headed over to return it full of fuel and washed. He asked me......ready for this?