Finger Painting Technique when using a Rotary Buffer

Joined
Dec 5, 2022
Messages
51,004
Reaction score
7
Finger Painting Technique when using a Rotary Buffer


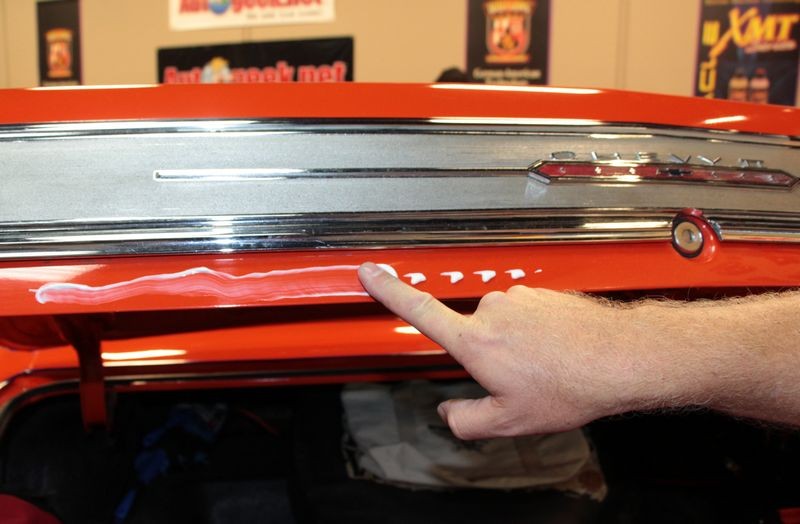
I call this Finger Painting - It's where you take your product spreader and spread out a thin layer of compound or polish to,


A: Spread the product out over the section of paint to be buffed.

B: Lubricate the area being buffed.


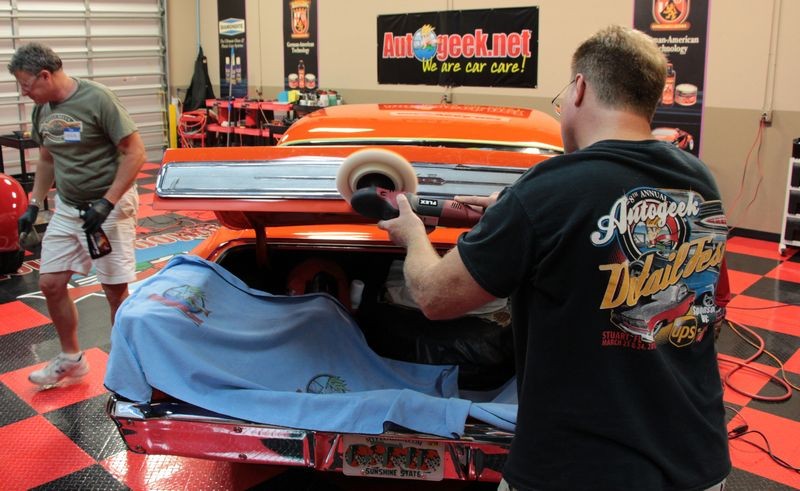
Normally I use the 10 @ 10 Technique to lay down a bead of product directly onto the paint to be buffed but for tight areas like you see below, you want to lubricate the paint and even the pad because buffing out thin panels like this or buffing into tight areas will put a lot of cutting power into play.

It's all about getting a film of compound or polish on the paint you're going to buff as this film of product not only contains the abrasives to abrade the paint but the film also lubricates the paint and especially the edges to help prevent burn-through.

1966_Orange_Nova_061.jpg


1966_Orange_Nova_062.jpg


1966_Orange_Nova_063.jpg


1966_Orange_Nova_064.jpg


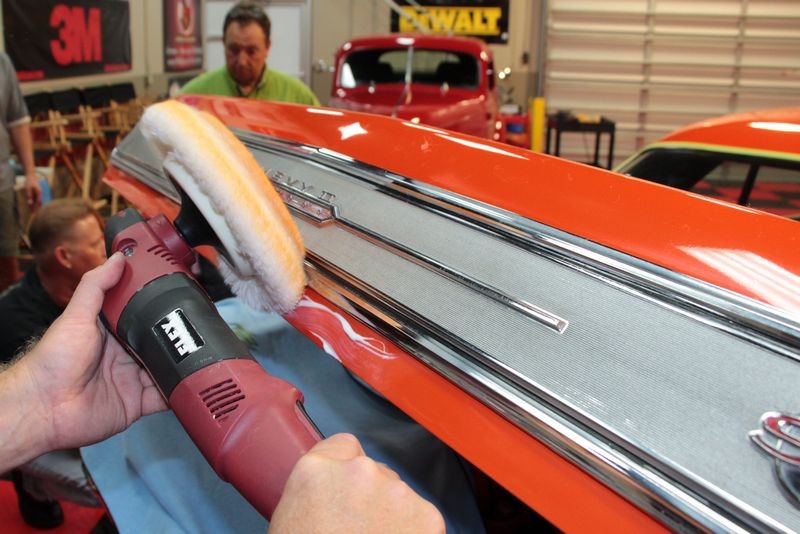
You can also apply some compound or polish to the outer edges of the pad and work this product into the fibers, (or work it into the foam if using a foam pad), to moisten and lubricate the outside edge of the pad.

Like shown here,

Rotary Buffer Tip - Prime the side edges of foam cutting pads


Just be careful when turning the polisher on as centrifugal force will kick in and you can sling any excess product out of the pad and onto surrounding areas and even your eyes.


:)
 
Thanks for the sharing. The 'prime the side edges' link is also very interesting thread.

Let me ask, since I only own a 3401 DA and that's what I have to tackle the job.

If you were tackling the same section on last picture with a 3401, would you use the pad flat (but just the edge in contact with area), or would you try the same 'position' you show for the rotary?

I know it's a different action tool, but since the 3401 keeps the pad spinning all the time, it offers the possibility of some action without using the pad fully contacted in the surface.

Difficult to explain what I mean, hope you can understand my question.

Thanks for sharing,

Kind Regards.
 
That's how I was taught to do it too years back when I first started. We call it "spreading the love" :laughing: :p (just kidding, just call it spreading the product)

IMG_52691.JPG


IMG_5272.JPG


IMG_52741.JPG


IMG_5270.JPG


IMG_5273.JPG
 
I do this technique with chrome as well. I dab the polish on with finger and then pick it up with the rotary.

HUMP
 
Thanks for the sharing. The 'prime the side edges' link is also very interesting thread.

Little tips of the trade....


Let me ask, since I only own a 3401 DA and that's what I have to tackle the job.

If you were tackling the same section on last picture with a 3401, would you use the pad flat (but just the edge in contact with area), or would you try the same 'position' you show for the rotary?

Probably have to go up on edge because if you try to hold the pad flat the pad is going to want to "grab" the edge of the trunk lid and this will jerk you around.


I know it's a different action tool, but since the 3401 keeps the pad spinning all the time, it offers the possibility of some action without using the pad fully contacted in the surface.

When you go up on edge with a 3401 it feels to your hands like how it feels when you're driving a car with a very flat tire. Womp, womp, womp.

Another option is to simply knock-out thin strips of paint like I show in the picture by hand.


:)
 
Being there when Mike wheeled the rotary on the Nova and I did see the results. His choice and it needed it. I know I don`t offer much to the site short of encouragement and insight in the garage.

One of the better things I do is keep a threads alive as newer members and old always can benefit the information available on this forum.

Like Mike always says "MAKE IT SHINE".

There is plenty of Pros on the site but equally as much as people trying just to keep the cars shiny and protected.


:xyxthumbs:
 
That's how I was taught to do it too years back when I first started. We call it "spreading the love" :laughing: :p

(just kidding, just call it spreading the product)

Cool pictures Art and most of all I'm impressed! You've mastered the art of uploading your pictures to the AG Gallery so you can insert them instead of attach them.

(I looked at the code, that's how I can tell if someone is using Photobucket or AG)


:bowdown: :bowdown:


And spreading product out with your product spreader is just the down and dirty way to push through a job. I think sometimes people think there might be some cool technique for various procedures and sometimes there are and sometimes there's just doing what comes natural.

But the key point is to lubricate the paint to reduce the potential to make a mistake, especially when using a rotary buffer with a wool pad and a compound.


:dblthumb2:

Yeah it took me a while to figure out the mastery of uploading one's pictures to AutogeekOnline :D I think cos most of the time, about 98% of the time. I used the app and not my actual pc.

Also, does the Flex rotary spin backwards like the 3401 does?

I've used it at the first SoCal meet up, but can't remember.

I do remember doing the 10@10 technique backwards though. Just learned it on the fly. The backwards 10@10 on a Flex
 
I always use a yellow foam wax applicator since I avoid to get chemicals on my fingers.
 
Yeah it took me a while to figure out the mastery of uploading one's pictures to AutogeekOnline :D I think cos most of the time, about 98% of the time. I used the app and not my actual pc.

It's the right way to do it though so good job.


Also, does the Flex rotary spin backwards like the 3401 does?

No, the pad on the Flex PE14 rotates clockwise as you're looking down on it from behind the tool like all over rotary buffers.


I do remember doing the 10@10 technique backwards though. Just learned it on the fly. The backwards 10@10 on a Flex


Correct.


:xyxthumbs:
 
Back
Top