GG6 & LC thinpro pads, So this happened..?!?!

Multiple pads. You used 1 pad for half of a Silverado, that's not good. If you are cleaning on the fly (look up the video tutorials) then you should be using at minimum 4 pads, Silverado is a big truck.

I agree.

You'll get more life out of your pads overall by switching to a clean dry pad often versus trying to buff out an entire car/truck/suv using only one or two pads.

Thin pads rotate better than thick pads. That's why the trend for thin pads is the new norm. People want the correction power of a rotary buffer without the risks of using a rotary buffer or the holograms and burning issues. So there's a trade-off as nothing is free in this world.

Thin pads rotate better but there's less mass to dissipate any heat build up so the heat build up will be more focused and it will happen faster than with a thicker pad.

How hard one presses the polisher against the paint is also a huge factor too.


I actually ordered 6 pads to use on it with every intention of changing every section but it just seemed like the pad was still doing fine so I just kept on trucking,

That's how it looked from the outside but as your pictures show... the violent oscillating action at high speed over time tells another story, a story that the pads were not doing fine.


is there anyway to tell when the pad needs changed or do you just do it because you know you should ?

You should just change because you know you should but also from this experience you will learn that thin pads become saturated with product after just a few section passes. Wet foam holds in heat better than dry foam and heat is the issue for any pad on any of these types of dual action polishers. Long stroke orbital polishers like the RUPES BigFoot 15 and 21 don't have the heat problem for pads like these short stroke dual action polishers but you also pay more for them upfront.


Even with pad saturation and heat this should not have happened.

I hope this is not going to be an issue.


I'd have to disagree.

Wet foam hold heat in better than dry foam. Add TIME as in pressure over time plus liquid and violent oscillating action and any pad will suffer from exposure to the heat build up focused at the center of the backing plate.


Think it could be an issue with my particular machine or the new thinpro pads?

Nope. Looks like and sounds like the machine is working perfectly and the pads are working as advertised.


The DA action tends to concentrate polish in the middle of the pad.

The liquid (polish) transfers heat better than foam.

Try applying the polish to the pad at the outer edge, and change pads or at least towel it if the center becomes saturated.


I agree with all of the above.

When I started teaching classes for Meguiar's years ago Meguiar's taught placing a X pattern on the face of the pad.

I noticed the issue of pad saturation and started teaching people to place a circle of product around the outer edge of the pad.

My theory was that the product was going to migrate to the center of the pad on it's own so I wasn't going to help it. (help it by placing product in an X-pattern which would place fresh product in the center of the pad).

A few years later Kevin Brown shared pad priming with the idea being to apply product to the entire face of the pad and then apply a few small drops to the face of the pad.

Regardless as to how you apply the product to the pad the enemy is time and pressure because over time and with pressure the product is going to migrate to the center of the pad and build-up. Then it's going to get hot.

The heat is going to cause the adhesive between the velcro and the pad to break down. The heat is going to cause the adhesive between the Velcro and the backing plate to break down and if it's a uni-construction backing plate at some point the heat is going to have a negative effect on "something".

The heat is also going to have a negative effect on the pad material.

And all of this is simply the nature of the beast. Your car, truck or SUV has swirls, scratches, water spots and/or oxidation. You decide you don't want the swirls, scratches, water spots and/or oxidation you buy a polisher and the pads and products to go with it and buff out the paint.

The heat is going to always be an issue and the only good remedy at this time is to switch to a clean, dry pad often.

Like I stated earlier in this reply... by switching to a clean, dry pad often your pads will last longer overall. Conversely, by not switching to a clean, dry pad often your pads won't last very long.

It's not the tool manufacturers fault and it's not the pad manufacturers fault it's physics.


That's why I alway say... more pads is better. Let your budget be your guide and if you're BRAND NEW to machine polishing and you're reading this thread as a lurker or a member learn from the experience and pictures shared here and plan accordingly.


If you detail cars for money then at some level you should be building the cost of pad wear into your service charge.


:)
 
Here's your pictures....

pad_failure_02.jpg


pad_failure_01.jpg


:Picture:
 
Think it could be an issue with my particular machine or the new thinpro pads?

I forgot that these are thin pads that won't dissipate heat as well as thicker pads, yep change pads often and try and use more per car. I ordered a bunch of these so will see how they hold up myself, I never go pass a panel per pad so lets see.
 
Sometimes, you'll think the pad is doing fine, until you place a new one on the machine. The new, fresh pad has a nice "crisp" feel to the overall operarion.

Something about a saturated pad also seems to run rougher, like it messes with the balance of the machine.
 
Just to note....

In my first book The Art of Detailing I cover the topic of product build-up and using the circle pattern on page 62 to 63.

In my second book, the updated version of the first book, The Complete Guide to a Show Car Shine, I have this info on page 78 to 79.


For anyone reading this thread into the future new to machine polishing if you want to flatten out the learning curve simply get a copy of The Complete Guide to a Show Car Shine and read it from cover to cover. It's like a condensed version of this forum.


:)
 
I got my polisher and pads in the mail a couple days ago. I have a small truck, Ford Ranger. While reading this post I realize I did not order enough pads to do the truck. I have 1 LC Orange, 2 white, 2 black & 2 red. I'm not even close to enough pads! This will be my first time ever polishing with a DA. I'm nervous since my paint is in good condition but I have to learn. I have my wife's SUV and my bro in laws SUV to practice on before I even think about offering it as a service on my website. Glad I read this post before starting and burning up my pads and having a half done truck sitting in the driveway. I think I'll make an order and have 4 of each color to start, that should be enough, to start, hopefully.....
 
I got my polisher and pads in the mail a couple days ago.

Which polisher did you get?


This will be my first time ever polishing with a DA. I'm nervous since my paint is in good condition but I have to learn.


I'd recommend learning on something that's not important to you versusu learning on something that's very important to you.

There's really no issues with learning how to use a simple DA polisher. If fact to prove this point I wrote this article,


It's not that hard...


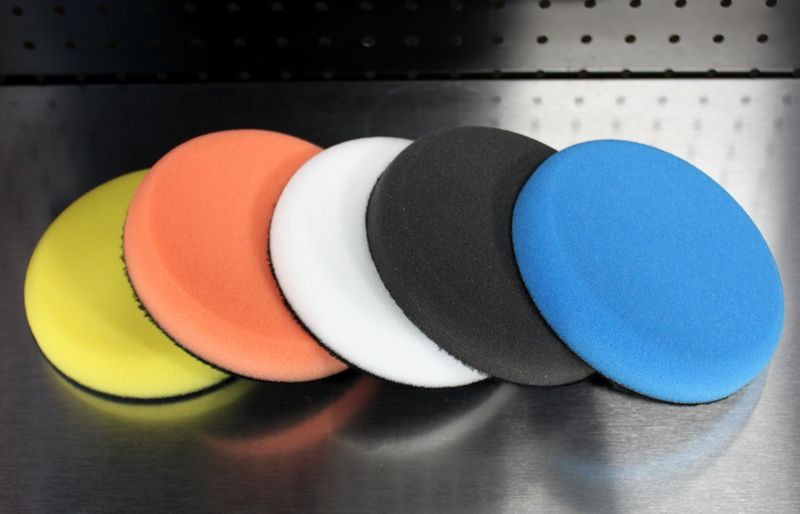
The normal 5.5" Lake Country Foam pads, these ones,


Lake Country

5.5" Flat Pads

In order from the most to the least aggressive

Yellow = Cutting pad (most aggressive)
Orange = Light Cutting Pad
White = Polishing Pad
Black = Finishing Pad
Blue = Waxing Pad (softest)

5_5FlatPads01.jpg


Are a lot more forgiving to newbies for what it's worth and still rotate great.


Lots of good info in this thread here,

Video: Mark your backing plate to make it easy to see pad rotation


:)
 
I have to admit I did that with one of my first thin pads as well. I figured live and learn. I imagine several others have as well. Once I get a pad primed well I like to keep going with it and not waste polish but the trade off is you waste a pad so you better get a feel for it and know when to change.
 
Which polisher did you get?
I went with the PC 7424 & the LC 6.5 smart pads. Just wasn't sure how many to start with when I ordered. I got a six pack but only 1 orange, which obviously isn't enough.

I'd recommend learning on something that's not important to you versusu learning on something that's very important to you.
My plan was to start with a small section (2' x 2' )like in the videos and work out as I gain confidence. I'm not too worried about marring up the paint but like anyone trying something the first time it can be a bit unsure of how to start. Reading and watching videos are one thing, doing is another. I know I'll be good at it but wanna do this the right way and not develop bad habits from the get go.
 
Also got your book, show car shine, and have read about half of it. Great info and it will be in my warehouse as a guide when I move in next month.
 
Well I got about half my truck done and this happened then it got dark and today it's been raining all morning how should I go about finishing up the detail, my truck is kindly dirty again from the water on the roads and it will be later this week before I can get back to it, do I just rehash it or will a quick detailer be enough? Do I need to go back over any of the sections I had already completed or just the sections I had not corrected & sealed yet?
 
I agree.

You'll get more life out of your pads overall by switching to a clean dry pad often versus trying to buff out an entire car/truck/suv using only one or two pads.

Thin pads rotate better than thick pads. That's why the trend for thin pads is the new norm. People want the correction power of a rotary buffer without the risks of using a rotary buffer or the holograms and burning issues. So there's a trade-off as nothing is free in this world.

Thin pads rotate better but there's less mass to dissipate any heat build up so the heat build up will be more focused and it will happen faster than with a thicker pad.

How hard one presses the polisher against the paint is also a huge factor too.


That's how it looked from the outside but as your pictures show... the violent oscillating action at high speed over time tells another story, a story that the pads were not doing fine.


You should just change because you know you should but also from this experience you will learn that thin pads become saturated with product after just a few section passes. Wet foam holds in heat better than dry foam and heat is the issue for any pad on any of these types of dual action polishers. Long stroke orbital polishers like the RUPES BigFoot 15 and 21 don't have the heat problem for pads like these short stroke dual action polishers but you also pay more for them upfront.


I'd have to disagree.

Wet foam hold heat in better than dry foam. Add TIME as in pressure over time plus liquid and violent oscillating action and any pad will suffer from exposure to the heat build up focused at the center of the backing plate.


Nope. Looks like and sounds like the machine is working perfectly and the pads are working as advertised.


I agree with all of the above.

When I started teaching classes for Meguiar's years ago Meguiar's taught placing a X pattern on the face of the pad.

I noticed the issue of pad saturation and started teaching people to place a circle of product around the outer edge of the pad.

My theory was that the product was going to migrate to the center of the pad on it's own so I wasn't going to help it. (help it by placing product in an X-pattern which would place fresh product in the center of the pad).

A few years later Kevin Brown shared pad priming with the idea being to apply product to the entire face of the pad and then apply a few small drops to the face of the pad.

Regardless as to how you apply the product to the pad the enemy is time and pressure because over time and with pressure the product is going to migrate to the center of the pad and build-up. Then it's going to get hot.

The heat is going to cause the adhesive between the velcro and the pad to break down. The heat is going to cause the adhesive between the Velcro and the backing plate to break down and if it's a uni-construction backing plate at some point the heat is going to have a negative effect on "something".

The heat is also going to have a negative effect on the pad material.

And all of this is simply the nature of the beast. Your car, truck or SUV has swirls, scratches, water spots and/or oxidation. You decide you don't want the swirls, scratches, water spots and/or oxidation you buy a polisher and the pads and products to go with it and buff out the paint.

The heat is going to always be an issue and the only good remedy at this time is to switch to a clean, dry pad often.

Like I stated earlier in this reply... by switching to a clean, dry pad often your pads will last longer overall. Conversely, by not switching to a clean, dry pad often your pads won't last very long.

It's not the tool manufacturers fault and it's not the pad manufacturers fault it's physics.


That's why I alway say... more pads is better. Let your budget be your guide and if you're BRAND NEW to machine polishing and you're reading this thread as a lurker or a member learn from the experience and pictures shared here and plan accordingly.


If you detail cars for money then at some level you should be building the cost of pad wear into your service charge.


:)


Thanks for the advice Mike! I will be ordering more pads & a pad brush soon!
 
Back
Top