Headlight restoration without kits

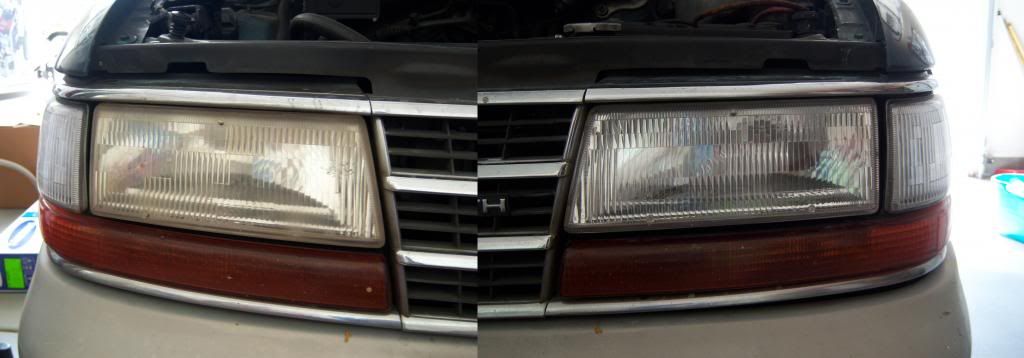
Well...these are my results after trying to correct the headlights.
Picture on the left:
I used what Meguiar's Heavy Correction Kit comes with but without actually using the kit itself.
1. Used 1000 grit
2. Followed with 3000 grit
3. Hit it with M105 with orange pad on speed 6
4. Hit it with M205 with white pad on speed 5

Picture on the right:
1. Used 1000 grit
2. Used 1500 grit
3. Used 2000 grit
4. Used 2500 grit
5. Used 3000 grit
6. Hit it with M105 with orange pad on speed 6
7. Hit it with M205 with white pad on speed 5

headlights.jpg

I am also planning to use your process on the right (I'll probably start at 1500 rather than 1000 though). Didn't get a kit because all I need is the sandpaper, so I bought some Megs Unigrit in the 6-pack that lets you choose what you want for each sheet. I think it was $11 or something on AG.net and got 20% off my entire order too so ended up being under $9 for the 6-pack.

FYI, would be great to see your "before" pics. I'll be doing mine next weekend and will post some before and after pics.
 
Yes, I know, I got a little excited going into this quick project that I completely forgot until I saw the results I got. I regret not taking them. But it seems like jeweling got me better results. I will be doing a '93 model vehicle maybe later this week and I will definitely post before and afters.
 
A couple of questions about this process.

If you do it by hand how do you keep the sandpaper flat? A block couldn't do those curves.

And for doing it with a drill, how do you get a 3" sanding pad into the corners?

I'm super interested in doing this for people. I just want to understand the process before I buy anything.

Can anyone recommend a drill?

To answer your question about the curves, I didn't use the sanding block for the headlights. What I did do was fold the sandpaper as I would if I wrapped it around the sanding block and used a MF towel on top of the sand paper to get even pressure and it works well to get around the curves.
 
A couple of questions about this process.

If you do it by hand how do you keep the sandpaper flat? A block couldn't do those curves.

And for doing it with a drill, how do you get a 3" sanding pad into the corners?

I'm super interested in doing this for people. I just want to understand the process before I buy anything.

Can anyone recommend a drill?

If you buy "pick 6" six pack of Megs Unigrit at AG.net, it comes with a sanding pad which is flexible. I just ordered yesterday and will be trying out next weekend on a 2003 Accord. Check this link: Meguiars Unigrit Sand Papers Sheets, wet-sanding papers, remove orange peel, finishing papers
 
You guys are making headlight restoration WAY TOO HARD. The two pictures below are from a 2000 Honda Accord; never had anything done to clean the headlights before now.

I have an old bottle of Meguiar's Ultimate Compound (you can use any rubbing compound; doesn't have to be expensive) and an old washcloth. In the first two photos, I rubbed the left side of the headlight for about 30 seconds.


View attachment 19341

View attachment 19342

In the third photo, I finished the entire headlight.

View attachment 19343


The entire process took less than 5 minutes. If you're not satisfied with the results, then go more aggressive with sandpaper, etc. But if I can clean a 13 year old headlight on a car with 160K miles in less than 5 minutes, I'm sure that most of you guys can get acceptable results using a rag and rubbing compound.

I tried ultimate compound using a DA. Didn't do it. Like every detail project, not everything can be fixed the same way. Trust me, if UC was all it took, that's all I would be doing. I'm all for the easy route wherever possible.
 
I tried ultimate compound using a DA. Didn't do it. Like every detail project, not everything can be fixed the same way. Trust me, if UC was all it took, that's all I would be doing. I'm all for the easy route wherever possible.

Sorry; I didn't see anyone comment on first trying compound. For that matter, I'd also try toothpaste prior to using sandpaper on my headlights.

You're definitely right that not everything can be fixed the same way. I believe in viewing everything as a corollary of Ockham's Razor rather than taking a Rube Goldberg approach.
 
So...I said I was going to do another set of headlights and post some before and after pics this time so here it is. Car is a '93 Plymouth Voyager that I previously used Meguiar's Heavy Headlight Restoration kit on a little over a year prior. It yellowed up again so I used the aforementioned processed.
I started with 1000 grit, then 1500 grit and worked my way up the 3000 grit.
I followed it up with M105 on PC7424XP.
After, I used M205 on PC7424XP
Coated it temporarily with M26 for the UV protection. When my Opti-Lens comes in on Monday I will remove the wax and apply that instead.

Here is my 50/50.
Plymouthheadlightrestoration20130706.jpg
 
Back
Top