Navigation
Install the app
How to install the app on iOS
Follow along with the video below to see how to install our site as a web app on your home screen.
Note: This feature may not be available in some browsers.
More options
Style variation
You are using an out of date browser. It may not display this or other websites correctly.
You should upgrade or use an alternative browser.
You should upgrade or use an alternative browser.
Houston, Texas Extreme Makeover Project - AGO members needed!
- Thread starter Mike Phillips
- Start date
chipintexas
New member
- Feb 9, 2015
- 21
- 0
I think the plan is two-fold. First, lots of hand rubbing on the #7, and then after a few more times of the #7, do some machine polishing in the areas where we can. There are some REALLY thin spots on the car that will still require hand polishing only.
As for Friday versus Saturday, hopefully the Clarity host will chime in, but I think the only thing that we decided was that it probably needs one really thick coat of #7 on Friday to sit overnight. I'm not sure how long that will take and/or what time to bring the car out there, but I'll find out now.
I hope that answers everything so far, but I'll hopefully chime back in here soon.
chipintexas
New member
- Feb 9, 2015
- 21
- 0
Friday will be a quick wipe down with waterless wash and #7. Not sure on the time yet, but Clarity detail said anyone who is interested in being there can come. It will be later in the afternoon, so if you are interested in being there, PM me with your information and I'll try to keep you posted for time on Friday. The main fun is set to begin at 9:30 on Saturday though.
refreshauto
New member
- Feb 19, 2014
- 1,158
- 0
i would like to be there Friday night for starting on the #7, but my flight gets there at 8 AM on Saturday. i am headed straight from IAH to Clarity and will see you guys there bright and early. if you all have any question feel free to call me as well and i can walk you through what we are doing. i have been a part of a few of these at Autogeek Thursday night sessions.
here is my contact info: 432-349-5109. feel free to give me a call or shoot me a text
here is my contact info: 432-349-5109. feel free to give me a call or shoot me a text
actuator_mz3
New member
- Jul 14, 2014
- 99
- 0
You are.probably renting a car but I live right by IAH, let me know if you need a ride.i would like to be there Friday night for starting on the #7, but my flight gets there at 8 AM on Saturday. i am headed straight from IAH to Clarity and will see you guys there bright and early. if you all have any question feel free to call me as well and i can walk you through what we are doing. i have been a part of a few of these at Autogeek Thursday night sessions.
here is my contact info: 432-349-5109. feel free to give me a call or shoot me a text
refreshauto
New member
- Feb 19, 2014
- 1,158
- 0
You are.probably renting a car but I live right by IAH, let me know if you need a ride.
Thanks, im not renting a car. My sisters lives right there by IAH also. Im using her car
Mike Phillips
Active member
- Dec 5, 2022
- 51,004
- 7
- Thread starter
- #48
Chip, I'm confused. In Mike's original post, it says we are doing this by hand.
Is that not the plan anymore?
Good question.
My article on how to restore barn finds with the original single stage paint has a component to it that some people miss. I know because I get asked questions about they part they miss and I see misinformation posted by others about this procedure.
So to answer your question and to clarify...
From my original article I have taken a screenshot of the third paragraph. I've also updated the thread and made the important part of the first sentence bold and red.
This is the part people miss and other people confuse themselves with and others because their project is NOT important to them.
Read the red text...
The key word is important.
If it's important to you to do everything you can to preserver the original paint on a car you own or are working on, then INSTEAD of starting out with a compound or polish and ABRADING DRY BRITTLE PAINT that's also probably VERY THIN - then instead... condition the paint to make it less brittle and more workable by rubbing it down and gorging it with the TS oils found in the #7 Show Car Glaze.
This product has been around since the time of the Model T. I know of no other product that is still around using the original formula. None.
This product has a number of uses and one of them is to feed dry antique paint and bring the pigments back to life again as well as rejuvenate the paint.
By Hand
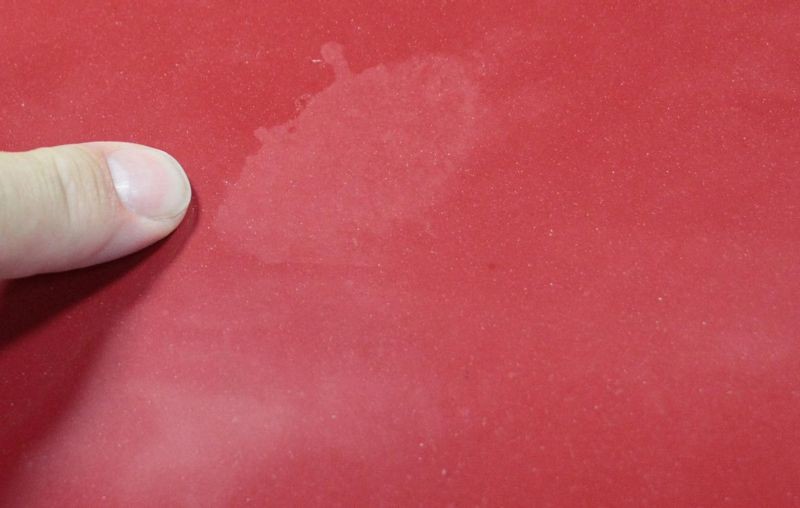
The first step is done by hand. That is you take terry cloth, usually a 100% cotton terry cloth wash cloth like you would use in the shower, and you fold it 4-ways and apply a LIBERAL amount of the #7 onto just one side, (continue using only this one side), and then using your ELBOW GREASE you begin rubbing the paint down with the #7.
This does 2 things....
1. The terry cloth acts as a gentle form of abrasive and the oils in the #7 act as a lubricant and together with the rubbing action you gently peel off decades of dead, oxidize paint. This is the SAFE way to remove the dead paint. Anyone can do this with a caveman compound but that's not how you work safely on paint that is IMPORTANT to you.
2. As you're rubbing the paint down you're also pushing the oils INTO the porous single stage paint. This is something a compound or polish cannot do, at least not with the oils found in the #7 which are a very specific type of oil.
The results from 2-3 well rubbed applications of the #7 are you remove the dead paint, bring back the full richness of color and make the paint safer to compound or polish IF you think it needs compounding or polishing.2. As you're rubbing the paint down you're also pushing the oils INTO the porous single stage paint. This is something a compound or polish cannot do, at least not with the oils found in the #7 which are a very specific type of oil.
For some people, the results from simply rubbing the paint down with the #7 and terry cloth are more than good enough and afterwards they'll choose to slap a wax on the car then stick a fork in it and call it done.
By Machine
For others, they will want to try to squeeze a little more surface shine and gloss out of the paint plus remove some below surface defects, (swirls and scratches), and for these people they will then do some TEST SPOTS (like I've been teaching in the car detailing world for over 20 years now), and determine a process to carefully machine polish the old antique paint using the least aggressive products, pads and even tools to get the job done.
This is why Chip has the #7 as well as the same high quality compounds and polishes I used when I rubbed out Wayne Carini's 1953 Hudson.
I ONLY rubbed the front fenders and hood by hand on Wayne's Hudson with the Pinnacle Advanced Finishing Polish after the #7 treatment because the paint was incredible thin which I document in this article.
Wayne Carini 1953 Hudson Hornet Original Paint Restored by Mike Phillips


The rest of the car was machine polished using a VERY SAFE tool, the Porter Cable 7424XP with simple flat faced foam polishing pads and only the Pinnacle Advanced Swirl Remover and Advanced Finishing Polish. The compound was not needed.
The results speak for themselves....
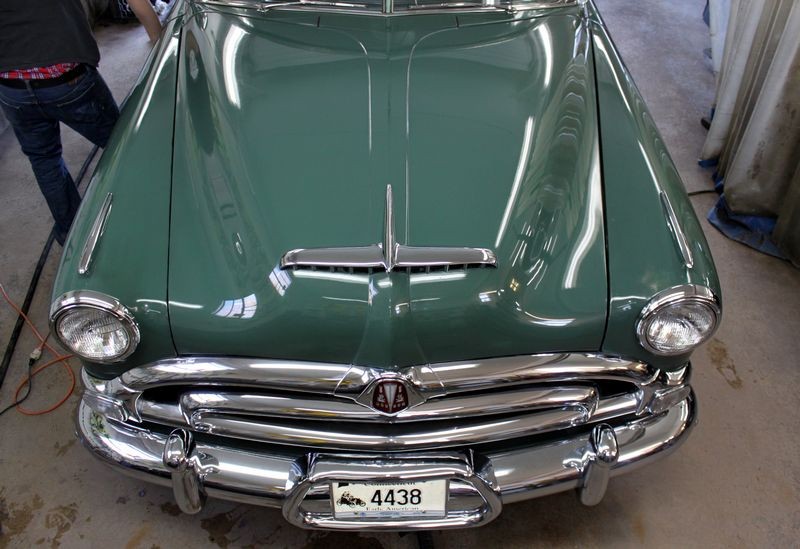
It was IMPORTANT to Wayne to preserve the original paint.
The car would lose a lot of it's value as an ALL ORIGINAL car if it had to be re-painted.
Note that this was the first time I met Wayne and worked on any of his cars. He was very hesitant to let ANYONE touch his baby. After working on a Ferrari and a 1959 Corvette plus demonstrating what could be done on the Hudson I earned his trust and that's how you get to work on cool cars owned by cool guys like Wayne Carini.


So to answer your question about working by hand and working by machine,
You're going to start out working by hand. The #7 rub-out simply doesn't work by machine. The paint likes to be hand rubbed by the human hand with terry cloth.
AFTER the #7 IF you or the owner of the car thinks trying to do some machine polishing is the right direction to go then that's when you do some testing, dial in a process that creates the results you're looking for and then move on to stage 2 of the paint restoration process and machine polish the paint.
If you do a lot of compounding, for example you feel there's plenty of paint to work with, then after all the machine steps are completed then you can hand or machine apply a follow-up application of the #7 to fully saturate and gorge the newly abraded and uncovered single stage paint and then apply a traditional carnauba finishing wax like the Pinnacle Souveran Paste Wax.
For the follow-up application of #7 you can do tis using simple foam applicator pads or a soft foam polishing or finishing pad on a very simple DA polisher like the Porter Cable 7424XP.
I wish I could be there to show how to do each of these steps but I have the utmost confidence in Curtis at Clarity Auto Detail as he told me he's read my article and restored the antique paint on some BMW's owned by the late Paul Walker with great success.
I also have complete confidence in Vargas aka refreshauto as he has taken my Detailing Boot Camp Class and was a part of the team that did this,
How to restore single stage paint - Advanced Detailing Class


Here's my Detailing Boot Camp Class that did this paint restoration... looks like a brand new paint job if you ask me....

Here's the deal, you don't know what you can do, (or what you'll need as it relates to compounds and polishes), until you try.
That's why Chip has a collection of products. You can't test if you don't have anything to test with.
I also have the utmost confidence in all the rest of our forum members that have volunteered to be a part of this project.
Guys that hang out on AutogeekOnline gain the most important tool in their arsenal and that's knowledge. Of course they back-up their knowledge with hands-on experience but professional quality work starts with head knowledge. You have to know what you're doing before you start doing.
I'm already looking forward to the after pictures from this project. This is an epic detail project in the forum world and bragging rights for everyone involved.
:dblthumb2:
Mike Phillips
Active member
- Dec 5, 2022
- 51,004
- 7
- Thread starter
- #49
I think the plan is two-fold. First, lots of hand rubbing on the #7, and then after a few more times of the #7, do some machine polishing in the areas where we can. There are some REALLY thin spots on the car that will still require hand polishing only.
Perfect.
As for Friday versus Saturday, hopefully the Clarity host will chime in, but I think the only thing that we decided was that it probably needs one really thick coat of #7 on Friday to sit overnight.
Correct. Rub in well and let soak overnight.
Here's a tip... the #7 is very oily as it should be. It will wipe off easier using cotton, terrycloth towels.
I used to take soft bath towels and beach towels and cut them up into smaller chunks and use these for the initial wipe off.
The loop or nap that makes terry cloth what it is will SLICE into the oily film and break it up making it easier to wipe off.
Microfiber is soft and gentle and that makes it perfect for the finishing steps but these first initial steps a more STOUT type of fiber will be your friend.
I've done hundreds of single stage paint restorations in my life so I'm speaking from experience.
When the wife isn't looking... raid the linen closet and pick out the old, worn but soft terrycloth towels and then out of her site... cut them up.

:dblthumb2:
actuator_mz3
New member
- Jul 14, 2014
- 99
- 0
Thank you Mike, that makes this whole process make a lot more sense.
Mike Phillips
Active member
- Dec 5, 2022
- 51,004
- 7
- Thread starter
- #51
Thank you Mike, that makes this whole process make a lot more sense.
No problemo....
I know this procedure can be confusing because most people on a forum in the year 2015 have only worked on cars that have basecoat/clearcoat finishes.
I'm actually amazed that my article is getting close to 300,000 views.
One thing for sure, I get contacted from people around the country and around the world from this one article and it's because to a lot of people that own or are working on some recently discovered barn treasure... it's important to them to do the job right the first time because they understand there's usually not chance of a second shot at it.
And when you watch shows like Chasing Classic Cars or What's in the Barn with Dale Walksler, there's still a lot of hidden treasure across the land and at some point someone is going to want to save the original paint.
")
refreshauto
New member
- Feb 19, 2014
- 1,158
- 0
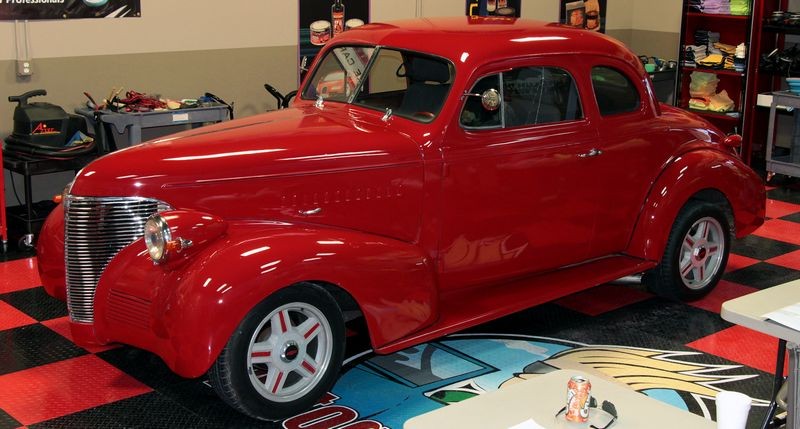
Better pictures to come, but here is 1 i took with my phone. Had a great time working with all these guys and a huge thank you to Curtis from Clarity for allowing us to us their facility
chipintexas
New member
- Feb 9, 2015
- 21
- 0
I took over 150 photos of the before/after. I'm going to go through and week them out and will be posting tomorrow I hope. Thanks to all the guys who showed up and for Curtis and Beth for hosting this awesome event.
As Mike likes to say, we restored the paint of this car to ITS maximum potential. It's 57-years-old, so it's still got some blemishes, but the paint and chrome are very happy. The proof in the pudding was the inordinate numbers of thumbs up, honks, waves, and people rolling down their windows when stopped to admire the car. Great job to all who helped.
I think I need to pay some attention to my daily driver now!


Mike Phillips
Active member
- Dec 5, 2022
- 51,004
- 7
- Thread starter
- #55
Me too and I wasn't even there!
Another amazing extreme makeover to an original, antique single stage paint.
As I stated previously in this thread, the opportunity to work on original antique single stage paint like this Cadillac is INCREDIBLY RARE so when you have the opportunity TAKE IT!
For all the guys that were involved with this project, if this was the first time you restored a single stage paint job would you agree it's more fun working on this type of paint than working on modern cars with clearcoats?
For me, this type of work is the best because this is real paint. Modern paints are basically plastic, they are nothing like the single stage paints of the old days.
Looking forward to more pictures, I would recommend someone starting a "dedicated thread" for the before, during and after shots.
:dblthumb2:
Souldetailer
New member
- Feb 13, 2015
- 673
- 0
Awesome job to everyone involved. Look forward to a lot more pictures. Sweeeeeet ride.:dblthumb2:
Peace,
Darrin
Peace,
Darrin


chipintexas
New member
- Feb 9, 2015
- 21
- 0
I created a new thread with all the photos from this event. It was easier than continuing this thread I think. If not, feel free to combine or move to a different section.
http://www.autogeekonline.net/forum...extreme-makeover-photo-recap.html#post1245752
http://www.autogeekonline.net/forum...extreme-makeover-photo-recap.html#post1245752