Mike Phillips
Active member
- Dec 5, 2022
- 51,004
- 8
How do you know when to stop buffing?
One of our forum members, Mitchell aka Buggy Bath asked a question today that I thought was a really good question that others might also want to know the answer.
He posted his question to page 5 of this thread,
The Definitive How-To Article for Removing Swirls, Scratches and Water Spots Using a Porter Cable 7424XP, G110v2 or Griot's Garage Polisher
Below is his question and my answers...
You know that's actually a really good question and the answer depends upon what your goal is?
100 percent Perfection
If you're aiming for 100% perfection or very close to it, then you need to thoroughly inspect each section you buff after the first correction step and make sure all the defects you want to remove and feel comfortable removing have been removed.
If there are still defects in that section then you need to re-buff that section till you're satisfied with the condition of the paint at this time.
It's okay if there's still haze from the buffing process, but ANY "below surface defects" that you don't want to see after you make your final wipe still remain then you need to continue buffing till they are fully removed during this first correction step.
If you don't remove them during the first correction step then they will still be there after the final wipe.
The way to inspect is like you see me doing here in this article, this is how I normally inspect after wetsanding paint and then after the first compounding step. The sanding marks must be removed after the compounding step because the polishing step are only going to restore gloss and clarity. Polishing will remove some of any defects left after compounding of course, but the major portion of any below surface defects must be removed after what I call "The Major Correction Step" in my first how-to book.
Damp-Sanding Tools, Tips and Techniques by Mike Phillips
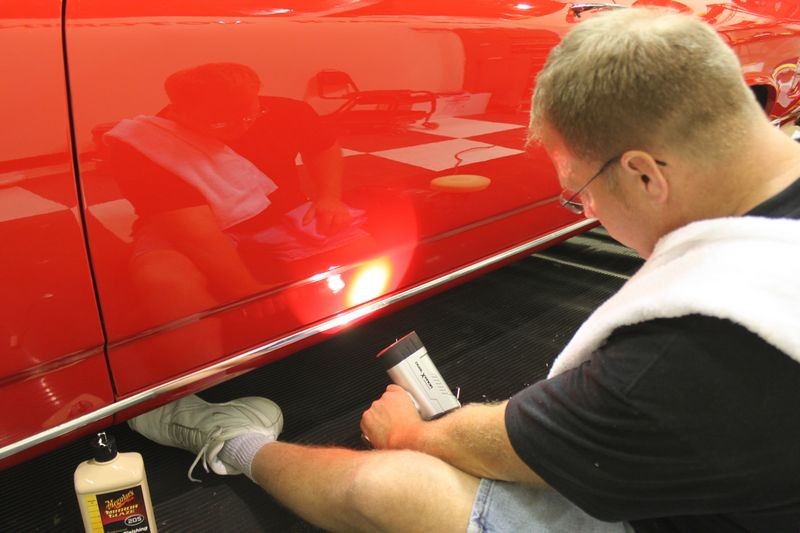
Checking my work each step of the way by wiping with Mineral Spirits and using the Brinkmann Swirl Finder Light to insure no sanding marks were missed and no swirls were left behind.
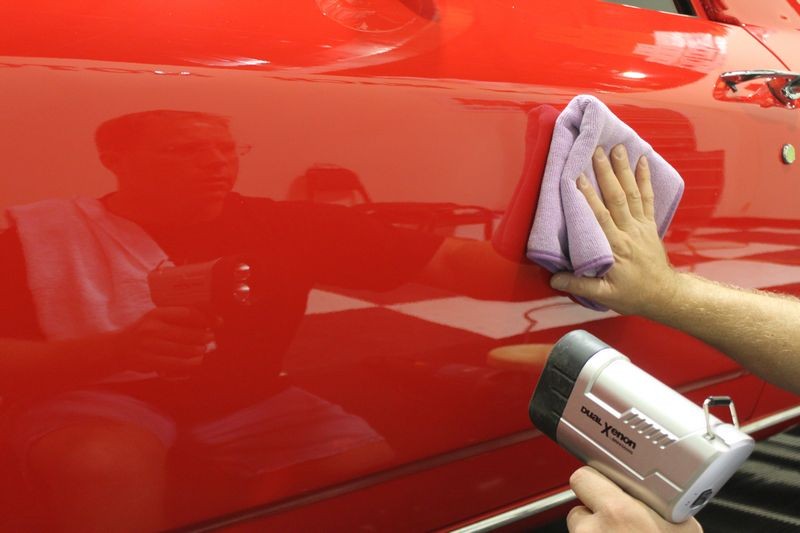
For really low panels, if you hold the light down low and at just the right angle it will shine just right to show the "surface" condition of the paint, this is the area you want to be looking at when inspecting. The part of the light I'm using in these shots is the small lit up area that's is the reflection of the bulb in the paint, not the large blown out area lit up by the light.

Note: You never chemically strip fresh paint using products like IPA or MS. The paint on this El Camino was a custom paint job but when I sanded and buffed it, it was already a few years old, i.e. no longer "fresh" paint as in 30 days or less old.
90% Defect Removal
If you're aiming to remove the majority of the shallow swirls, scratches and other below surface defects but not the deeper RIDS or random, isolated deeper scratches, then you should be accomplishing this using the system you dial-in during the correction step of your Test Spot. After doing the correction and/or the correction and polishing step of your Test Spot, inspect thoroughly that section of paint.
If you're happy with the results from your Test Spot, then theoretically, if you repeat or duplicate the process you didn in your test spot to the rest of the car then you should produce the same results.
For this type of buffing I normally don't inspect each panel after I buff it it I assume and trust in my skills to be doing good work.
Great question, I think I'll turn this question and the answers into an article so this information isn't buried on 5 of this thread where fewer people will find it.
Thank you for asking...

One of our forum members, Mitchell aka Buggy Bath asked a question today that I thought was a really good question that others might also want to know the answer.
He posted his question to page 5 of this thread,
The Definitive How-To Article for Removing Swirls, Scratches and Water Spots Using a Porter Cable 7424XP, G110v2 or Griot's Garage Polisher
Below is his question and my answers...
Okay. I also have a question about knowing when I am actually done buffing something. Should it be completely smooth with no imperfections? Or do I use a filler or something to hide them?
Thanks
You know that's actually a really good question and the answer depends upon what your goal is?
100 percent Perfection
If you're aiming for 100% perfection or very close to it, then you need to thoroughly inspect each section you buff after the first correction step and make sure all the defects you want to remove and feel comfortable removing have been removed.
If there are still defects in that section then you need to re-buff that section till you're satisfied with the condition of the paint at this time.
It's okay if there's still haze from the buffing process, but ANY "below surface defects" that you don't want to see after you make your final wipe still remain then you need to continue buffing till they are fully removed during this first correction step.
If you don't remove them during the first correction step then they will still be there after the final wipe.
The way to inspect is like you see me doing here in this article, this is how I normally inspect after wetsanding paint and then after the first compounding step. The sanding marks must be removed after the compounding step because the polishing step are only going to restore gloss and clarity. Polishing will remove some of any defects left after compounding of course, but the major portion of any below surface defects must be removed after what I call "The Major Correction Step" in my first how-to book.
Damp-Sanding Tools, Tips and Techniques by Mike Phillips
Checking my work each step of the way by wiping with Mineral Spirits and using the Brinkmann Swirl Finder Light to insure no sanding marks were missed and no swirls were left behind.
For really low panels, if you hold the light down low and at just the right angle it will shine just right to show the "surface" condition of the paint, this is the area you want to be looking at when inspecting. The part of the light I'm using in these shots is the small lit up area that's is the reflection of the bulb in the paint, not the large blown out area lit up by the light.
Note: You never chemically strip fresh paint using products like IPA or MS. The paint on this El Camino was a custom paint job but when I sanded and buffed it, it was already a few years old, i.e. no longer "fresh" paint as in 30 days or less old.
90% Defect Removal
If you're aiming to remove the majority of the shallow swirls, scratches and other below surface defects but not the deeper RIDS or random, isolated deeper scratches, then you should be accomplishing this using the system you dial-in during the correction step of your Test Spot. After doing the correction and/or the correction and polishing step of your Test Spot, inspect thoroughly that section of paint.
If you're happy with the results from your Test Spot, then theoretically, if you repeat or duplicate the process you didn in your test spot to the rest of the car then you should produce the same results.
For this type of buffing I normally don't inspect each panel after I buff it it I assume and trust in my skills to be doing good work.
Great question, I think I'll turn this question and the answers into an article so this information isn't buried on 5 of this thread where fewer people will find it.
Thank you for asking...


")