Navigation
Install the app
How to install the app on iOS
Follow along with the video below to see how to install our site as a web app on your home screen.
Note: This feature may not be available in some browsers.
More options
Style variation
You are using an out of date browser. It may not display this or other websites correctly.
You should upgrade or use an alternative browser.
You should upgrade or use an alternative browser.
How to apply SON1C Wax Carnaubavore by machine properly
- Thread starter SON1C
- Start date

FUNX650
New member
- Dec 1, 2010
- 21,057
- 1
Hi SON1C (Drew)...
Thanks for your time, and effort, in producing this video! rops:
rops:
Some good machine application tips included therein!
Speaking of tips:
I find this one to be: "most gripping...yet unsuspenseful".
")
Bob
Thanks for your time, and effort, in producing this video!
rops: Some good machine application tips included therein!
Speaking of tips:
I find this one to be: "most gripping...yet unsuspenseful".
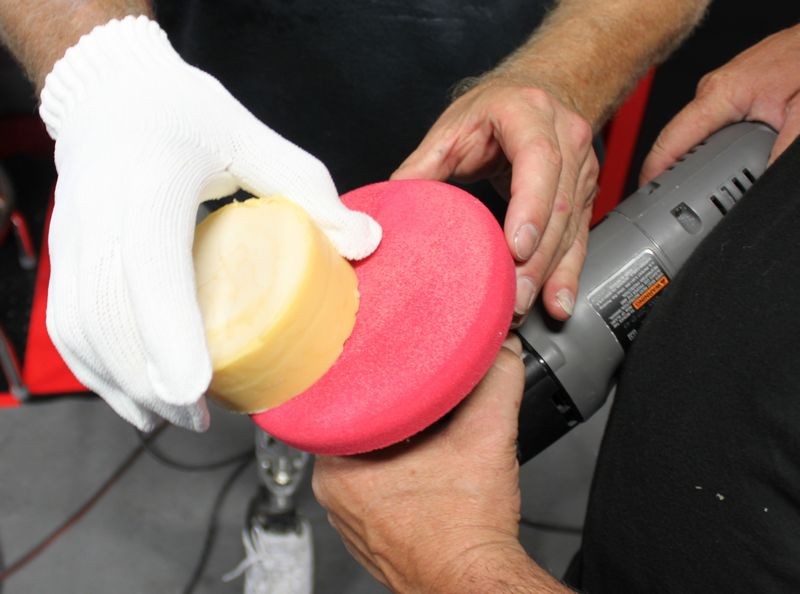
Applying paste wax to Jeff's pad so he can get busy machine applying a paste wax...
Bob
Mike Phillips
Active member
- Dec 5, 2022
- 51,004
- 7
Excellent video! :dblthumb2:
We machine apply pretty much all the paste waxes we use here for our Thursday night project cars and here's a couple of tips...
1. The first time you knock the wax out of the jar take a paper towel and wipe out any remaining wax out of the inside of the jar and this will make removing the wax and the putting the wax back into the jar a lot easier with less mess.
2. Always hold the wax very carefully when it's out of the jar. If you're not careful and you hold it in your hand with just a little too much pressure you can deform the cylindrical chunk of wax and this makes it a lot harder to slip back into the jar. I like to use a microfiber glove to hold the wax, this keeps the wax clean and my hand clean.
3. While a few swipes across the face of the pad will go a long ways you're still going to need to apply some more wax to the face of the pad as you move around the car. Knowing this, instead of placing the wax back into the jar and sealing the jar with the lid, place the jar and the lid on a clean work bench or table and after you swipe the wax across the face of the foam buffing pad carefully set the wax into the lid.
4. Very Important: Remember which way the wax came out of the jar and be sure to ALWAYS put it back into the jar the same direction. That is the bottom of the wax should go in first to rest against the bottom of the inside of the jar. There's usually a taper to the cylinder of wax and if you try to insert the cylinder of wax backwards or upside down into the jar you'll often find it does not fit as well and you can easily tear up the wax and this ends up with wasted wax.
5. When machine waxing you only need a medium speed setting, not a fast setting. High speed settings are for removing defects. When using a finishing wax after you've already performed all the correction and polishing steps, the goal is merely to do a GREAT job of spreading out a thin layer of wax and of course working the wax "into" the paint to whatever level is possible. Single stage paints are more permeable than clear coat paints). Use a medium speed setting and then go over each panel 2-3 times to ensure uniform coverage and a uniform layer.
Hope that helps...
:xyxthumbs:
57BORNTORUN
New member
- Jul 19, 2012
- 1,554
- 0
Us in the GEEK-Garage learned that technique from you MIKE.:dblthumb2::buffing:
scottdevine
New member
- May 27, 2013
- 111
- 0
wish i had this info about 3 weeks ago when i got drews wax...unfortunately the wax flew out of my hands while my da was running and is now filled with floor junk...to make matters worse, i flipped over the wax and did the process again, only to yield the same result. So i have a $65 pile of sticky garage floor garbage...live and learn! but it still smells great!
FUNX650
New member
- Dec 1, 2010
- 21,057
- 1
Sorry for your misfortune...wish i had this info about 3 weeks ago when i got drews wax...unfortunately the wax flew out of my hands while my da was running and is now filled with floor junk...to make matters worse, i flipped over the wax and did the process again, only to yield the same result. So i have a $65 pile of sticky garage floor garbage...live and learn! but it still smells great!
But are there any folks with which you share a mutual dislike?
Perfect chance, IMO...to 'mend fences' by salvaging this new "metal-flake wax" upon their vehicles.
Or, as I've heard folks describe it:
Nothing like a new wax application to have someone: "grit through their teeth".

Bob
SON1C
New member
- Apr 4, 2011
- 3,442
- 3
- Thread starter
- #8
Thank you Bob it's my pleasure thanks for viewing!Hi SON1C (Drew)...
Thanks for your time, and effort, in producing this video!
Some good machine application tips included therein!
Speaking of tips:
I find this one to be: "most gripping...yet unsuspenseful".
Bob
Incredible tips Mike, you are certainly the king of nuba machine application!Excellent video! :dblthumb2:
We machine apply pretty much all the paste waxes we use here for our Thursday night project cars and here's a couple of tips...
1. The first time you knock the wax out of the jar take a paper towel and wipe out any remaining wax out of the inside of the jar and this will make removing the wax and the putting the wax back into the jar a lot easier with less mess.
2. Always hold the wax very carefully when it's out of the jar. If you're not careful and you hold it in your hand with just a little too much pressure you can deform the cylindrical chunk of wax and this makes it a lot harder to slip back into the jar. I like to use a microfiber glove to hold the wax, this keeps the wax clean and my hand clean.
3. While a few swipes across the face of the pad will go a long ways you're still going to need to apply some more wax to the face of the pad as you move around the car. Knowing this, instead of placing the wax back into the jar and sealing the jar with the lid, place the jar and the lid on a clean work bench or table and after you swipe the wax across the face of the foam buffing pad carefully set the wax into the lid.
4. Very Important: Remember which way the wax came out of the jar and be sure to ALWAYS put it back into the jar the same direction. That is the bottom of the wax should go in first to rest against the bottom of the inside of the jar. There's usually a taper to the cylinder of wax and if you try to insert the cylinder of wax backwards or upside down into the jar you'll often find it does not fit as well and you can easily tear up the wax and this ends up with wasted wax.
5. When machine waxing you only need a medium speed setting, not a fast setting. High speed settings are for removing defects. When using a finishing wax after you've already performed all the correction and polishing steps, the goal is merely to do a GREAT job of spreading out a thin layer of wax and of course working the wax "into" the paint to whatever level is possible. Single stage paints are more permeable than clear coat paints). Use a medium speed setting and then go over each panel 2-3 times to ensure uniform coverage and a uniform layer.
Hope that helps...
:xyxthumbs:
Definitely the right guy to learn from!Us in the GEEK-Garage learned that technique from you MIKE.:dblthumb2::buffing:
Can you please PM details?wish i had this info about 3 weeks ago when i got drews wax...unfortunately the wax flew out of my hands while my da was running and is now filled with floor junk...to make matters worse, i flipped over the wax and did the process again, only to yield the same result. So i have a $65 pile of sticky garage floor garbage...live and learn! but it still smells great!
Thank you sir!Great video Drew !!!!
Lol certainly a viable solution, have you done this before Bob?!Sorry for your misfortune...
But are there any folks with which you share a mutual dislike?
Perfect chance, IMO...to 'mend fences' by salvaging this new "metal-flake wax" upon their vehicles.
Or, as I've heard folks describe it:
Nothing like a new wax application to have someone: "grit through their teeth".
Bob
well that answered my question i pmd you about!!! LOL!