Navigation
Install the app
How to install the app on iOS
Follow along with the video below to see how to install our site as a web app on your home screen.
Note: This feature may not be available in some browsers.
More options
Style variation
You are using an out of date browser. It may not display this or other websites correctly.
You should upgrade or use an alternative browser.
You should upgrade or use an alternative browser.
How to take photos - Advice
- Thread starter Danube
- Start date
Porsche Pilot
New member
- Jun 25, 2010
- 1,750
- 0
It is near impossible to hold the Brinkmann, focus the camera and hit the shutter...unless you have three arms. I learned from a guy named Mike Phillips...he lurks around here, that you need to give the camera a point to focus on. A little piece of tape next to the defect works great.
Sent from my iPad using Tapatalk
Sent from my iPad using Tapatalk
Flash Gordon
Well-known member
- Feb 6, 2010
- 11,462
- 463
^
1) Turn camera on
2) Point in the general direction of the subject you're trying to cover
3) Push button
What else can I help you with tonite?
1) Turn camera on
2) Point in the general direction of the subject you're trying to cover
3) Push button
What else can I help you with tonite?
Spiney
New member
- Aug 19, 2011
- 449
- 0
It is near impossible to hold the Brinkmann, focus the camera and hit the shutter...unless you have three arms. I learned from a guy named Mike Phillips...he lurks around here, that you need to give the camera a point to focus on. A little piece of tape next to the defect works great.
Sent from my iPad using Tapatalk
As a photographer I totally agree. Most camera's Auto Focus needs contrast in order to achieve sharp focus. So a piece of tape or even a post-it note that has a color that contrast with your paint will do wonders. Then you can crop that out when you post the picture.
O
opie_7afe
Guest
for me it helps to hold the camera ontop of the brinkman and hold it like a bear holds things lol works decent for me... then if anything use the optical zoom to get closer, i never use digital zoom as imo it distorts image and id rather crop.
Mike Phillips
Active member
- Dec 5, 2022
- 51,004
- 7
How-To capture swirls, scratches, etchings and other surface defects with your camera
A few tips and techniques for helping your camera to focus on the surface so you can capture the defects in the paint you're hoping to remove.
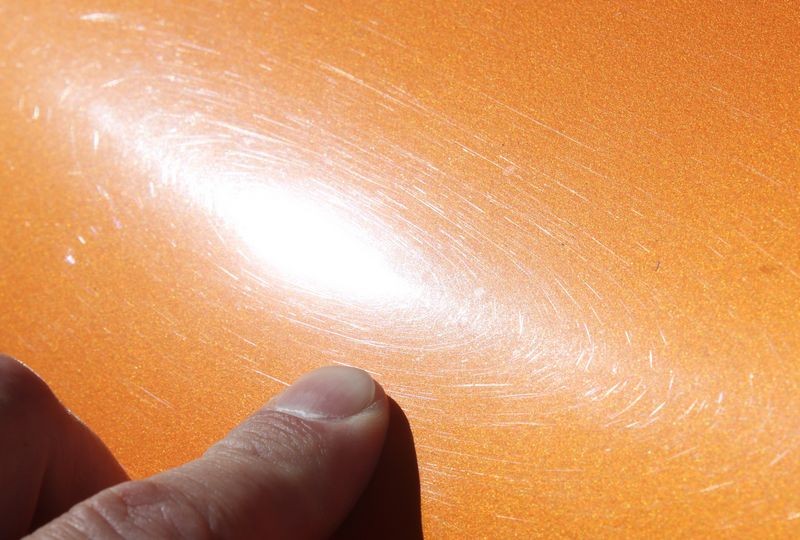
Finger Pointing Focus Technique
Besides figuring out the right camera setting for your specific camera, another quick, simple way to help your camera focus on a defect you're trying to capture with a picture is to simply place your index finger close to the defect on or hovering over the finish then carefully captures a few pictures and in most cases you'll get a couple you can use on the Internet. This works for Swirls, Scratches, Etchings, Water Spots both Type I and Type II, Stains, Oxidation, etc. Basically anything on the surface. The reason you need to give the camera something to focus on is because often times when taking shots of a large, uniform, flat surface, once any focus points are zoomed out of the picture your camera has nothing to sense and focus on.
Detailing Clay
You can also use a little piece of detailing clay because in most cases you have some detailing clay around. If the paint is clean and it should when trying to capture pictures of surface defects, then when you're done taking your pictures you should be okay to put the little piece of clay back into the large piece you took it from or just through it away. A small piece will work fine. (See picture below).
Coin
A coin can also be used if the surface is flat and horizontal like the hood. Place the coin carefully onto the paint so as not to instill a scratch. If you already have a flawless, swirl-free finish then maybe stick with the finger or clay technique. If you're getting ready to buff the car out then as long as you're careful you'll be okay; remember you're going to be buffing out the paint and likely the defect you're trying to capture with a picture.
Cobweb Swirls or Cobweb-Effect

Cobweb Swirls or Cobweb-Effect

Cobweb Swirls or Cobweb-Effect

Detailing Clay
Another way to help your camera focus on a surface defect is to place something on the surface of the paint, for example in the below picture we placed a small piece of detailing clay on the paint, then let the camera auto focus and wa-la, perfectly captured swirls, scratches and a bird dropping etching in the paint.

Random, Isolated Deeper Scratch
Scratch Removed using Ultimate Compound

An Isolated Bird Dropping Etching
How To Remove a Bird Dropping Etching by Hand using M105 Ultra Cut Compound

Photos courtesy of MeguiarsOnline.com
")
Due credit where credit is due
This article was originally written by me, (Mike Phillips), and posted to MeguiarsOnline on May 28th, 2006 and it can be found here,
How-To capture swirls, scratches, etchings and other surface defects with your camera
Sometimes I will try to re-write articles I have written on the Internet and sometimes it's really hard to re-write what I've already written, in these cases it's easier to share the original article and provide a link back to the originating site out of respect for the other site and the law, and for good reasons of good Netiquette. I don't like seeing my articles stolen or re-written by others and then seeing my worked presented as someone else's and wouldn't do that to anyone else.
-Mike Phillips
A few tips and techniques for helping your camera to focus on the surface so you can capture the defects in the paint you're hoping to remove.
Finger Pointing Focus Technique
Besides figuring out the right camera setting for your specific camera, another quick, simple way to help your camera focus on a defect you're trying to capture with a picture is to simply place your index finger close to the defect on or hovering over the finish then carefully captures a few pictures and in most cases you'll get a couple you can use on the Internet. This works for Swirls, Scratches, Etchings, Water Spots both Type I and Type II, Stains, Oxidation, etc. Basically anything on the surface. The reason you need to give the camera something to focus on is because often times when taking shots of a large, uniform, flat surface, once any focus points are zoomed out of the picture your camera has nothing to sense and focus on.
Detailing Clay
You can also use a little piece of detailing clay because in most cases you have some detailing clay around. If the paint is clean and it should when trying to capture pictures of surface defects, then when you're done taking your pictures you should be okay to put the little piece of clay back into the large piece you took it from or just through it away. A small piece will work fine. (See picture below).
Coin
A coin can also be used if the surface is flat and horizontal like the hood. Place the coin carefully onto the paint so as not to instill a scratch. If you already have a flawless, swirl-free finish then maybe stick with the finger or clay technique. If you're getting ready to buff the car out then as long as you're careful you'll be okay; remember you're going to be buffing out the paint and likely the defect you're trying to capture with a picture.
Cobweb Swirls or Cobweb-Effect
Cobweb Swirls or Cobweb-Effect
Cobweb Swirls or Cobweb-Effect
Detailing Clay
Another way to help your camera focus on a surface defect is to place something on the surface of the paint, for example in the below picture we placed a small piece of detailing clay on the paint, then let the camera auto focus and wa-la, perfectly captured swirls, scratches and a bird dropping etching in the paint.
Random, Isolated Deeper Scratch
Scratch Removed using Ultimate Compound
An Isolated Bird Dropping Etching
How To Remove a Bird Dropping Etching by Hand using M105 Ultra Cut Compound
Photos courtesy of MeguiarsOnline.com
Mike Phillips
Active member
- Dec 5, 2022
- 51,004
- 7
And this is why you'll often see my finger in any of the pictures I take trying to capture the true condition of the paint.
A lot of people think I'm pointing to the swirls or defects in the paint and that's why my finger is in the picture but really that's just a secondary benefit. The real reason is because by placing my finger on the paint my camera will focus on my finger and most of the time this means the paint surface will be in focus too...
I could use a penny, or a piece of painter's tape, or a piece of detailing clay or anything that can be quickly placed on to the paint in the area I want to photograph, but I usually have my finger with me and it's quick and easy to use.
Here's an example...
1939 Lincoln Zephyr - Swirls Removed - Modeled by Nicole
jfelbab
New member
- May 10, 2011
- 335
- 0
If you have a P&S camera be sure to put it in macro mode and follow the tips on getting something in the image to focus on. Vary the light/camera angle to best illustrate the defect you are trying to highlight. Using a moderate to high f-stop will make more of the image in the sharp focus zone. Direct sunlight is great for bringing out these defects but sometimes the high amount of sunlight reflected will cause exposure problems. Bracket your exposures wherever possible. Try to shoot at 1/125 or higher if possible to minimize camera movement.
Mike Phillips
Active member
- Dec 5, 2022
- 51,004
- 7
If you have a P&S camera be sure to put it in macro mode and follow the tips on getting something in the image to focus on. Vary the light/camera angle to best illustrate the defect you are trying to highlight. Using a moderate to high f-stop will make more of the image in the sharp focus zone. Direct sunlight is great for bringing out these defects but sometimes the high amount of sunlight reflected will cause exposure problems. Bracket your exposures wherever possible. Try to shoot at 1/125 or higher if possible to minimize camera movement.
Those are some good tips...
You know, I've had three Canon Rebels, I bought the first one introduced, wore it out and bought a second one. Left it worn out with Meguiar's. Then at since coming to Autogeek in 2009 I got the newest version at that time which is the Rebel T1i and it's pretty worn out now too...
I've never read the instruction manual. :laughing: I should... might help me to take a better picture...


 icture: icture: icture: icture: icture: