How to upload a photo into your Autogeek Photo Gallery

Any chance the AG photo gallery will get updated?

I'd have to check with Jason...

Again, anytime I'm happy to work with you over the phone and show you how to get your photos uploaded.

Send me a sample photo to my e-mail first: [email protected]


Let me see if I can upload it to you gallery and if so then give me a call and we'll walk through it together.

Up to you... I don't care what people use so much as I do having pictures disappear over time... After 7-8 years of watching pictures disappear, like I said it kind of ruins a thread to see the text but no pictures.


And you've got Dwayne as a resource for Photobucket which is a kind offer...


:dblthumb2:
Since I use this forum to learn, I fully appreciate pictures to complete the story. Having them on this forum should keep them permanent for future viewers.

I still owe Mark (07 z-oh-6) a comparison of different interior dressings and need to get the pictures uploaded AND usable so your offer is grately appreciated!
 
I'd have to check with Jason...

Again, anytime I'm happy to work with you over the phone and show you how to get your photos uploaded.

Send me a sample photo to my e-mail first: [email protected]


Let me see if I can upload it to you gallery and if so then give me a call and we'll walk through it together.

Up to you... I don't care what people use so much as I do having pictures disappear over time... After 7-8 years of watching pictures disappear, like I said it kind of ruins a thread to see the text but no pictures.


And you've got Dwayne as a resource for Photobucket which is a kind offer...


:dblthumb2:
Mike,

I sent you a photo that was already compressed to your email address. I will give you a call.
 
this is a test.

99BMWdashDIAfarLTOPPventandabovemothersRT_buff2.jpg


hey this works
 
Hi Mike,

Is there any way to delete a photo once it has been uploaded to the gallery?

Thanks.
 
I have a Mac. Using both Firefox and Safari, if I try and upload any more than 2 photos at a time, it fails. It processes for a short time ("uploading"), but eventually it just goes back to the upload page as if all the clicking never happened.

Makes for a tedious process...

Suggestions?
 
I have a Mac. Using both Firefox and Safari, if I try and upload any more than 2 photos at a time, it fails. It processes for a short time ("uploading"), but eventually it just goes back to the upload page as if all the clicking never happened.

Makes for a tedious process...

Suggestions?

Yes.

Send me one of the pictures and let me troubleshoot by trying to upload it myself. I upload pictures almost everyday without a hitch using the techniques shared in my tutorials and using the software that I normally use.

Heck here's just one example of over 100 pictures that I've cropped, resized, uploaded and then inserted into a thread...

1939 Lincoln Zephyr - Swirls Removed - Modeled by Nicole

1939LincolnZephyr067.jpg


:Picture:
 
mike,
i can get pics uploaded 1-2 at a time. it's just that i can't batch load any more than that.

email with 5 pics sent to [email protected]


Here's why you're having trouble... you're pictures are freaking HUGE!

The picture size is 1936 pixels wide by 2592 pixels tall!


I understand how convenient it is to simply take photos off your camera's memory stick and directly upload them to a photo gallery but it's not a very good use of anyone's resources.

Resources = A hard drive somewhere that someone has to pay for $$$


That's why I resize all my picture before uploading them, two reasons,


1. It's called being a good steward with your resource, in this case it's Max's servers, in the case of Photobucket or Flickr it's their resources and if you have a FREE account you only get so much room before it's no longer free or you start deleting old pictures to make room for new pictures and then leave a trail of red x's all over the Internet.

2. It's good "netiquette" to resize your pictures before sharing on any website so you don't force your reader to horizontal scroll.


I took about 20 seconds to resize your picture using free software I use everyday for this kind of work called Easy Thumbnails.

Then the picture uploaded instantly. Here's one of the pictures you sent me that was 1936 pixels wide by 2592 pixels tall now that it's been resized to 600 pixels wide. (I don't care what the height is, in my tutorial I explain why)

This is MORE than big enough to get your point across, that is you're sharing a picture of a bottle of wax.


600 Pixels Wide
Djerrick001.jpg


Here's my article on how to resize photos using Easy Thumbnails, I include screen shots and text that explains how to resize your photos before uploading them ANYWHERE on the Internet. It's really not that hard to do if you just invest a little tiny amount of time into teaching yourself how do do it.

How to resize your photos before uploading to a photo gallery

Modern cameras take great pictures that are also incredibly HUGE and way to large to post to a discussion forum without resizing.

2 things,
1. Sharing a photo that is so large that your force your reader to horizontal scroll defeats your purpose of sharing your photo.

A good rule of thumb is to resize your photos to 800 pixels wide if your really want to show a large photo. By doing this, the majority of the people in the world will be able to see the entire picture without having to horizontal scroll.

Anytime someone has to horizontal scroll to see an entire picture they can't really see the entire picture because as they scroll to one side on their monitor to see what's not on the screen, a portion of the picture on the opposite side of the screen is disappearing off the monitor.

Therefore they can never really see the entire photo which kind of takes away from the value of the photo and usually the goal of the poster, (to show a photo, not a portion of a photo).
2. Uploading HUGE pictures files requires more space on the host's server. It's not a responsible use of your hosts server space or hard drive space and over time, if everyone simply uploads huge files like your huge pictures, it uses up a lot of your hosts resources. Not a big deal if the forum is a flash-in-the-pan but if someone is in this for the long run, (like Autogeek Online), then it is important to be a good steward of AG's resources.
This is 600 pixels wide
(I drove a Scoop for a Pulp Mill in this shot)
ScoopDriverMike01.jpg


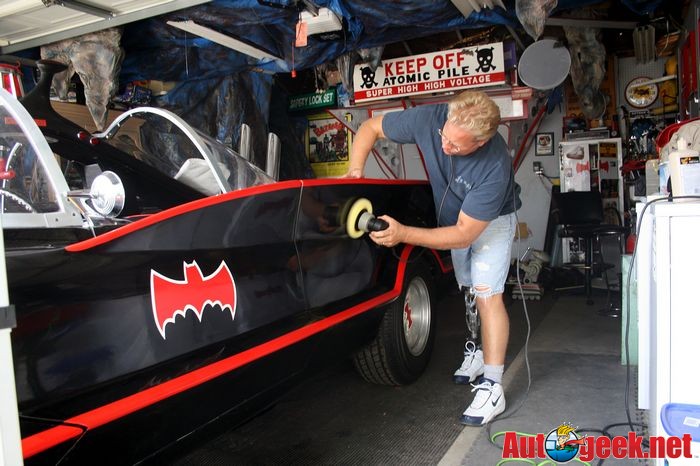
This is 700 pixels wide
(Machine applying wax to Nate's 1966 Batmobile recreation)
Buffingthesideofthebatmobile.jpg


This is 800 pixels wide
(This picture was taken with an early Sony Mavica Camera)
59CorvetteLowDown.jpg


It's really not that hard to resize your pictures to a "Viewable Size" which is a courtesy to both your reader and whoever's photo gallery you're uploading your pictures to.

I first started using Easy Thumbnails when I was looking for software to help me make Avatars without distorting the original picture. What I found out is that it works great for not only making huge pictures tiny, (most Avatars are small), but it works great for making huge pictures ANY size, like 800 pixels wide.

The software is very easy to use but to flatten out your learning curve, here's some screenshots that will show you how to set it up.


Easy Thumbnails Website

Screenshot of the Easy Thumbnails Website

2600_EasyThumbnailsHomepage.jpg


Create and name a folder Easy Thumbnails on your C-drive in either your Download folder or the Program Files folder on your Hard Drive and then click the Free Download button on the left hand side of the page and a dialog box will appear. Click on the Save button, and save it to the EZ Thumbnail folder you created on your C-drive.

2EasyThumbnailsDownload.jpg


After the program is finished downloading, go to that folder and double click on the .exe file and your now in business.

There are three tabs across the top of this software program. The only tabs you need to be concerned is the Files and Settings tabs.

The Files Tabs enables you to browse to the folder in which you keep your pictures, this would be where it says, Look in.

Towards the bottom of the page you will see the words, Save in, over to the left is a button, the shape of a square. By clicking on this button, you can choose where the Easy Thumbnails programs saves the pictures you resize. This can be the same folder the pictures are in, or a different folder.

2EasyThumbnailsScreenShotFiles-Tabs.JPG


Now click the Settings tab.

2EasyThumbnailsScreenShotSettings.jpg


In the settings tab, there are three settings you need to be aware of.

The Max Width setting
The Maximum Width setting is used to adjust the width of your pictures. For most discussion forums 500 to 800 pixels wide is the maximum width you want to make your pictures. Otherwise, you will force the reader to horizontal scroll. I switch between 600 and 800 pixels wide on most of the photo's I upload.

The PhotoPost software that Autogeek Online uses for archiving and displaying photos automatically resizes photos to two different widths if your pictures are larger than 600 pixels wide. These would be,

* Thumbnail

* 600 pixels wide, This is the first size photo you click to when you click on a thumbnail.

If you upload a picture wider than 600 pixels wide you can get to that size by clicking on the 600 pixel wide photo and this is where you get the HUGE pictures that you often see in a thread because the original wasn't resized before uploading. You can read more about this here,

How to insert an image from your photo gallery into your message


The Max Height setting
The Maximum Height setting should be set to a very high number, like 100000000. The reason for this is because the Easy Thumbnail software will resize your photo's using the Max Width setting as a baseline. The height will be configured optimally according to the original photo's dimensions. That is of course as long as the number in the Max Height is larger than any photo you are resizing, (Which for most people, 100000000 pixels should be taller than any photo you can take). With settings like this, Easy Thumbnails will automatically resize the photo based solely upon the width you choose and there will be NO DISTORTION of the pictures.

If you are going to resize a photo that is taller than it is wide, then set your Maximum Width to something like 300 or 400 pixels wide. (After you do a couple of tall pictures, you will see what I mean.


The Prefix/Suffix setting
The Prefix/Suffix setting inserts a prefix number in front of the original file name. You can use this to help you identify the files you have created using Easy Thumbnails. For example: If your photo is named, car.jpg and the original photo is 800 pixels wide. If you put 600 in the Max Width setting, and then put 600_ in the Prefix setting, after you click on the Make button to resize the photo, the new photo you will have made will be called, 600_car.jpg

If you leave this setting blank, it will add nothing to the name of the photo.

Be warned that if your Save in folder is the same as your original photo folder, then your original photo will be overwritten and be the new size you have put into the Max Width setting.

This can be a good thing or a bad thing.

If you want to keep your original photos the same size for safe keeping, then you should either put some type of prefix in the Prefix setting box, or make your Save in folder something different than where your original photos are stored. If you don?t want to fill up your hard drive with space hogging pictures, and keeping an original copy of your photos isn?t important to you, then go a head and leave the Prefix setting box blank, and save your photo?s into the same folder the original photos are stored in.

Give this free program a try, it works great and from what I can tell it has never distorted any of my photos in anyway.


Here's some other articles I've written on working with photos on discussion forums...


How-To capture swirls, scratches, etchings and other surface defects with your camera

How to crop out the fluff and resize your pictures! - Using FREE online software!

How to upload a photo into your Autogeek Photo Gallery

How to insert an image from your photo gallery into your message

Handiest little picture viewer tool I've been using for years now...


:xyxthumbs:
 
Thanks for the lesson and the offer for telephone help, Mike.

All those number were greek to me. Never had the interest to translate them, but it make sense now. Please excuse my inadvertent misuse of server space.

I do use a PC, so I did not try out the software you suggested. But I did download K Studio's Resize! and it works like a charm. In fact, quite easy.

Batch loads are now successful.

Test. 800 pixel width (vs. previously 1600).

IMG_03752.jpg


As others have mentioned, the software for photo management embedded into this forum software is quite klunky and user unfriendly. Working with multiple photos is tedious as it requires numerous clicks, eg. moving photos within folders, uploading photos, etc. You cannot shift click to perform an action on a set of photos in one step. Surprising considering forums are quite pic dependent.

Also, I have yet to figure out how to delete a photo from my album.
 
Last edited:
Mike, how can I delete a photo I have uploaded? Also I had taken a picture of bottles of product and when I shrunk the image with Easy Thumbnails it made the labels blurry. Is this normal? They are clear when I look at them on my camera. Here is the pic.

tn_4-24-12_AG_Purchases.JPG


Thanks,
Drew
 
Mike, how can I delete a photo I have uploaded?

There's no option to delete photos, not sure why could be software related. As an Admin I can delete photos or any of the Mods can.


Also I had taken a picture of bottles of product and when I shrunk the image with Easy Thumbnails it made the labels blurry. Is this normal?

No. This is why I sought out, first used and continue to use Easy Thumbnails because it WON'T distort images. IF it's distorting an image it's because you don't have the parameters set up like I explain in my how-to article that includes screen shots of of how to set it up.


Seen the note I made in RED next to the Max Height Setting instructions


From my article here,

How to resize your photos before uploading to a photo gallery


This part...

Now click the Settings tab.

2EasyThumbnailsScreenShotSettings.jpg


In the settings tab, there are three settings you need to be aware of.

The Max Width setting
The Maximum Width setting is used to adjust the width of your pictures. For most discussion forums 500 to 800 pixels wide is the maximum width you want to make your pictures. Otherwise, you will force the reader to horizontal scroll. I switch between 600 and 800 pixels wide on most of the photo's I upload.

The PhotoPost software that Autogeek Online uses for archiving and displaying photos automatically resizes photos to two different widths if your pictures are larger than 600 pixels wide. These would be,

* Thumbnail

* 600 pixels wide, This is the first size photo you click to when you click on a thumbnail.

If you upload a picture wider than 600 pixels wide you can get to that size by clicking on the 600 pixel wide photo and this is where you get the HUGE pictures that you often see in a thread because the original wasn't resized before uploading. You can read more about this here,

How to insert an image from your photo gallery into your message


The Max Height setting - <--- This setting needs to be HUGE like I show in the above photo
The Maximum Height setting should be set to a very high number, like 100000000. The reason for this is because the Easy Thumbnail software will resize your photo's using the Max Width setting as a baseline. The height will be configured optimally according to the original photo's dimensions. That is of course as long as the number in the Max Height is larger than any photo you are resizing, (Which for most people, 100000000 pixels should be taller than any photo you can take). With settings like this, Easy Thumbnails will automatically resize the photo based solely upon the width you choose and there will be NO DISTORTION of the pictures.

If you are going to resize a photo that is taller than it is wide, then set your Maximum Width to something like 300 or 400 pixels wide. (After you do a couple of tall pictures, you will see what I mean.


They are clear when I look at them on my camera. Here is the pic.


Thanks,
Drew

E-mail me the original pictures and let me check it out.

Just to note, a picture viewed on the screen of your camera can look good and in focus. You pull it up on your monitor and in reality it can be very out of focus.

Great question Drew and I'm glad to help but look at the volume of pictures I've posted to the Internet since 2002 and you will never see a distorted photo.

Once in a while you will see an out of focus photo because if that's all I have and it's important to the story I'll use it. When I resize an out of focus picture using Easy Thumbnails, Easy Thumbnails doesn't distort the picture it was distorted or out of focus to start with.

Make sense?


Here's my e-mail [email protected]


:)
 
Mike,

Thank you for your response and offer of help. With all you do it is amazing that you still take the time to be so helpful! I figured out what I did wrong. It is hard to explain, but I re-sized the photo wrong the first time and then used that messed up copy and blew it back up which made it blurry. I scrapped that photo and started fresh with the original copy and re-sized it correctly. Now my picture looks clear!

600_4-24-12_AG_Purchase.JPG


Thanks,
Drew

P.S. Because of your articles I can now post pictures! Can't wait to do a few picture reviews!
 
Mike,

Thank you for your response and offer of help. With all you do it is amazing that you still take the time to be so helpful!

I figured out what I did wrong. It is hard to explain, but I re-sized the photo wrong the first time and then used that messed up copy and blew it back up which made it blurry. I scrapped that photo and started fresh with the original copy and re-sized it correctly. Now my picture looks clear!

600_4-24-12_AG_Purchase.JPG


Thanks,
Drew

P.S. Because of your articles I can now post pictures! Can't wait to do a few picture reviews!


Congratulations!


Now that's a clear picture!


Thanks for sticking with it, I'm confident you'll find the ability to work with pictures a real asset for the rest of your online life, I know it's helped me tremendously.


:xyxthumbs:
 
Old thread, I know...but I really want to use this..

I've had a few issues uploading pics to AG's gallery so maybe someone can somone clarify this for me
In Mike's first post, second pic:

"Your photos should already be resized to no larger than 800 pixels wide."

Does this mean that the picture I'm uploading should already be resized to (for example) 800x600?
Or does this mean that the picture will get reized upon me uploading it?

I've run into issues using this tool, so I'll either jump to Imgur, Flickr, Photobucket...as this tool/software seems quite dated at best.
I select them, upload them, then they disappear into the nether as someone else had stated; Maybe this is happening because they are well over 800x600?
 
How to upload a photo into your Autogeek Photo Gallery


This how-to article will show you how to upload a photo on your computer into your photo gallery that you get with your Autogeek discussion forum membership.


It's important to resize your pictures first in an effort to be a good steward of the Autogeek resources; we'll write a how-to article for that in the near future.

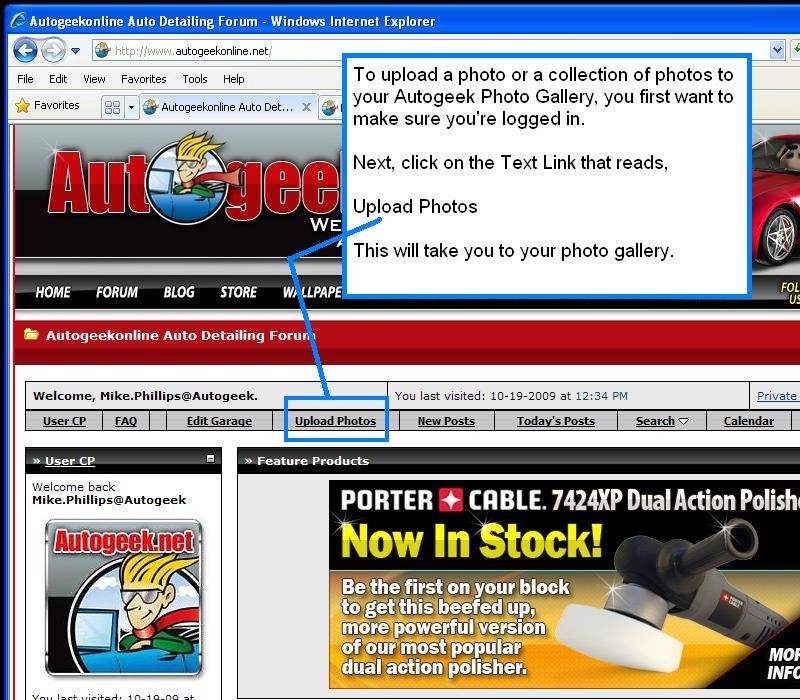
First, make sure you're logged-in to the Autogeek forum. If you're not sure how to tell if you're logged in, here's an article that will show you how to tell.

How to tell if you're logged into the forum?


Next, locate the text link in the gray horizontal navigation bar that runs across the top of every page of the forum and >click< on it.

UploadAPhoto001.jpg


Next, you need to know where your photos are on your computer that you want to upload. This may seem like a no-brainer but sometimes Newbies to computers and digital cameras know their photos are on their computer, but they don't know where.

dunno.gif


So make sure you know the location of the folder that holds the photos you want to upload because you're going to need to tell the PhotoPost Gallery where the photos are stored by browsing to them.


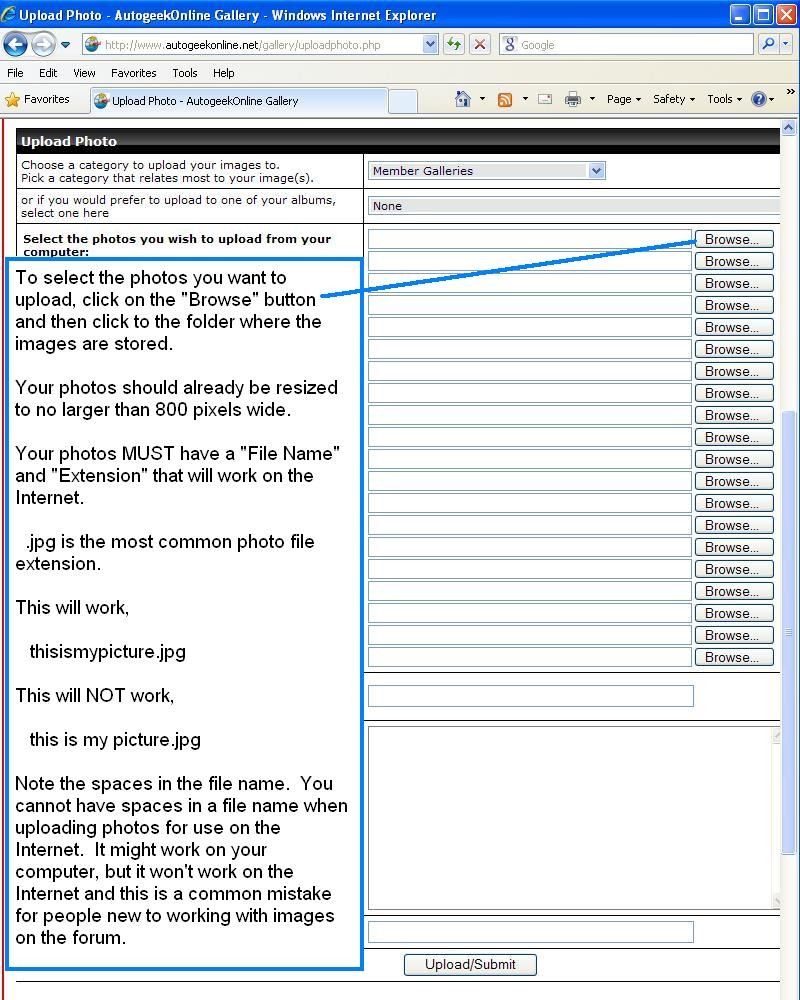
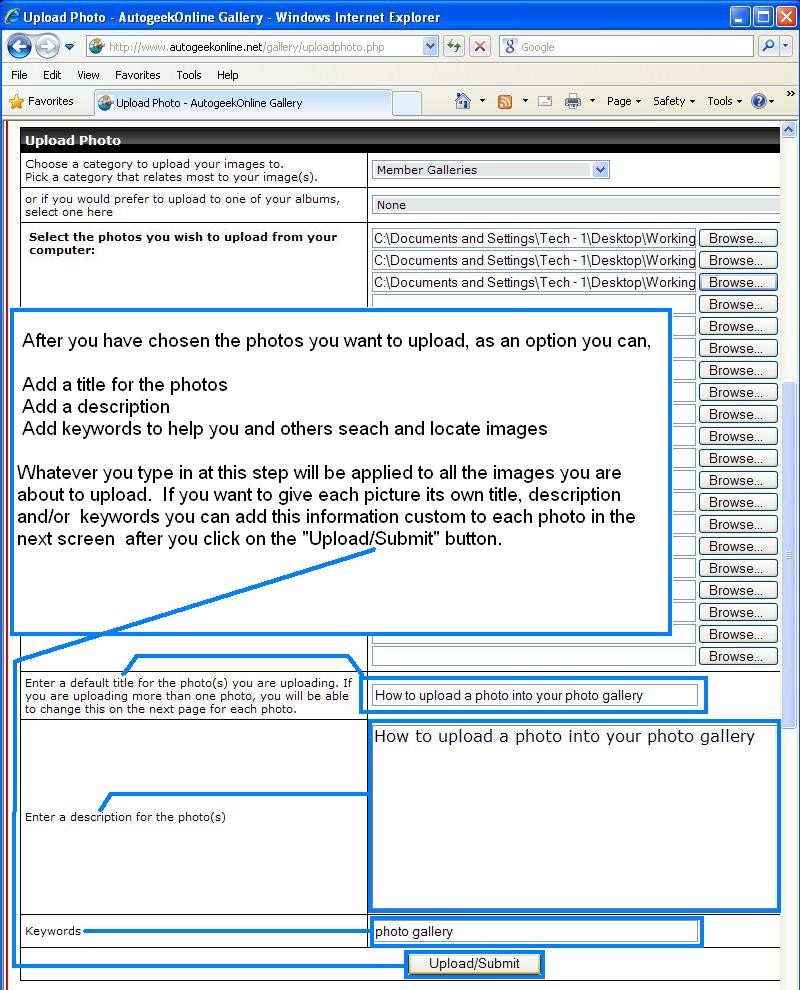
After clicking to your gallery, you'll see a screen that looks like this,

UploadAPhoto002.jpg


If you have more than one photo to upload, continue to >click< on the Browse button and select another photo. Remember which photos you have added and try not to select the same photo twice.


Next, add a title, description and keywords for your photos and then >click< on the Upload/Submit button. If you want to add different titles, descriptions and keywords for each photo you will have a chance to do this in the next screen when uploading multiple pictures.

UploadAPhoto003.jpg


Ta da! That's it, you have just successfully uploaded your photos into your photo gallery here on the Autogeek Online Discussion Forum.

Next we'll take a look at how to insert your photos into your messages.


smile.gif

Mike, how do you do this with an IPad? I can post one pic but I would like to post several like I see being done on here.

Thanks for your help and I love this place!
 
Old thread, I know...but I really want to use this..

There's no such thing as an old thread if the information is accurate.


I've had a few issues uploading pics to AG's gallery so maybe someone can someone clarify this for me
In Mike's first post, second pic:

"Your photos should already be resized to no larger than 800 pixels wide."

Does this mean that the picture I'm uploading should already be resized to (for example) 800x600?
Or does this mean that the picture will get resized upon me uploading it?

In this article I recommend that you resize your pictures BEFORE uploading them as a good steward of the AG resources.

Modern cameras take HUGE pictures and with the visual size comes a huge file size but the thing is no one can see a HUGE picture on a computer monitor without horizontally scrolling and if you're scrolling you can't see the entire picture anyways as part of the picture rolls off the screen as you scroll to the other side of the picture.

Make sense?

A good average is 800 pixels wide. Then everyone can see your pictures on any electronic device without having to horizontal scroll.

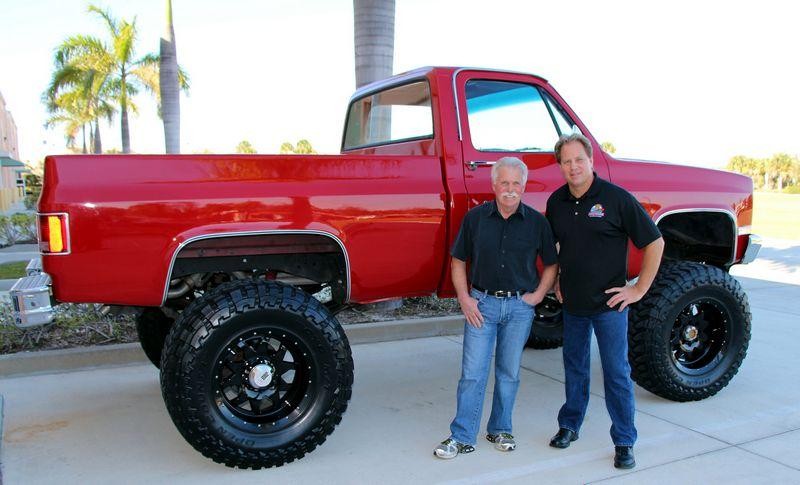
This picture is 800 pixels wide...

Wayne_Carine_Mike_Phillips_1987_Silverado.jpg


I've run into issues using this tool, so I'll either jump to Imgur, Flickr, Photobucket...as this tool/software seems quite dated at best.

I upload hundreds of photos each week without a problem and my pictures always show up.

I have an article on why Photobucket is a bad idea unless you're going to pay for a pro level account and then pay for it the rest of your life. Otherwise your pictures will disappear and that makes your thread useless.


I select them, upload them, then they disappear into the nether as someone else had stated; Maybe this is happening because they are well over 800x600?


Yep.... that's the reason. The file size is too large and if you and everyone were to be able to upload HUGE files for pictures all the time it will fill up the hard drive space on the server for the picture gallery.

People upload HUGE pictures to their free Photobucket accounts and then they use up all their free space and that's when their pictures start disappearing all over the Internet wherever they posted them.

It's really not that hard to teach yourself how to work with pictures on discussion forums and I've written a number of articles with screenshots that show you what to do but it starts with taking the humongous picture files your camera creates and "doing something to them" before uploading and that's resizing them to a sane file size.


How to resize your photos before uploading to a photo gallery


When people use Photobucket, sooner or later here's what we all see....


Photobucket.jpg


Photobucket2.jpg
 
I use picasa from google to resize...choose your folder and under file there is option export pictures...you can resize and add watermark at the same time...
 
I use picasa from google to resize...choose your folder and under file there is option export pictures...you can resize and add watermark at the same time...


The important thing is to find the software and a system that works for you and then of course use it.

I have Picasa and I use to to search for photos but I trust Easy Thumbnails to resize without distorting my pictures plus I already know how to use it.

The worst thing about pictures isn't how you resize them but where you host them. Every time I see someone sharing a great set of pictures that really does a great job of telling their story, if I right click on the picture to see where it's hosted and I see Photobucket in the web address I already know what the future, down the road holds.

If a person takes just a little time to self-educate themselves on how to use the free gallery they get as a member here their pictures will never disappear.


My own work is a testimoney to this by the volume of pictures I post and every picture I've ever posted to this forum still shows up today.


:)
 
Back
Top