Junkman's, The Mother of All "How to Fix Your Paint for Novices" Thread!

Good to see you posting here again Junkman. I've always appreciated your approach in training

I look foward to your contributions to the forum in the future

Flash
 
Good to see you posting here again Junkman. I've always appreciated your approach in training

I look foward to your contributions to the forum in the future

Flash

Thanks Flash, I'll see what I can do. :props:
 
I saw this earlier on my phone and just wanted to say whats up to you Junkman...glad to see you posting on here!
 
Thanks for the videos! A lot of good information there. Between your videos and AG's tutorials/videos noobs like me should avoid a lot of mistakes.
Now i just have to stop buying things from AG and actually take the 1st step and start detailing, heh!
 
I saw this earlier on my phone and just wanted to say whats up to you Junkman...glad to see you posting on here!

Thanks for the videos! A lot of good information there. Between your videos and AG's tutorials/videos noobs like me should avoid a lot of mistakes.
Now i just have to stop buying things from AG and actually take the 1st step and start detailing, heh!

You're welcome gents! Thanks for making a guy feel welcomed. :xyxthumbs:
 
No offense taken! I don't want you to get that vibe. I did help Adam's with a BUNCH of their projects but I never worked for them. I've own a computer consulting firm for the last 13 years. Detailing is a passion for me but I would never do it for a living. Detailing is WAY more work than I care to be doing at my age. After years of being a cop in LA and the Marine Corps, I'm stopping to smell the roses... and the women too. :D
I here you on stopping and smelling the roses and looking at the pretty ladies. 32 yrs in Military some health issues, now i get up in the morning with a smile on my face an wondering what I can do to my toy today. Videos did help alot and your presentation and talk at Grabiks made things simple.

Find what works for you and use it.

THANKS !!!!!

Thirty-two years? Dang man, you must have liked that uniform! lol! Thank you for your service sir! :dblthumb2:
 
Very entertaining video's !!!

Detailing made simple basically is the idea I get when I watch your video's. I like how you focus on the majors instead of insisting about utilizing special techniques with priming the pad and whatnot. I think a lot of new people in detailing think that certain methods are mandatory to getting proper results. When there really not. Doing the basics the correct way will yield proper results as shown in your video's.

The results speak for themselves on that hammered paint ! You must be delighted to be using high quality detailing products. I know your main focus is on technique and not product choice, but you have to admit that meg's compound and 205 polish is on another level compared to just about every other product line. especially Adams' polishing compounds.

Keep up the great work !
 
... The results speak for themselves on that hammered paint ! You must be delighted to be using high quality detailing products. I know your main focus is on technique and not product choice, but you have to admit that meg's compound and 205 polish is on another level compared to just about every other product line. especially Adams' polishing compounds.

Keep up the great work !

Thanks. To be honest, I really don't see a very large performance difference as I do see with a given product's working characteristic (when talking about your boutique and professional product lines). In other words, I have notice that some heavier compounds require more pampering in order to make them "act right" when compared to others. This is true for me across a broad range of manufacturers. They may all cut with the similar effectiveness but some are easier to deal with than others (some work better in higher temperatures than others, etc...).

The lighter compounds like M205 and the Adam's Fine Machine Polish tend to have similar performance characteristics. It's the price that stands out between these two products. I can get a 32oz bottle of M205 for pretty much what a 16oz bottle of FMP cost. So the better product for me has nothing to do with performance, it's because of the price that makes M205 a much better option.

One true thing that you hit on is my insistence that paint correction doesn't have to be rocket science. When I first started learning about this stuff (before the Internet), your choices were simple and there was not a lot of information to get lost in. With the boom of the Internet, a noob could drown in all the information presented today. When I started making videos, I was determined to introduce the K.I.S.S. method into my approach as that is the way I learn nest. I have never been afraid to ask a question or insist that I didn't understand something if I didn't. While obtaining my electronic engineering degree, I always sat in the front of the class an my hand went up so often that a few people in class got tired of seeing it. Being recently discharged from the Marines, I always offered them a sit down behind the school after class. :D

My father did body work for 40 years and a lot of his work ethic was instilled within me. I can't stand seeing a nice car look like crap. So for all the folks who take pride in the appearance of their wheels but don't know jack about fixing paint, I decided that I was going to take the mystery out of paint correction. That's how I found You Tube and the rest became 'a brutha' in his garage productions'. :xyxthumbs:
 
Awesome video series, ton's of information for us new guys. I definitely learned a lot from watching that series, I am going to watch the rest of you videos as well.

You touched very briefly on quick detailers and how they grind the grit into your paint, I am wondering what your thoughts are on the waterless was systems, like this one. DP Waterless Auto Wash lets you wash your vehicle without water! Waterless car wash

Thanks Junkman, and keep those video's coming!
 
Your videos are great and l had me laughing a few times. You're very entertaining.

I really like your pad priming technique. Priming has always been hard for me, I felt like I was using way to much product just to get it primed. Your method looks simpler and much less wasteful.

I also like your technique for the actually correcting step. Just one SLOW section pass. Looks easier to manage then doing 5-6 like I used to.
 
Awesome video series, ton's of information for us new guys. I definitely learned a lot from watching that series, I am going to watch the rest of you videos as well.

You touched very briefly on quick detailers and how they grind the grit into your paint, I am wondering what your thoughts are on the waterless was systems, like this one. DP Waterless Auto Wash lets you wash your vehicle without water! Waterless car wash

Thanks Junkman, and keep those video's coming!

I actually talk about waterless wash systems in my touchless wash videos. Here's the deal. It's not the product that I have a problem with, it's the misconception and the technique used by some people who buy the product. It's like using a Cresent wrench to do major engine work. Yea, you can adjust it to the various bolts sizes that you're dealing with, but wouldn't a socket set be a much better choice for that type of work? Also, one guy's idea of what can be 'waterless washed' compared to another could be night and day. That opens the product up for abuse and ends up with the user creating paint damage. A product like that cannot be used in all dirty car situations.

All one has to truly do is magnify the process of removing dirt from the paint with a minimal amount of lubrication (or soap and water, my favorite). The first wipe across your paint may cause a ridge of dirt to develop on the towel you are using (depending on how dirty your paint is). That ridge of dirt when magnified is nothing more that a mountain of boulders. The second that your towel starts traveling in the opposite direction, you are grinding that dirt against your finish and thus are doing what I call, making sandpaper.

Manufacturers like to use fancy terms about how their product uses "encapsulating agents" to trap the dirt so that it doesn't scratch your paint. Really? And the emperor has no cloths. That's my response. If you can't use layman's English to explain how your product works, there's a problem. That's when I start checking to see if your lips are close to my posterior region and there's smoke being blown (and there are a few products on the market that fit that description). Look at my videos. I explain this stuff so that a 10 year old can understand it. Just wrap your mind around common sense and tell me that you honestly believe that using something like that is not risky for your paint. If you just take common sense the size of a mustard seed, you will have a hard time believing that a waterless wash product, used the way most people think it should be used is about the worst thing you should use to completely wash your car.

Now that's not to say that a product like that doesn't have it uses. Something like removing bird poop, fingerprints or a drop of oil would be fine to wipe off with a waterless wash as long as you don't go back and forth with your towel. However, there are cheaper alternatives like some of your quick detailers that can be used to do the same thing. This is when I tell guys to stop and go with their gut. If you are about to do something to your paint and you have a feeling that it could create damage, that's common sense whispering in your ear. Trust her, she knows when you're about to screw up. She is the horn in this video trying to get you to stop before you become 'that guy'.

[ame=http://www.youtube.com/watch?v=V9xFgyv8BJI]2013 Nissan Altima: Enough - YouTube[/video]


Your videos are great and l had me laughing a few times. You're very entertaining.

I really like your pad priming technique. Priming has always been hard for me, I felt like I was using way to much product just to get it primed. Your method looks simpler and much less wasteful.

I also like your technique for the actually correcting step. Just one SLOW section pass. Looks easier to manage then doing 5-6 like I used to.

Remember this. Paint correction is not a race. It does not have to be completed in one day, one weekend or all at once. YOU are the only person on the planet who is going to achieve the most satisfaction out of YOUR car being spotless and swirl free. Thus, don't disappoint yourself. Take your time and reward your efforts with positive results. :)
 
Absolutely GREAT!

I truly do not want to diminish ANY video that has been posted on AGO, but this has to be a "Must Watch" for anyone starting out.

Great job Marine!

Bill
 
I am looking into mobile detailing. I heard you say in video #3 that you should not do paint correction outdoors. Just a question.... Say a customer needs paint correction done. Is it possible to do what you did using a canopy and still get great results ?
 
Absolutely GREAT!

I truly do not want to diminish ANY video that has been posted on AGO, but this has to be a "Must Watch" for anyone starting out.

Great job Marine!

Bill

Thank you Mr. Bill. :xyxthumbs:

I am looking into mobile detailing. I heard you say in video #3 that you should not do paint correction outdoors. Just a question.... Say a customer needs paint correction done. Is it possible to do what you did using a canopy and still get great results ?

Actually what I said was as a novice, you should never do this outdoors and in direct sunlight. Can it be done outside and/or under a canopy? Yes, but here's the deal. If you are working with a heavier compound like M105, #4, #1 or 3M's Rubbing Compound and the surface of the car is warm to hot, you risk the chance of creating a dusty fiasco. Working outdoors takes experience in that you have to know how to coax the heavier polishes along. It becomes more work in that you spend a lot of time doing clean up afterward or just coaxing the polish to perform as it should. So if the surface of the car is warm or hot, you're going to have fun fighting all the dust that you will end up producing and all the pads that you will end up clogging. You have to be very cognizant of exactly how much polish to use and you must keep your pads clean at all times while working. Every pass that you make in this environment will NOT consist of adding more polish to the pad. You have to be able to look at your pad and determine when to add polish and when to just spritz the pad with a quick detailer. As you can see, it gets to be more of a headache when working in that arena.

A novice should never work in that arena as it will affect their learning experience in a negative way, causing them to develop working habits that will either frustrate them or impact their effectiveness when it comes to paint correction. Because I do so many car shows, I had no choice but I had to learn how to work on a hot car in direct sunlight. It is definitely NOT the way I do things if I can avoid it. It's way more headache than I care to deal with.
 
Because I do so many car shows, I had no choice but I had to learn how to work on a hot car in direct sunlight. It is definitely NOT the way I do things if I can avoid it. It's way more headache than I care to deal with.


I had to work on a black Corvette all day yesterday in direct sunlight. Temperatures of black paint get up to 170 degrees not including any heat generated by the actual buffing process...


Black Car Paint Temperature in Full Sun
(And a few other colors too)

Here's a black Corvette that's been parked here since 8:00am this morning...
BlackPaintinFullSun003.jpg


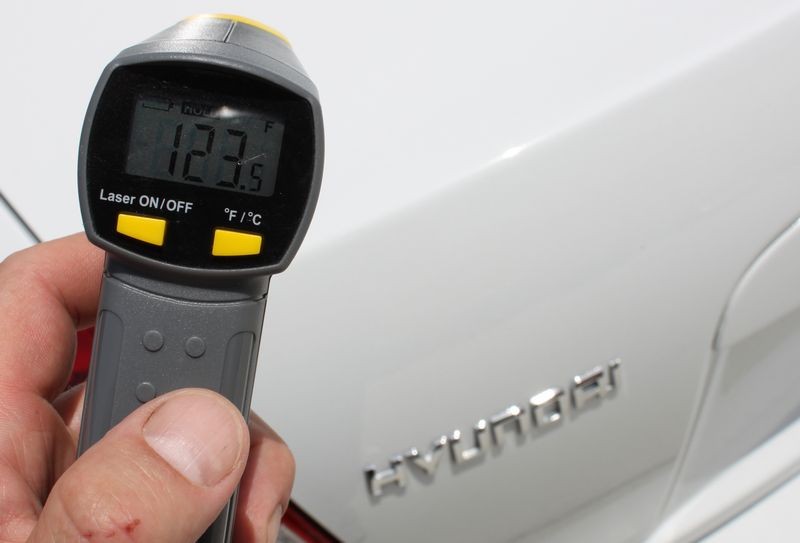
White paint on a Hyundai...
BlackPaintinFullSun018.jpg


So if you have to work on a car in direct sunlight in hot temperatures you need to modify your techniques...

Tips for working in warm/hot weather or direct sunlight


Here's two tips I used yesterday while buffing out the black Corvette...


1. Shrink your work area down to a smaller size...
Anytime a product becomes difficult to work with, one tip you can try is to shrink down the size of your work area. This means you spread the product out over a smaller area and only work this smaller area.

Be careful not to allow yourself to do what I call Buffer Creep. This is where you creep outward from your original small section and end up buffing out a larger section. Avoid Buffer Creep. Especially if your product appears to be drying up and becoming dusty.


Why a smaller area?
Because when you're working only a small are you're continually engaging the working film of product over the area more quickly as you move the polisher and by doing this there's less time for the product to dry and dust.


2. Clean your pads often or switch to a clean dry pad...
It's vitally important to work clean and this means cleaning your pad often and often can mean cleaning your pad after each Section Pass no matter which type of polisher you're using.


Quote:
The definition of a pass
There are two definitions of the word pass as it relates to machine polishing with any type of machine.


Single Pass
A single pass is just that. It's when you move the polisher from one side of the section you're buffing to the other side of the section you're buffing. That's a single pass.


Section Pass
A section pass is when you move the polisher back and forth, or front to back with enough single overlapping passes to cover the entire section one time. That's a section pass.

[video=youtube_share;Q70g83mnTn4"]YouTube Video on How To do a Section Pass[/video]

In most cases if you're removing any substantial below surface defects you're going to make 6-8 section passes to the section you’re working before you either feel comfortable you've removed the defects or you're at the end of the buffing cycle for the product you're using.


The warmer or hotter the temperatures and the worse the working conditions, then the more often you want to clean your pads.


Rotary Buffers
When cutting with a wool pad on a rotary buffer it really helps to have a pad washer, but if you don't have one you can get by with a Spur. When using foam pads you can use a pad washer or the "Cleaning your pad on the fly" technique" using a clean, terry cloth towel.


How to clean your foam pad on the fly


DA Polishers - Porter Cable - Meguiar's - Griot's
When cutting with a DA Polisher you can get by with "Cleaning your pad on the fly"
using a terry cloth towel, but a pad washer will clean a foam cutting pad better. Of course you can always switch to a new pad or a clean dry, used pad. The "Cleaning the pad on the fly technique" does not work with the Flex 3401 or the Cyclo Polisher. For these two types of polishers you'll need to use a pad washer, wash your pads by hand, or substitute clean new pads, or clean, dry used pads.


Keep in mind that anytime you us ANY product that abrades the paint, you will have two substances building up on the face of your pad,

  1. Spent residue
  2. Removed paint
Both of these need to be removed as they build up before adding new product and continuing with the buffing process.

Back when cars were painted with single stage paints, you could easily see the removed paint build up on the face of the pad because it was pigmented or colored. This would be a strong visual indicator to help remind you to clean your pads often.

With modern clear coats, you're still removing paint when you're abrading or doing correction work but because the clear layer is clear, it just doesn't show up as dramatically as single stage paint. The important point is to understand that clear paint is building up on the face of your pad and to clean our pad often.

You also want to wipe off any residue from the area worked before adding fresh product if you're going to work the area again.


:)
 
Thanks Junkman. I watched your videos in this thread and found them to be very helpful.
 
Back
Top