Laura
New member
- Aug 2, 2009
- 299
- 0
Lessons I learned from a Black 2009 BMW 550i
Lesson #1 – Even people with good intentions don’t know how to take care of their paint.
This car is basically the only thing a friend of mine got out of his recent divorce. It has almost 25,000 miles on it and compared to most cars with similar mileage, it was very clean. He had it on a regular schedule with a detailer, and he was very careful with it. He thought he was doing everything right.


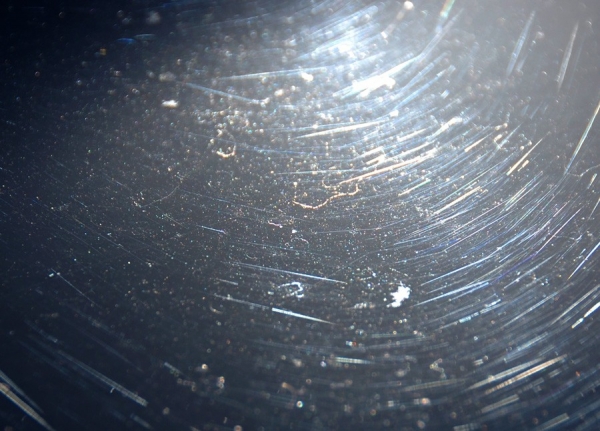
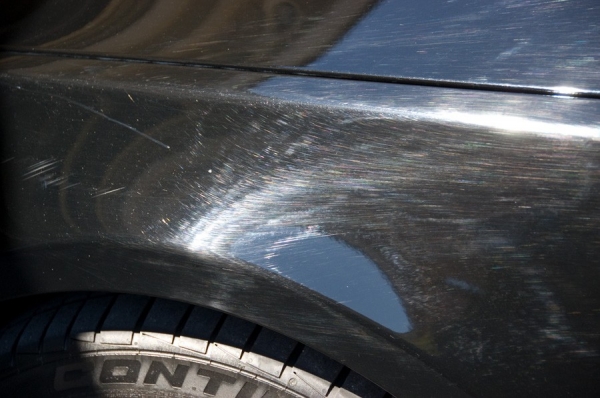
To the average person, it looked pretty good. And overall my friend was satisfied; he honestly didn’t know what I was going to do to it – in retrospect that was probably a good thing! Fortunately it was a sunny day when I got it, so it wasn’t too hard to point out the true condition of the paint. It had all types of water spots, there were scuff marks on the fenders, and it was totally swirled out.
Water Spots:
Fender Scuffs:
Swirly:

I’m not sure what the regular detailer was doing to it, but it obviously had never been clayed.

When I pointed this out, he so innocently said, “I thought all cars looked like that.” He clearly didn’t know the difference between a swirl and a squirrel. I’m amazed how uneducated most people are about car care!
Lesson #2 – The purpose of the test spots is to establish a standard
I started out with Wolfgang TSR and a Lake Country flat 5.5 orange pad – any other time, that’s what I’ve started with. So I did my test spot and drove it back out in the sun. Much to my surprise, there were still some swirls.

I happened to have a couple of LC yellow pads, so I tried those. In this pic, the yellow pad test spot is on the left and the orange is on the right. I ended up going with the yellow.

At that point I thought the test spot had served its purpose. Little did I know…
I’m not sure if it was because this was my first black car or that it was the worst paint I’d ever corrected (my luck!), but this was very different – and MUCH harder - than any other car I’ve buffed out. Once I had the trunk lid done, I moved to the side and everything changed. In addition to the swirls, there were also deeper scratches and those scuff marks. The combination of product quantity, speed, pressure, time, pass size, etc, etc that I’d dialed in on the trunk lid didn’t work on the side. I eventually learned that if I inspected the paint a little closer and compared it to the condition I was familiar with from the trunk, it made it easier to know how to adjust my process. All along I thought I was supposed to do the very same thing on the whole car that I did in the test spot, but now I think of it differently. The test spot was the standard; I knew what process would correct what type paint, and if the paint was either better or worse than that, I knew I needed to vary my process accordingly. Once I figured that out, it became easier and quicker. That led me to my next lesson learned.
Lesson #3 – You can’t truly see the paint without good lights
Another no-brainer, but in my opinion worth mentioning. I’m not endorsing any kind of lights; I probably don’t have the best, I’m just extremely grateful for the ones I have!

My garage glows at night!

Lesson #4 – No matter how much of a noobie you are, when your neighbors see you tape off a car, they think you’re a pro.
My neighbors have watched me do all those crazy things for some time now, and periodically one will stop by and ask a question or two. This time one actually stopped by to watch. Wanting to educate as many as possible, I showed him the swirls, talked about how to properly wash and dry the car, and let him try some clay. He was doing pretty well…then came lesson #5.
Lesson #5 - Just because you can buff a car doesn’t mean you can TEACH someone to buff a car – it’s a completely different skill set
Putting a power tool in a man’s hands does something to his brain. Once he got a hold of my PCXP, I don’t think he heard another word I said. We turned it on about speed 2 to spread out the WG Total Swirl Remover, and he moved at about speed 2. But, when we turned it up to speed 5, he flew. I kept telling him to slow down, but it just wasn’t getting through. And for whatever reason, “Keep the pad flat” was translated as “keep it parallel to the ground.” I was trying as hard as I could, but it just wasn’t sinking in. I had lost all patience and was really scared he was going to do some damage I couldn’t fix…thus, lesson #6.
Lesson #6 – If you do try teach someone how to buff out a car, don’t start out on a friend’s cherished $70,000 black BMW
I don’t think that lesson really needs any more explanation.
On to the results…brought to you complements of the Wolfgang Twins:

Final test spot:

Trunk 50/50:

Back door before:

Back door 50/50:

Back door after:

Back door in sun (cloudy sun):

Hood before:

Hood 50/50:

Hood after:

Scuff mark before:
Scuff mark after:

Unfortunately, it was cloudy when I finished, but here are a few parting shots of the whole car.


And the final lesson…
Lesson #7 – When doing a tough paint correction, make sure to charge enough to pay for a good manicure afterward!!

Thanks for looking.
Lesson #1 – Even people with good intentions don’t know how to take care of their paint.
This car is basically the only thing a friend of mine got out of his recent divorce. It has almost 25,000 miles on it and compared to most cars with similar mileage, it was very clean. He had it on a regular schedule with a detailer, and he was very careful with it. He thought he was doing everything right.
To the average person, it looked pretty good. And overall my friend was satisfied; he honestly didn’t know what I was going to do to it – in retrospect that was probably a good thing! Fortunately it was a sunny day when I got it, so it wasn’t too hard to point out the true condition of the paint. It had all types of water spots, there were scuff marks on the fenders, and it was totally swirled out.
Water Spots:
Fender Scuffs:
Swirly:
I’m not sure what the regular detailer was doing to it, but it obviously had never been clayed.
When I pointed this out, he so innocently said, “I thought all cars looked like that.” He clearly didn’t know the difference between a swirl and a squirrel. I’m amazed how uneducated most people are about car care!
Lesson #2 – The purpose of the test spots is to establish a standard
I started out with Wolfgang TSR and a Lake Country flat 5.5 orange pad – any other time, that’s what I’ve started with. So I did my test spot and drove it back out in the sun. Much to my surprise, there were still some swirls.
I happened to have a couple of LC yellow pads, so I tried those. In this pic, the yellow pad test spot is on the left and the orange is on the right. I ended up going with the yellow.
At that point I thought the test spot had served its purpose. Little did I know…
I’m not sure if it was because this was my first black car or that it was the worst paint I’d ever corrected (my luck!), but this was very different – and MUCH harder - than any other car I’ve buffed out. Once I had the trunk lid done, I moved to the side and everything changed. In addition to the swirls, there were also deeper scratches and those scuff marks. The combination of product quantity, speed, pressure, time, pass size, etc, etc that I’d dialed in on the trunk lid didn’t work on the side. I eventually learned that if I inspected the paint a little closer and compared it to the condition I was familiar with from the trunk, it made it easier to know how to adjust my process. All along I thought I was supposed to do the very same thing on the whole car that I did in the test spot, but now I think of it differently. The test spot was the standard; I knew what process would correct what type paint, and if the paint was either better or worse than that, I knew I needed to vary my process accordingly. Once I figured that out, it became easier and quicker. That led me to my next lesson learned.
Lesson #3 – You can’t truly see the paint without good lights
Another no-brainer, but in my opinion worth mentioning. I’m not endorsing any kind of lights; I probably don’t have the best, I’m just extremely grateful for the ones I have!
My garage glows at night!
Lesson #4 – No matter how much of a noobie you are, when your neighbors see you tape off a car, they think you’re a pro.
My neighbors have watched me do all those crazy things for some time now, and periodically one will stop by and ask a question or two. This time one actually stopped by to watch. Wanting to educate as many as possible, I showed him the swirls, talked about how to properly wash and dry the car, and let him try some clay. He was doing pretty well…then came lesson #5.
Lesson #5 - Just because you can buff a car doesn’t mean you can TEACH someone to buff a car – it’s a completely different skill set
Putting a power tool in a man’s hands does something to his brain. Once he got a hold of my PCXP, I don’t think he heard another word I said. We turned it on about speed 2 to spread out the WG Total Swirl Remover, and he moved at about speed 2. But, when we turned it up to speed 5, he flew. I kept telling him to slow down, but it just wasn’t getting through. And for whatever reason, “Keep the pad flat” was translated as “keep it parallel to the ground.” I was trying as hard as I could, but it just wasn’t sinking in. I had lost all patience and was really scared he was going to do some damage I couldn’t fix…thus, lesson #6.
Lesson #6 – If you do try teach someone how to buff out a car, don’t start out on a friend’s cherished $70,000 black BMW
I don’t think that lesson really needs any more explanation.
On to the results…brought to you complements of the Wolfgang Twins:
Final test spot:
Trunk 50/50:
Back door before:
Back door 50/50:
Back door after:
Back door in sun (cloudy sun):
Hood before:
Hood 50/50:
Hood after:
Scuff mark before:
Scuff mark after:
Unfortunately, it was cloudy when I finished, but here are a few parting shots of the whole car.
And the final lesson…
Lesson #7 – When doing a tough paint correction, make sure to charge enough to pay for a good manicure afterward!!
Thanks for looking.