Mark Your Backing Plate - Makes it easy to see Pad Rotation

Joined
Dec 5, 2022
Messages
51,004
Reaction score
7
Mark Your Backing Plate - Makes it easy to see Pad Rotation


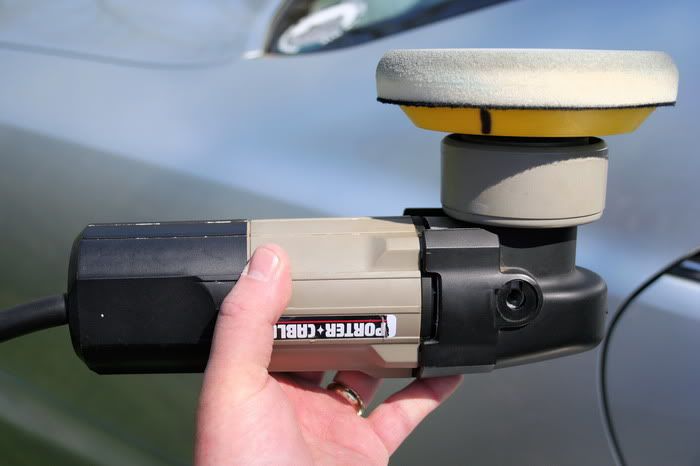
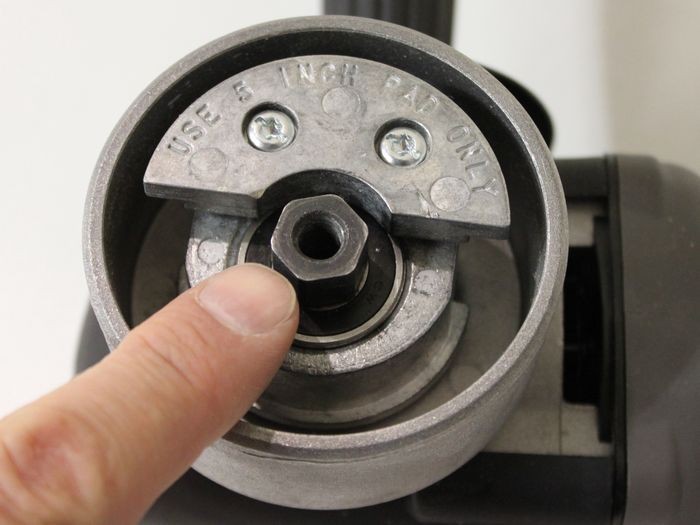
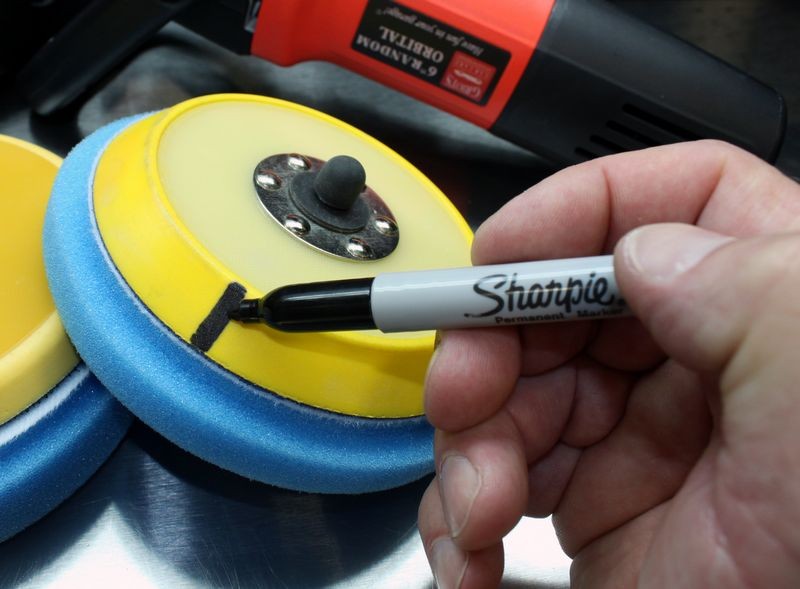
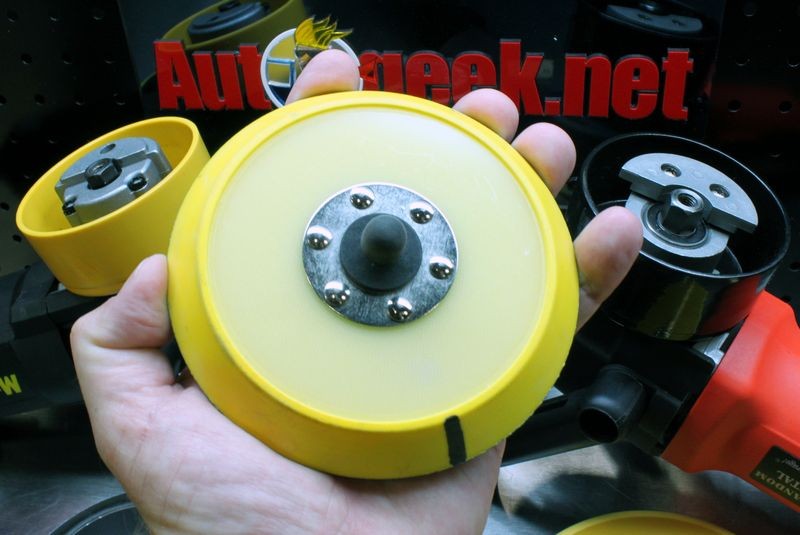
Anytime you're trying to remove tings like swirls, scratches, water spots or oxidation using a DA Polisher you want to see the pad rotating while you're applying firm downward pressure.

To make it easier to see if the pad is in fact rotating, here's tip, place a black mark on the back of your backing plate. This will make it easy to visually see if the pad is rotating.

Like this,

MarkYourBackingPlate01.jpg


MarkYourBackingPlate03.jpg


MarkYourBackingPlate02.jpg


This tip works well for,
Porter Cable 7424XP
Porter Cable 7424
Porter Cable 7336

Griot's Garage 6" Random Orbital Polisher


Meguiar's G110v2
Meguiar's G100
Meguiar's G100a
Meguiar's G220

Shurhold DA Polisher

DAS DA Polishers
The below video also explains why and shows where to mark your backing plate at the 17:00 minute mark into the video.


How to remove shallow RIDS and how to machine
apply both a paint sealant and a finishing wax[/center


This how-to video also covers,

  • RIDS - Random Isolated Deeper Scratches
  • Removing watches and any jewelery
  • Using a DA Polisher without the handle
  • Placing cord over shoulder
  • Priming the pad on a DA Polisher
  • Speed settings for removing isolated defects
  • Downward pressure needed for removing isolated defects
  • How to clean a pad on the fly
  • Where and why to mark your backing plate with a black mark
  • Rotating the body of the tool to keep the pad flat to a panel
  • Why to allow the pad to stop spinning before lifting the pad off the paint
  • How to swap backing plates from a 3.5" to a 5"
  • Machine waxing using 5.5" Hydro-Tech Crimson Finishing pads with Menzerna Power Lock
  • The "Kissing the Finish" Technique
  • How to do the Swipe Test to check if a wax or paint sealant is dry
  • How to remove dried paint sealant using a microfiber bonnet on a dry pad on a DA Polisher
  • How to clean a microfiber bonnet on the fly with your fingernails
  • How to apply a paste wax by machine - Souveran Paste Wax
  • How to carefully wipe a WOWO wax off by hand using Microfiber Gloves and plush Microfiber Towels
  • How and why to fold a microfiber towel 4-ways to wipe wax off
  • How to break-open a coat of wax and then creep out to carefully wipe off a coating of wax
  • How to do the "Final Wipe"


:buffing:​
 
Lots of good information in that video Mike. I hope to see several more videos such as this.
 
Such a simple tip that I picked up previously from you, Mike....excellent reminder post.

Having that line makes a huge difference in knowing if you're applying the right amount of pressure. I've foudn I also now know how fast I want the line moving around based on what product/pad I'm using....
 
So if the pad is just vibrating and not (SPINNING) it means ur putting down too much pressure to the polisher right?
 
That's funny, I did the same thing. In fact, I think you used my marker!

CamryDetailDay-03.jpg
 
I didn't watch the whole 42 min of the video, but from just watching about 5 min of it, I noticed you just used a more aggressive product on certain areas/spots.

So if I just have a couple places that need a more aggressive product/pad, can I just use the more aggressive product/pad on that area/spot and not have to go over the entire vehicle with the more aggressive product/pad?? I didn't know if that would affect the clearcoat.

For example, if I need to use Megs 105 and a orange pad on one spot, I don't have to go over the entire car with Megs 105 and orange pad? And then use a less aggressive product/pad like Megs 205 and a white pad on the rest of the vehicle?
 
So if the pad is just vibrating and not (SPINNING) it means ur putting down too much pressure to the polisher right?

As your question applies to a DA Polisher like the PC, Megs and Griot's, if the pad is just vibrating or jiggling, but not rotating it could be,

  • Too little pressure - There's a quirky thing about these tools that if you hold the pad just right against the paint as though barely touching it the pad won't rotate like it does under pressure but more or less just flutter and even rotate backwards or counter-clockwise.
  • Too much pressure - If you apply too much pressure you can stop the pad from spinning, this is the safety characteristic that Newbies love and experience people forget about after they master the tool and then complain because the pad stops spinning. :D

  • Uneven pressure against pad - If you don't hold the pad flat to the surface, that is you hold the body of the tool in a way that pressure is greater to just an edge or side of the face of the pad you can easily stop the pad from spinning. This is more noticeable with larger pads like 6.5" and 7" pads as the larger the diameter the pad the more leverage the pad has over the spindler/drive mechanism.

  • Raised body line - If you're buffing on a raised body line there will be more pressure to smaller area of the face of the pad and this can be enough to stop or slow down the rotation of the pad.
  • Convex or Concave shaped body panel - Like a raised body line, if you're working on a convex or concave shaped body panel you can have more pressure to the outer edges of the pad or the inner portion of the pad and this can stop the pad from rotating or slow pad rotation down.
  • Too large a pad - When buffing with larger pads the larger diameter of the pad give the pad leverage over the spindle and this can stop pad rotating or slow pad rotation down.
  • Wet or saturated pad - When a pad becomes wet or saturated with product the combination of foam and liquid act to absorb and dissipate the energy coming out of the tool and this can stop or slow down the rotation of a pad.

See this article for more information on how the drive mechanism for these tools works....

The Free Floating Spindle Bearing Assembly - The Story Behind The Story...

The Spindle
FreeRotatingSpingleAssembley004.jpg


Watch the below TV show starting at the 10:30 mark and I will show you not only why the PC style tools are so safe but how too much pressure will stop the pad from rotating. (against my hand :D )

What's in Autogeek's Garage - Episode 3 - Season 2

[ame=http://www.youtube.com/watch?v=M9Tj6rV8RIc&t=10m30s]What's in Autogeek's Garage - Episode 3 - Season 2 - YouTube[/video]


:xyxthumbs:
 
I didn't watch the whole 42 min of the video, but from just watching about 5 min of it, I noticed you just used a more aggressive product on certain areas/spots.

So if I just have a couple places that need a more aggressive product/pad, can I just use the more aggressive product/pad on that area/spot and not have to go over the entire vehicle with the more aggressive product/pad?? I didn't know if that would affect the clearcoat.

Yes, but keep in mind, after going over these areas with the more aggressive product you need to make a few cover passes using your less aggressive pad and product combination to make sure you don't leave any haze or micro-marring behind from the aggressive product and pad.


For example, if I need to use Megs 105 and a orange pad on one spot, I don't have to go over the entire car with Megs 105 and orange pad?

Correct.


And then use a less aggressive product/pad like Megs 205 and a white pad on the rest of the vehicle?
Correct.

If you've already buffed out the car and you're just doing some "Spot Repair", then you only have to do the M105/M205, (or whatever your compound/polish products are), to the spots you're working on.

You can as an option re-polish the entire car and the re-apply wax because nothing looks as good as a freshly waxed car.


:dblthumb2:
 
Back
Top