Socalautodetail
New member
- Jun 3, 2012
- 44
- 0
Today I got to try out my new Meguiars Headlight & Spot Repair Kit paired with my GG 3" DA polisher on some yellowed Lexus RX300 headlights.

Meguiars Professional Headlight & Spot Repair Kit, headlight lens restorer, auto headlight repair, plastic headlight restorer, paint spot repair
I have completed countless headlight restorations in the past by hand and I can say with no reservations that the unigrit discs are worth every penny. They sand evenly, quickly and with very little effort.
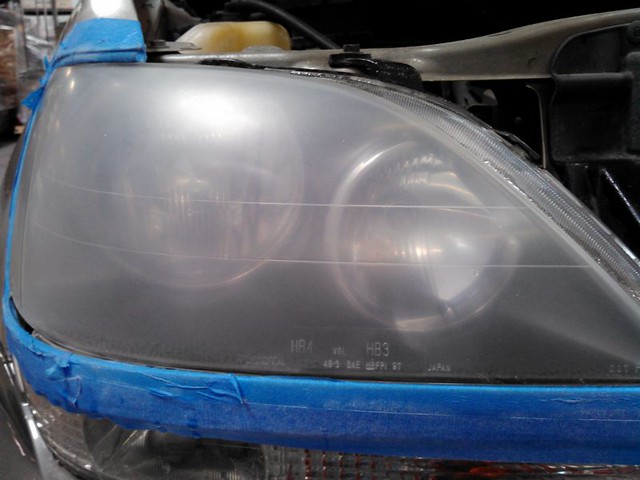
Before you begin sanding, make sure you tape off the paint and surrounding trim to protect it from the sandpaper and buffer. Here are the headlights before restoration and after being taped. The kit comes with brown tape, but I had some blue painters tape lying around, so I used that rather than opening the new package.


Step 1: Meguair's suggests drysanding with 500 grit. The kit comes with a unigrit pad that you attach to your DA backing plate. The sanding discs attach to this pad which provides some cushion and allows you to get around edges a lot easier.

Here is the passenger headlight after 500 grit.

Step 2: Drysand with 800 grit.

Step 3: Wetsand with 1000 grit.

You can see the lenses are starting to clear up with each step. Here is the passenger lense after 1000 grit.
Step 4: Wetsand with 3000 grit.

Step 5: Compound using the included wool pad and M105, both included in the kit. Remember to remove the unigrit pad (pictured top left corner) before attaching any compounding or polishing pads.

Here is the passenger headlight after M105

Step 6: Polish with the included M105 and yellow foam polishing pad.

As you can see the lense is now free from defect and can be considered "restored." However, here is where I believe Meguair's missed the mark. If you stop at this point, the headlight will probably yellow again in a matter of months, especially in the southern California sun. The lenses need to now be sealed.

I have adopted the Spar Urethane method as described in countless posts on AG and have had great success with it. I wanted to test out Meguair's method as well as see how the headlights looked after stopping at 3000 grit and skipping the compounding and polishing because the Spar will fill in the scratches (I believe up to 1500 grit), so anything beyond that makes it harder to apply without streaks and is unnecessary. So I stopped after 3000 grit on the driver's side in order to do a side-by-side comparison.

I always remove the tape before applying the sealant so that I don't accidentally drag the tape on the headlight while the sealant is wet and have to start over. As others have said, if you make a mistake, you have about 10 minutes to easily remove the sealant with mineral spirits and start over without having to sand again.
Here is an image of the passenger side headlight that included 500, 800, 1000, 3000, M105, M205 & Spar Urethane

And here is the driver's side headlight that included 500, 800, 1000, 3000 & Spar Urethane

As you can see, both sides look great and we couldn't really tell a difference between the 2 during our inspection. I expected this to be the case before I started, but wanted to give the Meguair's instructions a chance and give a full review.
Final thoughts: If you are doing spot repair and restoring headlights regularly, the unigrit discs are great and are much cheaper to purchase as a kit rather than individually. It will save you lots of time and effort vs sanding manually. The added bonus is the Meguair's bag appears to be top-notch and has ample storage space for me to add the GG 3" buffer, the Scott towels, mixing cups, spoons, additional 3" pads and lots of small bottles of solution. The bag looks great and will impress when you pull it out during mobile jobs. I'm extremely happy with my purchase and would recommend without reservations...just remember to seal those headlights after you are finished sanding and polishing.
Meguiars Professional Headlight & Spot Repair Kit, headlight lens restorer, auto headlight repair, plastic headlight restorer, paint spot repair
I have completed countless headlight restorations in the past by hand and I can say with no reservations that the unigrit discs are worth every penny. They sand evenly, quickly and with very little effort.
Before you begin sanding, make sure you tape off the paint and surrounding trim to protect it from the sandpaper and buffer. Here are the headlights before restoration and after being taped. The kit comes with brown tape, but I had some blue painters tape lying around, so I used that rather than opening the new package.
Step 1: Meguair's suggests drysanding with 500 grit. The kit comes with a unigrit pad that you attach to your DA backing plate. The sanding discs attach to this pad which provides some cushion and allows you to get around edges a lot easier.
Here is the passenger headlight after 500 grit.
Step 2: Drysand with 800 grit.
Step 3: Wetsand with 1000 grit.
You can see the lenses are starting to clear up with each step. Here is the passenger lense after 1000 grit.
Step 4: Wetsand with 3000 grit.
Step 5: Compound using the included wool pad and M105, both included in the kit. Remember to remove the unigrit pad (pictured top left corner) before attaching any compounding or polishing pads.
Here is the passenger headlight after M105
Step 6: Polish with the included M105 and yellow foam polishing pad.
As you can see the lense is now free from defect and can be considered "restored." However, here is where I believe Meguair's missed the mark. If you stop at this point, the headlight will probably yellow again in a matter of months, especially in the southern California sun. The lenses need to now be sealed.
I have adopted the Spar Urethane method as described in countless posts on AG and have had great success with it. I wanted to test out Meguair's method as well as see how the headlights looked after stopping at 3000 grit and skipping the compounding and polishing because the Spar will fill in the scratches (I believe up to 1500 grit), so anything beyond that makes it harder to apply without streaks and is unnecessary. So I stopped after 3000 grit on the driver's side in order to do a side-by-side comparison.
I always remove the tape before applying the sealant so that I don't accidentally drag the tape on the headlight while the sealant is wet and have to start over. As others have said, if you make a mistake, you have about 10 minutes to easily remove the sealant with mineral spirits and start over without having to sand again.
Here is an image of the passenger side headlight that included 500, 800, 1000, 3000, M105, M205 & Spar Urethane
And here is the driver's side headlight that included 500, 800, 1000, 3000 & Spar Urethane
As you can see, both sides look great and we couldn't really tell a difference between the 2 during our inspection. I expected this to be the case before I started, but wanted to give the Meguair's instructions a chance and give a full review.
Final thoughts: If you are doing spot repair and restoring headlights regularly, the unigrit discs are great and are much cheaper to purchase as a kit rather than individually. It will save you lots of time and effort vs sanding manually. The added bonus is the Meguair's bag appears to be top-notch and has ample storage space for me to add the GG 3" buffer, the Scott towels, mixing cups, spoons, additional 3" pads and lots of small bottles of solution. The bag looks great and will impress when you pull it out during mobile jobs. I'm extremely happy with my purchase and would recommend without reservations...just remember to seal those headlights after you are finished sanding and polishing.