Need advice - Oxidized Paint Correction on 1968 Dodge Charger

And here's this...


All Mike Phillips #7 Show Car Glaze Articles in one place


Here's my articles on #7 I recommend reading them all...


This is the original, and incredibley in-depth article on the topic of restoring antique piant with #7 - LOTS of great info and pictures.

The Secret to Removing Oxidation and Restoring a Show Car Finish to Antique Single Stage Paints
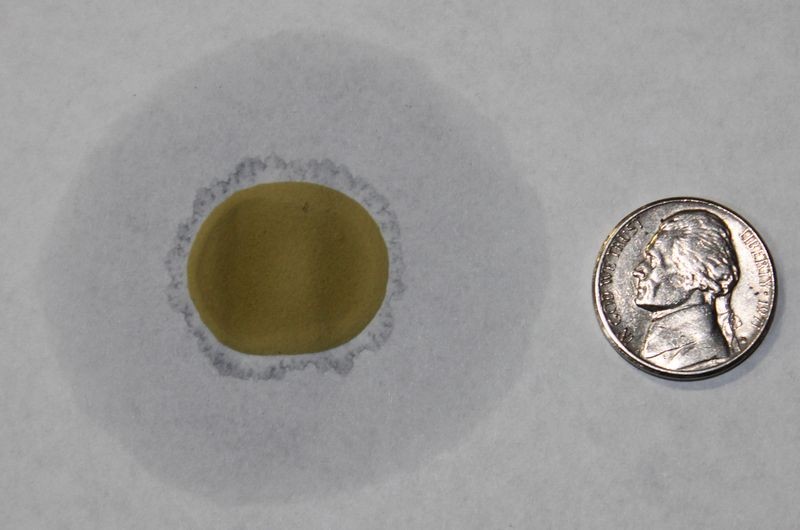
7CapillaryAction02.jpg


Wayne Carini 1954 Hudson Hornet Original Paint Restored by Mike Phillips

Here's a walk-around video I mad showing the before condition of the Hudson and explaining the technique for using #7 to restore the original paint.


Here's the TV commercial we did with the Hudson and using #7 plus Pinnacle products, which are the products I actually did use to restore the paint over the entire car.


The #7 Rub Down Technique by Mike Phillips

watermark.php


Meguiar's #7 Show Car Glaze - Goodbye to an old friend - hello to a new friend!

800_M07Collection.jpg


4 Steps to restore single paint paint - 1972 Mercedes-Benz 280 SE

1972_Mercedes_280SE_003.jpg


On Autogeek.com


Meguiar's #7 Show Car Glaze


:)


:)
 
Okay awesome, thanks Mike and Tom! Yup, makes perfect sense.

Yeah, that video on the Meguair's #7 rubdown is great.

I'm very impressed by the #7. I need to get the car out in the sunlight, but it seems to have removed the white micro marring you can see in this before video? Is that possible? Seems almost too good to be true, haha. This is the side that I had done some DA polishing on and mentioned in the first post of this thread.

1968 Dodge Charger - Sunlight After Paint Correction (Still Oxidized and Hazy) - 3-21-21 - YouTube

Is this a good choice for pad to apply the Blackfire One Step with the DA or should I go with something firmer for more correction? And, just to confirm, do nothing with 3D One, even with a DA?

Griots Garage 6.5 inch Black Foam Finishing Pad (2-Pack)

Sorry for all the questions. I'm reading the book and the articles, but just like to confirm everything since each situation with old single stage paint can be different or call for slightly different approaches.


Thank you so much! You've got a Mike Phillips fan and AutoGeek customer for life!

Ted
 
Okay awesome, thanks Mike and Tom! Yup, makes perfect sense.

Yeah, that video on the Meguair's #7 rubdown is great.

I'm very impressed by the #7. I need to get the car out in the sunlight, but it seems to have removed the white micro marring you can see in this before video? Is that possible?

The oils in the #7 would make anything whitish disappear. Rubbing it over old paint can remove white oxidation and reveal fresh paint that still has good pigmentation. But as far as physically removing defects by abrading or leveling the paint - the answer is "no".

#7 is non-abrasive. You might get some cut from the pad, tool and pressure over time, but not the product itself.


Is this a good choice for pad to apply the Blackfire One Step with the DA or should I go with something firmer for more correction? And, just to confirm, do nothing with 3D One, even with a DA?

Griots Garage 6.5 inch Black Foam Finishing Pad (2-Pack)

No. Get the orange version of these Griot's pads. That will give the product more bite and thus better correction ability.


Sorry for all the questions. I'm reading the book and the articles, but just like to confirm everything since each situation with old single stage paint can be different or call for slightly different approaches.


Thank you so much! You've got a Mike Phillips fan and AutoGeek customer for life!

Ted


Just happy to help another person through to success with their project.


:cheers:
 
Sounds good re: orange pads. Will keep everyone updated on the Blackfire One Step test spot, etc.

thanks again!
Ted


The oils in the #7 would make anything whitish disappear. Rubbing it over old paint can remove white oxidation and reveal fresh paint that still has good pigmentation. But as far as physically removing defects by abrading or leveling the paint - the answer is "no".

#7 is non-abrasive. You might get some cut from the pad, tool and pressure over time, but not the product itself.


No. Get the orange version of these Griot's pads. That will give the product more bite and thus better correction ability.


Just happy to help another person through to success with their project.


:cheers:
 
It gonna be awesome!

Can't wait for results!

Tom
 
Hey guys!
Just did a test panel with the DA, orange griot pad, and Blackfire One Step. Six section passes.

It's doesn't look THAT much different than the paint did after Meguiar's 7 rubdown. I'm probably going too fast with the polisher, adding too much One Step, or doing something else wrong. Or, it's just that my 53 year old paint isn't reacting to it.

It tends to look a little murkier actually, like it's going into the paint but not making it shiny.

Here are a few vids. I think the second test panel, on the trunk lid, looks a little better.

If this is as good as it gets, is there a world where I just seal it with Blackfire One Step and/or a carnauba wax by hand? I'm pretty bad with the DA and it's kinda loud in my apartment parking garage. Or, if it's better to change my approach with the DA, either using better technique or a different product or pad, please let me know. Thanks!

I'll post some photos, too.

1968 Dodge Charger - DA Polishing w/ One Step and Orange Pad - Part 1 - YouTube

1968 Dodge Charger - DA Polishing w/ One Step and Orange Pad - Part 2 - YouTube
 
I watched your vids... Your DA process is greatly improved since your earlier videos where I made the "haphazard" comment.

As for the BF One Step not making much improvement, my experience with old paint is that once it gets to a certain point it will never polish back out. And on top of that, any polish or wax or AIO you use on it will actually make it look worse with the whitish, milky, hazy look you describe.

What I've done in the past with paint in your condition is to finish it with a "oily" protectant (think Armor-All or similar type products). It's been a while and I don't remember exactly what protectant I used, but I tried a bunch, and it will make old paint like yours look as good as it can get. It will hide any chalkiness/haziness and brighten the color better than anything else I ever tried.

It works on the same principle as the #7... That is getting oils into the paint.

You can only do so much with old deteriorated paint and the "protectant" route is the best method I've ever found. It's easy too. Just wipe it on quite liberally, let it soak in, and then buff off the excess. Repeat as often as you find necessary as it will not last a very long time... Every 2-3 weeks or so.
 
Thanks, much appreciated!

Yeah, that makes sense. I was thinking of trying Meguiar’s 21 Synthetic Sealant of their Yellow Wax
by hand or trying once more with Blackfire One Step and DA. I wonder if something like Rupes P800
protective sealant or even a ceramic coating would be worth it.

At the end of the day, I’m very happy with what the Meguiar’s 7 rubdown achieved and am basically good to keep
It like that but I remember Mike saying it needs to be sealed at this point.

Here are some pics.

Thanks all!
 
I have question....

How many rub downs did you do?

In some cases, I have done 7 rubdowns in 7 days! Just to make sure paint was full of the oils from Megs #7.

Tom
 
I did two full rubdowns, three on the driver side, which wasn’t super wet during wipe off until the third.
Perhaps I’ll do a few more? Seems to look really good upon wipe off.
 
Humm....

Couple things in mind---2Black1 mention that paint may be too far gone. This might be the case...

Another thing---Just do megs #7, several times, rub on-24 hours and rub off. Repeat. Do as much as 4 times or more...

And then machine polish on megs yellow wax. Wipe off and Done.

No cutting of any kind.

This might work or not....

Key is getting oils saturated in paint.

Tom
 
If it were me....

I'll prolly do up to 5 megs #7, maybe even more.

Then cut/polish/sealed with megs yellow wax....

Done....

Tom
 
My opinion...

I understand that this is a great learning experience and so the effort you are putting in is beneficial regardless of the results you achieve. You are learning and that makes your efforts worthwhile.

But... You have to know when you've done all that can be done. I think you have reached that point.

I'd do the "protectant" method that I described earlier and call it done!

And just to satisfy your own curiosity, do a few test spots. One saturated and wiped/buffed with a protectant. And as many others as you'd like to do with polish, wax, sealant, glaze or whatever you want. See what the difference is. I can almost guarantee that the "protectant" test spot will look as good or better than the others... And you can get there with a fraction of the time and material costs of the other methods.

I am certainly not discounting some of the other recommendations you have gotten, but I do think that in the end that my simple "protectant" recommendation will work as well as any other method in your case.
 
Dunno..but I think you can milk a little more just with #7 alone.

Then do the "protectant" on top of megs #7, which would be the megs yellow wax....

That's what I would do....

Tom
 
1) I love that car - Dodge Chargers of that vintage are just plain cool
2) I love the fact that you are doing this all in the parking garage of your apartment complex - that shows some dedication

Keep up the good work! You might not ever achieve perfection or even close to it on 50+ year old paint. But, you'll most likely make it look better and that is what really counts.
 
Thanks for all the responses everyone. Much appreciated.

Yeah I absolutely hear what you’re saying, 2black1s. I’ve know this car has needed body and paint since I bought it in 2001 so have been very happy to breathe some new life into it with the Meguiar’s 7. By protectant/armor all, did you mean something that is normally used for interior/vinyl or more of an exterior spray sealant?

That said, I’d be down to try TMQ’s idea about Meguiar’s Yellow wax with a DA. TMQ, do you think I could apply by hand as well or is the DA a lot better?

Waddell64 - yeah it gets tricky in the apartment complex garage but the guy who parks next to me was into detailing and has been really cool haha. Part of me wants to pass this off to a good detailer in my area for maintenance in the future, just because it’s not a practical or well lit space to do much.

Here’s a video of the car outside in some better light.
1968 Dodge Charger - Sunlight After Meguiar?s #7 Rubdown - 4-14-21 - YouTube

Thanks all!
I’ll post another cool pic I just took tonight
 
... Yeah I absolutely hear what you’re saying, 2black1s. I’ve know this car has needed body and paint since I bought it in 2001 so have been very happy to breathe some new life into it with the Meguiar’s 7. By protectant/armor all, did you mean something that is normally used for interior/vinyl or more of an exterior spray sealant?...

That's exactly what I'm talking about. A protectant for vinyl, rubber, plastic trim, etc. The oilier, the better. One of the products I remember trying was a thick, clear, silicone gel that was marketed as a tire dressing.

The oils in the protectant are what gives some life to the otherwise compromised paint. I've never seen a wax product do much for paint in this condition and more often than not, they will actually make it look worse, especially any wax that dries to a white haze.

It's been about 20 years since I've actually done this process. I used to do it on a original paint 69 GTO I had and others. There are many products today that weren't around back then. Some of today's spray sealant/coatings might work well once you saturate the paint with oils from the #7 and/or the protectant.

EDIT: I just looked at your "sunlight" video after writing the above. From the looks in that video the paint looks like the BF did make some improvement and maybe the paint can be polished somewhat. Truthfully, I think you are in a predicament where only some experimenting will reveal the best course forward. But remember... You're never going to get anywhere close to perfection so keep your expectations real and do your best to determine when enough is enough.

EDIT #2: I just noticed that you are in Encino. I'm in Simi Valley. If you ever want to drive it over here and get a real world assessment and try some different processes and products, I'd be glad to help out. PM me if you're interested.
 
Back
Top