Neglected my paint for too long...

noamd1109

New member
Joined
Apr 23, 2014
Messages
14
Reaction score
0
Have been reading the forums for a while but the last three years having twin boys running around I let far too much car care slide.

Wanted to post some pictures and get some thoughts on the best way to attack the problem.

This is on a 2007 Jetta Wolfsburg.

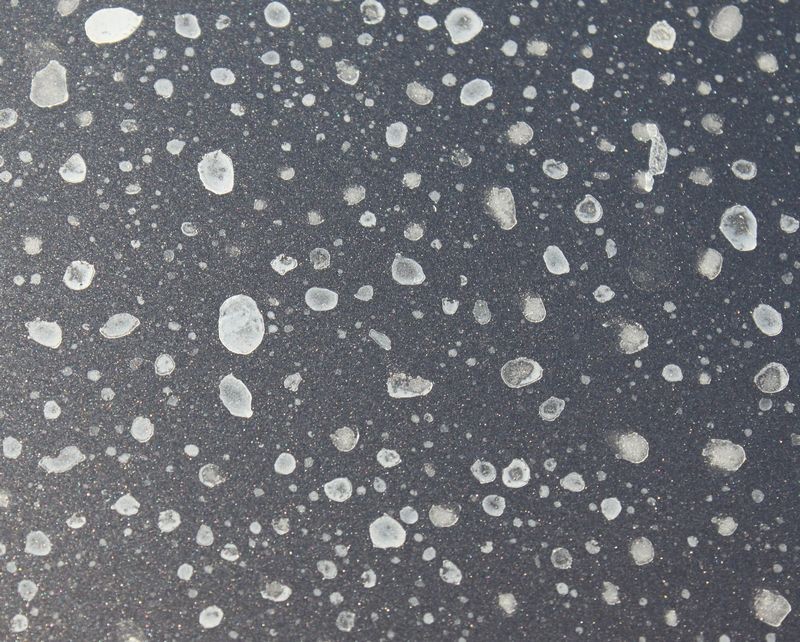
Looks to me like some really hard water spots with some fading/milky color.

First three are of the hood which the most annoyingly speckled, and the last pic is of the roof which is just all worn a milky white overlay color.

Was thinking of starting with multiple deep washes, then trying some of the vinegar on the spots, and claying the entire car after that, but I am unsure where to go from that point.

Most of Mike's restoration videos use the #7 restorer but I am not sure if that is the best route to go when there is still mostly shiny clearcoat on the rest of the car as well. Is this still the proper path to take?

Thanks in advance for any thoughts or advice on what you see in the pictures.
 
I would use a nice heavy amount of a soap like citrus wash red, then car pro spotless, then ironX, then clay or alternative, then test spot on the ugly areas.
 
There is no areas that look like spiderwebs out side of the milky area right?
 
Meguiar's water spot remover polish may work on those water spots after some claying. You can pick it up locally.
 
There is no areas that look like spiderwebs out side of the milky area right?

Actually there is no obvious problems with the surface other than how it looks.

I don't see any cracking or peeling or actual damage to the finish, so I figure with the right treatment it can be recovered/saved.

Thanks for the input so far, I will be starting the process this weekend, and will take a good set of before pictures so I can post them with hopefully a nice set for the after as well.
 
Meguiar's water spot remover polish may work on those water spots after some claying. You can pick it up locally.

Any thoughts on if I should clay before trying the vinegar wipe that Mike recommends in another section for water spots?

I assumed that would come before claying, because anything that would loosen up and come off before would be a benefit.

Always open to input on this.
 
I would use a nice heavy amount of a soap like citrus wash red, then car pro spotless, then ironX, then clay or alternative, then test spot on the ugly areas.

+1 CarPro decontamination products are outstanding!
 
Any thoughts on if I should clay before trying the vinegar wipe that Mike recommends in another section for water spots?

I assumed that would come before claying, because anything that would loosen up and come off before would be a benefit.

Always open to input on this.
I put vinegar in the same type as decontamination like Iron X which is before claying.
(You should still Iron X) Better to dissolve the mineral deposits with vinegar to remove them most gently than to go for clay to shear them off and increase marring.
 
If you follow what I said except vinegar for spotless I guess that would work never read up on vinegar for water spots. So it would be wash with some type of heavy mix soap/apc, vinegar, iron decon, clay, and polish. I think you will end up amazed at what you come out with.
 
I just did an old Iroc with that problem. It just needed to be cut and polished.
 
Any thoughts on if I should clay before trying the vinegar wipe that Mike recommends in another section for water spots?


Actually, I have an article that dispells the myth about using Vinegar to remove water spots and explains in details what every other person that's ever recommended using Vinegar on a discussion forum leaves out.


Using Vinegar to remove water spots


Water Spots
SprinklerSpotsM006.jpg
s​


Vinegar
A common recommendation for removing water spots is to wipe the paint with vinegar, they kind you find in a kitchen pantry. If the water spots are in fact mineral deposits sitting on the top of the paint then this may work but you won't know until you try.

How Vinegar Works - (If and when it works)
Common cooking vinegar or food grade vinegar is a weak form of acetic acid, which is has low pH. Mineral deposits are just that, minerals that are either dissolved in water or embodied in water and when the water evaporates it leaves the physical mineral behind on the surface.

There are different types of minerals in water but one of the most common is Calcium Hydroxide. Calcium Hydroxide has a high pH, if the mineral deposits on your car's paint are Calcium Hydroxide, then the low pH Acetic Acid in the Vinegar will act to neutralize the high pH of the Calcium Hydroxide and either dissolve the minerals or break their bond to the paint and at that point you would be able to wipe them off the surface.

If the hard water spots are some other type of mineral deposits, then there's a good chance the acetic acid in the vinegar will have no effect and in a worse case scenario cause more harm than good. This is why in the forum world you'll often read accounts from some people where they share how great vinegar worked for them in their situation but then you'll read accounts by other people where the vinegar had no effect.

The problem with using Vinegar is that the acetic acid will act to remove any wax or paint sealant previously applied to the paint, wiping a waxed finish with vinegar certainly won't add more protection and what's the opposite of adding?

The other problem with using vinegar is that in and of itself it doesn't provide any extra lubricating ability outside of being a liquid. So using it with some type of cloth, for example a microfiber towel will not be as gentle as using a product formulated by a chemist specifically to be wiped over polished finish. And if fact if there are physical minerals on the surface then wiping them off without some type of added lubricity could in fact lead to scratching of the finish.

The two products show above, Duragloss 505 and Meguiar's M47 are manufactured by reputable companies and I'm confident the chemists have taken into account everything involved with creating a product for Joe Consumer to potentially wipe a clear coated finish to remove mineral deposits.

Remember clear coat paints are scratch-sensitive, that is they scratch easily. I think it's safe to assume that any product created by a reputable company for wiping off mineral deposits will include both lubricating agents plus glossing agents along with their proprietary ingredients for forcing the minerals to release their bond to the surface.

Key Benefits
The lubricating agents help prevent potential scratching from the minerals on the surface and the glossing agents restore a just detailed look to the finish.

These two included features to the products are important to car owners even thought most car owners probably don't even know they want and need these benefits from the product.

Vinegar offers neither of these benefits.


My recommendation
If you find you have what I call Type I Water Spots, that is what the world generically refers to as Hard Water Spots or Mineral Deposits, then obtain one of the two products listed in this article, especially if the spotting is an ongoing problem and give them a try. Other safe options would be to try a spray detailer, (at least it offers lubricating and glossing features), or try washing the car using a high lubricity car wash.

If you do opt to try vinegar, test first to a small area. Dampen a clean, soft microfiber towel with vinegar, place it on the affected area and allow it to remain for a few seconds so it can soften and hopefully dissolve the mineral deposits, then gently wipe the surface. This would be a safer approach then wiping dry paint with dry mineral deposits bonded to the surface.


Important
If you use vinegar to remove water spots, plan on re-applying some type of wax or paint sealant afterwards to restore any protection removed from the acetic acid.
 
Most of Mike's restoration videos use the #7 restorer but I am not sure if that is the best route to go when there is still mostly shiny clearcoat


My article on using #7 is about restoring original and antique SINGLE STAGE PAINT, not restoring the clear coat on a modern cars.


The Secret to Removing Oxidation and Restoring a Show Car Finish to Antique Single Stage Paints

Interestingly, the above article now has 189,774 views. In light of the fact that most people own a car with a clear coat. :laughing:


For the water spots on your car's clear coat, here's the deal...

Water spots or any defect are either topical, that is mostly ON THE SURFACE or sub-surface, that means the defect be it a water spot stain or a scratch have penetrated INTO the clear layer of paint.

For the pictures showing the damage to your car's clear the remedy is going to be to compound the paint.

If you don't own a polisher of some sort, nows the time to get one and then get some buffing pads and a quality compound like the Wolfgang Uber Compound and get to abrading the top clear coat to remove the damaged paint.

Then after you fix the problem, take the necessary precautions to make sure it doesn't happen again as you cannot compound a factory thin clear coat forever without removing all the clear.


:)
 
Dang it, Mike answered before I could :)

By the way.... :welcome:

As Mike said #7 is for single stage. I am pretty sure your Jetta is a base coat/clear coat. In my opinion you will have to at the bare minimum use a paint cleaner (AIO) to remove some of the staining, but it looks to me that it is more than likely that you will have to compound/polish the car. My recommendation if you don't have products on hand is to get the Griot Garage 6", the 5" backing plate, some 5.5" Lake country flat pad and some Menzerna PF2500 and you are in serious business to get this Jetta looking proper. Don't forget to use a quality paint sealant afterward

Prevention will be your friend from there on. Stay away from sprinklers, clean and dry your car in the shade, and PROTECT using a good paint sealant. Don't forget to get a good car shampoo (so not to degrade your sealant). Since you are in the heat, you may want to consider rinseless with dionized/demineralized water. They sell it everywhere in gallon forms. That way if water dries on your paint you won't have that ugly water spotting issue.

This is what PF2500 will do on VERY bad water spotting (on the deck lid of a BMW I worked on)
16917_484608891601490_542880644_n.jpg
 
Wanted to stop in and give an update on this, and thank everyone for their input.

Process has been slower than I had thought to gather up the needed products and find some time to get this done without hurrying it.

I purchased the Meguiar's Hard Water Spot remover that Mike and EVOlved recommended, some detailing clay (Griot's Garage detailing clay), a bottle of Iron X, an AIO cleaner (Klasse), and a good enough liquid wax for now to keep any progress protected enough til I can get the polisher and get a nice finish on the whole car before I consider it done.

Started with a nice wash with Meguiar's Car Wash soap that I had, and then went with the Water Spot remover. It did work a little bit, but not as much as I had imagined, so they must have been some really tough spots. Did the application twice to be sure.

Next I applied the Iron X and let that soak in for 30 minutes, and you could see 20-30 spots being dissolved even on a dark metallic paint.

Clayed the whole hood and that really was quite the difference in the smoothness of the paint from before to after.

The Klasse AIO was the final step which I did three good hard applications to really remove most of the discoloration.

I still have some more spots to hit again with the AIO that I missed getting out fully, but they were harder to see until I washed and waxed it again.

Will be ordering a polisher from you guys in the next two weeks or so once I get the rest of the roof trunk lid the same treatments, and that should get rid of all the fine scratches and hopefully get everything back to that nice new (or better than new!) shine.

Is there any recommendation on the different product that are packaged up with the polishers? This isn't going to be going to a car show or anything, so I was thinking maybe just the Meguiar's would be just fine for a daily driver, but if there is a good reason to use the higher end stuff because it will protect longer or something like that I am very open to spending the extra money to go that route.

Meguiars Porter Cable Ultra Polish Kit with 5.5 Inch Pads, Meguiar's Mirror Glaze Polishing Kit, Meguiars polishes, Porter Cable 7424 Mirror Glaze

Lastly looking for any input on a final protectant/sealant once everything is all nice looking for long term protection.

Thanks for all the help and advice, it has helped a ton.

Attaching a couple of pics of the hood for comparison to the originals.
 
Nice. You made a lot of difference in the appearance already.

The Klasse AIO is a chemical cleaner, i.e. no abrasives, so the only abrading you're doing on the contamination/discoloration is from the texture of the pad or applicator. I think that, in order to get results you're completely happy with, you'll need to do at least a small amount of abrasive work on the clear. I, also, am very conservative about doing any abrasive work on my clear, as I tend to keep cars for a LONG time. My philosophy is to get the paint/clear looking right, and then keep it that way by washing/drying very carefully. As Dr. Pain pointed out, Menzerna polishes finish out very nicely. If, like me, you are reluctant to use anything more abrasive than is absolutely necessary, you can start with a less abrasive version, say 3000 or even 4500. 4500 may be too mild for your first big cleanup session ... but I tried it first on my car and was happy with the results (the "test spot" you're no doubt familiar with from reading here).

Regarding a protective layer after you have the finish looking like you want ... If you don't want to venture into the relatively new coatings, I have had great results from Four Star Ultimate Paint Protection, a sealant. I got almost a year out of my last application by being very careful when I washed and dried the car, and by renewing the protection with occasional applications of CarPro Reload.
 
Nice. You made a lot of difference in the appearance already.

The Klasse AIO is a chemical cleaner, i.e. no abrasives, so the only abrading you're doing on the contamination/discoloration is from the texture of the pad or applicator. I think that, in order to get results you're completely happy with, you'll need to do at least a small amount of abrasive work on the clear.

Thanks for your thoughts, I will certainly look into that sealant for the final product.

Maybe 'hard' wasn't the best word for the Klasse... I worked it in good and deep? It certainly made a difference I could see between passes though.

And you are right the clear certainly needs some polishing love to get it looking right, but you can consider me sold on the process.

I had never heard of detailing clay before a few weeks ago, and now I feel like I know so much about paint care and restoration just by being addicted to Mike's videos and information from the site.

No expert, but it is amazing the amount of info and help he has provided/accumulated here on the subject.

I see equally or worse neglected cars in parking lots and I can't help but think 'Mike has a video on how to fix that one...'

I will post some more updates as this continues to progress and I get the polishing done.
 
Nice work already looks 300 times better you are on the path. You should be proud of what you have already completed. Nice work!! Start with a light polish so you don't kill the clear even more maybe meguiars ultimate polish or menz sf4000. You'll be floored at what you'll get with the right process just remember it's more about the process than the product..
 
Well it has taken far longer than I imagined to get a good polisher and all the stuff together to get started on this, but I wanted to post an update for those that have helped me so far.

I received by PC 7424 DA polisher, and I ordered up all the foam pads (Chemical Brothers) and liquids (Meguires).

I did my 'test spot' the other night when it all came on half the rear trunk lid, and it came out far better than I imagined when I started this process.

Since everything went well with the trunk lid I went and attacked the front hood last night.

I still have the entire roof still to go, but I think I am going to order a smaller backing pad and foam pads for working around the sunroof, etc before I start on that area.

Attaching some pictures, and will post some followup thoughts and questions in the next post.
 
My thoughts on the process and what I have learned here so far...

Overall I think the stock paint on a lot of modern cars is unbelievably resiliant. I should have ordered a more aggressive compound and compounding pad, and I think in a few months I will indeed probably go back over the hood again.

I remember reading in one of the 'how to' articles that Mike did him mentioning how hard the clear coats are on today's cars, and man is he right on. I did 4-5 runs going over the entire hood, and I still didn't get 'everything' gone equally as well as it should be.

This is going to require a medium to hard pad, and some agressive compound, as well as at least two stages (if not more) of polishing after all the defects are removed to get it back to a 'really good' level.

I am very happy with what has been saved already, and really to the average eye (two buddies I showed it to) still can't see the remaining imperfections... but they will continue to bug me until I fix them.

I figure it is far more important to get working on the roof though than re-visiting the hood more on a daily driver kind of car.

I used Meguire's Ultimate Compound for the compounding phase, and I haven't found any kind of a 'grit' level, but going to need something tougher for the roof so I don't need to make so many passes at the same area.

I think this is where the Menzerna products come with a nice 'number' attached to them so you can approximate the agressiveness and when polishing work your way back to shiny just like sandpaper using a finer grit each time.

I also had a hard time on areas in the hood where there is a negative crease, and some of the darkness form the old crud that was on there still shows a little...

Other than trying to run the corner of the compound pad down in there is there any tips on how to address that area better?

I also was very glad that I taped off the edges of the fenders, as well as the lights and VW logo on the front to avoid any quick buffing marks where you wouldn't want them. I didn't have to worry about those areas as I was repeatedly going over the hood areas with the compound.

Lastly, any advice or pads that I should use on the roof area? The rain gutters and area around the sun roof are going to be a bit tougher to deal with especially when working standing in a doorway of the car with the arms extended much more than the areas I have already done....

I am thinking a smaller backing pad and foam pads (3"?)

Thanks to all who have provided help and advice... and I will post some finished pics when I get this all done.
 
I also forgot to ask about the process with the Dual Action polisher during the work phase...

I watched Mike's video on using the PC 7424, and it was a great help, and I made the black lines on the backing pad with a black marker at 12,3,6,9 like he suggested...

The part that I was unsure of is how we should be seeing those lines moving during the process...

If I hardly applied any pressure to the polisher it was spinning pretty fast... and smoothly, which I assume is fine.

If I applied more pressure, it would 'slow down' and you could see it still rotating, but I was wondering if that was 'too slow' or anything.

Clearly when it stops spinning you have it at too much of an angle or there is too much pressure being applied, and you are probably losing the 'dual action' part of the whole thing at that point so you should back off...

Anyhow, I just tried to keep it spinning pretty freely and working slowly as Mike suggested in his video for the passes, but I figured I would ask about it for future use.
 
Back
Top