Navigation
Install the app
How to install the app on iOS
Follow along with the video below to see how to install our site as a web app on your home screen.
Note: This feature may not be available in some browsers.
More options
Style variation
You are using an out of date browser. It may not display this or other websites correctly.
You should upgrade or use an alternative browser.
You should upgrade or use an alternative browser.
Newbie with single stage paint
- Thread starter daryl_keys
- Start date
cardaddy
New member
- Nov 20, 2012
- 3,937
- 0
Just to touch on... Megs #7 is NOT going to take any scratches or blemishes out of the paint. But it WILL rejuvenate the paint, (possibly to where you can then safely polish it).
I wouldn't be afraid of polishing it, you'll LOVE the results.")
As far as a "kit"... nothing wrong with buying the pads and buffer as a kit. Just make SURE that you get more than the normal "6" different color pads. DO make sure that you get the buffer with the 5" backing plate, for 5½" pads.
Best thing would be possibly 3 orange, 3 white. Although 4 orange, 4 white, 2 blue, 2 black would likely give you better results down the road.
As for compounds and polishes.... The sky is the limit there.
Starting with a middle of the road cut compound, or a heavy polish would probably work.
Meguiar's 205 was mentioned because you can buy it in most auto parts stores.
Also, Meguiar's Ultimate Compound (had a bit more cut) and Ultimate Polish (has a bit less than 205) are excellent. You could even follow those with Meguiars M21 2.0 paint sealant and keep everything from the same family.
Outside of that... Menzerna makes a LOT of excellent products. For overall middle of the road cut and finish either SI 1500 or IP 2000. Also... one new one that folks have been trying, EVEN ME lately") is HD Adapt. I gotta' say, HD Adapt absolutely DOES NOT dust. That is a GOOD thing indeed. (Although... it's a bit of a different learning curve because it'll get gummy if you use too much.) I said that, because Meguiar's UC, UP, and 205 will NOT act like that.
is HD Adapt. I gotta' say, HD Adapt absolutely DOES NOT dust. That is a GOOD thing indeed. (Although... it's a bit of a different learning curve because it'll get gummy if you use too much.) I said that, because Meguiar's UC, UP, and 205 will NOT act like that.
I wouldn't be afraid of polishing it, you'll LOVE the results.
As far as a "kit"... nothing wrong with buying the pads and buffer as a kit. Just make SURE that you get more than the normal "6" different color pads. DO make sure that you get the buffer with the 5" backing plate, for 5½" pads.
Best thing would be possibly 3 orange, 3 white. Although 4 orange, 4 white, 2 blue, 2 black would likely give you better results down the road.
As for compounds and polishes.... The sky is the limit there.
Starting with a middle of the road cut compound, or a heavy polish would probably work.
Meguiar's 205 was mentioned because you can buy it in most auto parts stores.
Also, Meguiar's Ultimate Compound (had a bit more cut) and Ultimate Polish (has a bit less than 205) are excellent. You could even follow those with Meguiars M21 2.0 paint sealant and keep everything from the same family.
Outside of that... Menzerna makes a LOT of excellent products. For overall middle of the road cut and finish either SI 1500 or IP 2000. Also... one new one that folks have been trying, EVEN ME lately
is HD Adapt. I gotta' say, HD Adapt absolutely DOES NOT dust. That is a GOOD thing indeed. (Although... it's a bit of a different learning curve because it'll get gummy if you use too much.) I said that, because Meguiar's UC, UP, and 205 will NOT act like that.Mike Phillips
Active member
- Dec 5, 2022
- 51,004
- 7
Mike I know you preach #7 for single stage paint jobs.
I wanted to ask you what is the benefit to using #7 over a fine polish like Menzerna 3500 or Menzerna 3800?
If you mean would there be a benefit to applying #7 AFTER machine polishing with the above Menzerna polishes to a single stage paint then "yes" as it would gorge the single stage paint with the TS Oils before sealing and this has a number of benefits.
If you mean would there be a benefit to applying #7 AFTER machine polishing with the above Menzerna polishes to a basecoat/clearcoat finish then I would say "no" because except for very old clearcoat the oils would for the most part just sit on the surface.
Thanks Mike! I did test it to make sure it was single stage (because I was praying it wasn't), and unless I screwed up the test, it is.
I think you'll be amazed at how nicely single stage will look after polishing.
The paint doesn't feel rough at all to my fingertips, but with the plastic bag on my hand, the bumps are easy to feel.
I do like the idea of seeing if the #7 does the job as you said. That would be very nice.
If it ends up not removing the imperfections, can I then go back and clay bar it without problems and start over?
Just to clarify....
#7 is NON abrasive. It won't remove below surface defects like swirls and scratches.
My point was when working on OXIDIZED paint, like in chalky white oxidized paint, when you rub the chalky white oxidized paint off the car using the #7 with something like a cotton terry cloth wash cloth - any above surface bonded contaminants, that is the bumps you feel that are bonded to the top surface of the paint - would come off when you rubbed the chalky, oxidized paint off the car.
IF the paint is not chalky white with oxidation then you probably should use detailing clay first to remove the contaminants. The reason why is because after using the #7 if you don't remove 100 percent of the oily polish it will make the clay want to stick the paint when you're trying to rub it over the paint and this can be annoying.
I plan to try your plan first anyway. The paint really isn't in bad shape at all.
It looks good in the pictures.
Does just the first coat need to sit the 12-24 hours, or should each coat be done that way?
It's usually just the first application. The rub more applications till you get the paint looking where you want it.
Is there a Dodo Juice color you recommend for dark blue paint, or another wax you recommend for this paint?
Any high quality wax would work but this would be a good choice...
Dodo Juice Blue Velvet Hard Car Wax 250 ml
Mike Phillips
Active member
- Dec 5, 2022
- 51,004
- 7
Here's the write-up for a 1986 Ford Bronco I rubbed out in 2004 with single stage paint.
1986 Ford Bronco II - Extreme Makeover
Here's a picture from the above write-up that shows what happens when you use clay on oxidized single stage paint.

Not a huge deal but the point being when you clay oxidized single stage paint it's going to load up your clay with dead paint.
1986 Ford Bronco II - Extreme Makeover
Here's a picture from the above write-up that shows what happens when you use clay on oxidized single stage paint.
Not a huge deal but the point being when you clay oxidized single stage paint it's going to load up your clay with dead paint.
Mike Phillips
Active member
- Dec 5, 2022
- 51,004
- 7
For anyone reading this thread into the future....
If you're working on a car with single stage paint, specifically antique single stage paint that is IMPORTANT to you to preserve. Then take a few minutes to read through my article on this topic to learn what to do and why to do it.
Don't scan the article... read it.
The Secret to Removing Oxidation and Restoring a Show Car Finish to Antique Single Stage Paints
It is VERY in-depth and has LOTS of pictures with explanations of what you're going to do and why you're going to do it.
Here's just a small portion of the article...
And if you're a lurker reading this with questions the by all means join the forum and start a new thread with your questions and we'll help you preserve and restore your cool car project.
Click here to join the AutogeekOnline Detailing Discussion Forum
If you're working on a car with single stage paint, specifically antique single stage paint that is IMPORTANT to you to preserve. Then take a few minutes to read through my article on this topic to learn what to do and why to do it.
Don't scan the article... read it.
The Secret to Removing Oxidation and Restoring a Show Car Finish to Antique Single Stage Paints
It is VERY in-depth and has LOTS of pictures with explanations of what you're going to do and why you're going to do it.
Here's just a small portion of the article...
Mike Phillips said:This is key...
Saturation Application --> The First Application
This is a mostly unknown technique and that is to let the first application penetrate and soak into the paint for up to 24 hours before wiping the product off. The idea being to really apply the product wet and work it in really well and the walk away.
The idea is to allow the heavy concentration of oils to penetrate and seep into the paint for maximum saturation before removing the product and continuing with the process. In this case I finished applying the first application of #7 around 9:00 pm and then left the #7 to soak in until the next day. I started wiping the product off then next morning right about 10:00am.
Some will argue if this works or not but my experience is that with a porous single stage paint it does in fact help. One thing for sure it can't hurt.
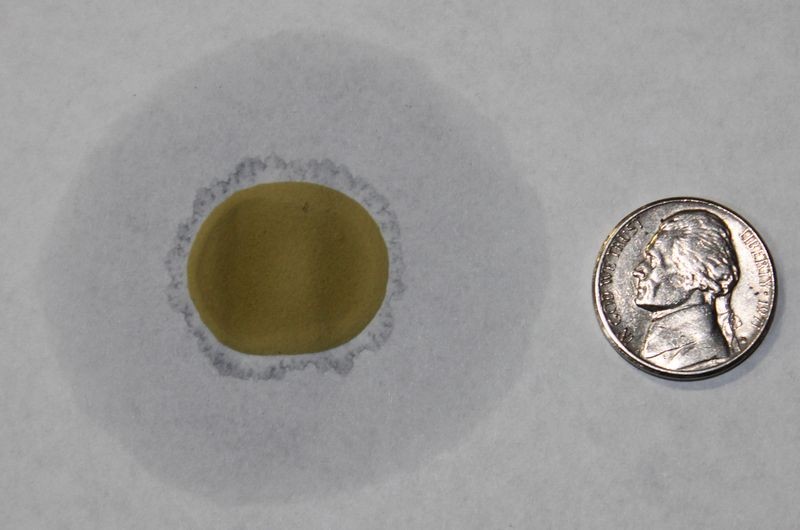
Paper Test for Capillary Action
If you place a few drops of #7 onto a piece of paper and then monitor it over a few days you will see the oils in the #7 migrate or seep away from the actual drop of product. It does this through capillary action and the same thing can work to your car's paints' advantage if it's a single stage lacquer or enamel paint.
I placed a few drops about the size of a nickel on a piece of standard printer paper around 3:00pm.

The next day I took these pictures at approximately 10:00am, (19 hours later), note how the oils in the drops of #7 have migrated outward via capillary action.
Feeder Oils penetrate or feed the paint
This same effect can take place in a single stage paint but not only will the oils travel horizontally, they will also travel vertically, that they will penetrate downward "into" your car's paint and this is where the term feeder oils comes from as the oils penetrate into or feed the paint. The result is they will condition the paint restoring some level of workability as compared to just working on old dry paint, and they will also bring out the full richness of color, something that will showcase the beauty of your car's paint.
And if you're a lurker reading this with questions the by all means join the forum and start a new thread with your questions and we'll help you preserve and restore your cool car project.
Click here to join the AutogeekOnline Detailing Discussion Forum
Mike Phillips
Active member
- Dec 5, 2022
- 51,004
- 7
Just to touch on... Megs #7 is NOT going to take any scratches or blemishes out of the paint. But it WILL rejuvenate the paint, (possibly to where you can then safely polish it).
I wouldn't be afraid of polishing it, you'll LOVE the results.
As far as a "kit"... nothing wrong with buying the pads and buffer as a kit. Just make SURE that you get more than the normal "6" different color pads. DO make sure that you get the buffer with the 5" backing plate, for 5½" pads.
Like I show in this article....
Video: Mark your backing plate to make it easy to see pad rotation
Meguiar's 205 was mentioned because you can buy it in most auto parts stores.
But don't forget about shopping from the place where you get great customer service, like you get on this forum.
I don't think I've ever been to an auto parts store where the guy behind the counter could tell me anything of any substance when it comes to detailing cars.
 rops: rops: rops:
Mike Phillips
Active member
- Dec 5, 2022
- 51,004
- 7
Mike this article is awesome, ill remember till the day i die.
When I was in you class and you showed the class this on the red Lincoln convertible it was one of the best experience in my life, so thank you for sharing with everyone
Thanks Axel.
Just to note... as far as I know this is the ONLY class in the history of man where the class was taught how to correctly use #7 to hand-rub and restore the original paint on a 1967 Lincoln Convertible.
And the entire class is documented with pictures here,
Rupes Bigfoot Polishers Detailing Class & Extreme Paint Restoration
TONS of pictures showing the entire process here,
Rupes Bigfoot Polishers Detailing Class & Extreme Paint Restoration
:xyxthumbs:
Thanks a bunch guys. I have applied two coats of #7 to this point. I got it out in the sunlight today to see how it did. I think it helped a good bit, but I don't think I'm going to get away without polishing it. It does also still fail the plastic bag test. Should I go back at this point and clay bar it, or proceed with polishing? As for the polishing part itself, I am getting the impression I would be better off not doing that by hand and using a DA instead. Is that the correct impression for me to have? If so, is there one you recommend for beginners?
I think some very light polishing should do the trick, but again, I'm pretty much a noob. I definitely don't want to screw this up and end up having to respray. I took some progress pictures which I will post later when I get to my home computer.
Sorry to keep pestering you guys with questions that I'm sure you find tiresome. I really do appreciate the help very much. I'm looking forward to rolling this thing out in the spring to some local cruise ins. Hopefully it will be looking sweet!
Ok, I'm almost done (or as far as I'm probably going to go). 4 coats of #7, Menzerna 3500 polish on white flat foam pads, 2 coats of Dodo Juice Purple Haze. The highlight is, it's better than when I started. Sadly, not nearly as good as a pro could've done, but I'm glad I did it. It was really enjoyable.
I ordered a Porter Cable 7424 package that included one of your books, Mike. It was extremely helpful! I may seal the paint, so if anyone has any input on that, I'd love to hear it. We haven't had much good weather for pictures here, and the light in my garage isn't awesome, but I'll attach a couple pictures from after the 1st coat of Dodo Juice (which smelled like blackberries, my favorite).
Thanks again, everyone. I think I'll do more of this in the future.
So, I tried for 20 minutes and could only get one picture to post!