Ongoing RUPES review - all opinions welcome!!

Really? What about the smaller 15 backing plate on the 21? Do you think the orbit would be too large for the 5.5" pads?

When I get my 15 i'll try it out. From what I've read, the machine will not be as finely balanced without the original backing plate. But, I will definitely try when it comes in and let you all know.
 
All I can say is that I placed an order for a Rupes from Kevin yesterday and really look forward to using it.

As somone who has sold warranties and lifetime warrantied products, I could care less about the warranty. If it works through the first three cars, odds are it will work for a long time. Besides, Kevin, unlike some of the other sellers, has torn these down and knows how to work on them. I have no fear.

If the 21mm Rupes saves me a few hours and reduces stress, it's money well spent in my book.
 
Travis, Diman here. I have a 15E backing plate and all color 5" pads coming in for my 21E.

I understand what Travis is saying that this tool may not be for everyone. The machine is $400, the pads are $15 each, $40+ bottle of polish. It doesn't work with existing backing plates, so I had to get the Rupes 5" for $37. A full time detailer will recoup that expense quickly. For the weekend warrior, how many times will he have to polish or wax his car to recoup?

I'm with PorscheGuy997, I don't care about the warranty. This machine delivers faster results, which leads to more $$$. I would buy a new one each year if I had to because it's just that much better than the PCXP and GG6.
 
Thanks for the input Diman! Let us know how the balance is with the 15E backing plate. With the smaller pad size on the 21mm orbit & the washer mod, you should be able to get some ridiulously fast correction.
 
I have used my 15 on about 20 cars now. I find it works better and easier with both micro pads and foam pads of varying brands. I am interested in trying the rupes pads . I find it works very well on Porsche as I do a lot of them. Even on the softer Ferrari paint I find it works great using sonax perfect finish and a polishing pad to achieve a nearly one step showcar finish. I have not used my flex tools since, and only use my griots with a 3 inch pad. As mr. Dalton says,it will make you put your rotary away. I would like to know how the rupes products work from someone who has them
 
All I can say is that I placed an order for a Rupes from Kevin yesterday and really look forward to using it.

As somone who has sold warranties and lifetime warrantied products, I could care less about the warranty. If it works through the first three cars, odds are it will work for a long time. Besides, Kevin, unlike some of the other sellers, has torn these down and knows how to work on them. I have no fear.

If the 21mm Rupes saves me a few hours and reduces stress, it's money well spent in my book.

If Tom can clear his schedule Friday , we will come down and give your 21 and his 15 a workout. Bringing some M100 and HD CUT along with us. :buffing: :buffing::buffing:
 
The LHR15 came in yesterday. I'm not sure when I'll get to use it though, no cars are currently lined up

3ae3e19456b311e28e7522000a1fbe50_7.jpg
 
I'd really like to hear how 15 compares to 21. I still can't decide on which one to go with. I have a lot of 6" B&S pads, if 15 works well I'd rather go that rout.
 
I'd really like to hear how 15 compares to 21. I still can't decide on which one to go with. I have a lot of 6" B&S pads, if 15 works well I'd rather go that rout.

Unless you're detailing a lot of large panels I would go with the 15. The large orbit with the larger backing plate & pads of the 21 means that you are working a HUGE area. There's a reason the 15 has the word "Detailing" on it. I have also heard that the 15 is smoother than the 21 but won't know for sure until I try it out.

Here's my next job, I'll start on it either next Sunday or the week after. 5 day job with 3 coats of C1 + EXO.

8349980531_fc8286e9a9_c.jpg

Can't wait to see your write up on this. Have you heard anything about swapping out the backing plate on the 21 to a 5".
 
I need to pick up some more spare panels to do some testing on. I'll stop by the body shop this week and see what they have lying around.
 
Got some Rupes polish samples to play around with this weekend. :)


IMG_3496_zpsf95d2e3d.jpg
 
Different foam with operate in different ways on different machines. The hydrotech line may be to dense to get optimum performance out of the machine and the pad.
 
Different foam with operate in different ways on different machines. The hydrotech line may be to dense to get optimum performance out of the machine and the pad.

I actually feel the Hydro pads work just fine on the LHR21....didn't notice much of a difference really. ;)
 
Can't wait to hear what the RUPES polishes are like =)

HT's too dense? Have you checked out the RUPES green? That one seemed pretty stiff and dense to me.

I'm at Todd's class, pretty cool up here.

Transmitted from the Dream Detail studio.
 
Showing how easy it is to text DJ Mayo whilst polishing using the RUPES LHR75

yty5aze4.jpg


Transmitted from the this dinky hotel.
 
Hi Guys,

Hope everyone is well.

Ive detailed over a 100 cars now with the Rupes Bigfoot system, pads and compounds.

Cant fault the system in anyway shape or form, saves a load of time and headache, produces better results and gloss levels, but you cant use it like a rotary, I hear a lot of people are trying to use it like one, and putting pressure on the machine, this is not the way to use a Bigfoot. No pressure is needed, the machine does all the work.

Definitely changed the way I polish cars and with a whole less stress and back/arm/wrist ache!

Kind Regards
Paul Dalton

Miracle Detail.
Tel: 07788-441150
Office: 07788-441150
Int'l: +44 (0) 7788-441150
Email: [email protected]
Web: Miracle Detail - Car detailing - Paintwork Correction
Youtube: Miracle Detail aka Paul Dalton - YouTube
Twitter: http://twitter.com/MiracleDetailUK
Facebook: http://www.facebook.com/Miracledetail

Would the 21 be ok for the DIY or would the 15 be better? Can you finish down soft black paint with the 21? BTW for those noobies that don't know who Paul Dalton is, just because he only has 3 posts doesn't mean he's new to detailing. He is one if not the best detailer in the UK. Also very well respected in the US and around the world. The point is that this dude knows what he is talking about.
 
Cool picture...

Just to note, anytime you're using air tools besides managing the tool you also have to manage the air line. Unlike an electrical cord which is limp, an air line under air high air pressure will be stiff and then to want to direct the tool a direction. So you have to contend with the air line while working.


Not super important when machine polishing paint but if you're machine sanding it's more important as you need to keep the sanding disc flat to the surface so you don't gouge the paint.

Below is a picture of Shawn aka sullysdetailing at one of my dampsanding classes from years ago and an excerpt from my article on machine wetsanding or machine dampsanding...


One difference between sanding with an air-powered tool and an electric tool is the difference in power supply from a physical point of view. What I mean by this is that with an air-powered DA Sander you will have to contend with an air-line under pressure which is quite stiff. When sanding with an air-powered DA Sander you need to control the air-line in a way that it doesn't rub against the painted panels of the vehicle and also that it doesn't control or influence the angle of contact between the face of your sanding disc and the painted panel.

By this I mean because the air-line is stiff, you have to concentrate more on keeping the face of the disc flat against the paint as it's possible for the air-line to exert pressure in such a way as to lift up or push down, or to either side, the DA Sander as it's in your hand.

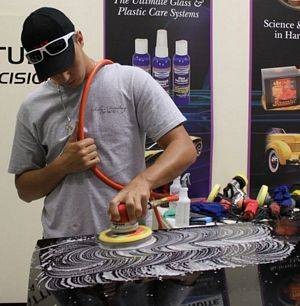
Note how Shawn has the air-line draped over his shoulder and then curved to his side before feeding into the back of the DA Sander in this picture. While this air line looks flexible, under pressure it is quite stiff and requires you to take that into account for your grip and your arm movement as you're sanding.

DampSanding26.jpg


This stiff air-line issue is avoided when using an electric DA Sander/Polisher because your electrical cord is limp in that it is not under high air pressure.


CFM or Cubic Feet per Minute
In order to use an air-powered DA sander you also need a continuous feed supply of compressed air rated at 90 PSI at the gauge. The larger the holding tank the better, for example if you want to sand down entire cars you should have a 60 to 80 gallon compressed air reservoir tank minimum. You can use small portable air compressors for small sections but trying to sand down the average size car hood will deplete the air out of the tank, force the compressor motor to run full speed to try to keep up and still won't be able to keep up and this will show up as your air sander slowing down and even stopping.

The benefit to an electric DA is that all you need is a stable source of electric power and a GFI outlet for safety reasons.

Note that if you ever use an extension cord with your electric DA or any electric power tool you should always use a heavy duty cord with 16 gauge wire or thicker to handle the flow of electricity to avoid burning up the electric motor in your tool.

More pictures from a 2009 class showing the same idea...

Pictures & Comments from October 4th, 2009 Sunday Detailing 102 - Advanced Class


FirstAdvancedClass008.jpg


FirstAdvancedClass010.jpg


FirstAdvancedClass015.jpg


FirstAdvancedClass016.jpg


FirstAdvancedClass017.jpg


FirstAdvancedClass021.jpg


FirstAdvancedClass022.jpg


FirstAdvancedClass028.jpg


Just something to keep in mind when working with air tools to either machine sand or machine buff paint.


:)
 
produces better results and gloss levels,


That's interesting because great results and super high gloss levels can be and have been produced for years with current tools, pads and technology.

Looking forward to meeting with RUPES next week at the Mobil Tech Expo.


This was done using a basic Porter Cable DA Polisher... I've always loved this picture because the paint literally looks wet...

1954 Ford F-100 - Extreme Makeover - Process and products used


54Ford50.jpg


I'm looking forward to testing out the RUPES polishers myself and I hope Paul is correct that the long throw orbit of the tool takes the kind of results you can get using the normal short throw tools will


produces better results and gloss levels,


That's a powerful statement because guys like Paul and all the guys that come to my Thursday night classes have a long and documented history of producing really high gloss results.


Here's Robert spraying Hyper-Polish onto a brand new, clean Optimum Microfiber Pad on a Porter Cable 7424XP

54Ford71.jpg


Robert from Impression's Detailing
Here's Robert with the PC tackling the rest of the hood... Robert is booked all the time doing show car work and his shop in in Palm City, Florida called Impression's Detailing. I often get asked by locals for a true professional to both detail their car and to also maintain it and I know I can always trust Robert to completely take care of all his customer's needs.
54Ford73.jpg


Jeff
Here's Jeff using the Porter Cable 7424XP to tackle the rear passenger fender, Jeff works in our Tech Support division and is a true car guy owning 2 Mustangs and a classic 1978 El Camino
54Ford74.jpg


Glen
Here's Glen using a Meguiar's G110v2 to remove the swirls out of the tailgate. This is the first time Glen has ever used a machine to polish paint and he did a superb job!
54Ford75.jpg


Next up... Finish Polishing or Jewelling with a DA Polisher

The finish left by the Microfiber Polishing Pads and the Hyper-Polish was as I stated before, simply amazing even after we chemically stripped the paint and inspected using the Brinkmann Swirl Finder Light.

That said, from my own personal testing on clearcoated black paint I'm strongly of the opinion that for show car work, that is for the maximum clarity, gloss and shine you still get the best results when you finish out with foam instead of fiber.

For this next step we're going to use Lake Country 5.5" Blue Low Profile Finessing Pads with Pinnacle Advanced Finishing Polish using DA Polishers on pretty much the same speed setting for each of the different tools that we used for the Optimum Microfiber Pads.


54Ford861.jpg


As we work around the truck the paint just gets glossier and glossier...


Glen, Robert and Adam machine polishing with Pinnacle Advanced Finishing Polish
54Ford91.jpg


54Ford94.jpg


54Ford113.jpg


54Ford108.jpg


This is going to be interesting...

But like I've always posted...

Be open to new products, pads, tools and techniques or you might miss out on some really cool new developments and I follow my own advice so I'm really looking forward to getting my hand on the RUPES polishers...


Boy... if you can get better than the below simply by chaning the throw of the orbit of a tool... that's a game changer...

1970 Barracuda Extreme Makeover


Tommys70Cuda032.jpg


1969 Camaro Pace Car - Show Car Makeover

1969CamaroIndyPC019.jpg


1969CamaroIndyPC098.jpg


Video & Pictures - GTechniq Makeover - 2012 High Voltage Yellow Scion tC 7.0

YellowScion19.jpg


YellowScion16.jpg


1970 1/2 Camaro - Show Car Finish by Pinnacle


1970Camaro061.jpg


1970Camaro068.jpg


Pictures & Videos: 2006 Mustang by Ford - Show Car Shine by Autogeek!


Brandons2006Mustang010.jpg


Brandons2006Mustang011.jpg


1939 Lincoln Zephyr - Swirls Removed - Show Car Finish Restored


1939LincolnZephyr066.jpg


1939LincolnZephyr068.jpg


Video & Pictures: 1965 Fastback Mustang - Gtechniq EXO Show Car Makeover!

65Stang034.jpg


65Stang033.jpg


1972 Corvette Stingray - Extreme Makeover - Process and Products Used

1972Corvette026.jpg


1972Corvette027.jpg


1994 Porsche 964 Turbo 3.6

94PorscheCTW44.jpg


94PorscheCTW45.jpg


Christmas Detail - Ferrari P4 - Move over Rudolf

Ferrari_P4_Detailed_by_Mike_Phillips_011.jpg


Ferrari_P4_Detailed_by_Mike_Phillips_012.jpg


Yep...looking forward all the time...

:xyxthumbs:
 
Back
Top