Mike Phillips
Active member
- Dec 5, 2022
- 51,004
- 8
- Thread starter
- #21
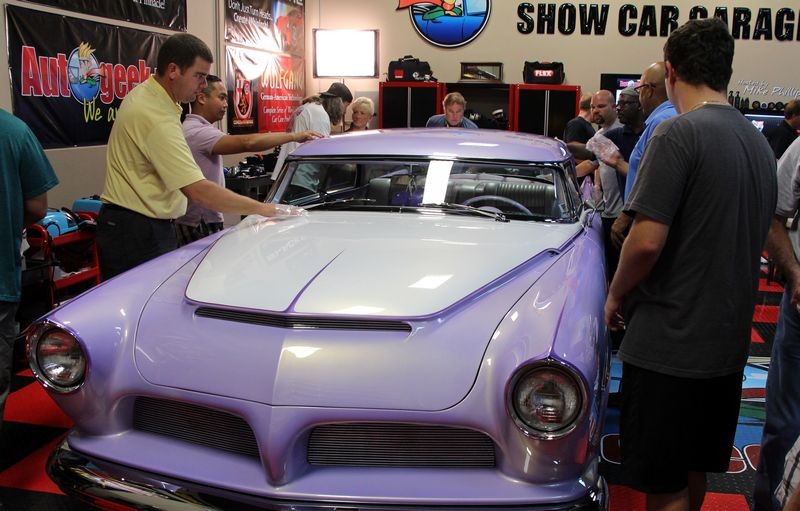
Richard Zocchi Kustom 1956 Dodge Lancer - Detailing Class at Autogeek
Multiple Car Show Winner
1956 Royal Doge Lancer
We start by washing the car using Pinnacle Waterless Car Wash.
Why? Because as a "Best Practice" I don't introduce lots of water to classics, kustoms, antiques, streetrods or muscle cars and I don't teach others to do it either.


Visual Inspection & The Baggie Test
Now that all the loose dirt and dust has been removed we inspect the paint using swirl finder lights and also with our clean hands followed by the Baggie Test.
Most people would think a show car has perfect paint in every sense of the word "perfect" but that's usually never the case. To the shock of many of the students, the paint on this car felt rough to the touch, somewhat like concrete.
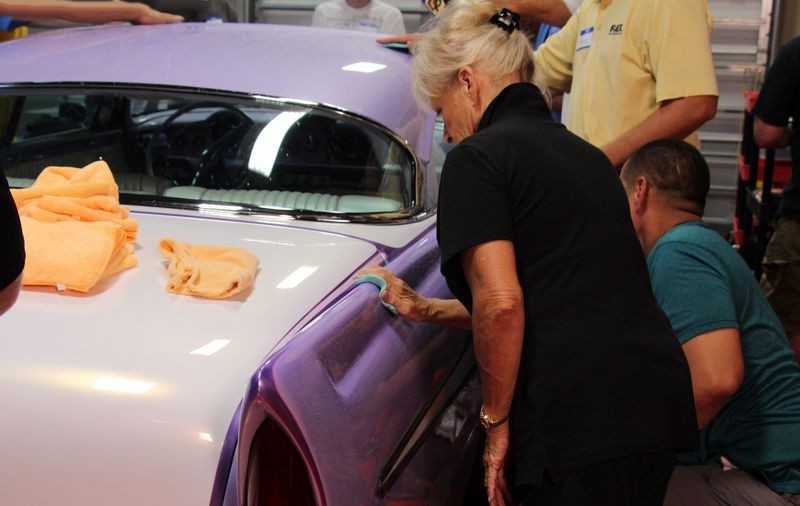
The correct way to use Detailing Clay
Next we went over the correct techniques for using detailing clay. There's lots of confusion over how to form the clay bar once it's removed from its packaging plus how to push it over the paint. All this is demonstrated first and then put into practice by the class.

After
After I clayed a section of paint I asked Sam to inspect my work using the Baggie Test. Here's Sam feeling the section of paint I clayed....

Here's Sam inspecting the section of paint left un-touched....

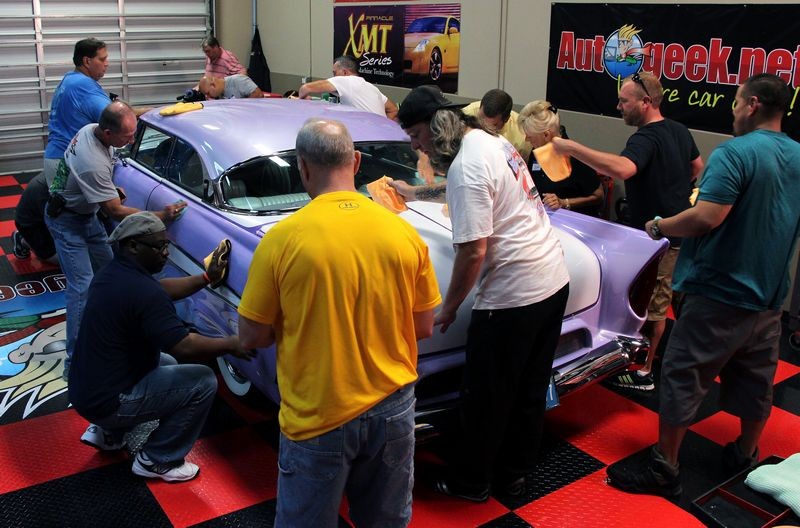
Hands-on time!
The owner told me this car was recently appraised at $156,000.00
I have great relationships with all the local area "Car Guys" and having been at Autogeek for 5 years, and before that teaching classes at Meguiar's Corporate Office in Irvine, California, I've worked very hard to earn their trust.

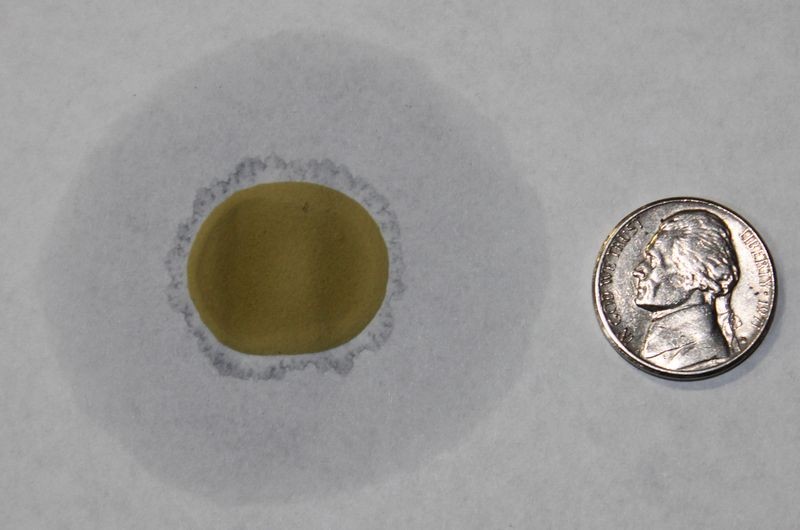
Contaminants on clay
Often times the contaminant you remove will be a blackish, grayish and even brown color. But it's possible to have contaminants bonded to the clay with very little color to them, clear overspray paint is a good example. Whatever was on the paint, claying removed it and left a clean, smooth surface for the next step, machine polishing.


Just as important as claying is so is carefully wiping off the clay lube so as not to re-instill toweling marks, especially to a show car.

")
Multiple Car Show Winner
1956 Royal Doge Lancer
The car premiered at the 2000 Grand National Roadster Show San Francisco Cow Palace and was awarded the prestigious George Barris Kustom d’Elegance Award.
(Richard Zocchi has won this award three times now … he was the winner of the very first George Barris Kustom D’Elegance Award in 1992 with his fabulous ‘39 Dodge and again in 1994 with his chopped yellow pearl ‘51 Olds).
At the Sacramento Autorama the car won the very first Manuel Arteche Memorial award.
At the Good Guys All American Get Together in Pleasanton, California, it was in the Top Five Customs.
Finally, at the West Coast Kustoms Paso Robles 2000 car show, it received the Larry Watson Nostalgia Pick.
The top was chopped four inches. The rear window was sunk into the package tray to create the flowing line. The side roof molding was hand-built. The windshield and all glass work was done by Dan Mazzoncini of Dan’s Glass, Concord, California.
The upper hood was lengthened 1 inch to create the hood grill and rear scoop.
The centerpiece of the grill opening was sectioned three inches and the grill cavity was hand-formed.
The front grill hood scoop and rear grill were hand-made of three-sixteenths round rod by John Aiello.
Headlights were extended out four inches to simulate early 50s Studebaker look.
Headlight bezels again used by Zocchi is his trademark look – ‘56 Olds with the outside lip cut off.
Front and rear bumpers were frenched and extended … all bumper bolts shaved off to give it a clean appearance.
Front and rear wheel wells were flared.
Hand-made rear skirts were added.
Rear quarter panels were extended four inches.
One-half inch round rod was used to create cavity opening on taillights, which were hand-built by Gene Winfield.
Side molding was used from ‘57 Pontiac which was altered on the quarter panels.
Doors and trunk handles were all removed and Unkl Al’s remote system was used.
Paint was applied by Marcos of Lucky 7 Auto Body, Antioch, CA. PPG toners of violet and white were used in a custom mix by Marcos with gold pearl.
The front suspension was re-worked with drop spindles from Fat Man Fabrications by Bob Madsen.
The car was then turned over to bob Westbury for installation of Air Technology Air Ride System.
The interior was hand-built by Bob Divine Interiors of Martinez, California. It was done in violet and white to match the dash and exterior. Pioneer sound system was also installed by Divine.
The engine is a stock 315 Hemi except for a mild cam. The engine was all painted and detailed.
All chrome work and stainless work was done by Sherm’s Plating of Sacramento, California.
The car has radial tires with 2 ¼ inch whitewalls.
Hubcaps were custom made.
Class Topics (Richard Zocchi has won this award three times now … he was the winner of the very first George Barris Kustom D’Elegance Award in 1992 with his fabulous ‘39 Dodge and again in 1994 with his chopped yellow pearl ‘51 Olds).
At the Sacramento Autorama the car won the very first Manuel Arteche Memorial award.
At the Good Guys All American Get Together in Pleasanton, California, it was in the Top Five Customs.
Finally, at the West Coast Kustoms Paso Robles 2000 car show, it received the Larry Watson Nostalgia Pick.
The top was chopped four inches. The rear window was sunk into the package tray to create the flowing line. The side roof molding was hand-built. The windshield and all glass work was done by Dan Mazzoncini of Dan’s Glass, Concord, California.
The upper hood was lengthened 1 inch to create the hood grill and rear scoop.
The centerpiece of the grill opening was sectioned three inches and the grill cavity was hand-formed.
The front grill hood scoop and rear grill were hand-made of three-sixteenths round rod by John Aiello.
Headlights were extended out four inches to simulate early 50s Studebaker look.
Headlight bezels again used by Zocchi is his trademark look – ‘56 Olds with the outside lip cut off.
Front and rear bumpers were frenched and extended … all bumper bolts shaved off to give it a clean appearance.
Front and rear wheel wells were flared.
Hand-made rear skirts were added.
Rear quarter panels were extended four inches.
One-half inch round rod was used to create cavity opening on taillights, which were hand-built by Gene Winfield.
Side molding was used from ‘57 Pontiac which was altered on the quarter panels.
Doors and trunk handles were all removed and Unkl Al’s remote system was used.
Paint was applied by Marcos of Lucky 7 Auto Body, Antioch, CA. PPG toners of violet and white were used in a custom mix by Marcos with gold pearl.
The front suspension was re-worked with drop spindles from Fat Man Fabrications by Bob Madsen.
The car was then turned over to bob Westbury for installation of Air Technology Air Ride System.
The interior was hand-built by Bob Divine Interiors of Martinez, California. It was done in violet and white to match the dash and exterior. Pioneer sound system was also installed by Divine.
The engine is a stock 315 Hemi except for a mild cam. The engine was all painted and detailed.
All chrome work and stainless work was done by Sherm’s Plating of Sacramento, California.
The car has radial tires with 2 ¼ inch whitewalls.
Hubcaps were custom made.
- How to use a Waterless Car Wash.
- How to visually inspect paint.
- How to inspect paint with your sense of touch.
- How to inspect paint using The Baggie Test.
- How to use a Porter Cable 7424XP Polisher to remove swirls, scratches, oxidation and staining.
- How to use a Porter Cable 7424XP to polish the paint to a super high gloss.
- How to use a Porter Cable 7424XP and Griot's 3" Mini Polisher to machine apply a show car wax.
- How to inspect your microfiber towels.
- How to break open a coating of wax and carefully remove it.
We start by washing the car using Pinnacle Waterless Car Wash.
Why? Because as a "Best Practice" I don't introduce lots of water to classics, kustoms, antiques, streetrods or muscle cars and I don't teach others to do it either.
Visual Inspection & The Baggie Test
Now that all the loose dirt and dust has been removed we inspect the paint using swirl finder lights and also with our clean hands followed by the Baggie Test.
Most people would think a show car has perfect paint in every sense of the word "perfect" but that's usually never the case. To the shock of many of the students, the paint on this car felt rough to the touch, somewhat like concrete.
The correct way to use Detailing Clay
Next we went over the correct techniques for using detailing clay. There's lots of confusion over how to form the clay bar once it's removed from its packaging plus how to push it over the paint. All this is demonstrated first and then put into practice by the class.
After
After I clayed a section of paint I asked Sam to inspect my work using the Baggie Test. Here's Sam feeling the section of paint I clayed....
Here's Sam inspecting the section of paint left un-touched....
Hands-on time!
The owner told me this car was recently appraised at $156,000.00
I have great relationships with all the local area "Car Guys" and having been at Autogeek for 5 years, and before that teaching classes at Meguiar's Corporate Office in Irvine, California, I've worked very hard to earn their trust.
Contaminants on clay
Often times the contaminant you remove will be a blackish, grayish and even brown color. But it's possible to have contaminants bonded to the clay with very little color to them, clear overspray paint is a good example. Whatever was on the paint, claying removed it and left a clean, smooth surface for the next step, machine polishing.
Just as important as claying is so is carefully wiping off the clay lube so as not to re-instill toweling marks, especially to a show car.