They're way to many and tiny to be rock chip. There was nothing there but scratches when I started. I only did one panel and the panel next to it is pit free.
So here's how you troubleshoot...
Do another panel and inspect. IF you see the pits in the next panel then it's easier to assume the issue is in the entire paint job and not isolated to just this panel.
If there are no pits or pin holes in the adjacent panel or any other panel then you have just isolated the issue to this single panel. At this point a person could then wonder if this single panel was repainted at some point since it was pumped out of the assembly line.
Yes, how do I correct them? There is no paint missing, just pits.
The way you remove any defect that goes "into" your car's paint is to abrade the paint, or as we say... compound or polish the paint, until you lower the surface level of the finish to the lowest depths of the defects you're trying to remove.
The problem with this approach, as I cover in my how-to book at the very beginning to frame up all the rest of the chapters in the book, is that factory paint is thin.
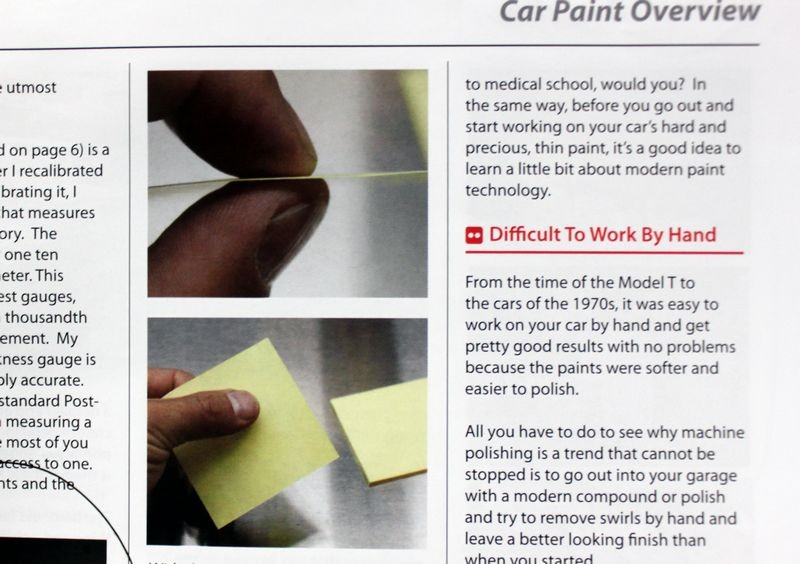
Here's a picture from my book, in the second edition you'll find it on pages 4 & 5. What the pictures show and what the text explains is that the average factory clear coat, that is just the "clear layer of paint", and also the only part "you" can actually work on, is approximately 2 mils thin. Notice I said 2 mils thin, not 2 mils thick. There's a difference.
The average post-it note is around 3 mils thin. So hold a post it note between your thumb and index finger like you see me doing on the screenshot from a page in my how-to book and just how thin your car's paint is will start to sink in.
From experience, the pits you see are common to paint, the cause and source vary and sometimes, even a lot of the time, the cause is unknown, at least to we the car detailing masses.
Again from experience, you can try to continue compounding the panel to try to chase the pits to their end, but again from experience, you'll find you simply remove more paint and uncover a seemingly, never-ending pit or hole in the paint. If you remove too much paint you can,
A: Set your car's finish up for premature clearcoat failure.
B: Expose the basecoat and then you'll have to have the panel repainted.
Another option is to accept the pits, wax the paint and move forward, or have this panel repainted by a Pro. I'm guessing that you, like most people won't like any of these options, I would either.
I thought about that but this was on my trunk.
That's why I don't think they are rock chips...
That's the monkey wrench in the machine.
NORMALLY when people post a pitting issue or a pin hole issue the problem is isolated to the hood.
The hood like Mike Stoops points out is the panel that receives all the impact for debris, or small particles of anything in the air at HIGH SPEED, that is when you're driving down the freeway.
The other times we see posts about these pits or pin holes on the hood it can be related to a re-paint to the hood due to all kinds of reason and the holes or pits are what is called, solvent popping.
Then there's also the issue of two types of heat affecting the hood that doesn't affect other panels and that's engine heat. So with the hood you get heat and UV rays from the sun beating down on your car PLUS the heat created under the hood from the engine which makes your engine compartment like an oven. This also can be a factor to paint issues we all see affecting the hood and no other panel.
The fact that you're seeing this on the trunk lid throws a monkey wrench into all the above scenarios or common problems.
But guess what? The problem is not just isolated to us in the States, I was posting about this same issue happening to a guy in the UK somewhere, (I'm guessing), on the UK forum Detailing World where I also hang out. If you read my post on this thread I also state I have a theory about the problem.
What is happening on this paint?
Think about the options I listed above,
- Continue compounding
- Accept the paint defects, wax the car and move on
- Have the panel repainted by a Pro
As I'm sure everyone here will be willing to help with any of the above.
Also, the problem you've encountered would have happened no matter what brand of compound or polish you choose to use.
")