Please help me save my car

liquidus

New member
Joined
May 4, 2010
Messages
3
Reaction score
0
Hello, newbie here and hope to help me...

I am having an issue with my car's paint and i would like some advice on how to solve this problem. Two years ago i put a viny decal on the hood of the car... Two months ago i removed it because it somehow 'cracked' due to the high temperatures of my country and all is left now is a some kind of shadow of the decal and many little bubbles where the decal was. I am not sure if it is the decal's adhesive though. I searched the net and found many solutions: acetone (?), meths, goo gone, elbow grease (WD40) even peanut butter (???), but i am afraid to use some of them because they might burn the paint. Can you please tell me what could i do? Will any of these work without destroying the paint? Is there any solution despite painting the hood again? Below the are pictures that might help :

dsc00558j.jpg


dsc00560y.jpg


Thank you for walking up with me until here. Any help will be greatly appreciated.
 
First, welcome to AGO!

Ouch. Looks bad. Where are you from?

The bubbles look like a paint defect. It doesn't seem at all topical. Did you put the decal on there when it was freshly painted?

I'm pretty sure you can remove the dark area unless you answered yes to my question above. Because if it was fresh paint and you slapped a vinyl decal on it, the thinner evaporating will try to seep out, which will most likely cause the bubbles and at the same time may have absorbed the color of the decal that was on it.

If you plan to do this again, i suggest you apply a decal on cured paint, and spray a clear on it afterwards to protect the sticker from fading, cracking and peeling, which will also add a gloss look.

As for the solutions you mentioned, i doubt any of those will work, acetone will dry your paint, meths - do you mean the paint stripper?, wd40 is a lubricant if the bubbles are just adhesive this may help. But if i were you, i would try a claybar first, if that doesn't work you will have to sand it down.
 
Wow!

Those are HUGE pictures!

I right clicked on the first photo and looked at the size it's 2592 pixels wide and 1944 pixels tall!

I have a 24" monitor and there's still plenty of horizontal scrolling to do...

If those are bubbles protruding UP out of the paint, like little hills or mountains then there's nothing you can pour out of a bottle or scoop out of a can that's going to fix that kind of problem. Same thing for cracks in the paint.


Here's this too...

How-to work with pictures on discussion forums


:props:
 
Thank you for the nice reception and the quick reply :)

I live in a small island called Cyprus :)

No, I didn't put the decal when it was freshly painted. By meths i mean um...denaturated alcohol? Wikipedia, the free encyclopedia i am not sure if i am clear with what i say. I will try wd40 and hope will do something. What claybar would you suggest? And since i doubt finding here i will try to order through the net. Any other suggestions on how to solve the problem are kindly welcomed :)
 
sorry for the large pictures i am a newbie here and still learning.. will have a look at the link. And thank you for your comment :) looks like all my hopes have collapsed :P
 
I just wanted to say Welcome! Beautifull country you've got there. That's on my lost list of places I'd like to be instead of this office right now. :) Sorry I don't have any advice... Just wanted to say welcome. I know a bunch of the others will pipe up though.

Take care.
 
What claybar would you suggest? And since i doubt finding here i will try to order through the net.

Not sure if clay will fix the problems in your picture but here's something I typed up that might help you...


the first thing you want to do is inspect the paint by feeling it and checking it for Above Surface Bonded Contaminants.


Above Surface Bonded Contaminants
  • Overspray Paint
  • Tree Sap Mist
  • Industrial Fallout
  • Air-borne Pollution
  • Any contaminant that lands on your paint and makes bond tight enough that it won't wash or wipe off
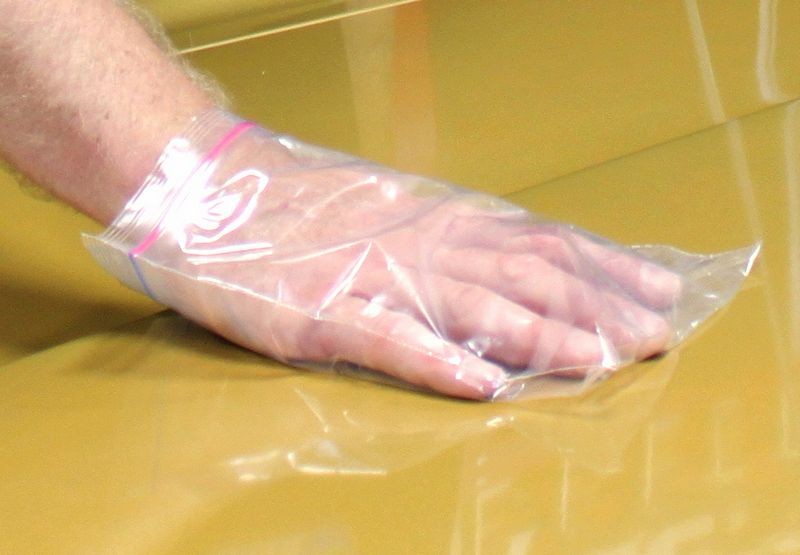
You can do this with your clean hand or you can use what's loosely called "The Plastic Baggie Test". That is where you take and place your hand inside a plastic baggie like a sandwich baggie and then feel your car's paint. The thin film of plastic covering your hand will intensify your sense of touch and enable you to feel contaminants on the paint that you otherwise could not and would not feel with just your hand alone.


The Plastic Baggie Test
NonAbrasiveMethod057.jpg


NonAbrasiveMethod057c.jpg


Inspection Results
The paint has a rough feel without the baggie but it really feels rough when I use The Sandwich Baggie Test. The results from my inspection tell me the paint is extremely dirty with Above Surface Bonded Contaminants. These could be air-borne overspray paint, tree sap, industrial fall out, pollution, etc.

To remove Above Surface Bonded Contaminants you want to use detailing clay to clay the paint. Detailing clay is like a hi-tech version of Play-Doh only it contains a special type of abrasive that won't put scratches into your cars paint but it does have the ability to abrade anything sitting on top of the paint somewhat like how sandpaper works.

Using Detailing Clay to Restore a Smooth as Glass Finish
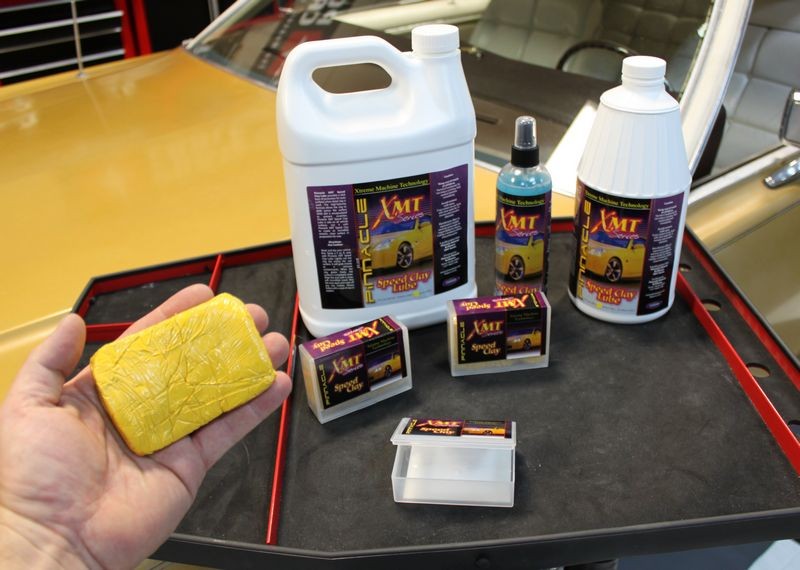
For this project we're going to use XMT Speed Clay and XMT Speed Clay Lube in the XMT Product Line from PinnacleWax.com

NonAbrasiveMethod003.jpg


NonAbrasiveMethod004.jpg


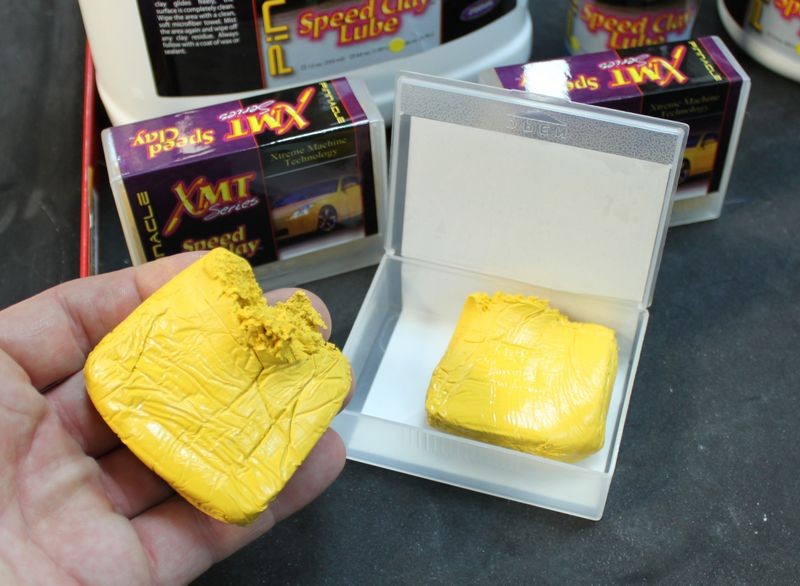
The XMT Clay bar is a whopping 226 grams or 8 ounces of clay! You only need a patty of clay large enough to fit across the face of your four fingers so we'll tear this clay bar in half and save one half for a future project and use this half to clay the paint on this Lincoln Continental.

NonAbrasiveMethod005.jpg


NonAbrasiveMethod006.jpg


Next, knead the clay into a round patty kind of like a small pancake, like this. You want to hold it in your hand like this too when you're claying the paint. If you've never used detailing clay before here's the link to a video on how detailing clay works and how to use it to clay your car's paint.

How detailing clay works and how to use detailing clay to remove above surface bonded contaminants


NonAbrasiveMethod007.jpg


The black film on the clay was the black film that was on the paint and this was after only claying about a two foot square section of paint.

Eewww.....
NonAbrasiveMethod009.jpg


As I work through this project and remove built-up contaminants like you see on the face of the clay patty, plus embedded dirt and surface oxidation, you're going to see the color of the car become brighter and brighter as it gets cleaner and cleaner.

NonAbrasiveMethod008.jpg


Things you'll need...

Cobra Deluxe Jr. 600 Microfiber Towels
XMT Speed Clay
XMT Speed Clay Lube


:)
 
hello and welcome. i'm no expert here, but what you might have is a case of the paint around the sticker being faded by the hot temps you refer to and the hot suns uv rays burning on it. the paint shaded by the sticker, did not fade. the bubbles, well i dont know, maybe the adhesive pulled on the paint when you lifted it off? with some time those areas might start to lighten to match the rest of the car.
 
I agree with Mike's post!!! Check the surface first if it will benefit from a clay bar treatment. It's just that i don't think any of the products you mentioned will remove the bubbles. If you were here in my country, i could help you fix the problem, you'll just have to buy the paint, and i'll help you paint and maintain it. :)
 
Back
Top