As for using M105 on harder clear coats, this is a great approach especially because since it's a SMAT product, you control how long you buff and how aggressive you get, for less cut, use a less aggressive pad and don't buff as long, this is where doing a Test Spot comes in handy, you can dial in your pad, product and process, process being how many passes or for how long you need to buff to remove the defects you're trying to remove.
Here's a few articles on SMAT products...
The Aggressiveness Order of SMAT Products - This might surprise you!
This article is really long but covers all the SMAT products at the time it was written.
The SMAT Pack - Everything you ever wanted to know about Meguiar's SMAT products...
Below is an excerpt from the above article...
Professional Line
M105 Ultra Cut Compound
M95 Speed Cut Compound
M86 Solo Cut & Polish Cream
M205 Ultra Finishing Polish
Detailer Line
D151 Paint Reconditioning Cream also called PRC
Consumer Line
Ultimate Compound
ScratchX 2.0
SwirlX
Professional Line - Caters to the Refinishing Industry (Car repainting industry)
Detailer Line - Caters to the Reconditioning Industry (Detailing industry)
Consumer Line - Caters to Joe Consumer Do-it-yourselfers and Hobbyist Detailers
There's been a lot of questions about SMAT products lately so I've compiled a collection of all the SMAT Products with a brief description of them and when to use them and where. Below this first post in this thread is a dedicated reply with each product, some company information about each product and my comments.
First.... what are SMAT Products?
SMAT = Super Micro Abrasive Technology
SMAT products use
Unigrit Abrasives for a controlled, even cutting action. There is one exception to the below and that is M95 Super Cut Compound. While the primary cutting ability of M95 comes from SMAT, it does also contain some diminishing abrasives but
because the primary performance of it's cutting ability is due to SMAT it is included in the the SMAT category.
SMAT Timeline
Below is a list of all the current SMAT product in the order in which they were introduced to the market...
- October, 2006 - M86 Cut & Polish Cream
- December, 2007 - M105 Ultra Cut Compound
- December, 2007 - M95 Speed Cut Compound
- April, 2008 - D151 Paint Reconditioning Cream
- November, 2008 - M105 Ultra Cut Compound - New Formula: DA Polisher Approved
- November, 2008 - M205 Ultra Finishing Polish
- November, 2008 - Ultimate Compound
- November, 2008 - SwirlX
- November, 2008 - ScratchX - New & Improved with SMAT
The difference between Diminishing and Non-Diminishing Abrasives BEFORE SMAT
There were two common types of abrasives used in paint care products usually for removing below surface defects like swirls, scratches and water spots in the enthusiast/detailer market and for removing sanding marks after wet-sanding in the refinishing industry.
Before clear coat paints were introduced starting in the early 1980's for U.S. car manufactures, there were also
non-diminishing abrasives used in paint care products that were
old technology and based off
large sized abrasives that while they cut fast they basically scoured the finish with swirls and scratches. Since clear coats were introduced this has forced most if not all company's that manufacture paint care products to bring up the quality of their abrasive technology.
What's the difference between DAT and SMAT
SMAT - Super Micro Abrasives Technology
DAT - Diminishing Abrasives Technology
DAT - Diminishing Abrasives Technology
Diminishing Abrasives are a category of abrasives that actually break down, pulverize and disintegrate into nothingness as you work them against the paint.
For example, a diminishing abrasive will start out a certain size and/or shape, then
under pressure over time as they are worked against the paint they will actually breakdown or break apart. This means they start out aggressive and thus aggressively abrading the paint, as they are worked under pressure over time they begin to break down and as they breakdown their aggressiveness level is reduced to the point that when correctly worked they are completely broken down and all you have left is a mixture of spent or used-up diminishing abrasives and the carrying agent or base they were embodied in to start with. There's also a certain amount of removed paint in this resulting mixture.
SMAT - Super Micro Abrasives Technology
Super Micro Abrasives are as the name states microscopic in size and do not break down like diminishing abrasives. While they may not breakdown like a diminishing abrasive, there does come a point where there effectiveness falls off in performance, my guess is that this is a cumulative effect of the base formula they are embodied in dissipates while particles of removed paint build up in the residue adulterating or diluting their effectiveness.
Just to note, this same adulterating or diluting effect takes place with any abrasive product because as the abrasive remove small particles of paint, these small particle of paint join into the mixture thus changing the ratio or percentage of abrasives to the base formula.
What's the practical difference?
The biggest difference that I can share is this, with diminishing abrasive technology you
MUST work the product until the abrasives have completely broken down to insure you don't leave any swirls in the paint. The reason for this is because if you stop buffing before the abrasives have completely broken down then they are still cutting or abrading the paint, thus leaving swirls in the paint.
This isn't really a problem because most diminishing abrasive products when used correctly will break down over a
normal buffing cycle, (period of time and number of passes), to sufficiently break the abrasives down. It's usually only an issue for people
new to car detailing who are learning as they go.
With Super Micro Abrasive Technology, theoretically, because the abrasives don't break down, or more specifically because the abrasives don't break down like diminishing abrasives break down, you can stop anywhere in the buffing cycle without leaving swirls caused by the abrasives. This would tend to make SMAT products more
"Bubba-Proof" with an easier or more flat learning curve.
Because the abrasives don't break down like traditional diminishing abrasives, and from experience leave a very clear, scratch-free finish whether you're using the most aggressive or the most non-aggressive products, this new technology kind of throws a
monkey wrench into the philosophy of,
"Use the least aggressive product to get the job done"
Notice in the above statement I used the word
aggressive,
not abrasive.
This is how the statement is supposed to be written because there are more factors involved besides just the liquid chemical that contribute to how aggressive a process is, for example, your
application material can be a
HUGE factor as to how aggressive your choice of products are. I just point this out because I see others typing the above quote and often times they write,
"Use the least abrasive product to get the job done"
While the meaning is
close, it's not
exact as you can use products that are not abrasive at all to accomplish a task and still be following the philosophy.
But I digress... back to the topic at hand...
Why it's important to use the least aggressive product to get the job done?
The idea behind using the least aggressive product to get the job done is to remove the defect or defects
while leaving the maximum amount of paint on the car.
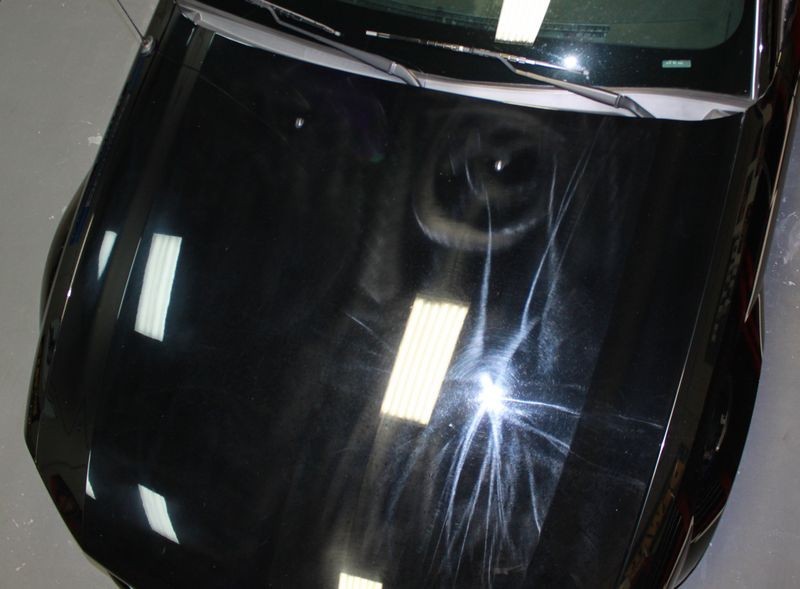
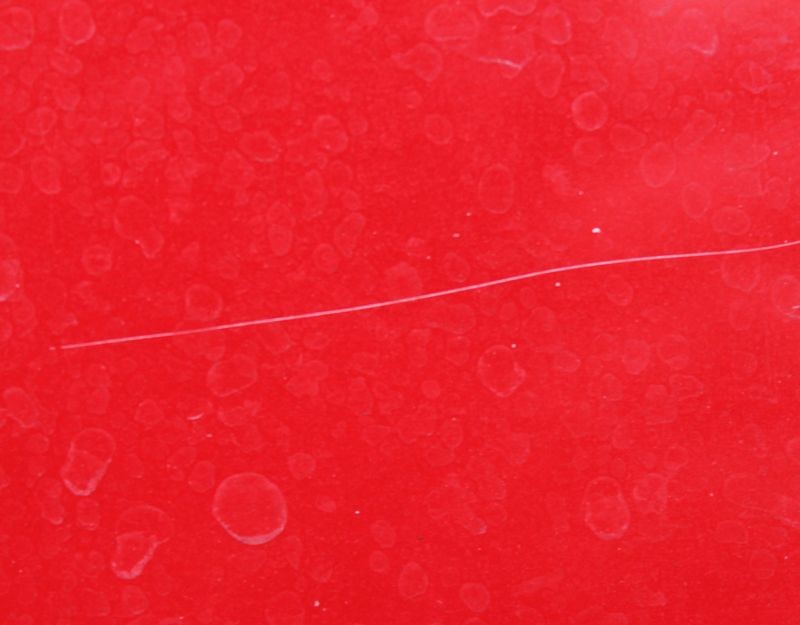
For any Newbies reading this, anytime you remove a defect or defects like swirls, scratches
Type II Water Spot Etchings,
Type I Bird Dropping -
Topical Stain Etchings,
Sanding Marks after wet-sanding, you
must remove some paint from the surface until you
level the surface of the paint with the lowest depths of the defects you're trying to remove.
So removing below surface defects means removing paint.
That's normal and acceptable but the problem is
paint is thin and from what I've seen over the years getting thinner. That means you and me don't have a lot of room for error and for decades, dating back to the Model T, the philosophy of,
"Use the least aggressive product to get the job done"
worked and made a lot of sense. Paint is thin and you only want to remove as little as as you have to in order to remove the defects so your paint will last over the service life of the car.
Now let me tie this
train-of-thought together with SMAT products and why it throws a monkey wrench into traditional thinking.
Because the abrasives used in SMAT products don't break down in the same way diminishing abrasives break down and tend to leave a scratch-free, high gloss finish, (no matter which product you're using), this means you apply them and then
only work them till the defects are gone.
Once the defects are gone, (and you visually see this as you work an area), you then stop working the product and wipe off the residue and move to the next step or a new section.
It's this ability to stop when the defects have been removed instead of stopping after the diminishing abrasive have broken down that throws a wrench into the old tried and true philosophy of
using the least aggressive product to get the job done because theoretically you can start with the most aggressive product and because you stop after the defects have been removed you achieve the same goal as you would have achieved by using the least aggressive product to get the job done but you can usually do it faster and more effectivley... AND you leave the same amount of paint on the car.
With diminishing abrasives, it could be that you've removed the defects but if you removed them before the abrasives fully broke down, you must continue to work the products to avoid leaving swirls in the paint because the abrasives are still abrading, this means you're removing paint you don't have to remove. At least that's the theory I'm presenting in this article.
Make sense?
IF not, then chew on the ideas presented above and if you're still confused then post your questions to the forum!

I'd like to stress that this isn't a
huge matter because the amount of paint you're removing with either approach is usually nominal in the big picture of things and both SMAT products and DAT products are both tried and true products that will get the job done safely, especially compared to the types of abrasive products that were historically used on car paint
until clear coats became the new norm.
Here's an overview of SMAT Products, keep in mind that some of these products are not targeted at the majority of people that will read this article, that is enthusiasts and detailers, some of these products are formulated for and targeted to the refinishing industry. Other products are targeted directly at the enthusiast of Consumer Market. Below I will address each of these markets.
Refinishing Industry - Body Shops - Places that cars are re-painted
Basically in more layman terms you would say the collision industry which is made up of Body Shops, whether they are independently owned, like my brother's shop in Astoria, Oregon,
Phillips Custom Colors, or a Franchise like
Maaco or
Earl Sheib, or a body shop inside a New Car Dealership like
Galpin Ford.
The re-finishing industry is anywhere cars bodies are repaired after an accident and the re-painted. Body shop environments, or fresh paint environments, require paint care products that are what we call
"Body Shop Safe", that means there are no ingredients in the formulas that could cause
surface adhesion problems when new or fresh paint is sprayed onto the car's exterior panels. Products for the refinishing industry are usually aggressive compounds and finishing polishes as these are the types of products needed to remove sanding marks after wet-sanding and then polish the paint to a customer-pleasing, high gloss.
For comparison,
Reconditioning Industry - Detail Shops and Mobile Detailers - Car Washes
Paint polishing work done at brick and mortar detail shops, or by Mobile Detailers or at Car Washes is referred to as
reconditioning as it usually involves not only the paint but also cleaning the interior, trunk, engine compartment and all aspects of a vehicle.
Paint polishing performed in the reconditioning industry can be categorized into two basic types of work and that would be,
- Production Detailing
- Show Car Detailing
Production detailing will usually mean the entire car inside and out is cleaned, waxed and/or dressed. For this type of work a one-step cleaner/wax is generally used on the paint to restore shine and protection.
Show Car Detailing is where the car is divided into segments and each segment gets a dedicated process to bring the car's appearance up to show car quality. For the paint polishing segment, most detailers will perform a multiple-step process which will take a car's paint to its maximum potential.
Consumer Market - Do-it-yourselfers, Weekend Warriors - Serious Car Enthusiasts, Hobby Detailers
The Consumer Market is pretty diverse but to keep this short and sweet, this market would be made-up of primarily of the average consumer or car owner that wants to take ownership of the car washing and waxing maintenance of their vehicles. Products for this market must be incredibly safe to use for beginners and be easy to work with via primarily hand application but also be able to be applied using entry level buffers and polishers.
")