CEE DOG
New member
- Jul 12, 2009
- 7,358
- 0
Review: CarPro Iron X
Introduction:
Two or three years ago I was considering purchasing a paint decontamination system to use on my Sky. I had been using clay but it bothered me that I wasn’t removing all of the contaminants since clay simply shaves the contaminants off at the surface of the paint. The problem was the paint contamination system I was looking at was difficult to apply and seemed to me to be a bit on the risky side.
Some time thereafter I heard about a product called Iron X. It was said Iron X was very simple to use and was entirely safe for paint. The only particles it would attack were the ferrous metals (like iron shavings and brake dust), which are lodged in the paint. A few months ago I started using this product and here’s my review.
Product Claims:
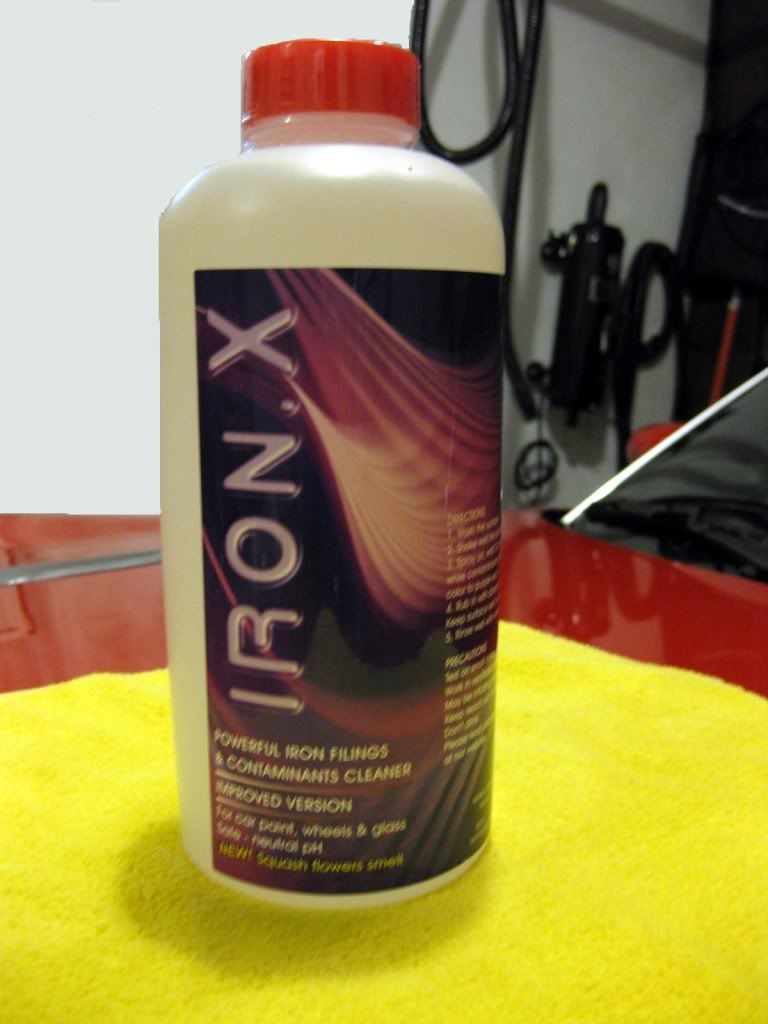
Iron X by CarPro is an acid-free, pH-balanced iron remover that decontaminates auto paint and wheels. Iron X prevents the spread of iron-related damage to protect your vehicle from paint system failure.
Details:
1.- Packaging: Plastic Bottle with all plastic trigger or Eco refill packs
2.- Directions: Clearly labeled
3.- Viscosity: Thin
4.- Color: Clear
5.- Scent: Squash Flowers (Mixed with hair perm J)
6.- Regular Price: 16.9 oz. (500ml) = $ 19.99
7.- Regular Price: 33.8 oz. (1000ml) = $ 32.99
8.- Regular Price: 169.0 oz. (5000ml) = $124.99
9.- Manufacturer: CarPro
10.- Made in: Korea
00-Product
Additional products used during application of Iron X:
1.- Sponge
01-Conditions
Preparation:
Typically when using Iron X I am planning to also polish the paint but sometimes it is simply a quick way to remove iron particles for a good wash and a wax or sealant. This time around I would be polishing and protecting with Cquartz.
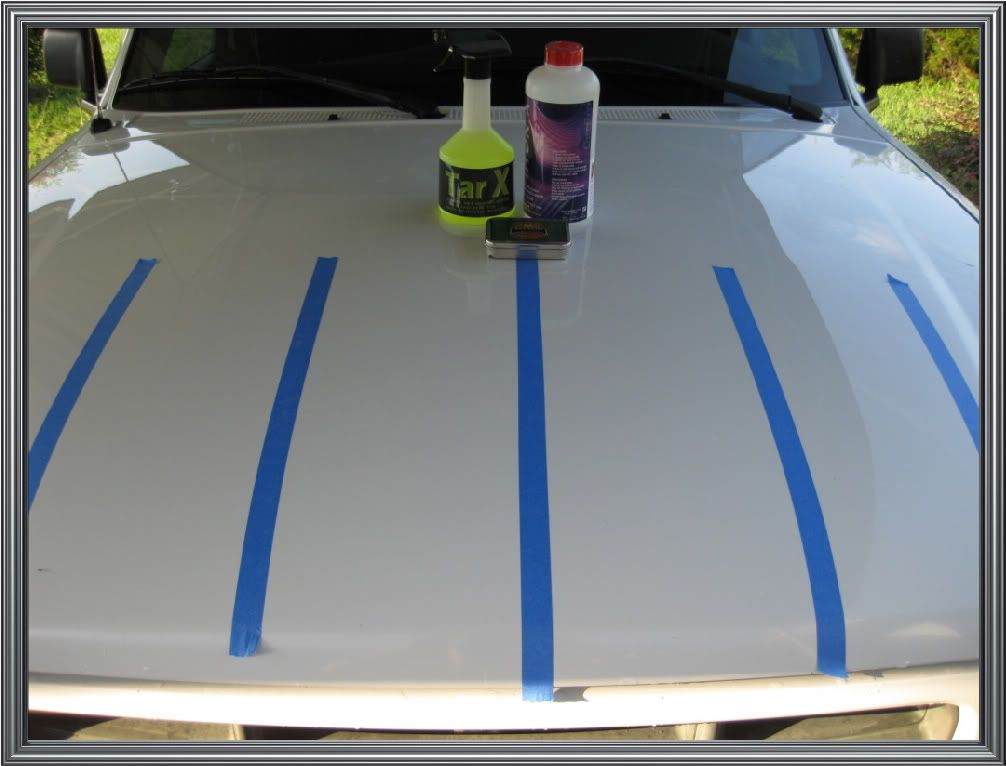
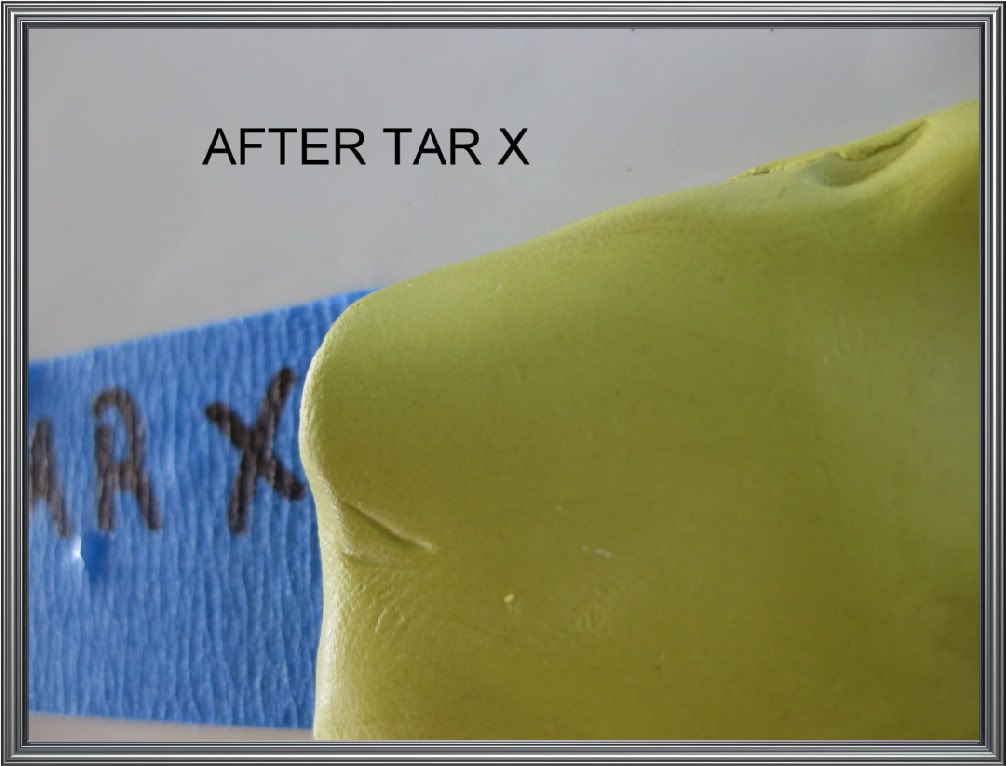
I began by washing the truck down with UPGW followed by OPC 3:1. After a thorough rinse I very quickly went over it with the Master Blaster to remove the excess water. After that step I moved forward with application of Tar X as described in a seperate review.
After dwelling time, agitation, removal, and rinse I used the Master Blaster once more to remove the excess water.
Application and noted observations:
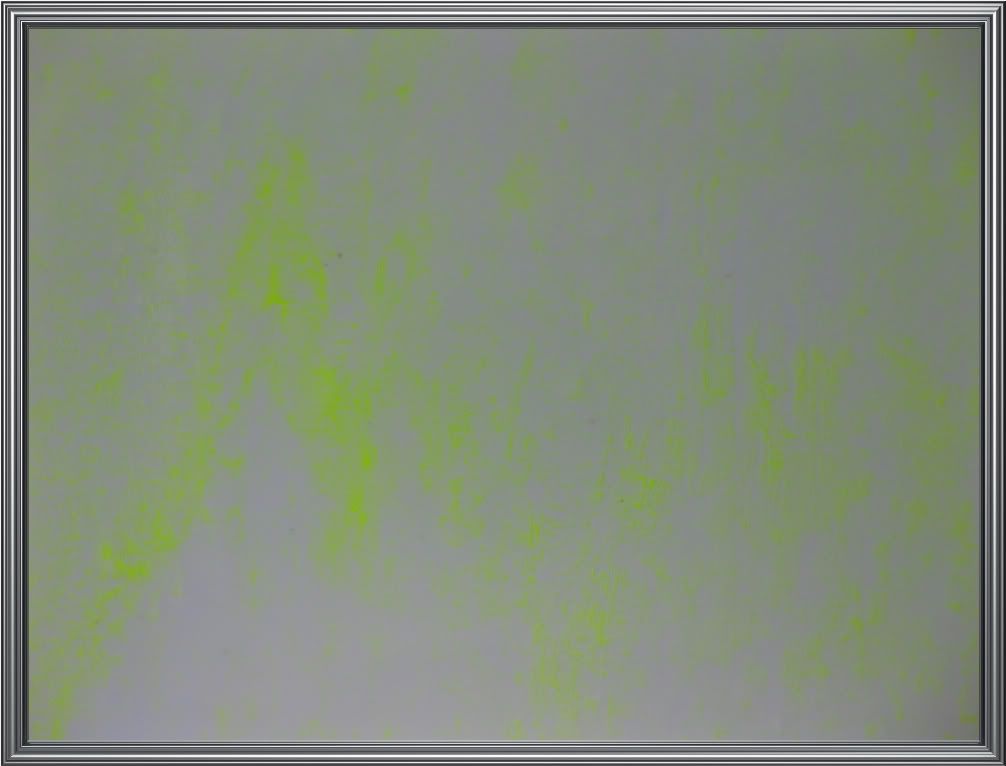
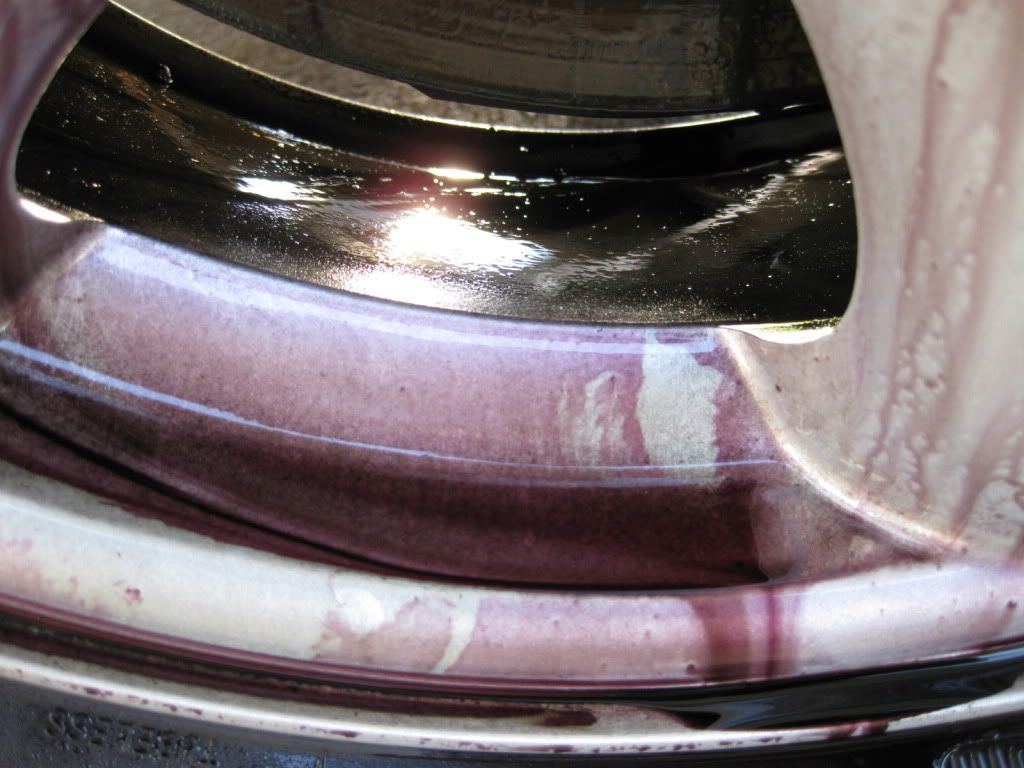
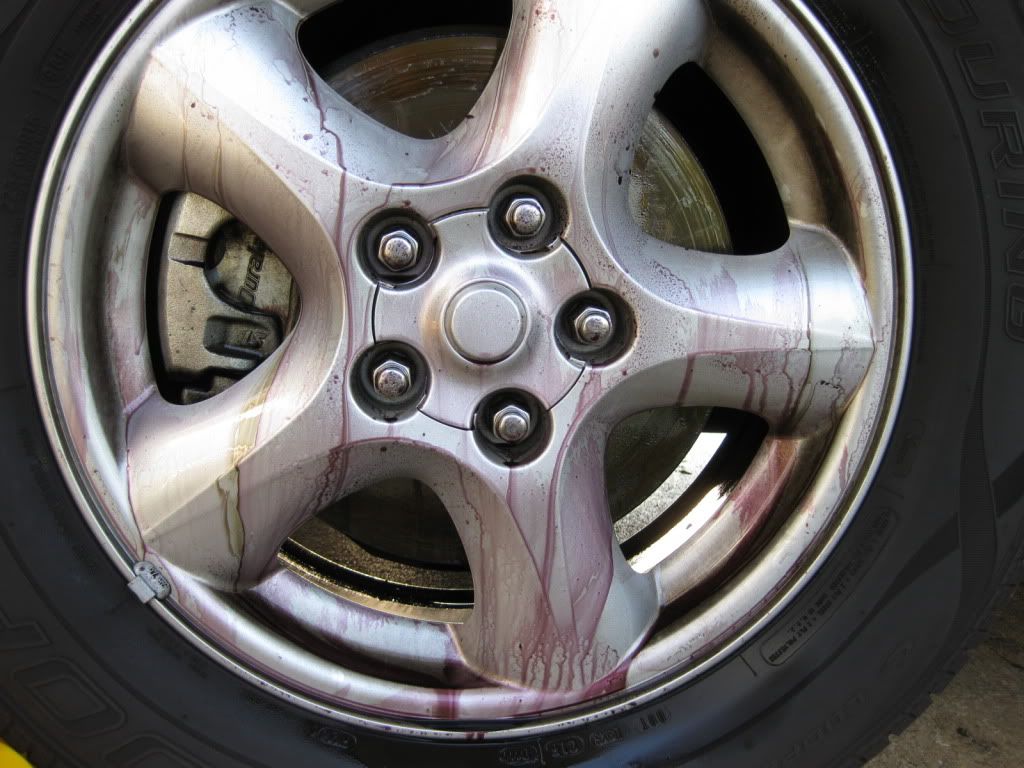
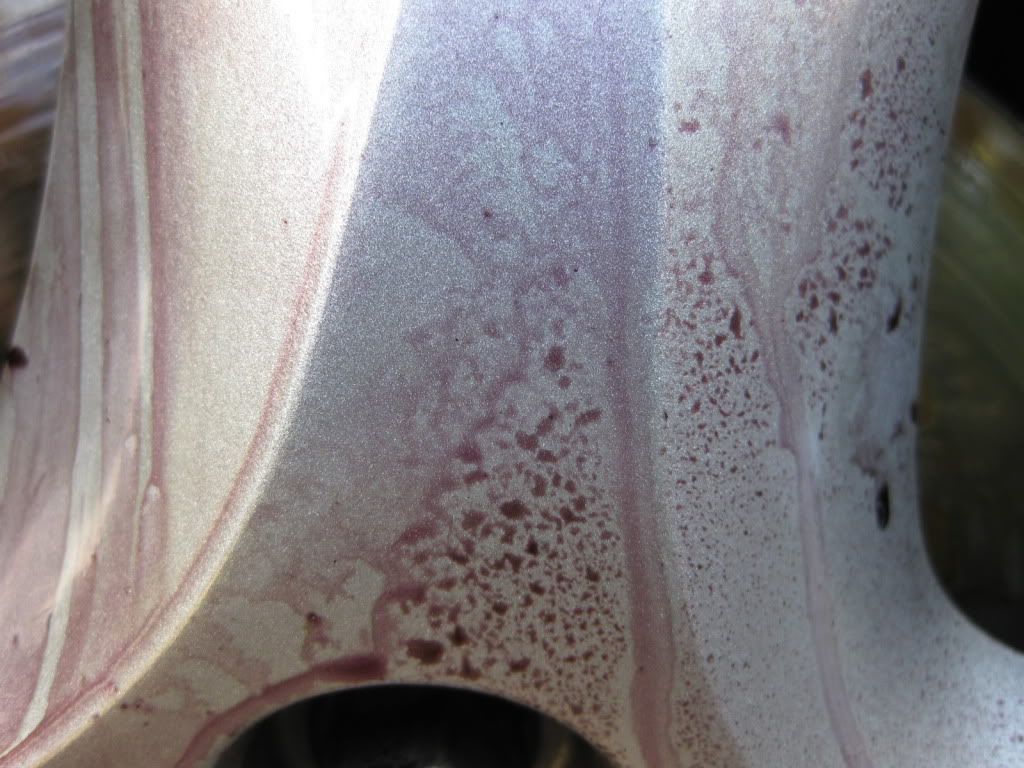
I applied Iron X by spraying it directly on the surface as is recommended. It didn’t take long before I observed a dark color emerging from the paint, which as you may know is the reaction of Iron X with the embedded iron particles in the paint.
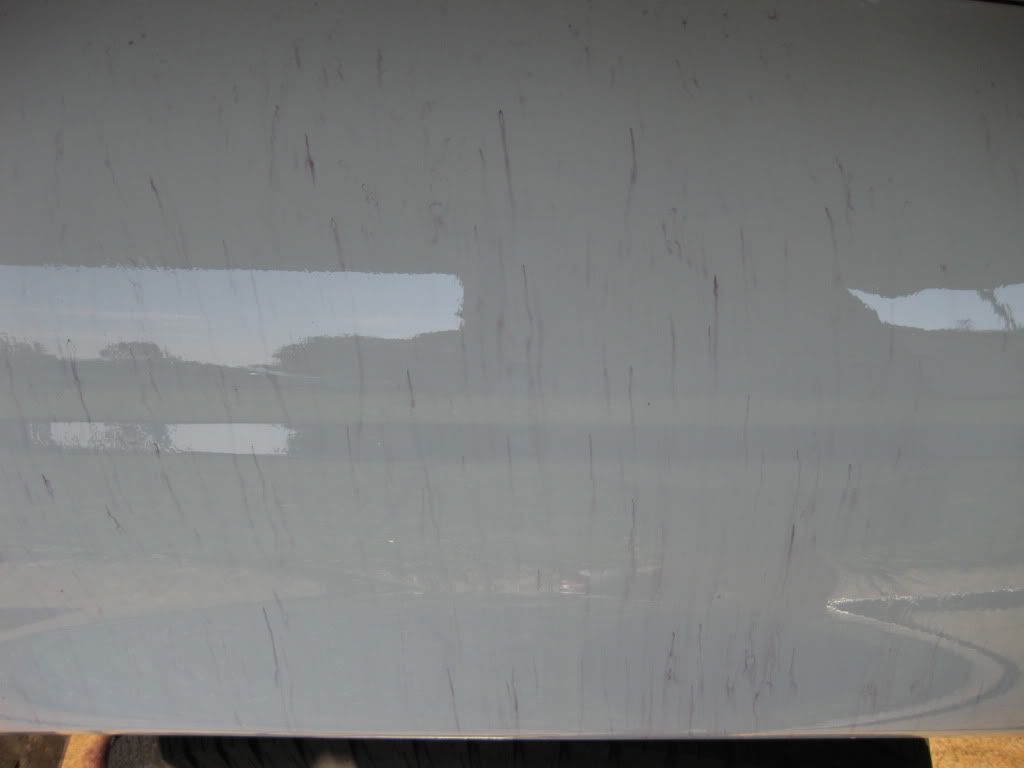
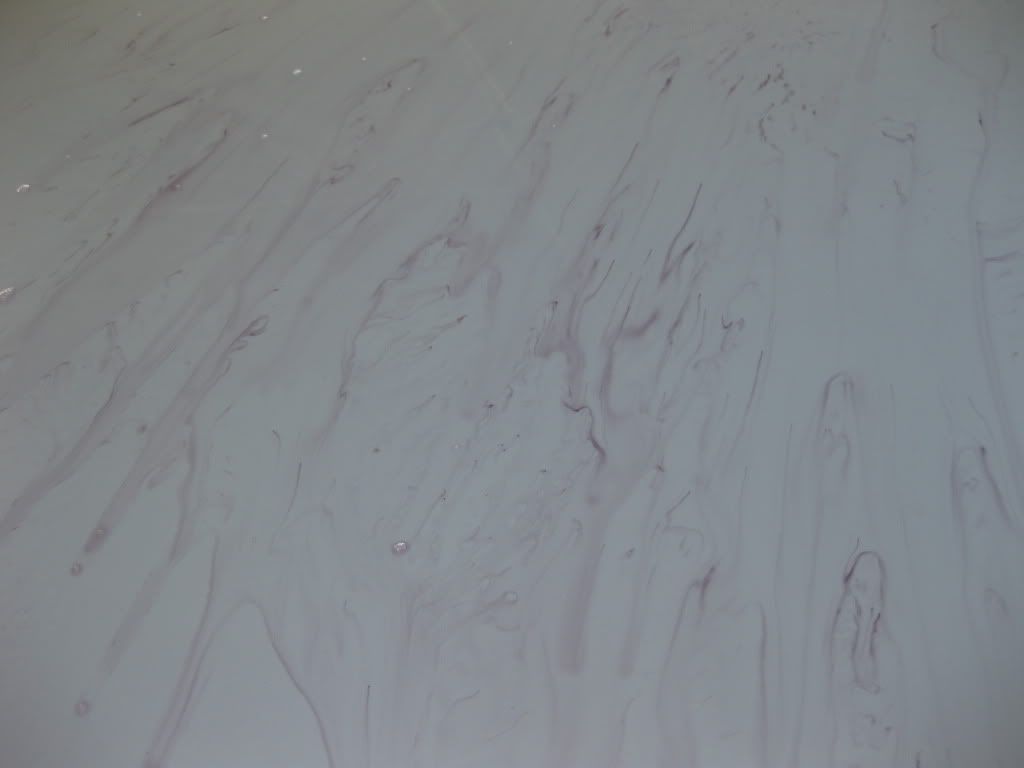
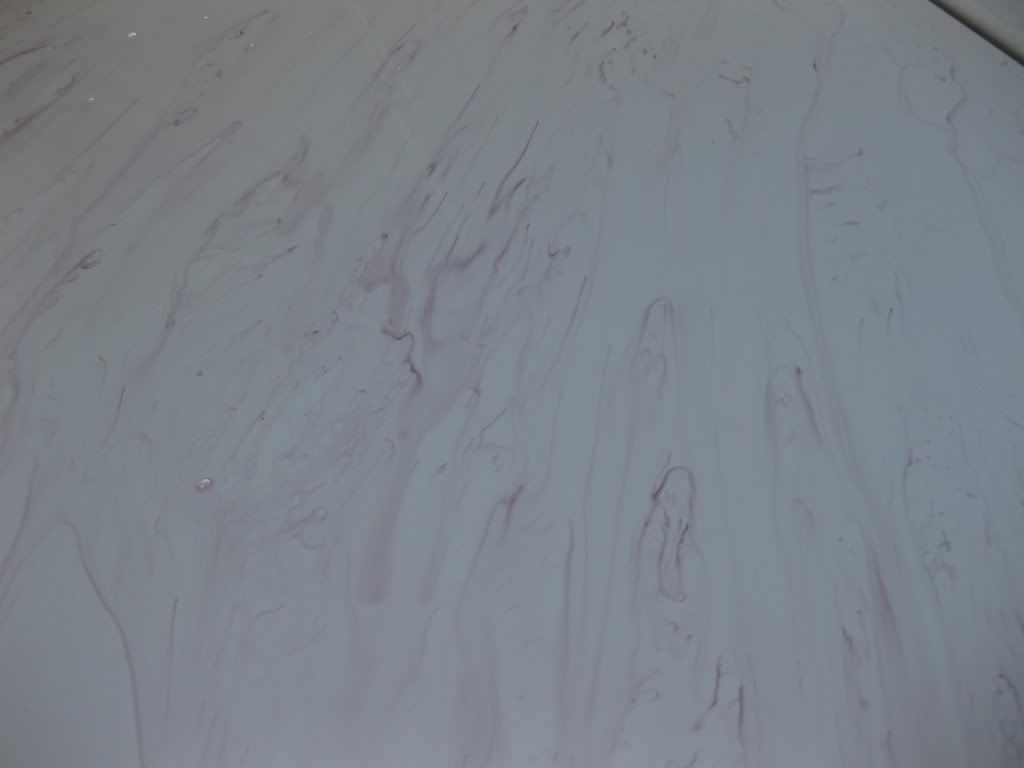
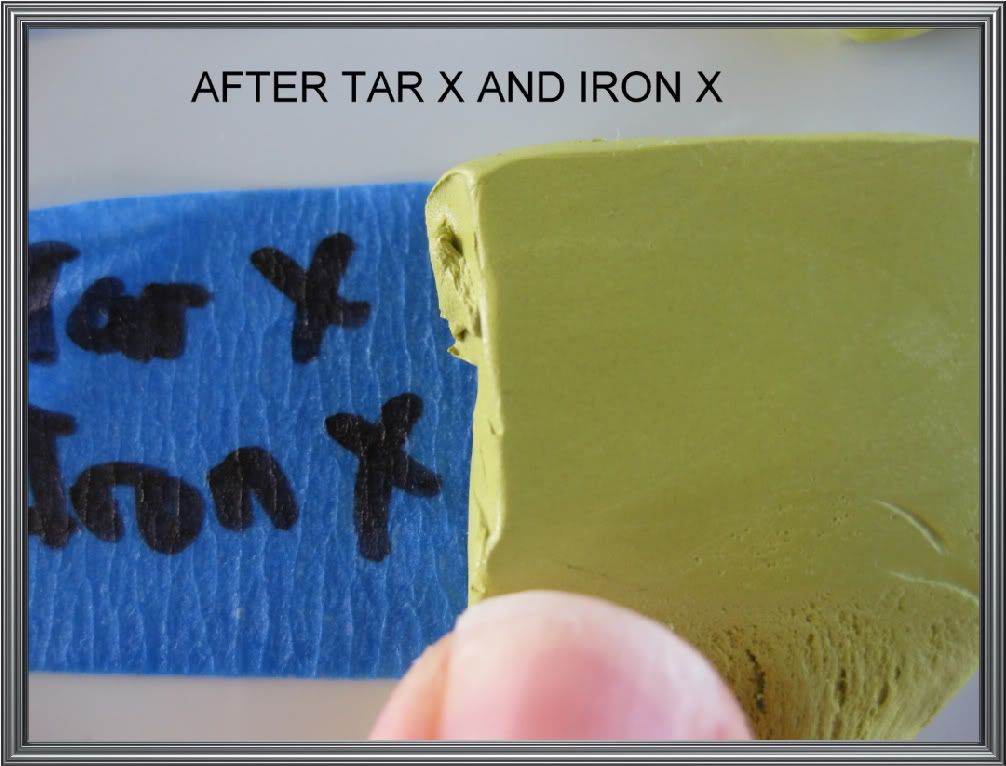
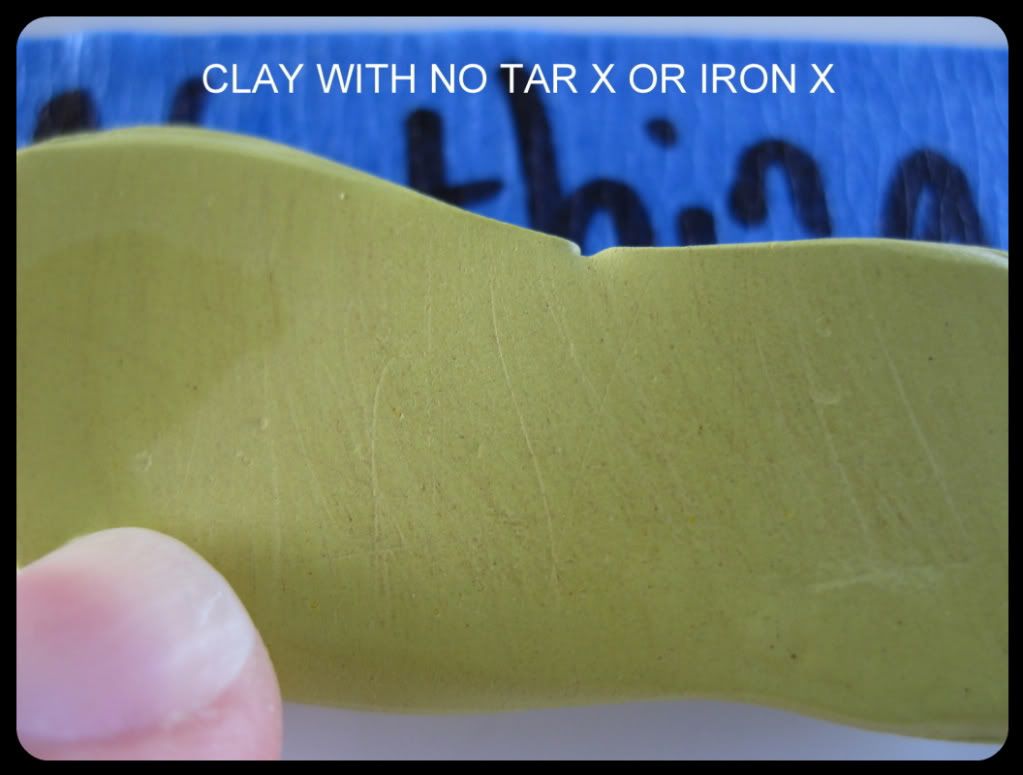
There are other products that change color during application but that doesn’t mean they are dissolving the iron. With some products this is just an affect of them coming into contact with (but not necessarily dissolving iron. Iron X is a product that does in fact dissolve iron contaminants as can be seen my test later in this review. As you will see the clay is noticeable more contaminated when you haven’t used Iron X first which proves that Iron X is in fact dissolving the iron particles it comes in contact with.
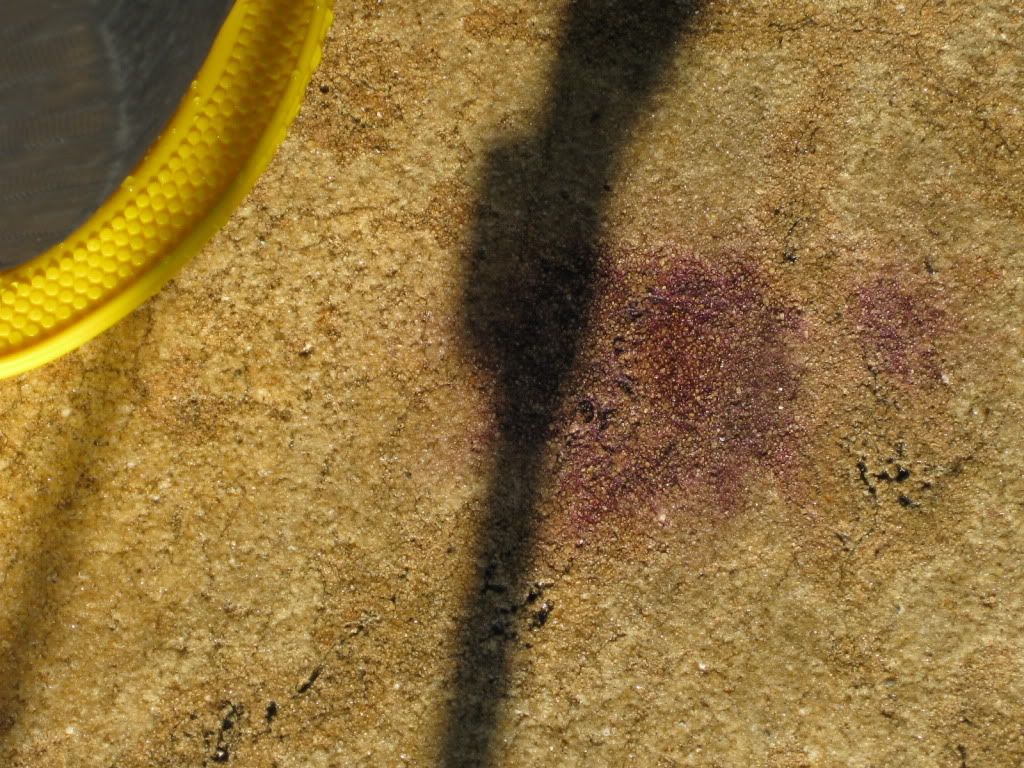
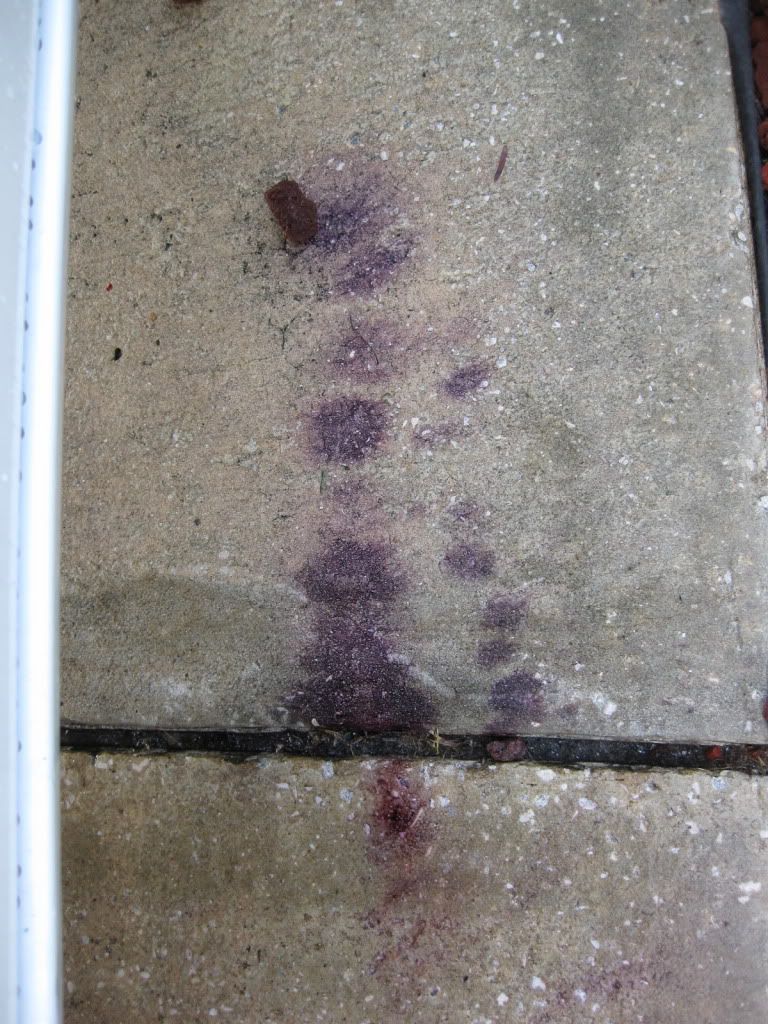
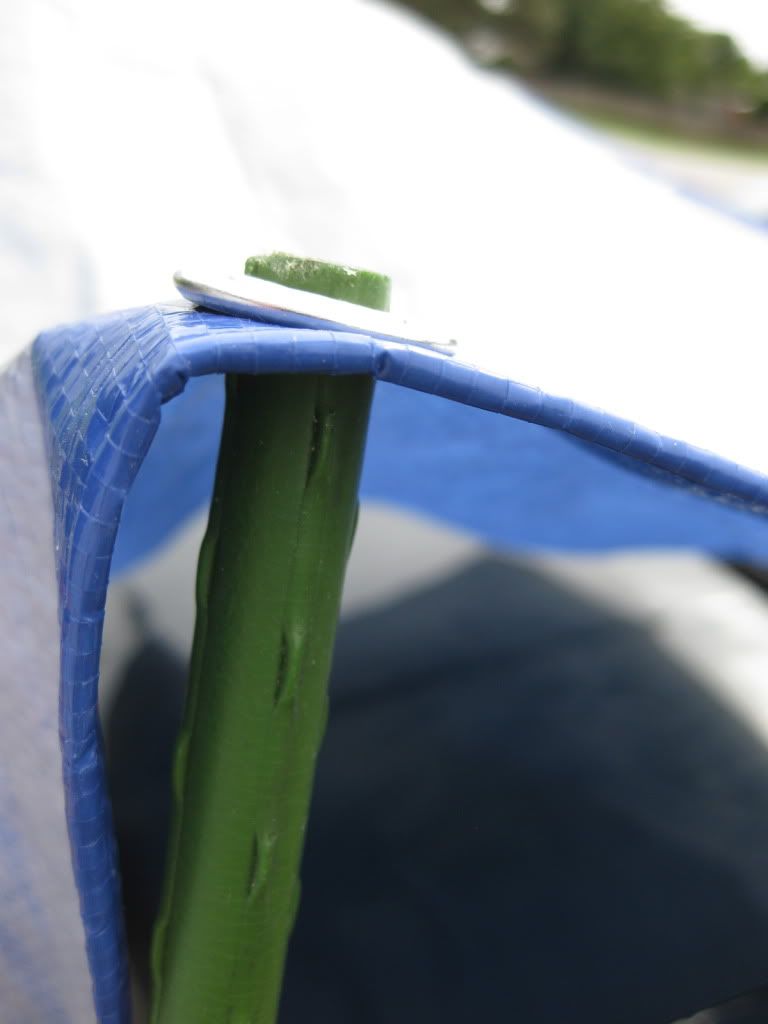
As you can see below, after using Iron X you may find some evidence of it’s use on the concrete around the vehicle but have no fear. It’s easily rinsed clean with the hose.
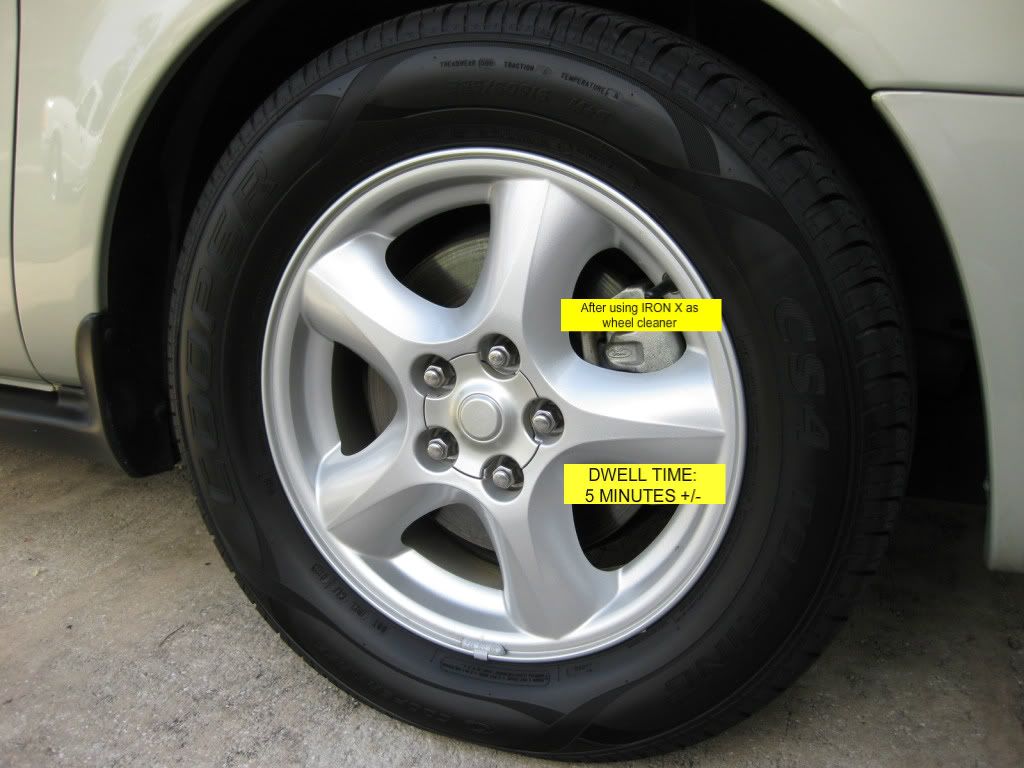
After allowing Iron X about 5 minutes dwell time I agitated it with my wash mitt before rinsing and drying the vehicle for my next step. On the vehicle shown here I used my wash mitt but I have since found that using a sponge for the Iron X step is more effective so a sponge is now my preferred method.
After the decontamination step and some product testing I tried clay on a test spot. Based on the cleanliness of the clay and other factors I chose to move forward without claying this particular vehicle. After polishing the vehicle was cleaned with Eraser and then coated with Cquartz.
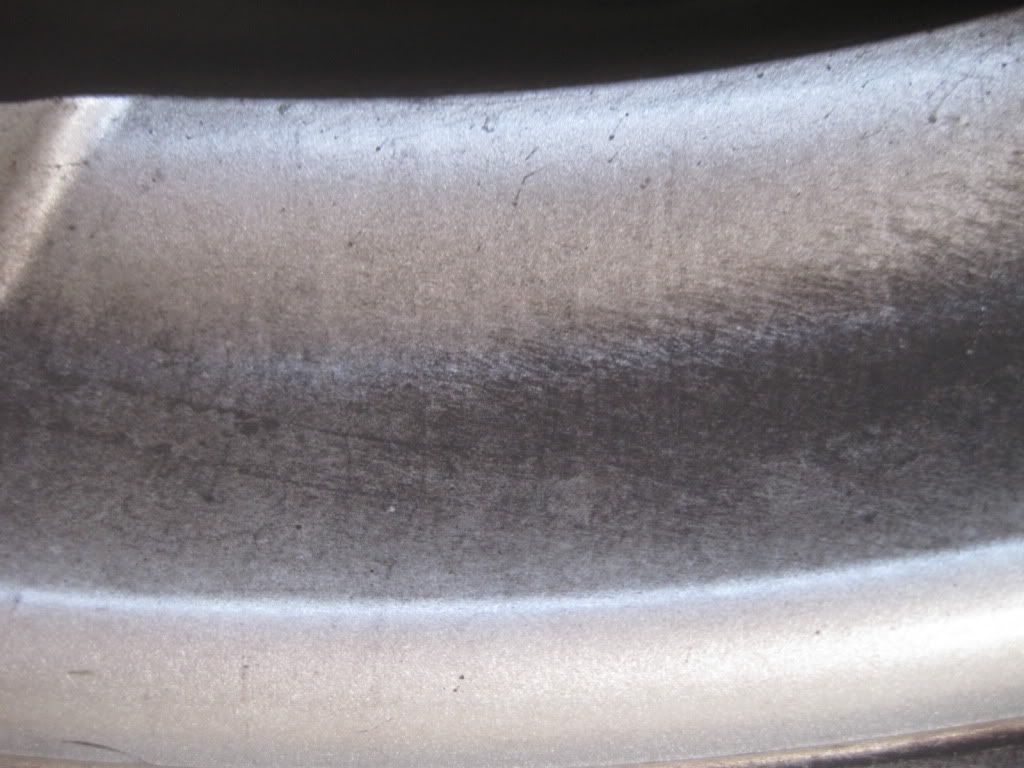
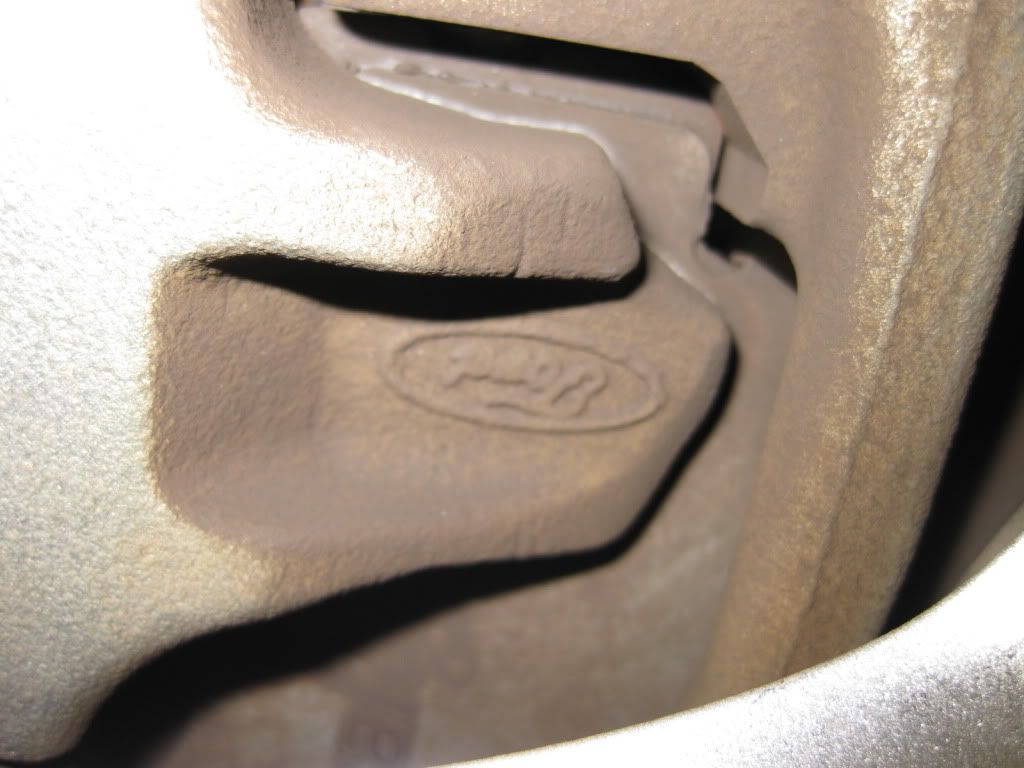
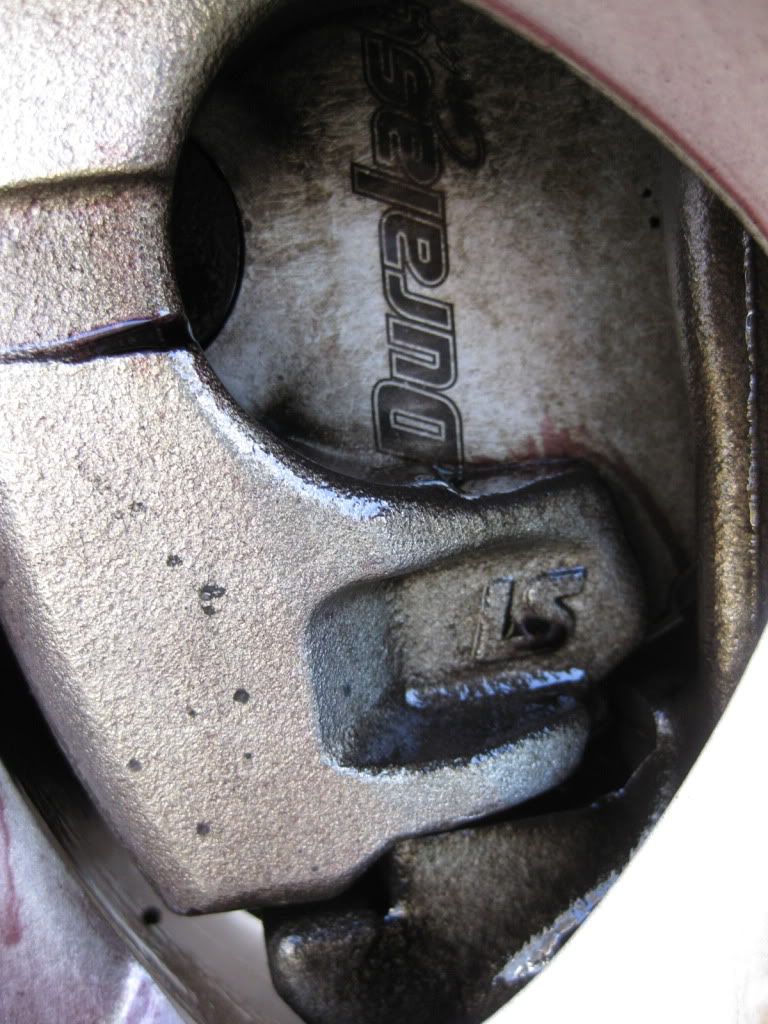
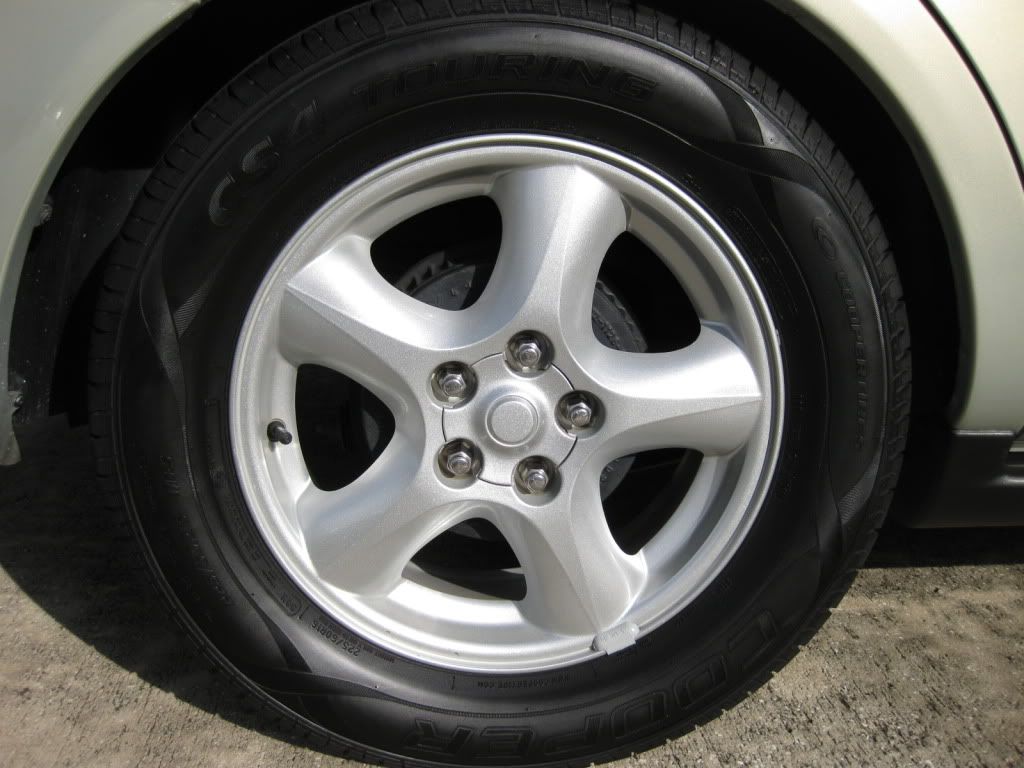
Iron X as a wheel cleaner
I have found Iron X to be an incredibly effective wheel cleaning aid and have done a bit of experimenting with it next to the Griots HD wheel cleaner. I found Iron X to be much more effective on iron but I quite liked the foaming ability of the GHD. I now use Iron X as a staple product for cleaning bad wheels. While I still use dedicated wheel cleaners in many cases I allow Iron X to do most of the work for me on baked on brake dust, which makes it sooo much easier! I have recently been experimenting with Iron X paste in some spots. It’s a great tool as well, but more on that another day.

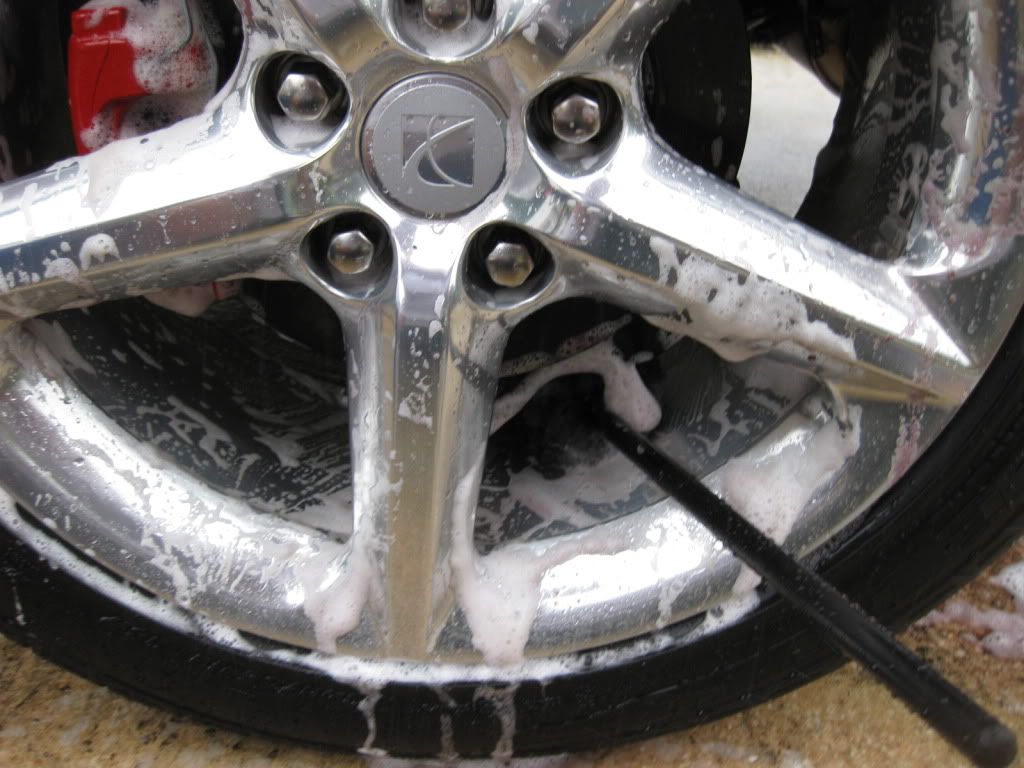
When using Iron X on my Sky wheels recently I allowed it to dwell as usual and then as I agitated it with my 3” wheel woolie I sprayed some foam cleaner across the area as well before rinsing it clean. I was just experimenting to see how I like the idea of foam and Iron X in conjunction.
Iron X vs. Clay & Iron X + Clay
After the testing I did back during my Tar X review I realized the scale of that test was too small so I decided to do a larger scale test with Iron X vs. clay for this review. I was hoping to book another white vehicle to work on but with none in sight I decided to try the test on my daily driver a couple weeks ago. I didn’t expect there to be enough contamination for the test but soon learned otherwise. First I'll give you the play by play, but please view the video of the process afterwards.
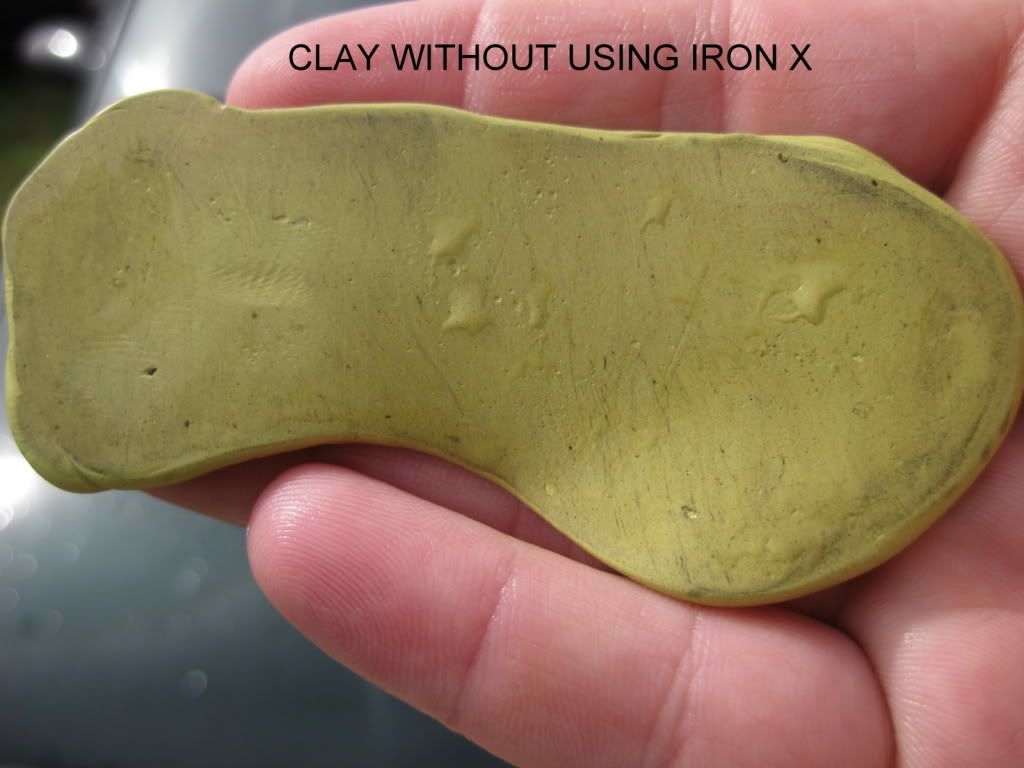
After washing the vehicle I began to clay the passenger half (US) of the hood and right away I realized there was plenty of iron and other contaminants to allow a test.
By the time I got to the drivers side for my Iron X section the sun was popping in and out of the clouds. Without my canopy I set up a temporary shelter.

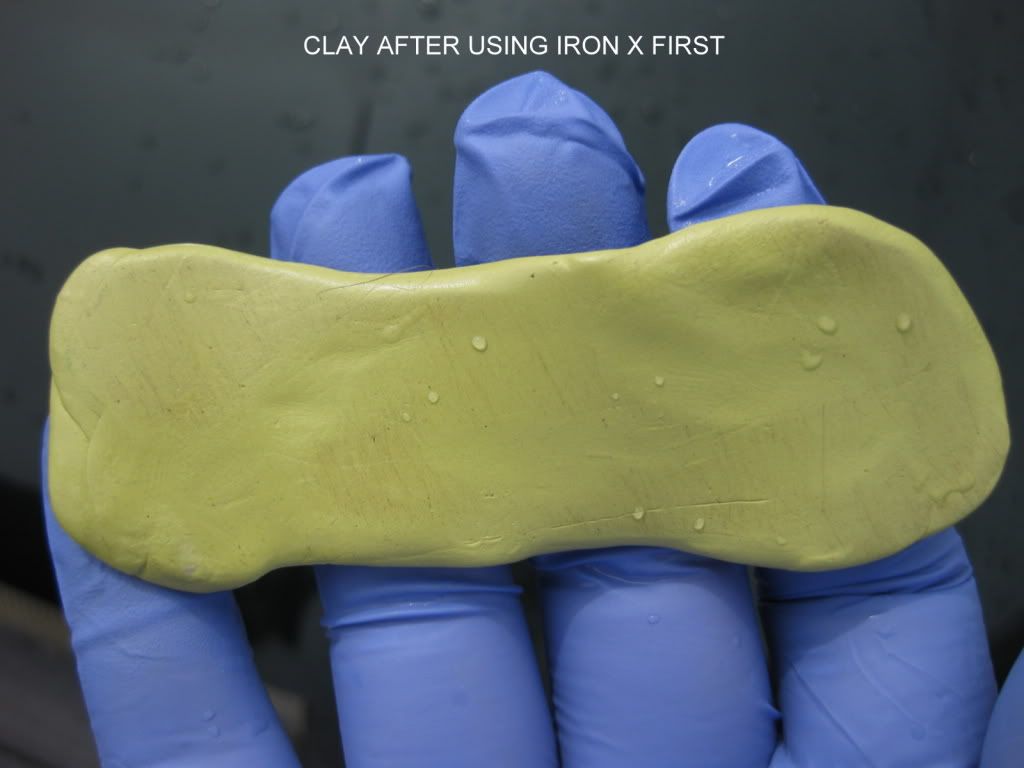
With that issue solved I sprayed Iron X across the surface and shortly thereafter lightly spread it with a small sponge to ensure complete coverage. After dwell time, agitation, and rinsing I moved onto the next phase of the test.
I wanted to see how much faster it would be to clay the side that had received Iron X treatment and how much cleaner the clay would be. I had intentionally clayed the untreated side of the hood without folding it even once. Normally I fold very often but for this test I abstained. As I began claying the Iron X treated side it was clear there was not near the same amount of contaminants left and clay application was both easier and a good deal faster.
The clay time on the treated side was about 3 minutes compared to over 10 minutes on the untreated side.
Using Iron X first also left the clay much cleaner, which means it will last longer ultimately saving me money.
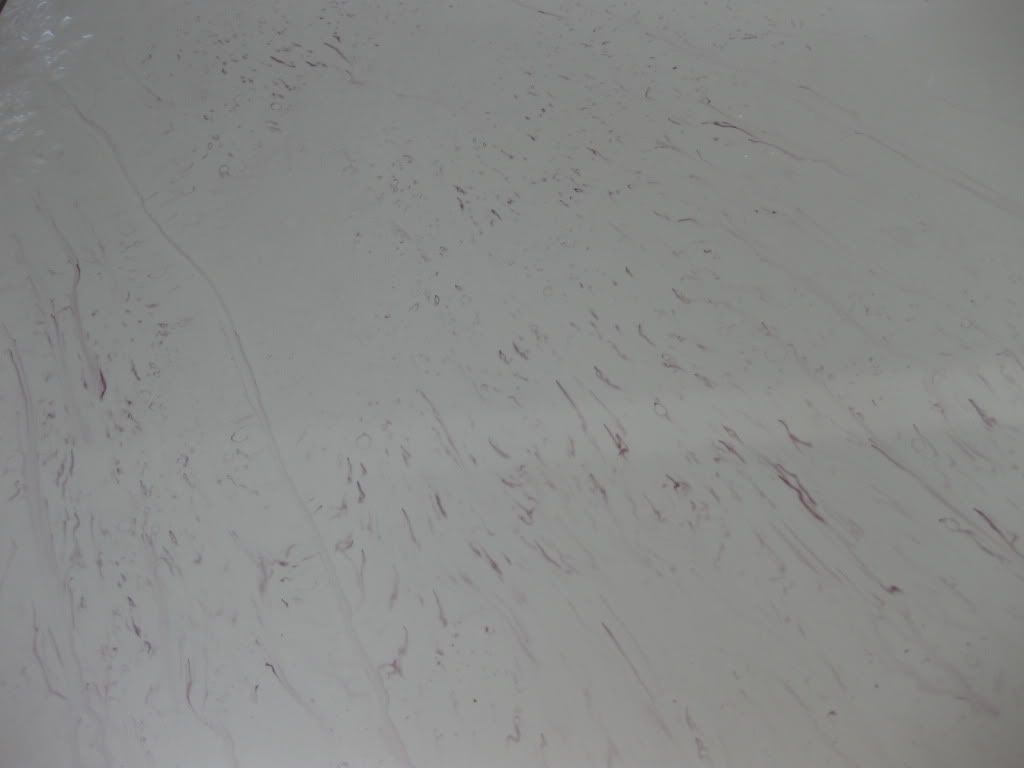
Next question was: Did the clay or Iron X remove more of the iron contaminants. For this test I applied Iron X to both sides of the hood and since the color of the paint made it difficult to show I used a lightly colored yellow sponge to show the difference. When it came time to agitate I cleaned and squeezed the sponge dry before using a separate side of the sponge for each side to pick up the color difference, which reflects the amount of iron particles left in the paint.
Here are the results:
With Clay a good deal more iron came off the paint when Iron X was applied afterwards
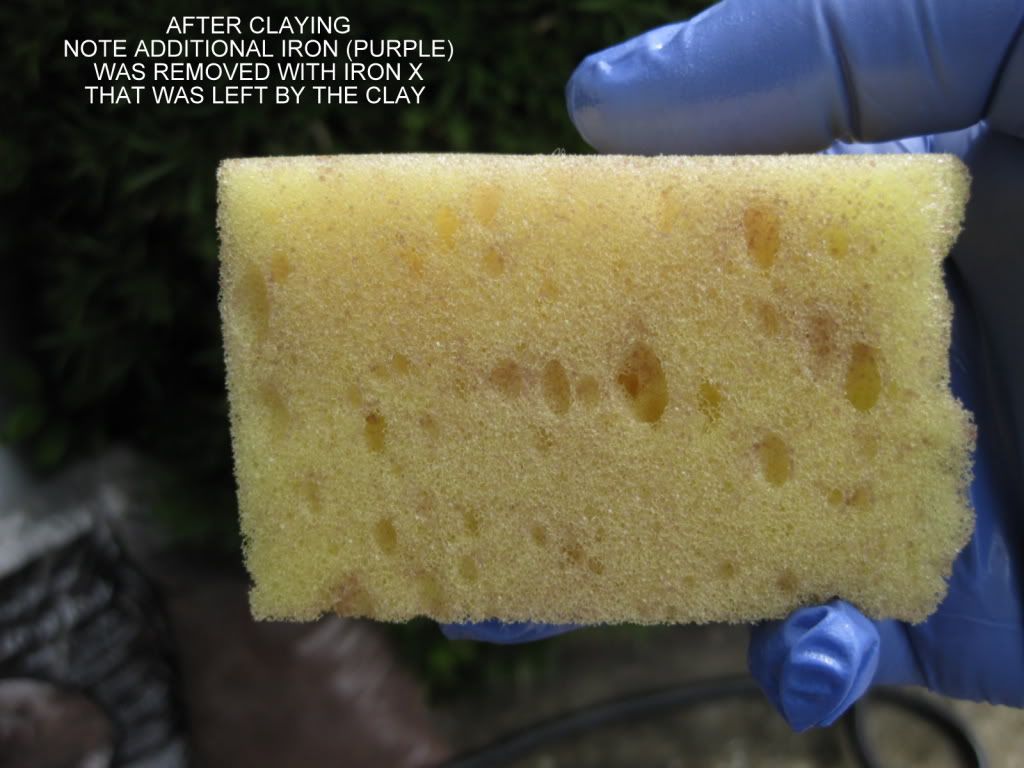
With Iron X only a small amount of additional iron was found on the second pass.
Video: Iron X vs. Clay & Iron X + Clay
[ame=http://www.youtube.com/watch?v=nUZok3jrj_o]Iron X.wmv - YouTube[/video]
Additional notes and observations:
There are a couple of other products that look as though they are based on the same technology as Iron X. I haven’t used them both but I did use the Iron Cut and in contrast it seemed to be weaker than Iron X and smelled worse (more rotten eggs then perm), not that that matters as much as function does to me.
Trigger:
Originally Iron X used a standard trigger with metal spring inside but upon recognizing the product was reacting with the spring CarPro made the move to an “all plastic” trigger, which is now in use.
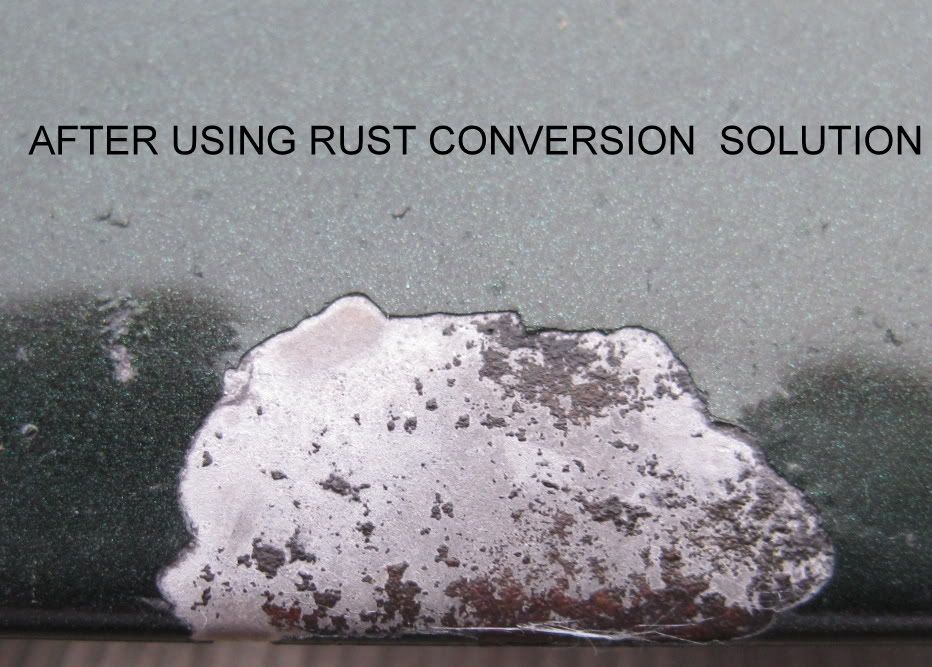
What to do about large paint chips on steel panels where even the primer is gone and it has rusted:
For this situation I would personally recommend that after you use Iron X you apply an iron conversion chemical before using touchup paint to protect the steel.

My Current Method of Application:
A.-Use outside or with sufficient ventilation.
B.-Use latex or Nitrile gloves, and face protection.
C.-If there is an inordinate amount of tree sap, tar, other organic material, wax, or sealants on the vehicle I recommend you strip them first so Iron X can attack the ferrous particles without any interference. This is not required but is how I like to do it for best results.
D.-For best results apply to a mostly dry surface. A few drops of water is ok.
1.-Shake the bottle.
2.-You can cover the surface with Iron X by spraying it everywhere but that can be wasteful. I recommend that you spray as needed and spread it with a small sponge or applicator to cover the entire surface. You may also consider using an atomizer type spray bottle or HVLP gun. In any case evenly cover the surfaces you wish to decontaminate. The product is strong so you don’t have to be wasteful. Just make sure it contacts the entire surface.
3.-Allow the product to dwell for 5 minutes in the shade. Do not allow it to dry in the sun.
On light colored paints you will see the product dissolving ferrous particles as it turns color. On darker colored paints everything is happening in exactly the same way. It’s simply more difficult for you to view the color changing affect. I have read people saying the product works better on lighter colored cars but that is illogical and is not the case. It works the same regardless of car color.
4.-After allowing to dwell take a damp (not soaked) grout or other paint safe sponge (or other media if you prefer) and agitate the surface.
5.-Thoroughly rinse the surface.
Don’t forget to rinse your media out also. I like the idea of having a dedicated Iron X sponge but that isn’t actually necessary and is simply wasteful for many people.
Pros:
1.- Safe for your paint: PH Balanced product is safe for clear coats and other surfaces (See Facts & FAQ below)
2.- Strength and effectiveness: Removes iron particles below the surface that clay leaves embedded in your paint
3.- Saves time: Reduce and in some cases eliminate the time intensive process of using clay. (My best estimate of clay time saved 50%-85%)
4.- Saves clay: Clay can be re-used more times and lasts longer.
5.- Application: Easy
???:
1.- Why are some retailers charging us the same for the Eco Packs as they do for the bottles when they are receiving them form CarPro at a lower cost? Can we get a piece of the money we should be saving by purchasing the pouch please?
Cons:
1.-Cost
2.-Does not replace clay entirely (although in some cases it allows you to skip it)
Final Observations and Summary:
After the wash mitt Iron X is my favorite CarPro product. It does an excellent job of removing iron particles from your paint without simply shaving the tops off like clay does. While clay is still usually useful it takes much less time and effort if you use Iron X first. Your clay will last longer and won’t always be needed on every panel. In situations where organic material like tar is an issue you can use an organic contaminant remover like Tar X to amplify the ease and speed of decontaminating your paint.
That about does it but I have just a couple more things. First is an Iron X FAQ followed by a partial repost of the testing I did for the Tar X review.
Introduction:
Two or three years ago I was considering purchasing a paint decontamination system to use on my Sky. I had been using clay but it bothered me that I wasn’t removing all of the contaminants since clay simply shaves the contaminants off at the surface of the paint. The problem was the paint contamination system I was looking at was difficult to apply and seemed to me to be a bit on the risky side.
Some time thereafter I heard about a product called Iron X. It was said Iron X was very simple to use and was entirely safe for paint. The only particles it would attack were the ferrous metals (like iron shavings and brake dust), which are lodged in the paint. A few months ago I started using this product and here’s my review.
Product Claims:
Iron X by CarPro is an acid-free, pH-balanced iron remover that decontaminates auto paint and wheels. Iron X prevents the spread of iron-related damage to protect your vehicle from paint system failure.
Details:
1.- Packaging: Plastic Bottle with all plastic trigger or Eco refill packs
2.- Directions: Clearly labeled
3.- Viscosity: Thin
4.- Color: Clear
5.- Scent: Squash Flowers (Mixed with hair perm J)
6.- Regular Price: 16.9 oz. (500ml) = $ 19.99
7.- Regular Price: 33.8 oz. (1000ml) = $ 32.99
8.- Regular Price: 169.0 oz. (5000ml) = $124.99
9.- Manufacturer: CarPro
10.- Made in: Korea
00-Product
Additional products used during application of Iron X:
1.- Sponge
01-Conditions
Preparation:
Typically when using Iron X I am planning to also polish the paint but sometimes it is simply a quick way to remove iron particles for a good wash and a wax or sealant. This time around I would be polishing and protecting with Cquartz.
I began by washing the truck down with UPGW followed by OPC 3:1. After a thorough rinse I very quickly went over it with the Master Blaster to remove the excess water. After that step I moved forward with application of Tar X as described in a seperate review.
After dwelling time, agitation, removal, and rinse I used the Master Blaster once more to remove the excess water.
Application and noted observations:
I applied Iron X by spraying it directly on the surface as is recommended. It didn’t take long before I observed a dark color emerging from the paint, which as you may know is the reaction of Iron X with the embedded iron particles in the paint.
There are other products that change color during application but that doesn’t mean they are dissolving the iron. With some products this is just an affect of them coming into contact with (but not necessarily dissolving iron. Iron X is a product that does in fact dissolve iron contaminants as can be seen my test later in this review. As you will see the clay is noticeable more contaminated when you haven’t used Iron X first which proves that Iron X is in fact dissolving the iron particles it comes in contact with.
As you can see below, after using Iron X you may find some evidence of it’s use on the concrete around the vehicle but have no fear. It’s easily rinsed clean with the hose.
After allowing Iron X about 5 minutes dwell time I agitated it with my wash mitt before rinsing and drying the vehicle for my next step. On the vehicle shown here I used my wash mitt but I have since found that using a sponge for the Iron X step is more effective so a sponge is now my preferred method.
After the decontamination step and some product testing I tried clay on a test spot. Based on the cleanliness of the clay and other factors I chose to move forward without claying this particular vehicle. After polishing the vehicle was cleaned with Eraser and then coated with Cquartz.
Iron X as a wheel cleaner
I have found Iron X to be an incredibly effective wheel cleaning aid and have done a bit of experimenting with it next to the Griots HD wheel cleaner. I found Iron X to be much more effective on iron but I quite liked the foaming ability of the GHD. I now use Iron X as a staple product for cleaning bad wheels. While I still use dedicated wheel cleaners in many cases I allow Iron X to do most of the work for me on baked on brake dust, which makes it sooo much easier! I have recently been experimenting with Iron X paste in some spots. It’s a great tool as well, but more on that another day.
When using Iron X on my Sky wheels recently I allowed it to dwell as usual and then as I agitated it with my 3” wheel woolie I sprayed some foam cleaner across the area as well before rinsing it clean. I was just experimenting to see how I like the idea of foam and Iron X in conjunction.
Iron X vs. Clay & Iron X + Clay
After the testing I did back during my Tar X review I realized the scale of that test was too small so I decided to do a larger scale test with Iron X vs. clay for this review. I was hoping to book another white vehicle to work on but with none in sight I decided to try the test on my daily driver a couple weeks ago. I didn’t expect there to be enough contamination for the test but soon learned otherwise. First I'll give you the play by play, but please view the video of the process afterwards.
After washing the vehicle I began to clay the passenger half (US) of the hood and right away I realized there was plenty of iron and other contaminants to allow a test.
By the time I got to the drivers side for my Iron X section the sun was popping in and out of the clouds. Without my canopy I set up a temporary shelter.
With that issue solved I sprayed Iron X across the surface and shortly thereafter lightly spread it with a small sponge to ensure complete coverage. After dwell time, agitation, and rinsing I moved onto the next phase of the test.
I wanted to see how much faster it would be to clay the side that had received Iron X treatment and how much cleaner the clay would be. I had intentionally clayed the untreated side of the hood without folding it even once. Normally I fold very often but for this test I abstained. As I began claying the Iron X treated side it was clear there was not near the same amount of contaminants left and clay application was both easier and a good deal faster.
The clay time on the treated side was about 3 minutes compared to over 10 minutes on the untreated side.
Using Iron X first also left the clay much cleaner, which means it will last longer ultimately saving me money.
Next question was: Did the clay or Iron X remove more of the iron contaminants. For this test I applied Iron X to both sides of the hood and since the color of the paint made it difficult to show I used a lightly colored yellow sponge to show the difference. When it came time to agitate I cleaned and squeezed the sponge dry before using a separate side of the sponge for each side to pick up the color difference, which reflects the amount of iron particles left in the paint.
Here are the results:
With Clay a good deal more iron came off the paint when Iron X was applied afterwards
With Iron X only a small amount of additional iron was found on the second pass.
Video: Iron X vs. Clay & Iron X + Clay
[ame=http://www.youtube.com/watch?v=nUZok3jrj_o]Iron X.wmv - YouTube[/video]
Additional notes and observations:
There are a couple of other products that look as though they are based on the same technology as Iron X. I haven’t used them both but I did use the Iron Cut and in contrast it seemed to be weaker than Iron X and smelled worse (more rotten eggs then perm), not that that matters as much as function does to me.
Trigger:
Originally Iron X used a standard trigger with metal spring inside but upon recognizing the product was reacting with the spring CarPro made the move to an “all plastic” trigger, which is now in use.
What to do about large paint chips on steel panels where even the primer is gone and it has rusted:
For this situation I would personally recommend that after you use Iron X you apply an iron conversion chemical before using touchup paint to protect the steel.
My Current Method of Application:
A.-Use outside or with sufficient ventilation.
B.-Use latex or Nitrile gloves, and face protection.
C.-If there is an inordinate amount of tree sap, tar, other organic material, wax, or sealants on the vehicle I recommend you strip them first so Iron X can attack the ferrous particles without any interference. This is not required but is how I like to do it for best results.
D.-For best results apply to a mostly dry surface. A few drops of water is ok.
1.-Shake the bottle.
2.-You can cover the surface with Iron X by spraying it everywhere but that can be wasteful. I recommend that you spray as needed and spread it with a small sponge or applicator to cover the entire surface. You may also consider using an atomizer type spray bottle or HVLP gun. In any case evenly cover the surfaces you wish to decontaminate. The product is strong so you don’t have to be wasteful. Just make sure it contacts the entire surface.
3.-Allow the product to dwell for 5 minutes in the shade. Do not allow it to dry in the sun.
On light colored paints you will see the product dissolving ferrous particles as it turns color. On darker colored paints everything is happening in exactly the same way. It’s simply more difficult for you to view the color changing affect. I have read people saying the product works better on lighter colored cars but that is illogical and is not the case. It works the same regardless of car color.
4.-After allowing to dwell take a damp (not soaked) grout or other paint safe sponge (or other media if you prefer) and agitate the surface.
5.-Thoroughly rinse the surface.
Don’t forget to rinse your media out also. I like the idea of having a dedicated Iron X sponge but that isn’t actually necessary and is simply wasteful for many people.
Pros:
1.- Safe for your paint: PH Balanced product is safe for clear coats and other surfaces (See Facts & FAQ below)
2.- Strength and effectiveness: Removes iron particles below the surface that clay leaves embedded in your paint
3.- Saves time: Reduce and in some cases eliminate the time intensive process of using clay. (My best estimate of clay time saved 50%-85%)
4.- Saves clay: Clay can be re-used more times and lasts longer.
5.- Application: Easy
???:
1.- Why are some retailers charging us the same for the Eco Packs as they do for the bottles when they are receiving them form CarPro at a lower cost? Can we get a piece of the money we should be saving by purchasing the pouch please?
Cons:
1.-Cost
2.-Does not replace clay entirely (although in some cases it allows you to skip it)
Final Observations and Summary:
After the wash mitt Iron X is my favorite CarPro product. It does an excellent job of removing iron particles from your paint without simply shaving the tops off like clay does. While clay is still usually useful it takes much less time and effort if you use Iron X first. Your clay will last longer and won’t always be needed on every panel. In situations where organic material like tar is an issue you can use an organic contaminant remover like Tar X to amplify the ease and speed of decontaminating your paint.
That about does it but I have just a couple more things. First is an Iron X FAQ followed by a partial repost of the testing I did for the Tar X review.


 rops:
rops:")