Mike Phillips
Active member
- Dec 5, 2022
- 51,004
- 6
Review: Griot's Garage G8 Headlight Sander
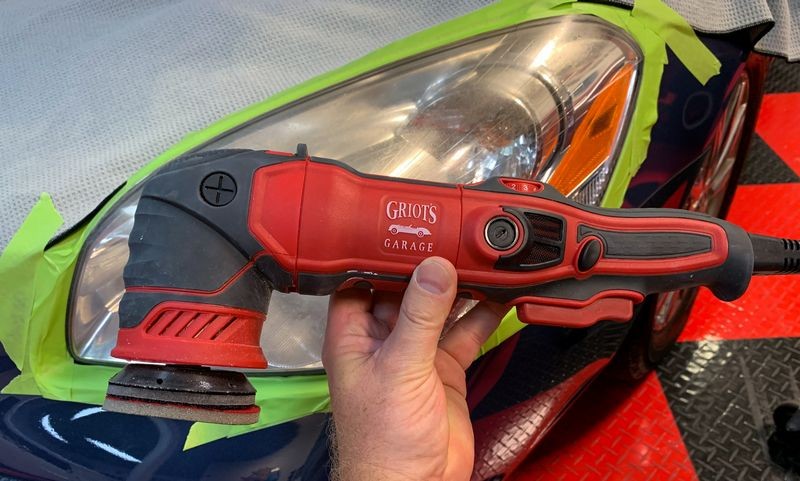
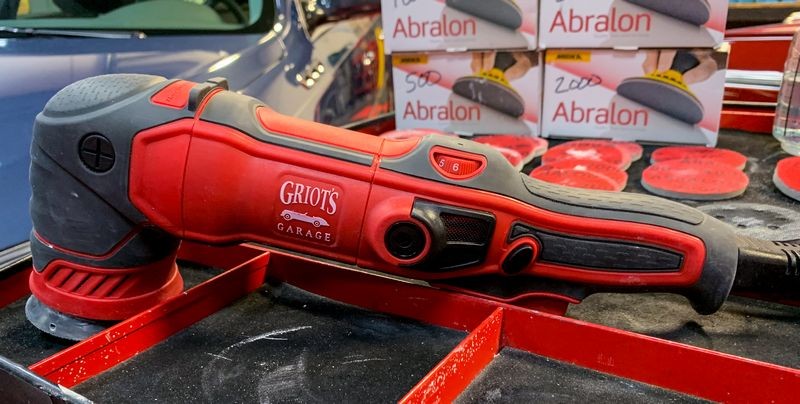
The Griot's Garage G8 Headlight Sander
Headlight sander?
Technically, the Griot's Garage G8 is a mini polisher and the replacement for their older 3" Mini Polisher. There's a huge difference between the old 3" Mini Polisher and its replacement the G8 Mini Polisher. The key differences are,
Orbit Stroke Length
3" Mini Polisher = 5mm free spinning random orbital polisher.
New G8 = 8mm free spinning random orbital polisher.
Power
3" Mini Polisher = 240 watt motor.
G8 Mini Polisher = 700 watt motor.
There's more new features with the new G8 that makes it a really great tool but in this how-to article, I'm going to show you besides being a great mini paint polishing tool it's also a great headlight sander.
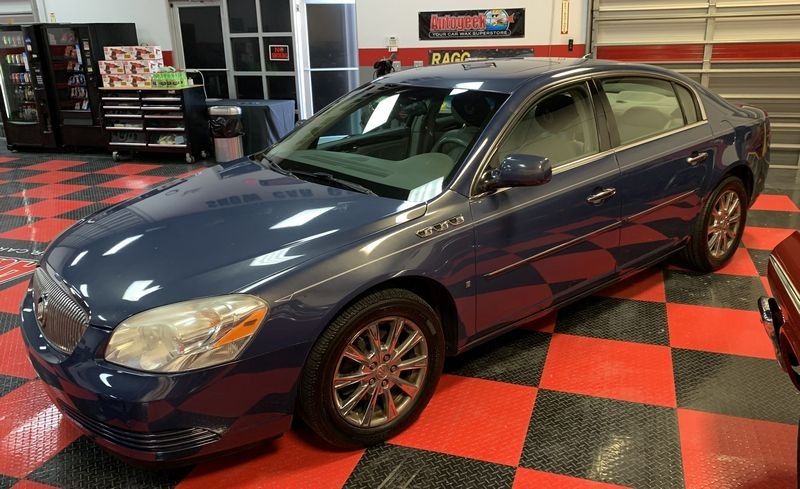
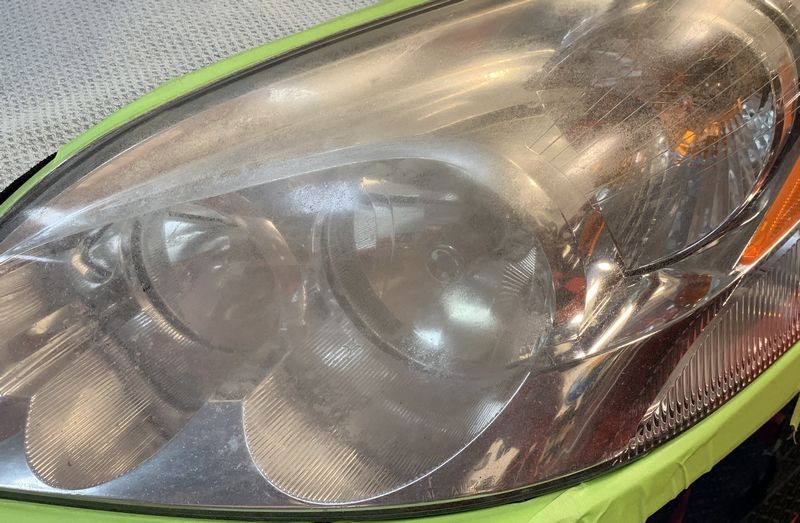
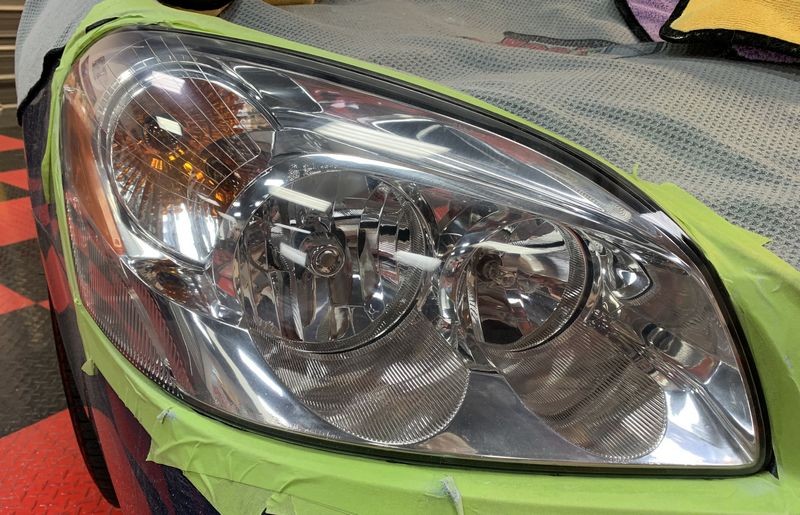
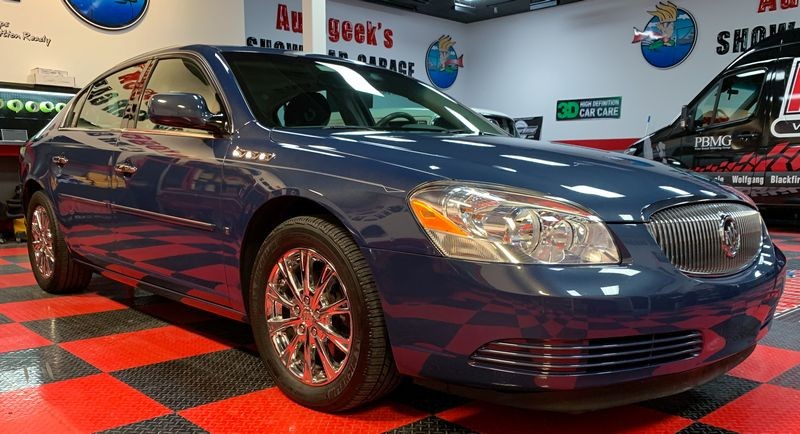
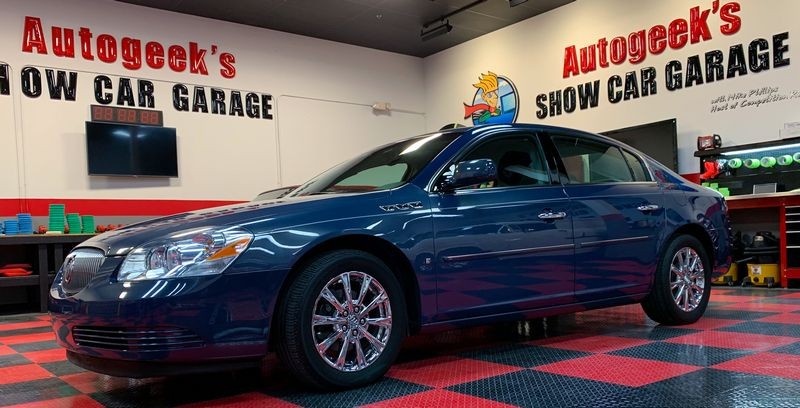
Demo car
This 2012 Buick Lucerne belongs to a friend of mine and as you can see, it's in dire need of headlight restoration.
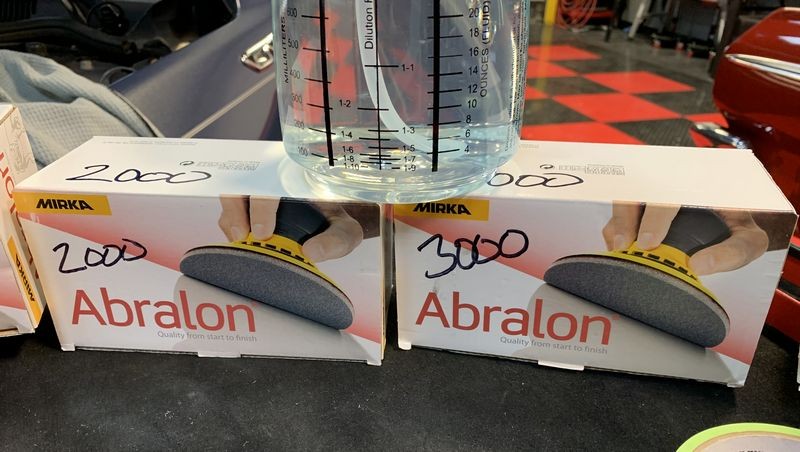
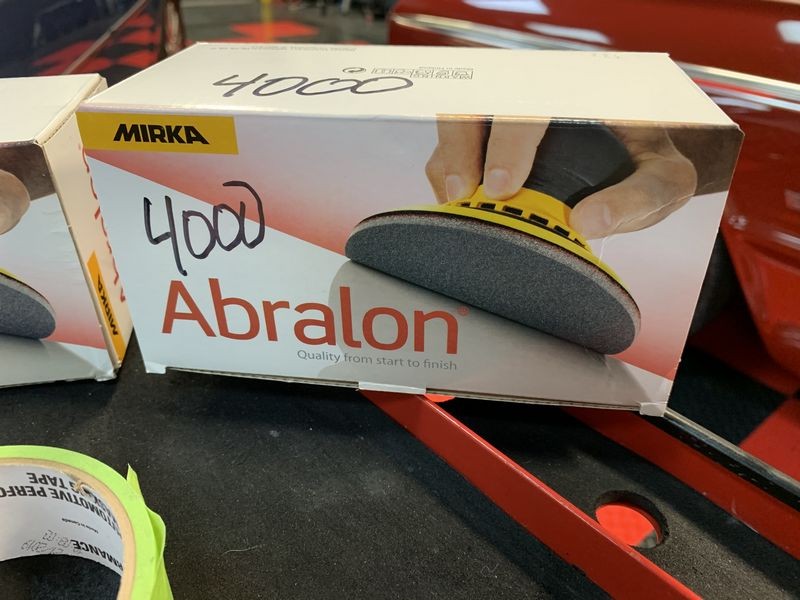
Mirka Abralon 3" Sanding Discs
In order to machine sand with the Griot's G8 you're going to need some 3" sanding discs. Here at Autogeek we carry the complete range of Mirka Abralon sanding discs ranging from #500 grit to #4000 grit. And "yes" for some headlights you're going to want to start with #500 grit in order to remove the dead, oxidized plastic and in some instances, the failed OEM coating. I've even had to resort to #320 grit wood sanding paper by hand in order to remove failed OEM coatings. So be prepared and get a collection of of various grits ahead of time as you cannot easily find these 3" discs at your local stores.
Clean Sanding Lube
Besides the sanding discs you'll also want to get a spray bottle with clean water and a few drops of soap. The soap can be car wash soap or even dish washing detergent. The type isn't important as most any type or brand will work. If you're working in a fresh paint environment like a body shop and machine sanding headlights (or anything), then you would want to use a Body Shop Safe soap.
The soap acts to lubricate the sanding process better than just water alone. The soap aslo helps to prevent your sanding disc from loading up with plastic particles, or in the case of machine sanding paint, it helps to prevent the sanding disc from loading up with paint. Remember, just a few drops in a 32 ounce bottle like I show in the picture below. If you use too much you create a lot of suds or foam and this can make it harder to see the surface you're sanding.

Foam Interface Pads
You will also need a 3" foam interface pad. This is a flexible foam pad that assists in the sanding process a number of different ways.
1: The foam flexes to enable the face of the sanding disc to conform to the curve of a headlight as many headlights have a curved design.
2: The foam interface pad acts to smooth out the abrading action for a more uniform sanding mark pattern for easier buff-out.
3: The foam interface pad acts to smooth out the sanding "action" that is felt by you - holding the tool.
The Abralon sanding discs to have a foam backing and you can get away without a foam interface pad but in my opinion and experience, it's better to use the foam interface pad than to sand without it and this is more true when machine sanding car paint. At Autogeek we carry 3" foam interface pads from Abralon. I believe the Meguiar's 3" foam interface pad has been discontinued.

Protective Tape
This is the 3M Painter's Tape and it's very stout as far as protective tape goes. You want to tape-off the paint around the headlight with 2 layers of tape just in-case you run the sander off the headlight and onto surrounding paint.
Most of the videos I see on sanding headlights get it close, but miss one thing. When taping off the paint around a headlight you want to lay down 2 LAYERS of protective tape - not just one layer.
Why?
Because if your hands waiver at all and you accidentally run a #500 grit sanding disc over a single layer of tape - there's a good chance you'll pull the tape up or even sand through it and now you have #500 grit sanding marks in clearcoat paint that is thinner than a Post-it Note. The recovery from #500 grit sanding marks inflicted into paint that's thinner than a Post-it Note can lead to sanding and buffing through the clearcoat. So take the time and the tape to lay down 2 layers of tape protection.

Technique Tip
For some cars, the way the body style is designed, the hood panel runs across the top of the headlight. If this is how the car you're working on is designed, then instead of taping off the pant on the hood next o the headlight simply open the hood and get this portion of paint AWAY from the sanding process.
Genius huh?
But - now you risk spraying splatter dots of wet sanding slurry all over the engine compartment. So to avoid having to clean the engine compartment simply lay some type of cover over the ares next to the sanding process. You could use a beach towel, an old blanket, some cardboard, etc.
Autogeek Cover-up Towel
Pictured below I've placed a couple of Autogeek Cover-up Towels in the engine compartment to cover-up and shield the engine compartment from the splatter created by machine sanding. Besides working great for this application you'll find yourself using the cover-up towels for all kinds of projects where you need to protect something from splatter dots. For example convertible tops, fuel injectors on show car engines, etc.

Here you can see two layers of tape around the headlight and the cover-up towel covering the engine compartment.

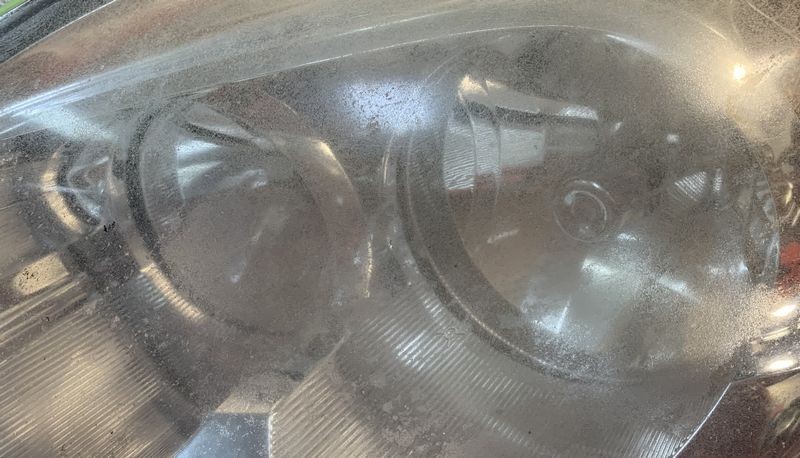
And here you can see how severely corroded and oxidized the plastic surface of the headlight has become.
Sanding versus Buffing
The surface is so neglected it is no longer smooth like it started out when the car was new - it now has a coarse texture. These headlights are so neglected that buffing alone will not properly restore them and this is why these headlights need to be sanded.
Step 1: Machine damp sanding with #500 Grit Abralon.

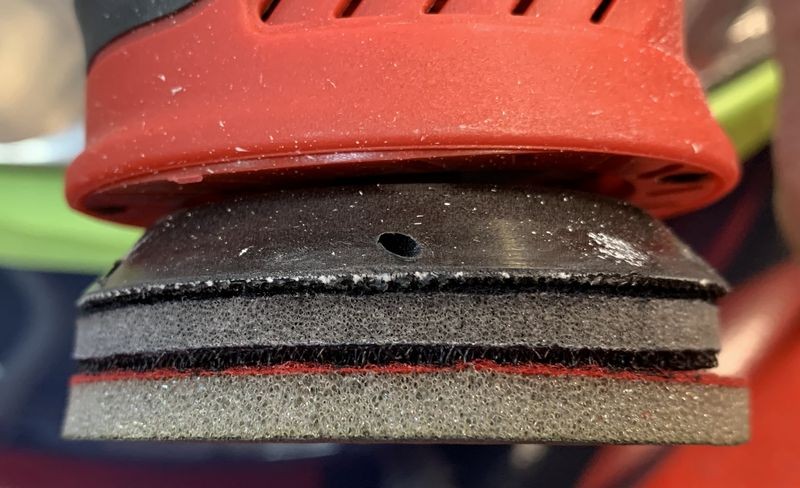
First I attach the foam interface pad to the backing plate on the Griot's G8 - it's important to center it up.

Then I place the #500 grit sanding disc onto the interface pad. In this side shot, you can see how much cushion is now available with the combined foam from the sanding disc and the interface pad.
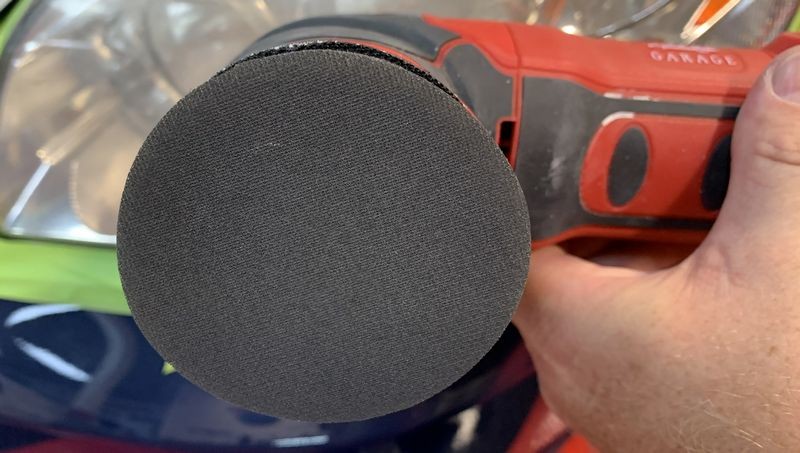
Here's the face of the the Abralon disc - if you look closely you can see it has a screen mesh design to hold and distribute the abrasive particles.
Step 2: Spray some sanding lube onto the headlight.

Sanding Slurry
Here I've sanded just a section and you can see the white colored sanding slurry on the face of the sanding disc and on the headlights. This is normal. The slurry is a mixture of the water and the plastic particles being sanded off the surface of the headlight.

Speed Setting 5
I experimented with some different speed settings and found I was able to easily maintain pad rotation on speed setting 5. Speed setting 6 worked of course also but was a tick to fast for effective abrading action and control.
After dialing in the speed setting that worked best, I continue to machine sand the entire headlight. It helps to use some type of section pass PATTERN as you sand simply so you know how many times you've sanded an area. Because there are so many different shapes and designs for headlights you'll have to be creative and come up with your a pattern to run the polisher over the headlight that works best for the headlight in front of you.
With #500 grit sanding discs, you'll still need to make around 10 to 12 solid section passes over a section of headlight to remove all the dead, oxidized plastic.

PAY ATTENTION
Now pay attention to the appearance of the plastic after each grit sanding step. See how opaque or frosted the plastic looks? As I work UP in the grit level the plastic will become more and more clear.
These are the results after sanding with #500 Mirka Abralon
Step 3: Re-sand with the #1000 grit sanding disc.
Refining your sanding marks
Step 3 through Step 6 is re-sanding the headlight with each of the different sanding discs until you finish out with the #4000 grit. Each time you move up in the grit level you refine the previous sanding marks so they are more shallow. The finer you sand out to the faster and easier it will be to buff out your sanding mark pattern.

Step 3: Re-sand with the #2000 grit sanding disc.
Step 3: Re-sand with the #3000 grit sanding disc.

Step 3: Re-sand with the #4000 grit sanding disc.
First - LOOK how CLEAR the plastic is after machine sanding with #4000 grit sanding discs. At this point, I could rub-out the sanding marks by hand with a quality compound and some cotton terrycloth.
Buffing time!
To show you how easy it is to buff out #4000 grit sanding marks from plastic I used the Griot's Garage Fast Correction Creme with a Griot's BOSS orange foam cutting pad. And of course, I used the same tool I did all the sanding with - the Griot's G8.

Looks brand new!

Repeat the process to the other headlights....


BOOM! - Crystal Clear!
Here's everything used to machine sand the headlights including the number of sanding discs in order from left to right, #400 grit to #4000 grit. By my count I used a total of 18 discs.

6 - #400 grit - 3 discs for each headlight
4 - #1000 grit - 2 discs for each headlight
4 - #2000 grit - 2 discs for each headlight
2 - #3000 grit - 1 disc for each headlight
2 - #4000 grit - 1 disc for each headlight

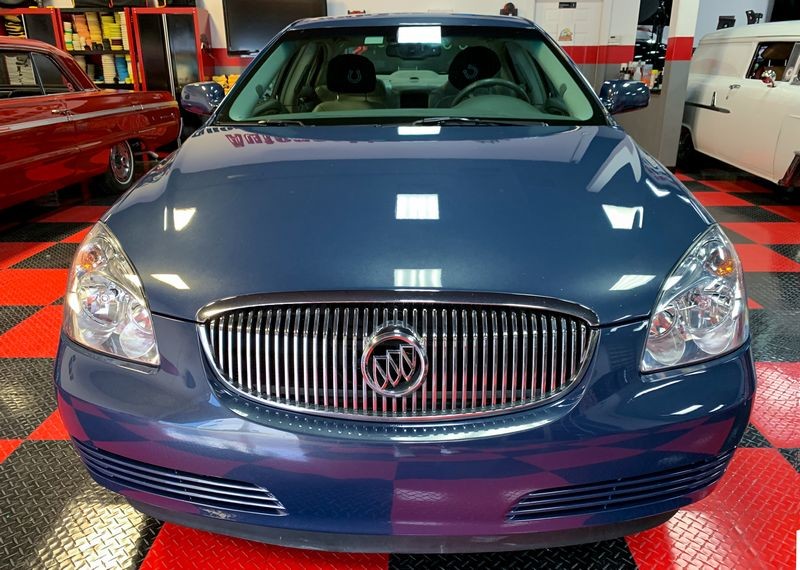
Final results...
After all the sanding, I used the Griot's Garage Headlight Restoration Coating out of the Griot's Headlight Restoration Kit. Sorry no pictures, I simply ran out of time as I did this project the weekend before my first 3-day Car Detailing Bootcamp Class.
The best headlight sander I've ever used...
Review and Comments
Not only is this a great mini polisher for buffing out thin panels and intricate areas it also works great for machine sanding headlights. It has way more power than the old Griot's 3" Mini Polisher and that shows up as a more robust ability to maintain rotation of the sanding discs. If you are an enthusiast detailer that likes to do-it-yourself then you'll love the versatility of this tool. If you're a professional detailer, then you should have this tool in your arsenal of tools so that when needed, you'll have the right tools for the job.
On Autogeek.com
Griot's G8 Mini Random Orbital Polisher
Griots Garage BOSS Fast Correcting Cream
Complete selection of 3" MIRKA Abralon Sanding Discs
3M Automotive Performance Masking Tape 3-Pack - (these are also available individually)
MIRKA Interface Pads - 3 Inch 5-pack (I think they are available as individuals too)
Autogeek Detailing Cover-Up Towel
Griots Garage Headlight Restoration Kit
")
The Griot's Garage G8 Headlight Sander
Headlight sander?
Technically, the Griot's Garage G8 is a mini polisher and the replacement for their older 3" Mini Polisher. There's a huge difference between the old 3" Mini Polisher and its replacement the G8 Mini Polisher. The key differences are,
Orbit Stroke Length
3" Mini Polisher = 5mm free spinning random orbital polisher.
New G8 = 8mm free spinning random orbital polisher.
Power
3" Mini Polisher = 240 watt motor.
G8 Mini Polisher = 700 watt motor.
There's more new features with the new G8 that makes it a really great tool but in this how-to article, I'm going to show you besides being a great mini paint polishing tool it's also a great headlight sander.
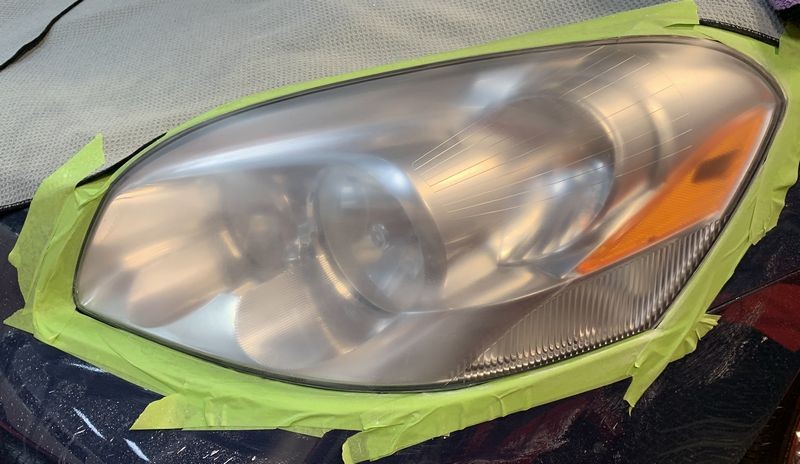
Demo car
This 2012 Buick Lucerne belongs to a friend of mine and as you can see, it's in dire need of headlight restoration.
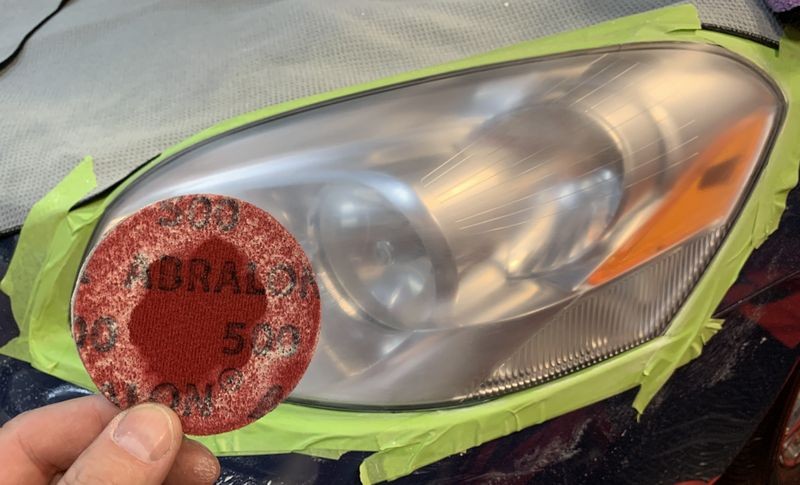
Mirka Abralon 3" Sanding Discs
In order to machine sand with the Griot's G8 you're going to need some 3" sanding discs. Here at Autogeek we carry the complete range of Mirka Abralon sanding discs ranging from #500 grit to #4000 grit. And "yes" for some headlights you're going to want to start with #500 grit in order to remove the dead, oxidized plastic and in some instances, the failed OEM coating. I've even had to resort to #320 grit wood sanding paper by hand in order to remove failed OEM coatings. So be prepared and get a collection of of various grits ahead of time as you cannot easily find these 3" discs at your local stores.
Clean Sanding Lube
Besides the sanding discs you'll also want to get a spray bottle with clean water and a few drops of soap. The soap can be car wash soap or even dish washing detergent. The type isn't important as most any type or brand will work. If you're working in a fresh paint environment like a body shop and machine sanding headlights (or anything), then you would want to use a Body Shop Safe soap.
The soap acts to lubricate the sanding process better than just water alone. The soap aslo helps to prevent your sanding disc from loading up with plastic particles, or in the case of machine sanding paint, it helps to prevent the sanding disc from loading up with paint. Remember, just a few drops in a 32 ounce bottle like I show in the picture below. If you use too much you create a lot of suds or foam and this can make it harder to see the surface you're sanding.
Foam Interface Pads
You will also need a 3" foam interface pad. This is a flexible foam pad that assists in the sanding process a number of different ways.
1: The foam flexes to enable the face of the sanding disc to conform to the curve of a headlight as many headlights have a curved design.
2: The foam interface pad acts to smooth out the abrading action for a more uniform sanding mark pattern for easier buff-out.
3: The foam interface pad acts to smooth out the sanding "action" that is felt by you - holding the tool.
The Abralon sanding discs to have a foam backing and you can get away without a foam interface pad but in my opinion and experience, it's better to use the foam interface pad than to sand without it and this is more true when machine sanding car paint. At Autogeek we carry 3" foam interface pads from Abralon. I believe the Meguiar's 3" foam interface pad has been discontinued.
Protective Tape
This is the 3M Painter's Tape and it's very stout as far as protective tape goes. You want to tape-off the paint around the headlight with 2 layers of tape just in-case you run the sander off the headlight and onto surrounding paint.
Most of the videos I see on sanding headlights get it close, but miss one thing. When taping off the paint around a headlight you want to lay down 2 LAYERS of protective tape - not just one layer.
Why?
Because if your hands waiver at all and you accidentally run a #500 grit sanding disc over a single layer of tape - there's a good chance you'll pull the tape up or even sand through it and now you have #500 grit sanding marks in clearcoat paint that is thinner than a Post-it Note. The recovery from #500 grit sanding marks inflicted into paint that's thinner than a Post-it Note can lead to sanding and buffing through the clearcoat. So take the time and the tape to lay down 2 layers of tape protection.
Technique Tip
For some cars, the way the body style is designed, the hood panel runs across the top of the headlight. If this is how the car you're working on is designed, then instead of taping off the pant on the hood next o the headlight simply open the hood and get this portion of paint AWAY from the sanding process.
Genius huh?
But - now you risk spraying splatter dots of wet sanding slurry all over the engine compartment. So to avoid having to clean the engine compartment simply lay some type of cover over the ares next to the sanding process. You could use a beach towel, an old blanket, some cardboard, etc.
Autogeek Cover-up Towel
Pictured below I've placed a couple of Autogeek Cover-up Towels in the engine compartment to cover-up and shield the engine compartment from the splatter created by machine sanding. Besides working great for this application you'll find yourself using the cover-up towels for all kinds of projects where you need to protect something from splatter dots. For example convertible tops, fuel injectors on show car engines, etc.
Here you can see two layers of tape around the headlight and the cover-up towel covering the engine compartment.
And here you can see how severely corroded and oxidized the plastic surface of the headlight has become.
Sanding versus Buffing
The surface is so neglected it is no longer smooth like it started out when the car was new - it now has a coarse texture. These headlights are so neglected that buffing alone will not properly restore them and this is why these headlights need to be sanded.
Step 1: Machine damp sanding with #500 Grit Abralon.
First I attach the foam interface pad to the backing plate on the Griot's G8 - it's important to center it up.
Then I place the #500 grit sanding disc onto the interface pad. In this side shot, you can see how much cushion is now available with the combined foam from the sanding disc and the interface pad.
Here's the face of the the Abralon disc - if you look closely you can see it has a screen mesh design to hold and distribute the abrasive particles.
Step 2: Spray some sanding lube onto the headlight.
Sanding Slurry
Here I've sanded just a section and you can see the white colored sanding slurry on the face of the sanding disc and on the headlights. This is normal. The slurry is a mixture of the water and the plastic particles being sanded off the surface of the headlight.
Speed Setting 5
I experimented with some different speed settings and found I was able to easily maintain pad rotation on speed setting 5. Speed setting 6 worked of course also but was a tick to fast for effective abrading action and control.
After dialing in the speed setting that worked best, I continue to machine sand the entire headlight. It helps to use some type of section pass PATTERN as you sand simply so you know how many times you've sanded an area. Because there are so many different shapes and designs for headlights you'll have to be creative and come up with your a pattern to run the polisher over the headlight that works best for the headlight in front of you.
With #500 grit sanding discs, you'll still need to make around 10 to 12 solid section passes over a section of headlight to remove all the dead, oxidized plastic.
PAY ATTENTION
Now pay attention to the appearance of the plastic after each grit sanding step. See how opaque or frosted the plastic looks? As I work UP in the grit level the plastic will become more and more clear.
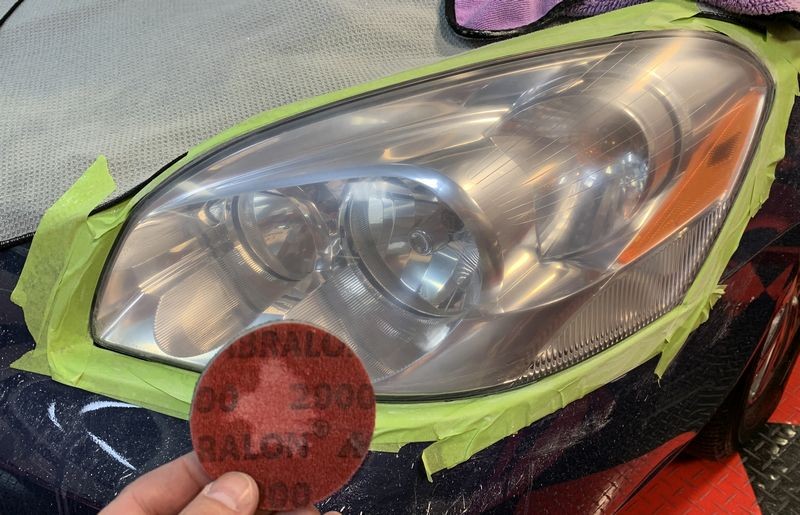
These are the results after sanding with #500 Mirka Abralon
Step 3: Re-sand with the #1000 grit sanding disc.
Refining your sanding marks
Step 3 through Step 6 is re-sanding the headlight with each of the different sanding discs until you finish out with the #4000 grit. Each time you move up in the grit level you refine the previous sanding marks so they are more shallow. The finer you sand out to the faster and easier it will be to buff out your sanding mark pattern.
Step 3: Re-sand with the #2000 grit sanding disc.
Step 3: Re-sand with the #3000 grit sanding disc.
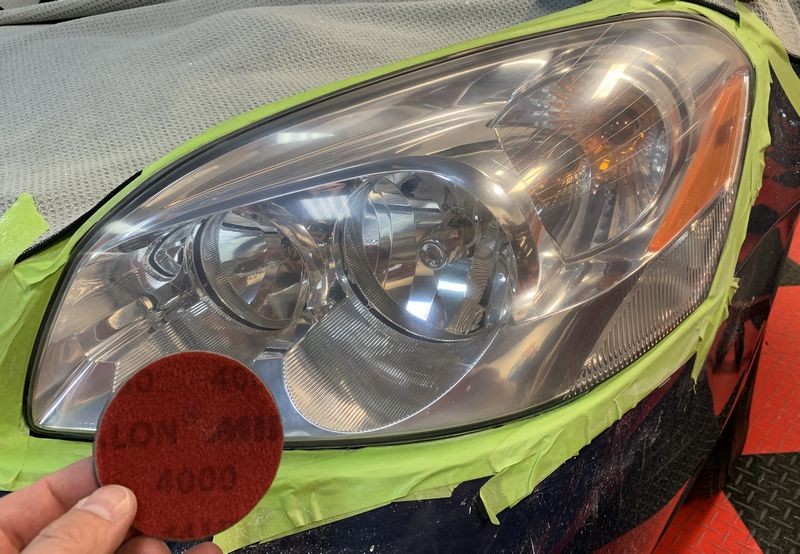
Step 3: Re-sand with the #4000 grit sanding disc.
First - LOOK how CLEAR the plastic is after machine sanding with #4000 grit sanding discs. At this point, I could rub-out the sanding marks by hand with a quality compound and some cotton terrycloth.
Buffing time!
To show you how easy it is to buff out #4000 grit sanding marks from plastic I used the Griot's Garage Fast Correction Creme with a Griot's BOSS orange foam cutting pad. And of course, I used the same tool I did all the sanding with - the Griot's G8.
Looks brand new!
Repeat the process to the other headlights....
BOOM! - Crystal Clear!
Here's everything used to machine sand the headlights including the number of sanding discs in order from left to right, #400 grit to #4000 grit. By my count I used a total of 18 discs.
6 - #400 grit - 3 discs for each headlight
4 - #1000 grit - 2 discs for each headlight
4 - #2000 grit - 2 discs for each headlight
2 - #3000 grit - 1 disc for each headlight
2 - #4000 grit - 1 disc for each headlight
Final results...
After all the sanding, I used the Griot's Garage Headlight Restoration Coating out of the Griot's Headlight Restoration Kit. Sorry no pictures, I simply ran out of time as I did this project the weekend before my first 3-day Car Detailing Bootcamp Class.
The best headlight sander I've ever used...
Review and Comments
Not only is this a great mini polisher for buffing out thin panels and intricate areas it also works great for machine sanding headlights. It has way more power than the old Griot's 3" Mini Polisher and that shows up as a more robust ability to maintain rotation of the sanding discs. If you are an enthusiast detailer that likes to do-it-yourself then you'll love the versatility of this tool. If you're a professional detailer, then you should have this tool in your arsenal of tools so that when needed, you'll have the right tools for the job.
On Autogeek.com
Griot's G8 Mini Random Orbital Polisher
Griots Garage BOSS Fast Correcting Cream
Complete selection of 3" MIRKA Abralon Sanding Discs
3M Automotive Performance Masking Tape 3-Pack - (these are also available individually)
MIRKA Interface Pads - 3 Inch 5-pack (I think they are available as individuals too)
Autogeek Detailing Cover-Up Towel
Griots Garage Headlight Restoration Kit

