Review: Hybrid Solutions Ceramic Polish & Wax

  • Thread starter Thread starter Mike Phillips
  • Start date Start date
M

Mike Phillips

Guest
Review: Hybrid Solutions Ceramic Polish & Wax


Hybrid Solutions Ceramic Polish & Wax
Ceramic_Polish_Wax_001.JPG


What is it?

Liquid one-step polish and wax with Si02


What does it do?

Removes swirls, scratches, water spots and oxidation while adding incredible gloss, depth and shine and a layer of Si02 and wax protection


When do I use it?

After first washing and drying your car and after removing any bonded contaminants if discovered.


Why should I use it?

To remove swirls, scratches, water spots and oxidation while leaving a show car finish in one step.


From the manufacturer


2-in-1 with all the fun!

Hybrid Solutions Polish and Wax is the all-in-one you need to correct marring and end with a glossy, protected finish. Hybrid Solutions Polish and Wax is just that… a polish AND a wax, making your detailing process a shorter one. Correct your paint, leave it glossy and with a durable protection from future hazards all in one product. Besides being obviously convenient, space and time saving, the Hybrid Ceramic has super hydrophobic properties that allow for water beading, precision polishing agents to remove paint imperfections and synthetic wax polymers to increase depth of color, shine and gloss.

The process to make your car look like perfection is, let’s be honest… a long one. There are many steps and many processes all doing something different in their own ways to help your car reach its destination of excellence. So, it wouldn’t be uncommon or laughable to be tired by the time you get to the polish stage. And then even at the polish stage you are thinking you still have to wax after this step. But with the Hybrid Solutions Polish and Wax you get the action and optimum results of the polish and wax in one.

When it comes to the polishing, Hybrid Solutions Polish and Wax is ready to save your car’s paint job. This product has super precision polishing agents that removes scratches, swirls and other paint imperfections. The polish portion of this product will also help restore the paint’s color that it lost due to oxidization. So, before the protection of the wax portion comes into effect, the polishing compounds will make your car’s imperfections disappear.

The wax is where it’s at! Hybrid Solutions Ceramic Polish and Wax is high in hydrophobic properties, with the add luxury of having SiO2 polymers. When a product is hydrophobic, it means it has chemical compounds that create surface tension on your car’s surface so that product stays closer. This allows for less opportunities to streak and for water spots to occur. Instead, the water will bead up and roll of your car in the coolest of ways.

In terms of water, the hydrophobic polymers are hydro-activated and increases the depth of color, making colors pop and gleam, leaving behind a mirror like shine. Those reds will look like a juicy cherry, blacks as dark as the night, whites like cream and all the colors in between. The SiO2 gives the wax super strength by hardening and cross linking into a pretty much impermeable surface that is chemically bonded to your car. It can be strong enough to prevent anything from affecting your surface. It will enhance gloss, repel water, protect against chemicals, abrasion, oxidization and UV rays.

The most noteworthy aspect of the Hybrid Solutions Ceramic Polish and Wax is its all-in-one, easy-to-use nature. Correct your paint, polish, wax and protect your vehicle in one step. All this in one bottle, yet still delivers amazing clarity and shine. A simple bottle contains all you need to make your car glisten like it never has before. The bottle size alone saves you space in your garage from minimal product use and saves you from having to luge multiple products are around the car.


DIRECTIONS

  1. Wash and dry car.
  2. Shake well!
  3. Avoid application on hot surfaces.
  4. For best results, do not over-apply high active formula, 2 ounces per vehicle is recommended.


HAND APPLICATION

  1. Apply 3 dime size drops to a foam applicator pad.
  2. Spread product evenly over a 2 ft. x 2 ft. section with light to moderate pressure in an overlapping, circular motion.
  3. Remove excess with a microfiber cloth, turning to a clean side for the final wipe.
  4. Use a damp microfiber cloth to remove high spots and activate shine polymers.
  5. Re-wipe with a dry microfiber cloth if necessary.


:)
 
Continued...


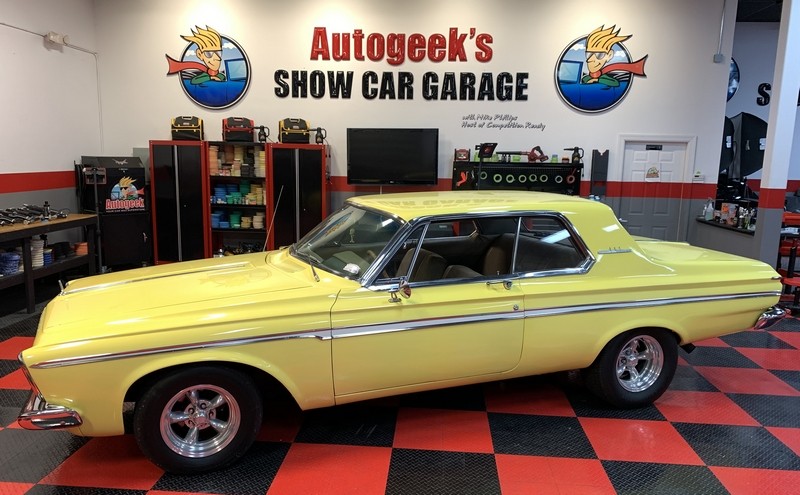
Test Car - 1963 Plymouth Fury

This is a former Drag Car with a 440 Wedge Big Block and Dual Quad Carburetors

I took these pictures when the car first arrived. From this distance and lighting, the paint looks good?

Ceramic_Polish_Wax_001.JPG


The real truth is the car is dirty. She's parked outside 7 days a week, 24 hours a day as the garage hold other toys that beat this one out.

Dried Bird Poo

Ceramic_Polish_Wax_002.JPG


Here you can see the dirt level....

Ceramic_Polish_Wax_003.JPG


Ceramic_Polish_Wax_004.JPG


Ceramic_Polish_Wax_005.JPG


I used and reviewed this product here a few weeks ago on my own car and it worked great. With a half a bottle ready to use, let's put it to work.

Ceramic_Polish_Wax_006.JPG


Ceramic_Polish_Wax_007.JPG


Ceramic_Polish_Wax_008.JPG


Ceramic_Polish_Wax_009.JPG


Now you can really see the dirt level....

Ceramic_Polish_Wax_010.JPG


Ceramic_Polish_Wax_011.JPG


Ceramic_Polish_Wax_012.JPG


Ceramic_Polish_Wax_013.JPG


Ceramic_Polish_Wax_014.JPG


Ceramic_Polish_Wax_015.JPG


Ceramic_Polish_Wax_016.JPG


Ceramic_Polish_Wax_017.JPG


Ceramic_Polish_Wax_018.JPG


Remember - the correct way to use a waterless wash is with lots of towels.

Ceramic_Polish_Wax_019.JPG


That's better - now the car looks clean because she is clean.

Ceramic_Polish_Wax_020.JPG


Mechanical Decontamination

It used to be all we had to remove things like overspray paint, airborne dirt and pollution and industrial fallout was detailing clay. In fact I document early clay here.

Now days there are lots of other options such as the Speed Master Clay Towel, which I reviewed here.


Ceramic_Polish_Wax_021.JPG


And here's a tip I shared back in 2012 - that is - mark the back of your clay towels like this so you can track which side you're using.

Ceramic_Polish_Wax_022.JPG


The way you use a clay towel is to fold it 4-ways like you see below. Then if and when a side or quadrant wears out - you'll know which sides are still good and ready to use.

Ceramic_Polish_Wax_023.JPG


Ceramic_Polish_Wax_024.JPG


Gloss comes from a smooth surface

As a RT or Recognized Trainer, Ido Skills Validation Testing for the IDA. One of the test questions is,

What is the benefit of claying?

Most guys get part of the answer, that is claying removed contaminants. But there's more to it than that. Claying restores a smooth surface and GLOSS comes from a smooth surface. So claying is like laying down or starting a foundation on which to build. First you remove the defects ON TOP of the surface and then you remove the defects IN the paint surface i.e. swirls and scratches. But your end results start with removing the contaminants and restoring a smooth surface.


Ceramic_Polish_Wax_025.JPG


Here's one of my articles on claying and gloss from 2011

Gloss starts first with a smooth surface...


:)
 
Continued....


Paint Inspection

Now that the car has been washed and clayed, next it's time to take a look at the swirl level using a swirl finder light.

Ceramic_Polish_Wax_026.JPG


Yep - them be swirls....

Ceramic_Polish_Wax_027.JPG


The entire car has this same level of swirls.

Ceramic_Polish_Wax_028.JPG


Ceramic_Polish_Wax_028c.JPG


Hybrid Solutions Ceramic Polish & Wax

So by any other words, this is what is called a cleaner/wax. Now days we all call it an AIO or All-in-One. My guess the terms changed because it's faster and easier to type AIO with your two thumbs on a smart phone versus type out the word cleaner/wax. Also, the term cleaner/wax implies the protection component is a "wax" or waxy substance like Carnauba. I tend to use the term cleaner/wax as a general term to simply mean a product that polishes and protects, which is what this product is by function.

From the Turtle Wax website here,

A unique time-saving alternative to traditional multi-stage paint correction systems. The innovative platelet technology cleans and removes paint imperfections, while the super hydrophobic polymers infused with SiO2 add ultimate protection, depth of color, gloss and shine.


The platelet technology is the abrasive technology and it works great.

The super hydrophobic polymers are infused with Si02 and this provides the protection, gloss, shine and high surface tension for water beading and self cleaning effect.


As someone that has coined some of the terms used in the car detailing industry and written boat loads of how-to articles, here's just one article I've written on using a one-step cleaner/wax or AIO or in this example, an one-step cleaner/Si02

How to correctly use an AIO or Cleaner/Wax by Mike Phillips

And except for the BEAST, just about any other orbital polisher, you're only going to be tackling a section of paint about 16" by 16", maybe a little larger, depends on the the depths of the defects and the hardness of the paint, also your goal for defect removal, not everyone is looking for perfection but you would certainly not tackle a 2' by 2' section unless the paint just had light oxidation, staining and surface impurities.


The BEAST and Hybrid Solutions Polish & Wax

Ceramic_Polish_Wax_029.JPG


Until this day, I had never used this product. My co-worker and buddy Andre was flown out to Colorado to be a part of the launch for this line of products and he told me the platelet abrasive technology works really well. Upon reading the product label copy and as a former label writer for Meguiar's, I know you have limited real estate on a label to share information and ONLY the most important or valuable information survives the editing process. So seeing the bullet point about the abrasive technology caught my eye. As my friend Mike Pennington, the Director of Training at Meguiar's used to say to me when I was undertaking any project,

Here's your chance to be the hero or the zero....

Meaning, here's this product's chance to prove itself or get lumped together with all the could have been, should have been the latest and greatest thing since sliced bread.


Ceramic_Polish_Wax_030.JPG


Anyone that's read any of my articles or attended any of my car and boat detailing classes know I HARP on the importance of abrasive technology. In fact, here's exactly how feel about it and how it is.

Abrasive Technology - THE most important factor when it comes to polishing paint


Test Spot

The normal process when buffing out any car with any product, tool or pad is to START with a Test Spot. If you're reading this and didn't know this or don't know what a test spot is and why to do it, here's my most recent article on this topic.

The two reasons WHY you should always do a Test Spot before buffing out any car


My normal protocol when testing any product with abrasives, be it a compound, polish or an AIO, is to do the normal 8 section passes to a section of paint about 16" by 16" squarish. This will tell me,

A: Does the product work?
B: Whether the paint is hard or soft?
C: What the buffing cycle is like?
D: What the dusting or lack thereof is like?
E: What the wipe-off is like?

And the answers to the above questions will then let me know if I want to continue and use the product over the entire car OR if I need to adjust the number of section passes I make or even use the product at all.


In the picture below I have made 8 normal section passes with the BEAST and a Lake Country 6.5" Force Hybrid white foam polishing pad. This is a normal pad choice for this type of product and the initial test spot. I ran the tool on the 6 speed setting, (full speed) and applied about 10 pounds of downward pressure using a slow, smooth arm speed. Pretty much just like I explain to do in my FLEX how-to book.

Ceramic_Polish_Wax_031.JPG


Ceramic_Polish_Wax_032.JPG


Time to inspect the results with a Swirl Finder Light

I'm using the SCANGRIP MiniMatch and the results look great and I would even say impressive.

Ceramic_Polish_Wax_033.JPG


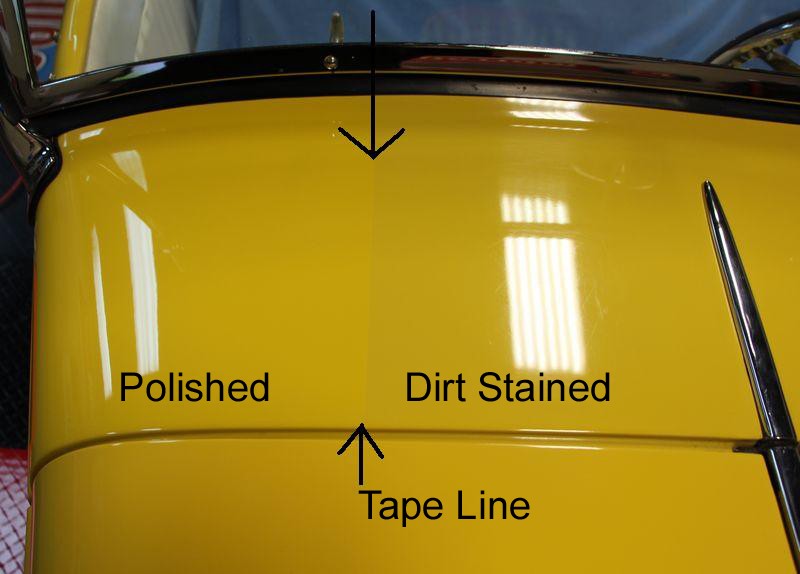
I've pulled the 3M Painter's tape back and here's before....

Ceramic_Polish_Wax_036.JPG


And here's after...

Ceramic_Polish_Wax_035.JPG


Chemically stripping the paint to insure accuracy in the results

I tend to not care to do this as I don't think filling is as big an issue as so many of the online experts. But for any of the naysayers and doubters, we all know that GTECHNIQ Panel Wipe is one of the best off-the shelf solvents for chemically stripping paint to remove any leftover polishing oils and/or fillers and/or other substances. It may or may not be strong enough to remove the super hydrophobic polymers are infused with Si02 but this is as aggressive as I'm going to torture these results.

Ceramic_Polish_Wax_037.JPG


More than ample product....

Ceramic_Polish_Wax_038.JPG


After wiping, there's no change in the results. In my opinion, this product is the real deal.

Ceramic_Polish_Wax_039.JPG


Dirt Stained Paint

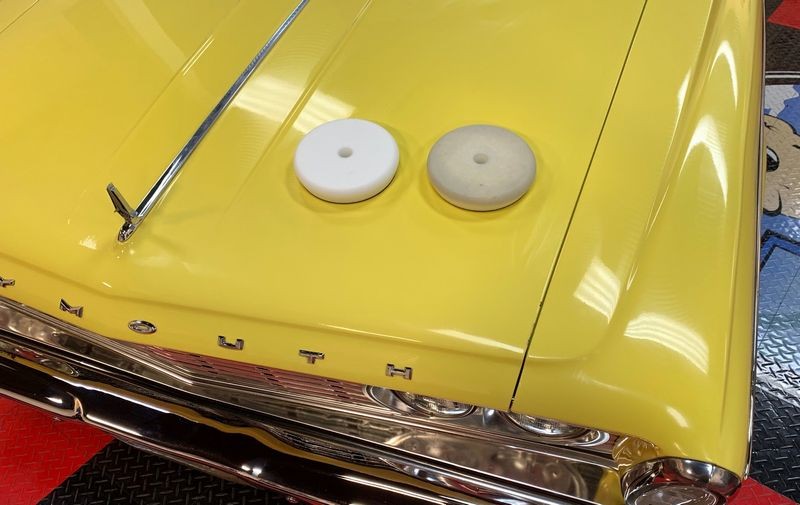
Here's another topic I'm always sharing online as well as in my classes and it's how paint gets dirty over time. I'm not talking about loose dirt that will wash off when you wash the car; I'm talking about dirt or pollution or road film that has IMPACTED onto the surface and build-up over time. This shows up like you see in the picture of the pads below.

Ceramic_Polish_Wax_040.JPG


The pad on the left is brand new, never been used and white like the fresh fallen snow. The pad on the left has been used on just the driver's side of the hood. The color you see is dirt staining and/or road film. Remember, I used a waterless wash AND RUBBED a Clay Towel with a clay lube all over the paint. Any LOOSE dirt would have been removed. What you're seeing on the pad is the dirt, pollution, road film and other junk that has built-up on this car's paint over time. And this is why if you own a daily driver, periodically you need to do some type of polishing process to the paint and glass as well as any hard smooth surface on the outside of the car.

Ceramic_Polish_Wax_041.JPG


Just to prove this was not a glitch, I'll do it again. That is start with a brand new pad and only buff out the passenger's side of the hood.

Ceramic_Polish_Wax_042.JPG


Ceramic_Polish_Wax_043.JPG


Ceramic_Polish_Wax_044.JPG


BOOM! Dirty Paint

Ceramic_Polish_Wax_045.JPG


Changing Colors
When a car has dirt stained paint or a build up of road film, when you machine polish the paint and remove the layer of film - the car will literally change colors as I have shown multiple times on this forum in my articles on this topic. The color will appear brighter and the full richness of color will be restored.


:)
 
Continued....


And about 3 hours later, here's the results....


Ceramic_Polish_Wax_049.JPG


Ceramic_Polish_Wax_051.JPG


Ceramic_Polish_Wax_052.JPG


Ceramic_Polish_Wax_053.JPG


Ceramic_Polish_Wax_054.JPG


Ceramic_Polish_Wax_055.JPG


Ceramic_Polish_Wax_056.JPG


Ceramic_Polish_Wax_057.JPG


Ceramic_Polish_Wax_058.JPG


Ceramic_Polish_Wax_059.JPG


Ceramic_Polish_Wax_060.JPG


Ceramic_Polish_Wax_062.JPG


Ceramic_Polish_Wax_063.JPG


Ceramic_Polish_Wax_064.JPG


Review

I like it.

I did start out with doubts about the product. Like a lot of people, when I heard of the new line of products, Hybrid Solutions from the parent company Turtle Wax, I did have to wonder, just how good this new line of product could be.

Well.... this the first product in the new line I've tested and I have to say this hit this one out of the park!
It's not overly aggressive but for the majority of do-it-yourselfers it will get the job done. If you have swirls and scratches so deep this product won't remove them then it's time to start looking at how you take care of you car. :dunno:

It has a long buffing cycle, zero dusting issue and excellent cutting ability for a light cutting cleaner/wax. I'm not super fond of the scent but I don't care about things like that much anyways. The super high gloss results speak for themselves in my pictures.

The only thing I would recommend to anyone that's going to use this product is to wipe it off within a brief time after application. It can be a tick sticky if you leave it on to long. I don't remember what if any the directions were for drying time, but wiping off sooner is easier than wiping off not sooner.

I've used a lot of cleaner/waxes in my life and many by recognized name brands and this product works as good and actually better than most. Except for the sticky wipe-off, it's a darn good product. And the price is hard to beat.


On Autogeek.com

Hybrid Solutions Ceramic Polish and Wax - $15.99


Ceramic_Polish_Wax_048.JPG


Ceramic_Polish_Wax_061.JPG


:)
 
Continued....


The owner, Carlos presented me with the official shirt of the No Name Car Club!

Ceramic_Polish_Wax_065.JPG


Ceramic_Polish_Wax_066.JPG


Thanks Carlos!


:dblthumb2:
 
Great Review, lots of documentation and a nice thorough write up of the process from wash to finish. Thanks for adding yet more beneficial content and information for us all here!
 
Agree, Professor Paint, yes that is the correct title, Mike has earned doing it all these years.

This type of review is why I enjoy his writing and style. Unlike the YouTube experience, I can follow along his storyline and do not have to sit through the entire video to refresh my memory. And best of all he shares so much to so many, I truly admire his dedication to the detailing community.

Thanks Mike, I'll have to give it a try some time after I use up my two bottles of Blackfire One Step from the last sale! LOL
 
Nice review.

Did you remove with a damp towel as stated in the directions (to remove high spots and activate shine polymers) ?

:)
 
Great Review, lots of documentation and a nice thorough write up of the process from wash to finish. Thanks for adding yet more beneficial content and information for us all here!

Thanks, I worked pretty hard on the car and the review. I have an interior review coming from work on this car too...


Agree, Professor Paint, yes that is the correct title, Mike has earned doing it all these years.

This type of review is why I enjoy his writing and style. Unlike the YouTube experience, I can follow along his storyline and do not have to sit through the entire video to refresh my memory. And best of all he shares so much to so many, I truly admire his dedication to the detailing community.

Thanks Kirby,

I could do a half the work on the car and the review but that's not my style.


Nice review.

Did you remove with a damp towel as stated in the directions (to remove high spots and activate shine polymers) ?

Ha ha... nope I missed that. But - all my life, I've never bought into use a wet towel to remove products as it seems that you could be also removing too much product.

I guess I should have re-visited the directions when I noticed the tick sticky wipe-off.

Just to clarify, it's not hard if you wipe off immediately, I tried to leave it longer like I do with the BF One Step. With BF One Step I'll do entire cars and won't wipe anything off until I'm completely done. So could be I've picked up a bad habit.


:)
 
Continued....


Dirt Stained Paint

Here's another topic I'm always sharing online as well as in my classes and it's how paint gets dirty over time. I'm not talking about loose dirt that will wash off when you wash the car; I'm talking about dirt or pollution or road film that has IMPACTED onto the surface and build-up over time. This shows up like you see in the picture of the pads below.

Ceramic_Polish_Wax_040.JPG


The pad on the left is brand new, never been used and white like the fresh fallen snow. The pad on the left has been used on just the driver's side of the hood. The color you see is dirt staining and/or road film. Remember, I used a waterless wash AND RUBBED a Clay Towel with a clay lube all over the paint. Any LOOSE dirt would have been removed. What you're seeing on the pad is the dirt, pollution, road film and other junk that has built-up on this car's paint over time. And this is why if you own a daily driver, periodically you need to do some type of polishing process to the paint and glass as well as any hard smooth surface on the outside of the car.

Ceramic_Polish_Wax_041.JPG


Just to prove this was not a glitch, I'll do it again. That is start with a brand new pad and only buff out the passenger's side of the hood.

Ceramic_Polish_Wax_042.JPG


Ceramic_Polish_Wax_043.JPG


Ceramic_Polish_Wax_044.JPG


BOOM! Dirty Paint

Ceramic_Polish_Wax_045.JPG


Changing Colors
When a car has dirt stained paint or a build up of road film, when you machine polish the paint and remove the layer of film - the car will literally change colors as I have shown multiple times on this forum in my articles on this topic. The color will appear brighter and the full richness of color will be restored.


:)


The below are for educational purposes. They explain where the dirt staining comes from and how and why it builds-up on the finish of any car parked outside all the time or driven as a daily driver. The first article explains it all with the pictures....


Road Film - If you drive your car in the rain your car has road film

Road_Film_From_Driving_in_the_Rain_01.jpg


This second one has pictures showing more examples of the dirt film that impacts onto your car's paint.

Here's why you need to polish paint...

Dirty_Old_Ford_006.jpg


:)
 
Ya know Mike, there’s probably some 20-30 pics in this thread, but none of them show that 440 Wedge! Any chance you’ve got some?
 
Ya know Mike, there’s probably some 20-30 pics in this thread, but none of them show that 440 Wedge! Any chance you’ve got some?


Ding dang!


You know this car has been here for at least 3 other projects and I know somewhere I had a picture of the engine but after spending about 20 minutes using Skynet to look for it alas... I cannot find it.

I will get one because it completely packs-out the engine compartment. And when you fire her up... she SHAKES the air around you. (Huge lift camshaft)


Normally I do get the engine picture and meant to in this case, just slipped by me.


:)
 
This was the only one I could find

Yeah, I took that a few weeks ago while walking through Lew's Cruise cruise-in.

I thought I had a better one of just the engine take a few years ago. Regardless, as soon as this coronavirus is beaten back I'll see the car again and take a picture of the 440 Wedge engine.


:)
 
Cool car, great review/write up as always.

Mark me down for one that was not optimistic due to the brand. Seems to have worked well, though.
 
Great writeup, much preferred to the long youtube videos posted by others on the net!

RamAirV1
 
Great writeup, much preferred to the long youtube videos posted by others on the net!

RamAirV1

Well said.

One reason I like to get my info on here is the reading.

I really cannot stand a 17 minute video with about 2 minutes of what I want or need to see.
 
More....


Just had a question asked to me about buffing metal trim on a car. Here's what I wrote,


Every time I buff out an old car I always include pictures that show all the pads I used.


When buffing out old cars, I practice and teach in all my detailing classes that you ALWAYS run the buffer over the trim.

This includes,


  • Stainless steel trim
  • Chrome trim
  • Nickel Trim
  • Aluminum Trim

T
hese metals don’t much care what you use on them – the act of a spinning pad and any quality compound or cleaner/wax will remove oxidation and staining and restore brilliance.

Here’s a review I just did for a new product, if you look at some of the pads the have a blackish/greyish color to them. That’s because I buffed out all the trim on the car.


See the pad on the bottom left?


Ceramic_Polish_Wax_047.JPG


Look how BLACK that pad looks? That didn't come from the paint or glass. That came from buffing out all the trim.

The paint was dirty, I proved this. And the metal trim was OXIDIZED. When the oxidation came off and onto the pad it looks BLACK.

I buffed out the paint, the glass and the metal trim and the end results are.... the ENTIRE car just SCREAMS SHINE!

Ceramic_Polish_Wax_051.JPG


Some people think I only like to work on old cars. They are so wrong.

I only like to buff out cars that don't have stupid plastic trim - that's new cars. If new cars had trim like this 1963 Plymouth Fury - then I would love to buff out new cars.

It's all about the lazy factor - not the car. A classic muscle car is faster and easier to buff out than ANYTHING with Pebble Textured PLASTIC TRIM - that if you don't tape it off, and accidentally run the buffer over the trim - you'll STAIN it.

With old cars - you PURPOSEFULLY run the buffer over the trim.

Understand the difference?

Yeah - give me a car any day without any exterior plastic trim.


:)
 
Back
Top