Navigation
Install the app
How to install the app on iOS
Follow along with the video below to see how to install our site as a web app on your home screen.
Note: This feature may not be available in some browsers.
More options
Style variation
You are using an out of date browser. It may not display this or other websites correctly.
You should upgrade or use an alternative browser.
You should upgrade or use an alternative browser.
Safe way to get rid of unsightly touch up paint globs
- Thread starter Jax TR6
- Start date
Setec Astronomy
Well-known member
- Aug 31, 2010
- 17,035
- 1,321
You should be able to use the...what was that company? Before Dr. ColorChip....Langka. You should be able to use the Langka method, get an old credit card, wrap some t-shirt material around it, dampen it with lacquer thinner, and "sand" down the blob. That's presuming you have clearcoat paint, obviously if you have an old TR-6 with a lacquer paint job, using lacquer thinner is going to be a bad idea...
YouTube
YouTube
Bruno Soares
New member
- Mar 30, 2017
- 2,482
- 2
Mask the paint around it and then wet sand? I'm thinking that would help level it fast w/o damaging your good clear coat. Then once level or close to use a compound and polish. I haven't done this myself but I'm thinking it might work.
rlmccarty2000
New member
- Dec 23, 2013
- 2,002
- 0
Mask the paint around it and then wet sand? I'm thinking that would help level it fast w/o damaging your good clear coat. Then once level or close to use a compound and polish. I haven't done this myself but I'm thinking it might work.
I was wondering about this technique myself. I guess at the worst you could dab a bit of Dr Colorchip paint on the area to coverup where the blob use to be. I’ve got a Rupes Nano and it comes with stick on sand paper dots that might work. I suppose they are meant to work to denib paint.
Setec Astronomy
Well-known member
- Aug 31, 2010
- 17,035
- 1,321
Well, at least we all agree.
Mike Phillips
Active member
- Dec 5, 2022
- 51,004
- 7
I'm the last person to claim someone else's idea as my own, but I posted this in 2010 - 9 years ago....
The goal is to take a ragged random shaped rock chip and turn it into a perfect circle with an even impression in the paint and now sanded clean for good adhesion.
Then apply your touch-up paint till the hole is level.
Allow to dry for about a week or two in warm temperatures.
Carefully sand the touch-up paint flat.
Remove sanding marks.
")
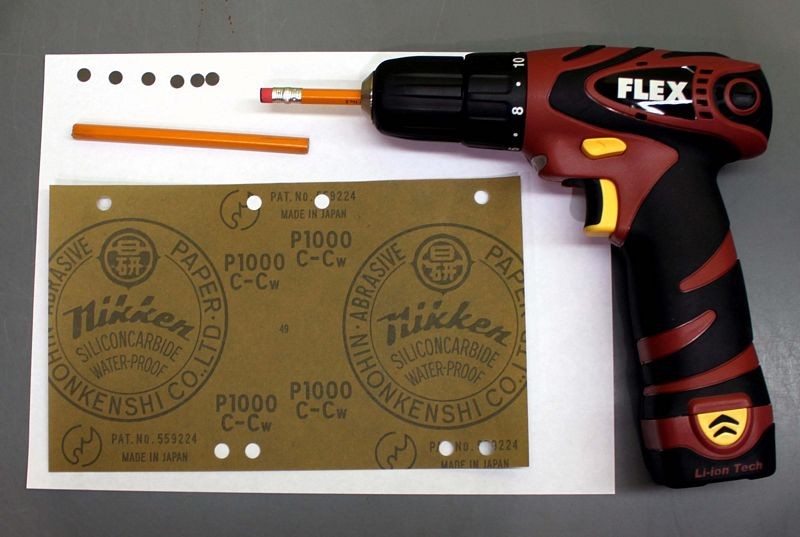
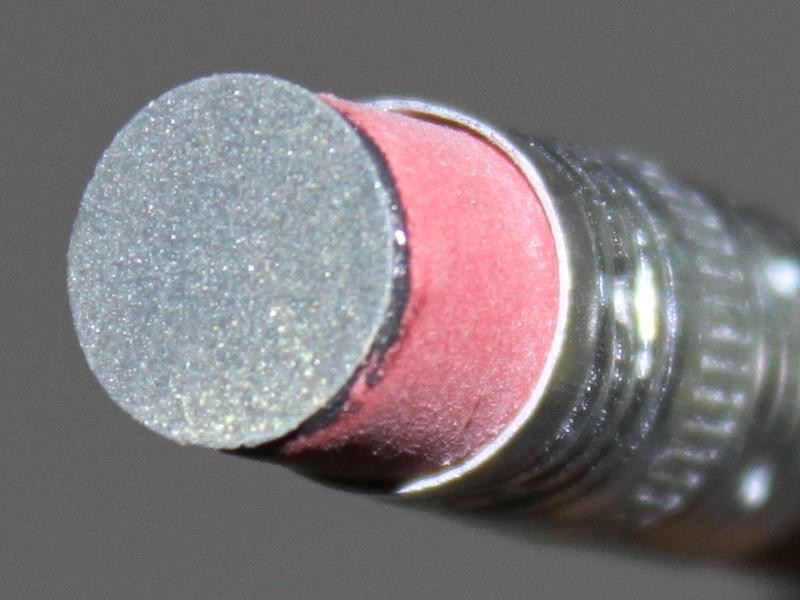
- Take a hole punch, punch out some holes in some sandpaper.
- Cut a pencil down to about 2-3 inches long on the erasure side.
- Glue these onto the face of an unused pencil erasure.
- Place the pencil in a Drill.
- Carefully hold the drill in such a way to sand on top of a rock chip.
The goal is to take a ragged random shaped rock chip and turn it into a perfect circle with an even impression in the paint and now sanded clean for good adhesion.
Then apply your touch-up paint till the hole is level.
Allow to dry for about a week or two in warm temperatures.
Carefully sand the touch-up paint flat.
Remove sanding marks.
Mike Phillips
Active member
- Dec 5, 2022
- 51,004
- 7
Also just to add....
I've been detailing cars and teaching others to detailing cars for over 30 years now. Not as long as some, probably longer than a few of you guys. I've seen a LOT. By this I mean I've seen a LOT of mistakes as well as successes.
When it comes to doing perfectionist rock chip repair most people turn a mole hill into a mountain. I've shared how they do this when it comes to sanding on touch-up paint next to HARD factory paint for years on this forum and I'll let someone else see if they can find it. I can't be the only one that remembers everything and where it's at.
Suffice to say... I've seen a lot of people turn a mole hill into a mountain.
- Thread starter
- #12
To ALL my fellow responders, I thank you for your input and advice.
As mentioned in the posts, I am going to try your techniques in areas that are very inconspicuous.
As with this forum, I will keep you all updated as to my procedure and results.
Can't wait for warmer sunnier weather here in Canada
As mentioned in the posts, I am going to try your techniques in areas that are very inconspicuous.
As with this forum, I will keep you all updated as to my procedure and results.
Can't wait for warmer sunnier weather here in Canada
I have some unsightly globs of touch up paint that look like seagulls S..t.
Does anyone have some remedial techniques to restore or repair the gawd
awful look?
Thanks in advance
Jax TR6
im just a shade tree detailer but have painted quite a few vehicles,too. id tackle this like i tackle a run or sag in clearcoat that ive sprayed:
take some glazing putty and spread it over and about 6-8"around the seagul s**t. doesnt have to be thick- just enough to cover the seagul s**t.
put some 600 grit on a block and start sanding. go in one direction like////// then switch to a different direction like \\\\\\. that just helps cut a bit quicker.
stop and look at progress. you should see the top of the seagull s**t showing through the glazing putty, which is all ya want to be sanding on. keep going until the glazing putty is just about gone then switch to 1000 grit. once glazing puttys gone switch to 1200 then 1500 then cut and buff.
this isnt me in the video, but pretty much something ive had to repair
Removing Clearcoat Runs with Glaze (Polyester Glazing Putty) - YouTube
prolly dont have to spread the glazing putty as far as i mentioned on the seagul s**ts.
tuscarora dave
Active member
- Aug 21, 2009
- 5,408
- 12
im just a shade tree detailer but have painted quite a few vehicles,too. id tackle this like i tackle a run or sag in clearcoat that ive sprayed:
take some glazing putty and spread it over and about 6-8"around the seagul s**t. doesnt have to be thick- just enough to cover the seagul s**t.
put some 600 grit on a block and start sanding. go in one direction like////// then switch to a different direction like \\\\\\. that just helps cut a bit quicker.
stop and look at progress. you should see the top of the seagull s**t showing through the glazing putty, which is all ya want to be sanding on. keep going until the glazing putty is just about gone then switch to 1000 grit. once glazing puttys gone switch to 1200 then 1500 then cut and buff.
this isnt me in the video, but pretty much something ive had to repair
Removing Clearcoat Runs with Glaze (Polyester Glazing Putty) - YouTube
prolly dont have to spread the glazing putty as far as i mentioned on the seagul s**ts.
That's pretty cool. I would have never thought of that. I see that working pretty decent on a single stage paint. I'd want to go real easy working that over a clear coat.
That's pretty cool. I would have never thought of that. I see that working pretty decent on a single stage paint. I'd want to go real easy working that over a clear coat.
thats the purpose of the glaze- you wont sand on the cc- just the seagul s**t as factory cc is quite thin.i dont think theres a difference between ss and cc unless its a metalic, in which case no sanding should be done on a ss metallic . if it is a ss its not factory and going to be quite a lot thicker mil than factory cc. probably thicker than bc/cc combined. and if its a cc thats been sprayed during a repaint its going to be a thicker mil than factory,too-the clear alone will probably be thicker than both bc/cc from the factory.
- Thread starter
- #16
Well, I have successfully removed the seagull s..t touch up on my car. I tried several suggestions that were posted on a beat up truck tailgate and the best (why would I assume anything else) suggestion was from Mike at Autogeek. I guess he's done this a few times in the past.")
Patience was rewarded, however, at first I was too aggressive in my attempts, but with perseverance I managed to succeed to my liking. I also punched out some 1/8 cork and glued the punch-outs to the cut off end of the pencils and then glued my various sandpaper to the cork. Worked fabulously, no pencil waste and a great assortment of grit at my disposal. I showed my technique to a friend who is considered as one of the best classic auto paint and restoration specialists in western Canada. He was amazed and shocked at the results. Mike, thank you for your expertise.
I hope the cork punch out works as great as mine did.
rlmccarty2000
New member
- Dec 23, 2013
- 2,002
- 0
Well, I have successfully removed the seagull s..t touch up on my car. I tried several suggestions that were posted on a beat up truck tailgate and the best (why would I assume anything else) suggestion was from Mike at Autogeek. I guess he's done this a few times in the past.
Patience was rewarded, however, at first I was too aggressive in my attempts, but with perseverance I managed to succeed to my liking. I also punched out some 1/8 cork and glued the punch-outs to the cut off end of the pencils and then glued my various sandpaper to the cork. Worked fabulously, no pencil waste and a great assortment of grit at my disposal. I showed my technique to a friend who is considered as one of the best classic auto paint and restoration specialists in western Canada. He was amazed and shocked at the results. Mike, thank you for your expertise.
I hope the cork punch out works as great as mine did.
What paint did you use? Could you post a picture or two? I love a success story. Tapatalk works great to post pictures.
I tried something a few weeks ago that gave me great results. I had about 20-30 very small chips that I touched up. I was going to just leave the small globs but a gave this a try. I wrapped a single layer of scotch tape around both ends of a razor blade leaving about 3/8" of the middle of the blade exposed. The scotch tape is very thin as far as tapes go. I was fairly sure that trying to cut off the glob would just pull the paint out so I held the blade perpendicular to the surface and scraped the glob away. It worked well leaving a small bump which should have been about .002". Barely able to feel it. From here, it would be quick to wet sand but I didn't.
I then tried cutting the blob by holding the blade at an angle. To my surprise, it did not pull the paint out of the chip. I then found that if I put some pressure on the center of the blade, it cut it off flush. Theoretically, it can't be exactly flush but I could not fill an edge. I think the pressure flexed the blade enough to get the cut closer. I spent about 15 minutes on cutting all these blobs.
It sounds like a scary thing to try but with all the chips, I did not have any problems.