Ok I need some help on what products i would need to use to remove oxidation and bring back that red shine to my car...Ive seen the videos and stuff but I'm confused on what products would benefit me best and the order of products?..I know first to waterless wash the car..than clay it..but what I want to know is do I use the #7 show car glaze than just polish and wax? or do i polish after i clay the car and than use the #7? any help would be appreciated.
Navigation
Install the app
How to install the app on iOS
Follow along with the video below to see how to install our site as a web app on your home screen.
Note: This feature may not be available in some browsers.
More options
Style variation
You are using an out of date browser. It may not display this or other websites correctly.
You should upgrade or use an alternative browser.
You should upgrade or use an alternative browser.
Single Stage 92 Foxbody
- Thread starter Randy9
- Start date
dpscoupe
New member
- Sep 13, 2012
- 450
- 0
Ok I need some help on what products i would need to use to remove oxidation and bring back that red shine to my car...Ive seen the videos and stuff but I'm confused on what products would benefit me best and the order of products?..I know first to waterless wash the car..than clay it..but what I want to know is do I use the #7 show car glaze than just polish and wax? or do i polish after i clay the car and than use the #7? any help would be appreciated.
I don't know if you've seen Mike's thread on single stage renewal, but its a great read.
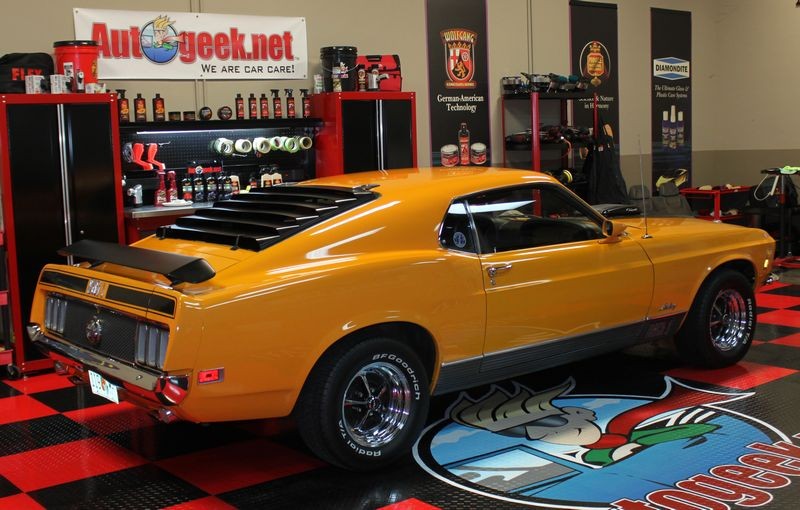
The Secret to Removing Oxidation and Restoring a Show Car Finish to Antique Single Stage Paints
Pics of what you're starting with are helpful as well.
Noticed this was your first post, so welcome to AGO!
- Thread starter
- #3
Thanks.. I saw that post and bookmarked it but I saw the video of the mach 1 on youtube and sort of lost on the whole process..in the post it shows to wash,clay, and than use #7 but in the video of the mach 1 he does the clay, polish,#7, and then wax...so should I ever have to use a polish?and also a compound?...ill post pics up tomorrow since its already dark right now but i plan on doing the whole process this weekend or next week on my day off
- Thread starter
- #4
Couldn't figure out how to edit first post but here is some pics of the car..car is dirty btw
I usually just wash and wax but it does look oxidized and I would like to make the paint look better so any procedure and products that anyone can suggest will be helpful.
I usually just wash and wax but it does look oxidized and I would like to make the paint look better so any procedure and products that anyone can suggest will be helpful.
dpscoupe
New member
- Sep 13, 2012
- 450
- 0
Couldn't figure out how to edit first post but here is some pics of the car..car is dirty btw
I usually just wash and wax but it does look oxidized and I would like to make the paint look better so any procedure and products that anyone can suggest will be helpful.
Ah, good ol vermillion red. Thin & soft. I think the reason Mike went a different direction on the Mach 1 is because he rated it at a #3 out of 11 (1 being best). Hopefully he'll see this & chime in for some clarity.
Personally, if it were my car, I'd wash, clay, go a few rounds with Megs #7, & then make a determination on where to go from there.
Do you have a DA or will you be working by hand?
- Thread starter
- #6
Ah, good ol vermillion red. Thin & soft. I think the reason Mike went a different direction on the Mach 1 is because he rated it at a #3 out of 11 (1 being best). Hopefully he'll see this & chime in for some clarity.
Personally, if it were my car, I'd wash, clay, go a few rounds with Megs #7, & then make a determination on where to go from there.
Do you have a DA or will you be working by hand?
I usually go by hand since ive never used machine but I would like to use the DA
Charleston
New member
- Apr 18, 2012
- 340
- 0
I would start with M205 or Ultimate Polish on a white pad.
Of course do a test spot. Single Stage paints can be easy and fun to work on. Especially a dull red!
Of course do a test spot. Single Stage paints can be easy and fun to work on. Especially a dull red!
- Thread starter
- #8
I would start with M205 or Ultimate Polish on a white pad.
Of course do a test spot. Single Stage paints can be easy and fun to work on. Especially a dull red!
So which DA would be best for me since I am a beginner when it comes to using machine? I know clay would be first after rinsing the car...but do i polish next than wax or what would be the best procedure? I want to do a full exterior detail and make the red really shine and make it look as good as possible
margallar
New member
- Oct 5, 2012
- 87
- 0
in my opinion
1. wash
2. clay
3. again wash (optional)
4. M7 show car glaze
5.wax
if the surface still doesn't look good after the show car glaze then wait and then reapply #7 the next day. if still not good then go to M80 speed glaze (don't omit the #7 in any case, it really makes compounding the paint easier). i really found M80 very very easy to use by hand, like you i also don't have a machine
Oh and take care when working on the curves ,lines and edges. paint is usually very thin on those places, if it is very thin then use masking tape
- Thread starter
- #10
in my opinion
1. wash
2. clay
3. again wash (optional)
4. M7 show car glaze
5.wax
if the surface still doesn't look good after the show car glaze then wait and then reapply #7 the next day. if still not good then go to M80 speed glaze (don't omit the #7 in any case, it really makes compounding the paint easier). i really found M80 very very easy to use by hand, like you i also don't have a machine
Oh and take care when working on the curves ,lines and edges. paint is usually very thin on those places, if it is very thin then use masking tape
Thanks for the tips..and about the compound, when will I ever have to compound?after #7 or is it a good idea to use a compound for this project?
Mike Phillips
Active member
- Dec 5, 2022
- 51,004
- 7
Oh and take care when working on the curves ,lines and edges. paint is usually very thin on those places, if it is very thin then use masking tape
Very good advice...
My article is mostly targeted at people working on older single stage paints and your car's paint is now 20 years old so I guess it qualifies.
The point of the process is to bring the paint back to live and condition it making the paint more workable before actually working on it.
The the paint on the Mach 1 was in very good condition to start with, not very bad condition, so I modified the process to match the condition of the paint.
Video and Pictures - 1970 Mustang Mach 1 Detailing Clinic at AutogeekOnline.net
For your red paint I would do #7 rub down like I show here,
The Secret to Removing Oxidation and Restoring a Show Car Finish to Antique Single Stage Paints
Removing Oxidation Without Abrasives
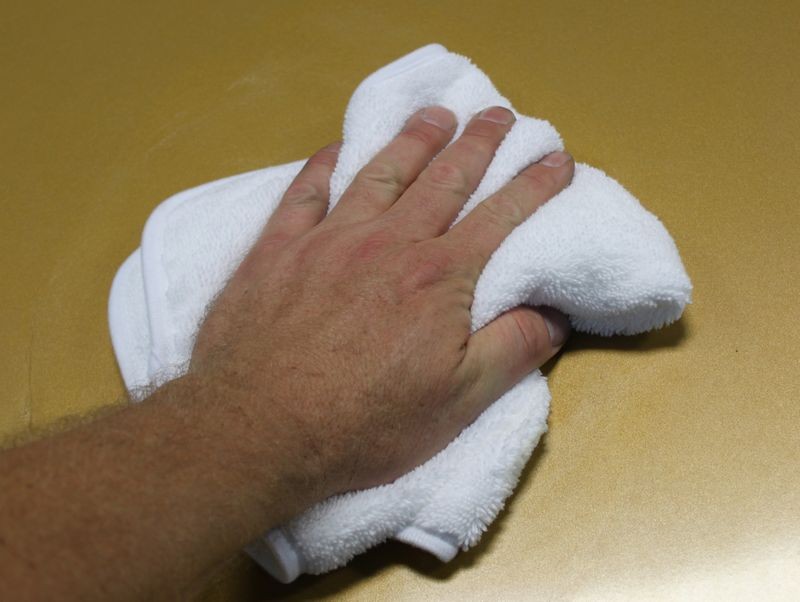
Now that all the bonded contaminants have been removed off the top of the paint it's time to remove the dead oxidized paint off the surface and to some degree some of the embedded dirt and oxidation below the surface. To do this we're going to use a plush, microfiber polishing towel with some Meguiar's #7 Show Car Glaze.
Always fold your microfiber towels 4 ways
What you want to do is take your polishing towel and fold it 4 ways to create a working cloth that is large enough you can place you hand on it when working the #7 over the paint. Folding the cloth 4 ways will also provide plenty of cushion to spread out the pressure of your fingers and palm. This enables you to work gently and safely on antique, fragile paints and will also help you to avoid instilling fingermarks.

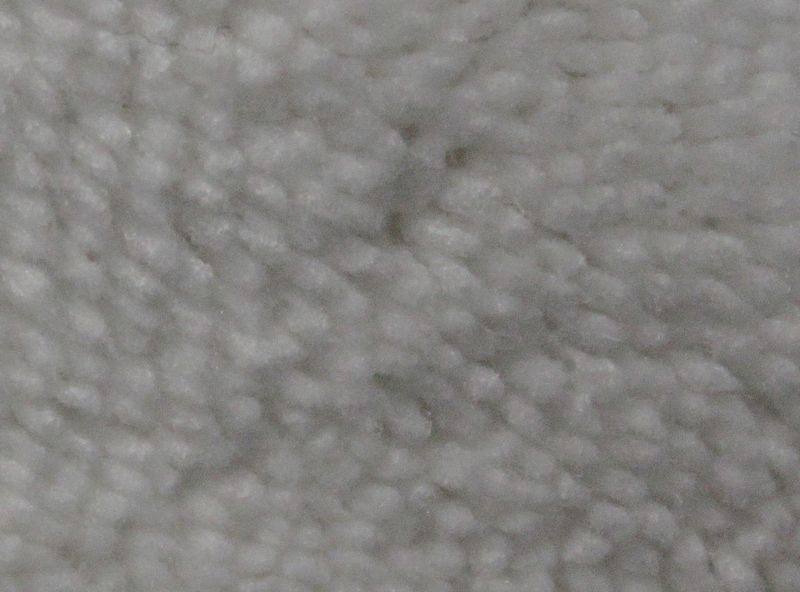
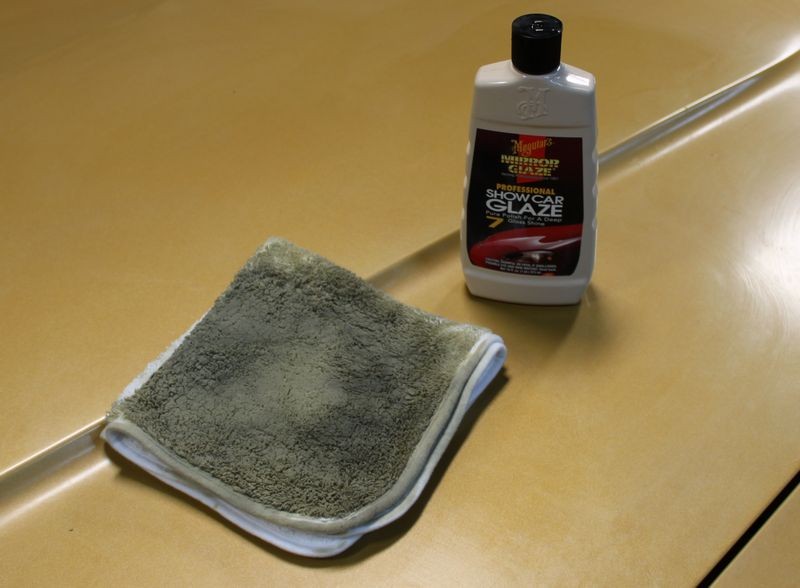
Non-abrasive abrasives...
Here's a close-up of the tufts of microfibers that make up the working face of this microfiber polishing towel. When used dry this microfiber polishing towel is soft and absorbent. The way we're going to use it however, it will still be soft and gentle to the paint except that I'm going to put a little passion behind my hand as I move this microfiber towel over the paint and the pressure I apply is going to engage the microfibers with the paint and provide a very gentle scrubbing and even abrading action.
Tufts of microfiber threads... these are your abrasives...
Shake well before using
Shake your bottle of #7 up exceedingly well. One of the reasons #7 used to come in clear glass bottles and later clear plastic bottles was so that you could see that the product had separated out and the hope was that as a thinking human being you would see the product had separated in the bottle and thus shake the bottle till the product had a uniform color and consistency.
After you shake the product up well you want to pour a generous amount of product out onto the face of just one side of your folded microfiber towel and note that you're going to use this one side for each panel over the entire car.
The words or terms for how much product you use goes like this,
Use the product heavy or wet
Because this is important, let me repeat these instructions...
Use the product heavy or wet!
This means you use a lot of product, you want the surface wet with product as you're working a section. You're trying to saturate the paint to gorge it with the rich polishing oils found in the #7 but you're also trying to emulsify and loosen any embedded dirt or oxidation off and out of the paint. For this car I used one full bottle on just the hood and the top of the trunk lid and most of another bottle for the passenger and driver's sides. The horizontal surfaces are always the worst because they are exposed to direct sunlight, water from rain and air-borne pollution and contaminants and thus always require the most work to clean, revitalize and restore.
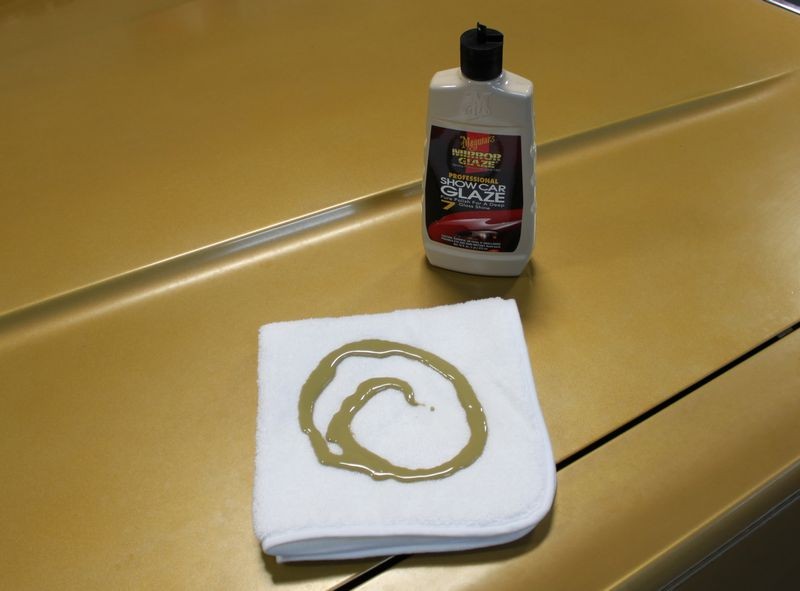
Fold the cloth into itself to spread the product out and wet the face of the cloth.
"It ain't braggin' if you can back it up" -Dizzy Dean
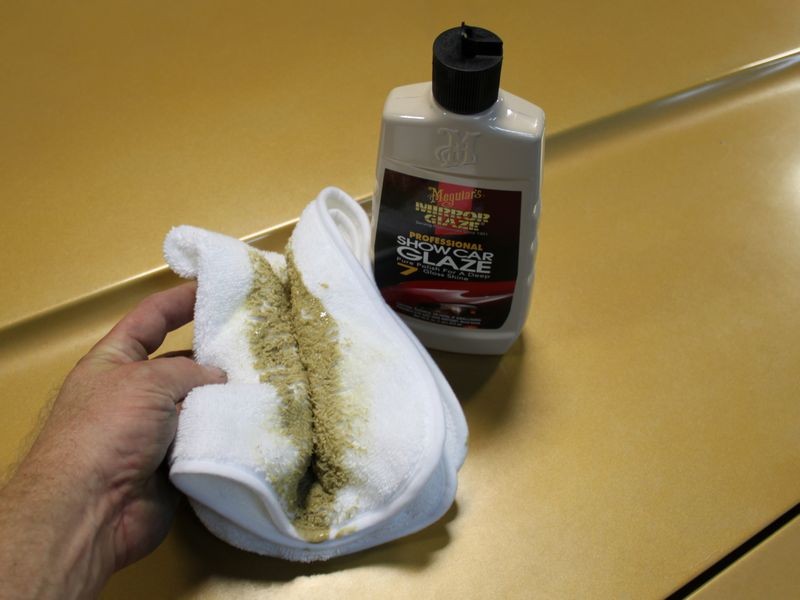
Now comes the passion: Start working the #7 Show Car Glaze over and into the paint in a vigorous manner. I'm in pretty good shape as I work out at the local gym and lead an active lifestyle that includes rubbing out cars both by hand and by machine.
I also dare say I'm pretty good at rubbing out cars by hand. I'm not bragging, just stating a fact that I can back up. It's more work than most people think and my point is this, rubbing this behemoth of a vehicle out by hand vigorously got me breathing hard and made my hands and arms tired.
Here's the point I'm trying to make...
If you're not breathing hard and you're not getting tired then you're not working the product over the paint vigorously enough.
Out of all the steps, this is the hardest, most time-consuming and most important step there is to do and it is this step that will determine your end results. If you don't remove the topical oxidation and embedded dirt and oxidation during this step then it will still be there when you make the final wipe to remove the wax. So put your heart and soul into this step. If you need to, take a break in-between panels.
It is vital that you work the #7 against the paint vigorously...
Rub out one panel at a time
After you work a small section, about 20" squarish or so, stop, re-apply fresh product and move onto a new section and be sure to overlap a little into the previous section.
- Panel = a door, the hood, the roof, etc.
- Section - a portion of a panel
Work a panel at a time, section by section
Continue working your way around one major panel until you've worked the entire panel. In this example
This is key...
Saturation Application --> The First Application
This is a mostly unknown technique and that is to let the first application penetrate and soak into the paint for up to 24 hours before wiping the product off. The idea being to really apply the product wet and work it in really well and the walk away.
The idea is to allow the heavy concentration of oils to penetrate and seep into the paint for maximum saturation before removing the product and continuing with the process. In this case I finished applying the first application of #7 around 9:00 pm and then left the #7 to soak in until the next day. I started wiping the product off then next morning right about 10:00am.
Some will argue if this works or not but my experience is that with a porous single stage paint it does in fact help. One thing for sure it can't hurt.
Paper Test for Capillary Action
If you place a few drops of #7 onto a piece of paper and then monitor it over a few days you will see the oils in the #7 migrate or seep away from the actual drop of product. It does this through capillary action and the same thing can work to your car's paints' advantage if it's a single stage lacquer or enamel paint.
I placed a few drops about the size of a nickel on a piece of standard printer paper around 3:00pm.

The next day I took these pictures at approximately 10:00am, (19 hours later), note how the oils in the drops of #7 have migrated outward via capillary action.
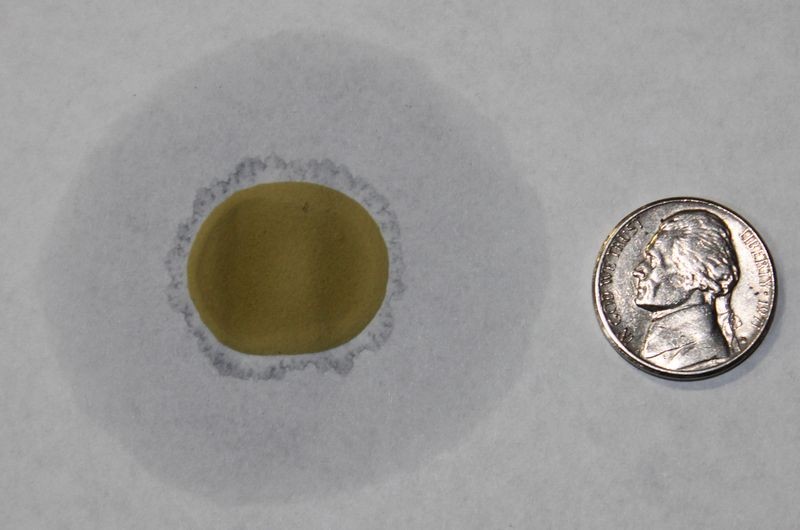
Feeder Oils penetrate or feed the paint
This same effect can take place in a single stage paint but not only will the oils travel horizontally, they will also travel vertically, that they will penetrate downward "into" your car's paint and this is where the term feeder oils comes from as the oils penetrate into or feed the paint. The result is they will condition the paint restoring some level of workability as compared to just working on old dry paint, and they will also bring out the full richness of color, something that will showcase the beauty of your car's paint.
37 Year Old Paint Soaking in Seven...
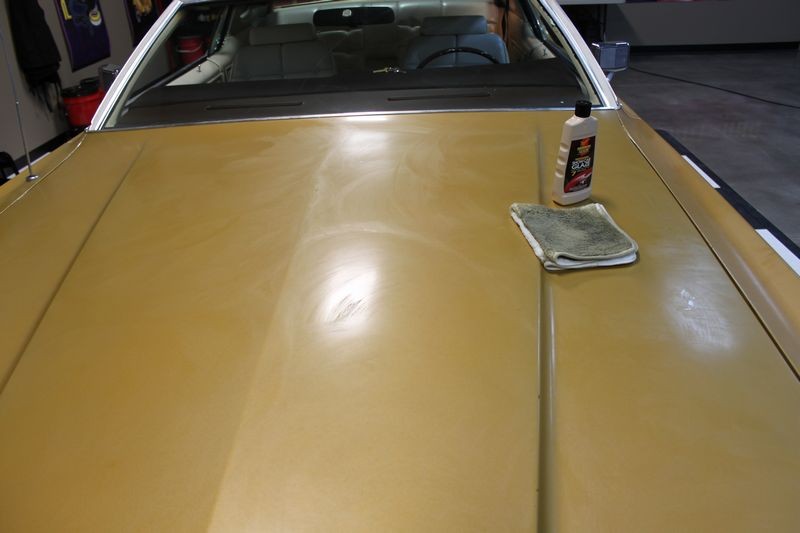
The worse condition the paint, the more times you repeat the #7 conditioning step
For this project I applied, worked and removed the #7 four times to the hood and tops of the fenders. After the initial saturation application I applied and worked in the #7 three more times the next day.
I put as much energy into the last application as I did the first application and in order to do this right it takes the desire for excellent results as well as the human elements of care and passion to rub out a hood 6' long and almost 5' in width 4 times like your life depended upon it but the results will be worth it.
After approximately 12 hours of soaking in #7 Show Car Glaze, we're ready to wipe off the first application off this 37-year old paint.

Then after you've rubbed the paint down really well by hand with the #7 take a moment to re-inspect it and then choose your next product and next step.
I could be you'll want to compound the paint and it could be you'll only want to polish the paint using a medium or fine cut polish, you won't know till after the #7 rubdown.
")
cobracarlo
Member
- Dec 18, 2012
- 33
- 0
Just to make sure are you sure its a single stage paint? I had a 93 GT and I could have sworn it was Base/Clear?
Mike Phillips
Active member
- Dec 5, 2022
- 51,004
- 7
Just to make sure are you sure its a single stage paint? I had a 93 GT and I could have sworn it was Base/Clear?
Good point...
How to Test for Single Stage or Clear Coat Paint
:xyxthumbs:
dpscoupe
New member
- Sep 13, 2012
- 450
- 0
Just to make sure are you sure its a single stage paint? I had a 93 GT and I could have sworn it was Base/Clear?
Bc/cc was an upgrade option. Could be either/or. There were more ss than bc /cc
margallar
New member
- Oct 5, 2012
- 87
- 0
it really depends on the condition of the paint and how well you can work the #7, if both factors are good then you might not need to go to any abrasive product at all. Grab some #7 and do a test area, this will help you learn how to work it into the paint and also will give you an idea of how good you can make it with just #7, just do it, when you try #7 on your car you will start to understand. single stage is a bit like a sponge, it pulls oils, you want to fill that sponge. filling it will restore depth and gloss and if the paint is still not satisfactory the oil feeding/#7 feeding will help ensure that the sponge (single stage paint  ) doesnt pull the oils from your abrasive product (compound etc).
go straight to an abrasive without prior application of #7 and the abrasive will dry quickly, that will prevent you from getting good results.
) doesnt pull the oils from your abrasive product (compound etc).go straight to an abrasive without prior application of #7 and the abrasive will dry quickly, that will prevent you from getting good results.
Mike Phillips
Active member
- Dec 5, 2022
- 51,004
- 7
Thanks Mike and everyone else. I confirmed using the link that Mike posted and I have single stage paint. I do know that there was option to get a clear coat.
This is also something I included in my how-to book on pages 10 and 11
Paperback
single stage is a bit like a sponge, it pulls oils, you want to fill that sponge. filling it will restore depth and gloss and if the paint is still not satisfactory the oil feeding/#7 feeding will help ensure that the sponge (single stage paint
Pretty good analogy... I would have added the word "dry" as in,
old, neglected single stage paint is a bit like a dry sponge...
go straight to an abrasive without prior application of #7 and the abrasive will dry quickly, that will prevent you from getting good results.
While it's true the abrasive product can dry up quickly because the dry single stage paint will act like a sponge and absorb any liquid carrying agents in the compound, the bigger danger is taking abrasives to dry, old brittle paint where the abrasives can do a lot of damage very quickly.
Thus the idea of gorging antique, single stage paints with the feeder-oils in the #7 Show Car Glaze is to make the paint more workable before you actually work on it.
- Thread starter
- #18
Ok i finally got paid and this whole week looks like it will be sunny and no longer rainy so i will for sure purchase the #7 but what products do you all suggest for the waterless carwash and the clay kit (with clay lubrication) ive looked at the options and there is a good variety of each product
BillyJack
Active member
- Aug 14, 2010
- 1,227
- 0
Ok i finally got paid and this whole week looks like it will be sunny and no longer rainy so i will for sure purchase the #7 but what products do you all suggest for the waterless carwash and the clay kit (with clay lubrication) ive looked at the options and there is a good variety of each product
I'd get some ONR-Optimum No Rinse Wash & Shine: clay lubricant, optimum rinseless wash, no rinse car wash, optimum detailing products
You can dilute it to use as a rinseless (not waterless) wash, clay lube or quick detailer, and it's excellent stuff in all 3 roles. IMO, waterless washes are only for garage queens that have accumulated dust, or maybe sat out overnight and got exposed to a combo of dust and dew. I have and use Optimum Opti-Clean as well as Griot's Waterless, but only in limited situations. Using a rinseless wash is almost as quick and far safer.
BTW, the El Camino in my avatar pic is a veteran of Mike's SS restoration process. It's SS lacquer from 1987 and had been buffed enough over the years that I was afraid of any more aggressive machine polishing. I performed Mike's process with 4-5 vigorous rubs of #7, allowing long soaks on the first two, followed by machine polishing with M80. It brought the paint back on the old girl enough to pick up a couple show trophies, so I'm a believer.
Bill
Last edited: