Sonax Perfect Finish vs PF2500

P203S was able to remove ~99% of everything. Whereas the SPF removed maybe ~93-95%. I feel like that they are both perfect 2nd steps in a two-step polish. Or even a 1-step polish on lighter car wash swirls, etc.

I'll see if I can get some time tomorrow to really scratch the panel with a dirty wash rag to get some scratches instead of light holograms and then complete a two-step polish with P203S and SPF being the 2nd step. I also don't believe Menzerna's claim that P203S had almost the same cut as SIP.

Thanks. It sounds like they're both pretty darn similar in terms of cutting capability.

Here's another question - both use diminishing abrasive technology. I've read elsewhere that PF2500/203s takes a long time to break down, and therefore, Sonax PF is much quicker to use (since Sonax PF takes far less time to break down).

Did you find this to be true? Thanks.

Yes. Todd Cooperider suggests ~45sec working time for SPF and that is pretty close to what I saw. 45-60secs.

The P203S definitely took a longer time to fully breakdown on both PC and rotary. I didn't really keep track of time (I can next time), but it felt like another full minute to break down over SPF.
 
With Menzerna polishes its all about patience. If you don't have that in your DNA, then move onto another brand particularly SMAT polishes.
 
Do i need to prime the pad first using the Mike Phillips method and wetting the entire surface?

Do you mean the Kevin Brown Method? ;)


Correct. Priming the pad is a technique pioneered, perfected and made famous by Kevin Brown. I never take credit for other people's work and in fact ALWAYS publicly give credit where credit is due.

Who has a copy of my how-to book?


What does it say on page 61 of the first edition?

What does it say on 77 in the second editin?


Can I get a witness?


:dunno:
 
I just bought a new bottle of Perfect Finish and i cant wait to try it! The article mentions to use only two drops per pass.

Do i need to prime the pad first using the Kevin Brown Method and wetting the entire surface?


Yes.

I have not read Todd's article on SPF I'm sure it's good though as Todd is very good writer when it comes to sharing ideas and techniques using a keyboard.


Here's the deal though, anytime you're using a dual action polisher, it never hurts to start out priming a dry pad with the product you're going to use and then add what I call you're "working products".

Sure all the product on the pad, the primed part and the drops, (working product), are going to be "working" but it's the additional drops that end up getting spread out over the surface that end up doing the majority of the cutting because these are the abrasives being pushed over the surface.

One thing I've tried to do is share this technique most every time I've demonstrated how to machine polish with a DA Polisher on TV. No reason to keep all the cool techniques to ourselves here in the Cyberworld.


Besides all the regulars that read this forum I know we have hundreds of lurkers that read it every hour of every day and thousands of lurkers over the course of just a few days as this forum in incredibly busy. And besides this thread being hot right now, hundreds and thousands of people will read it into the future.

So for all the lurkers now and into the future that might not be aware of what us regulars are talking about, here's a few pictures to tell the story...


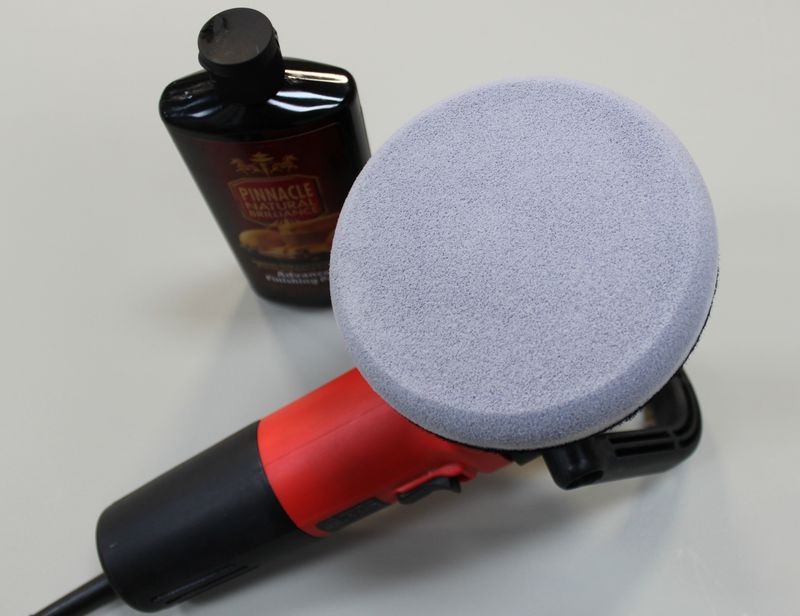
How to prime a foam pad when using a DA Polisher


Here are 3 ways to apply product to your pad.

1. Priming the pad then adding product to work with

Priming a clean, dry pad is considered the best approach for using a DA Polisher because it ensures that 100% of the working surface of the pad is wet with product and working at maximum efficiency when you turn the polisher on. I originally learned of this technique from my friend Kevin Brown.

Priming the pad also ensures that you don't have any dry portion of the pad working over the paint un-lubricated. This really isn't a risk because since you're just starting out you're going to be removing defects a lot more serious than would be caused by any portion of the pad that is dry and spinning against the paint.

Plus, after just a few passes, the product you apply to specific areas of the face of the pad will migrate over the entire face of the pad and it will do this rather quickly when you're on the higher speed settings.


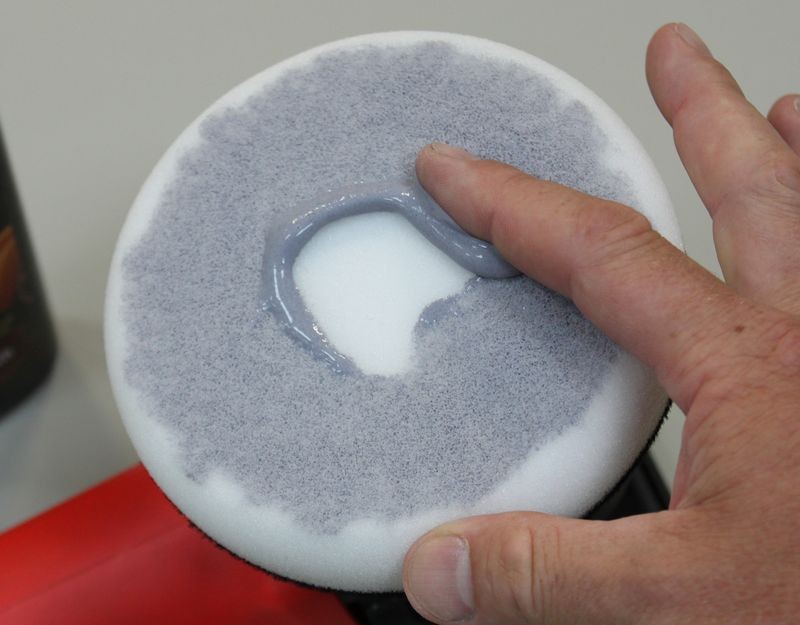
Priming the Pad - For clean, dry pads
Start with a clean, dry pad and add some fresh product to be spread out to the face of the pad. Using your finger, spread the product out over the pad and then using your finger work it into the pores of the pad. Don't saturate the pad, just use enough product to make sure that 100% of the working face of the pad has product coverage.

PrimingPad01.jpg


PrimingPad02.jpg


Work the product around the face of the pad and into the pores
PrimingPad03.jpg


PrimingPad04.jpg


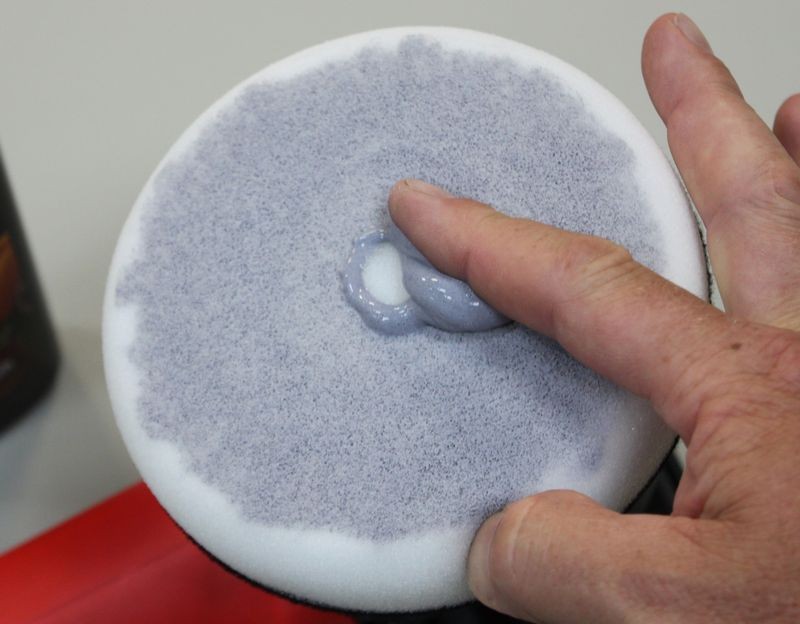
Any extra, take and apply to the outer edge until 100% of the working face of the pad is primed with product.
PrimingPad05.jpg


As an option you can also prime the outer edge. This helps if you're buffing around convex curves or around panels that the edge of your buffing pad may come into contact with, like spoilers, side mirror housings, curved panels etc.

PrimingPad06.jpg


PrimingPad07.jpg


Primed and ready to add "Working Product" to.
PrimingPad09.jpg


PrimingPad08.jpg


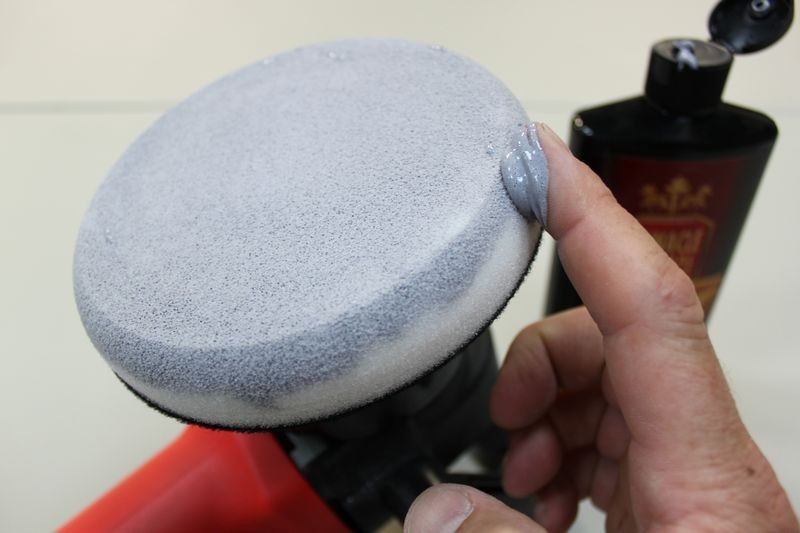
Adding "Working Product" to the primed pad
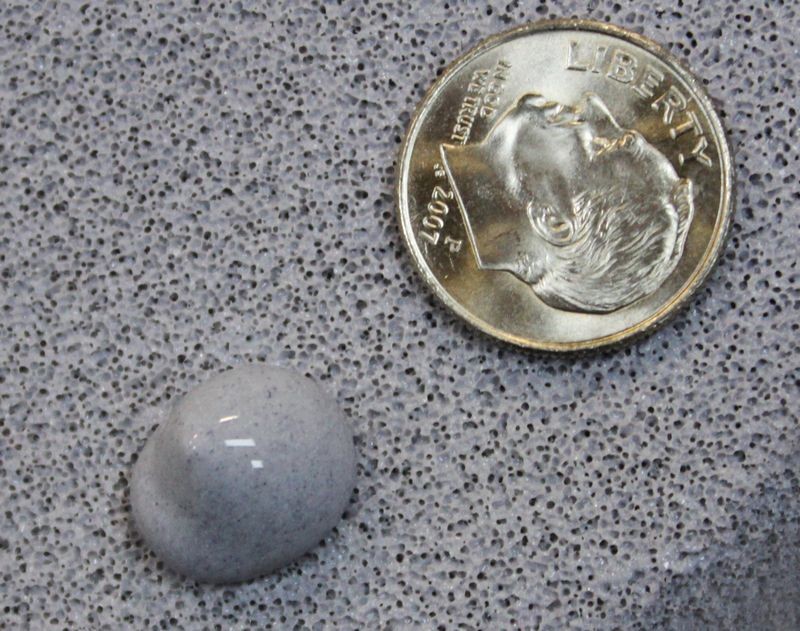
Some people will recommend 3 to 4 pea size drops of product as the proper amount of product to use and this can be correct for concentrated products or working small sections and if you follow this advice make sure you are not under-lubricating the surface being worked.

Pea size drops of product
PrimingPad10.jpg


PrimingPad11.jpg


For some products and paint conditions, you may want more product on the surface working for you. Here's an example of dime size drops of product.

Dime size drops of product
PrimingPad12.jpg


PrimingPad13.jpg


:xyxthumbs:
 
Every other week or so we bring in really cool cars and let forum members and local "Car Guys" in our community come here and work on them and we try to showcase all the really cool products available on Autogeek.net.

While last night we showcased Scholl products, a few weeks ago we used both the Sonax Nano Polish and the Sonax Perfect Finish on these two cars. The before pictures are in the link if you want to see them but here's the finished results.

And although we used Dodo Juice White Diamond for a wax everyone knows 90% of the end-reults comes from the prep work.

Prep-work = The Sonax polishes I mentioned above and a variety of pads and polishers.


1955_Chevy_1947_Buick_008.jpg


1955_Chevy_1947_Buick_007.jpg


1955_Chevy_1947_Buick_009.jpg


1955_Chevy_1947_Buick_010.jpg


1955_Chevy_1947_Buick_011.jpg


1955_Chevy_1947_Buick_012.jpg


1955_Chevy_1947_Buick_013.jpg


1955_Chevy_1947_Buick_014.jpg


1955_Chevy_1947_Buick_019.jpg


These two Sonax products also work really well with Microfiber Pads.


:xyxthumbs:
 
This video kind of shows what the Sonax polishes can do, they both work really well. I know I'm impressed with not only how they buff and wipe off but the pretty much flawless results anyone can get even without any knowledge, experience or skills...


Video: 1955 Chevy & 1947 Buick + Sonax + Dodo Juice + Perfection!I shot this "walk-around" video right after we buffed out this 1963 Plymouth Fury, just now getting to upload it to YouTube.


1955 Chevy & 1947 Buick + Sonax + Dodo Juice + Perfection!


[video=youtube_share;D34zxWfOizE"]Check out the rich gloss![/video]​


:xyxthumbs:
 
Thanks Mike, for responding.

I should add that I once used Riccardo Yellow Clay on my paint and it left terrible marring. Pinnacle Ultra Poly Clay had no such issues.

So - I guess this tells me that the Toyota winter grey paint is fairly soft?
 
Thanks Mike, for responding.

I should add that I once used Riccardo Yellow Clay on my paint and it left terrible marring.

Pinnacle Ultra Poly Clay had no such issues.

So - I guess this tells me that the Toyota winter grey paint is fairly soft?


Could be, hard to say as even hard clear coats can scratch easily.

I usually determine paint hardness or softness by how it reacts when machine polished or hand polished.


:)
 
Bumping this thread.

I have finally had an opportunity to obtain and try both products, but not in the same setting.

In general, I have found that Sonax PF will finish significantly better on soft paints and also breaks down a bit faster. However, Sonax PF seems to work a bit better on the Flex than the Rupes 21 -- and I say this because it seems to break down a hair faster on the Flex.

As far as cut, I do not have an apples to apples comparison. However, I used Sonax PF to correct my recently repainted bumper that was filled with wool pad swirls and rotary holograms and 90-95% of the defects were removed in just 4 passes with a LC HT Cyan Pad. The resulting finish had no haze and no micro marring...and it arguably looks better than the adjacent panels that were done with a B&S Green and HD Polish.
 
I compared the two on 645 and the pf2500 finished wayyyyy better kind of mad I payed for the sonax
 
Interesting...I've never used a better one-step than Perfect Finish and Rupes Yellow Pad. 2500 used to be my favorite.
 
Back
Top