Strange light reflection after compound and polish?

Also, don't buff to a DRY BUFF...

Wet Buffing Technique


The Wet Buffing Technique
Most compounds and polishes should be used so that there is enough product on the surface to maintain a wet film while the product is being worked. The wetness of the product is lubricating the paint as the abrasives abrade the paint and cushion or buffer the abrading action so the abrasives don’t simply scour the finish leaving behind what we call micro-marring or hazing the paint.

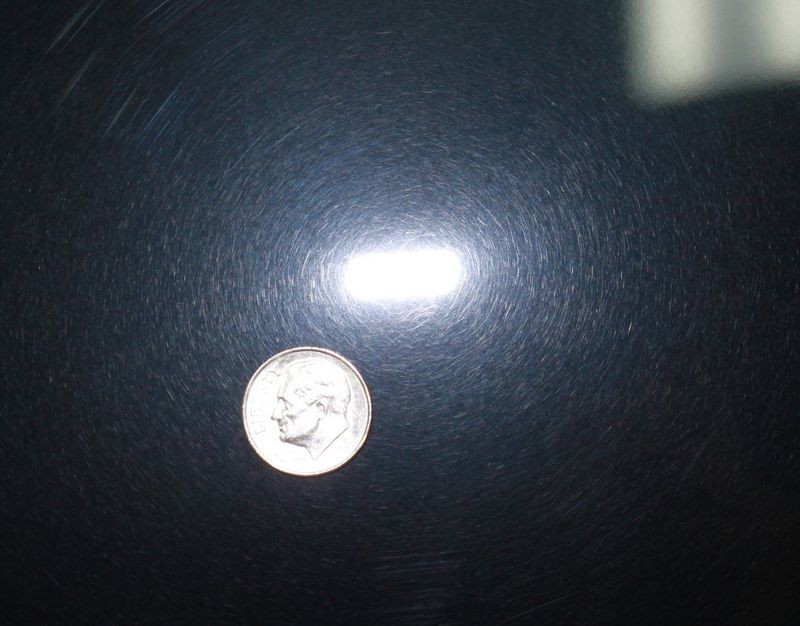
Micro-marring, Hazing or Tick Marks
MicromarringTickMarks01.jpg


Tip: Wet film behind your path-of-travel
Everyone new to buffing wants to be told some easily identifiable sign that they can use to tell when it's time to stop buffing and it's not that simple, so here's an indicator I've always used and share in our detailing classes.


As you're making a single pass with the polisher, the paint behind the path-of-travel should have a visible wet film on it. If the paint behind the pad is dry and shiny, you've run out of lubrication and you're dry buffing.

Turn the polisher off. Wipe the residue off and inspect using a Swirl Finder Light to make sure you didn't dull or micro-mar the paint, you usually won't cause any harm, but pay attention when your running the polisher and don't buff to a dry buff. If you do, you can quickly re-polish that section by cleaning your pad and adding a little fresh product and making a few new section passes.

Wet film behind your path-of-travel
Wetfilmbehindyourpath-of-travel.jpg


:)
 
Make sure you clean your pad often, especially if you don't have a lot of pads.

Foam will tend to absorb liquids out of your products. Add to this you're pressing down on the pad with pressure, the action of a dual action polisher is VIOLENT (at high speeds), and as the pad becomes wet or what we call

Pad Saturation

It will not work as well.


How to clean your foam pad on the fly


Video: How to clean your pad on the fly

Here's a technique I've been showing for years on how to clean your pad quickly so you can get back to buffing out your car.


How to clean your pad on the fly
[video=youtube_share;NuyrBrqz_YU&hd=1"]How To Clean Your Pad..." target="_blank">How To Clean Your Pad...[/video]​


The above technique works with any of the below DA Polishers,

Porter Cable DA Polisher
Meguiar's DA Polisher
Griot's Garage DA Polisher
Shurhold DA Polisher


If it works for you after watching the video, please post a comment to the thread for the video in the included link above.

Thank you.


When using a dual action polisher to remove below surface defects with any type of abrasive product you’re going to have two things building up on the face of the foam pad that you need to clean off.
  • Spent residue - From the product you’re using.
  • Paint - Small particles of paint that are coming off the car as you abrade the surface
If you’re working on a clear coat finish then keep in mind you won’t see the paint residue building up on the pad because the clear coat paint is clear. :idea:

Make sense?


If you’re working on a clearcoat finish, all you're going to see is the color of the product that you’re using. For example if you’re using a white colored polish you’ll see white residue building-up on the pad.

Now if you’re working on as single stage paint then you’ll see the color of the paint on the car on the face of your foam pad,. For example if you’re working on a single stage yellow paint system then you’ll see yellow paint on the face of your foam pad.

The important thing to understand is that as you work on the car with your polisher you’re going to be removing a little paint and there’s going to be used-up product and paint building-up on the face of the foam pad. It's important to clean this gunk off your pad often.

So the question is, how to you clean this gunk off the pad?


The answer is there’s a number of ways to clean your foam pad, the three most common are,
  • Pad Washer
  • Nylon Brush or Pad Cleaning Brush
  • Terry Cloth Towel
Out of the 3 options listed above, cleaning your pad on the fly is probably the most popular because it’s fast, and most people have a terry cloth towel in the linen closet that they can use to clean the pad.

The best way to clean a pad is with a pad washer but before you can use a pad washer you must first own one. Pad washers are worth their weight in gold if you buff cars out with any kind of regularity. If however you’re just buffing out your own personal cars, then chances are you don’t own a pad washer but chances are very good you do own a terry cloth towel or two that you can use to clean your pads on the fly.

Brushes work good if you’re using a rotary buffer but the only way you can use one with DA Polisher is to turn the polisher off, hold the polisher and pad in such a way that the pad won’t spin and then rub the brush over the face of the pad to scrape off the residue.

While this works, it means turning the polisher off, (now you're not buffing out the car, remember the time issue?) and grabbing your brush and then brushing the pad. Nothing wrong with this but when you consider how long it already takes to do the cleaning step, (about 4-6 hours for an average size car and that’s if your good at this and if you work fast and don’t take any breaks. So stopping the polisher and using a brush to clean the pad works but it’s not as fast or effective as using a terry cloth towel.

The whole idea and success behind the cleaning your pad on the fly technique is in that it allows you to clean your pad quickly, (that’s the on the fly part), and then quickly get back to work.

Again, buffing out an entire car using a dual action polisher from start to finish is an all day job. There is no time for lollygagging. If you lollygag or take long breaks, you either won’t get the job done in one day or you’ll sacrifice doing a quality job during the cleaning step in order to get to the waxing step so you can put the car back into service. :dunno:


So let’s take a look at how-to clean your pad on the fly

Cleaning your pad on the fly is where you take a terry cloth towel, usually a medium size hand towel works best, you fold it in two and then simply hold the towel against the face of the pad and then turn the polisher on and use your hand that’s holding the towel to push the towel into the foam. This will act to draw any excess liquid out of the foam and any excess residue off of the face of the pad.


This is me using the Clean your Pad on the Fly Technique to clean my pad on the fly as we removed the oxidation off this Neon.

EODodgeNeon010.jpg


EODodgeNeon011.jpg


EODodgeNeon012.jpg


EODodgeNeon013.jpg


:)
 
proceeded to compound with Meguiar's ultimate compound using an orange LC pad with DA at setting 5.


Meguiar's Ultimate Compound on speed 5 should remove most any holograms inflicted by a rotary buffer.

The exception would be if the person that inflicted them was using a rotary buffer with a wool pad and a caveman compound and PUSHING DOWN HARD then the holograms could be deeper just from bad technique and in this case it could be possible that Ultimate Compound with a foam pad on speed setting 5 didn't get them out during the first correction step.

If this is the case, then the M205 with a polishing pad probably won't remove them either.


I'd like to think or at least wish were past the days of caveman hack detailers though.


M205 is a great fine cut polish, it's the cousin to M105, at least when it was launched and it's meant to clean any holograms after the M105 and a rotary buffer but these would be shallow holograms from someone that actually knows what they are doing.

I have seen a lot of softer paint systems that show signs of micro-marring after M205 so if the paint on this car is soft you might want to try a different abrasive technology in a different brand.

Optimum
Sonax
Wolfgang
Rupes
Pinnacle


Area few brands that come to mind that make very good polishes that work well on soft paints as well as dual action polishers.

Just a thought....

My recommendation is to have at a few different types of polishes in your arsenal just for "testing".


Also if the DA you're using is a Porter Cable then set the speed on the 6.0 setting and mark your backing plate like I show in this article/video to make sure the pad is rotating when you're working any compound or polish.


Video: Mark your backing plate to make it easy to see pad rotation


MarkYourBackingPlate01.jpg


Here's a quick video that show how and why to mark your backing plate to see and monitor pad rotation while doing any correction or polishing steps.


[video=youtube_share;QM8PnDooZP8&hd=1"]How To Check Pad Rotation on a DA Polisher -...[/video]​


It's also important to maintain pad rotation with PC style tools when using a one-step cleaner/wax or AIO type product on neglected paint.

It's not vital to maintain pad rotating when applying a finishing wax or finishing paint sealant to a finish that you've just buffed out.

Note: Finishing Waxes and Finishing Paint Sealants would be of the type that don't offer any cleaning or abrading ability.


:xyxthumbs:
 
A-M-A-Z-I-N-G info...

I've saw many of what's written above in separated topics, and I liked a lot to see it compiled here again... this kind of defects OP is facing will be common since the caveman hackers are still doing their role.

At least here, in Brazil, I almost faint every time someone come to show me a work done on their cars...

The information provided here on this thread is GOLD, thank you very much for taking your time writing this up for us.

I've dealt with similar work earlier, and I had to struggle to get rid of defects. At that time, mind was terribly more tired than body, that's why I say to everyone detailing is not a physical activity (ONLY), it's a mental game, and a form of art.


Now I'm even more educated and pretty sure next time I'll be able to correct them at least faster and knowing better what to do.

Kind Regards.
 
Back
Top