Utilizing the "Smack Technique" on the PE14

Joined
Feb 26, 2011
Messages
12,365
Reaction score
0
Most of what I have written on using this technique on the 3401 is a direct carryover to the PE14. Everything stays the same with the only variance being the tool. Both machines have the same controls and everything from the neck to the rear is the exact same and has the same feel of operation. This makes it easier to move from machine to machine as they are identical.
http://www.autogeekonline.net/forum/auto-detailing-university/77155-my-technique-concerning-3401-menzerna-products-hybrid-pads.html

What I want to stress here is that proper alignment of pad to plate contact is paramount to a smooth buffing experience. The key is getting the pad to spin as “True” as possible. This will eliminate any vibrations caused by a pad not being centered.

Also anything that needs to be taped off including panels that are not level with each other should be taped as you don’t want a pad being spun by a rotary potentially burning the edges of panels. Mike just wrote an in depth article on this that I would like to share here if it’s ok with him.
http://www.autogeekonline.net/forum/how-articles/80865-how-tape-off-car-before-machine-polishing.html

Here is what I wrote for the 3401 article. The “Smack Technique” works for either machine.
FG400 and cutting pad speed 3-4
S4000 and polishing pad speed 4-5

When starting with a fresh new pad regardless of color choice or Menzerna selection is to first prime the pad with one mist of a pad conditioner or equivalent and then 4-6 dime sized dots of product depending on the size of the pad and area to be worked.

With the pad primed and ready to work with I set the speed dial accordingly to my options above, gently pull the trigger enough to activate the machine (basically speed 1) and do one brisk full coverage section pass in the section that I am going to work to spread the product out with only the weight of the machine.

Once the product has been spread out I squeeze the trigger fully to operate the polisher at the selected speed on the dial and start my normal routine of compounding or polishing with moderate to heavy pressure depending on what’s needed.

I also like to work Menzerna products longer such as 6-8 passes instead of the normal 4-6. When I get to the last 2 passes I ease up and only use the weight of the machine to finish.

When I am finished with the section that was just worked there should only be a very thin and clear residue left to wipe up which is a breeze to remove.

After the section was compounded or polished my method to cleaning the pad “on the fly” is to brush the face of the pad with a pad brush or mf towel while the pad is at rest. I don’t hold the brush and spin the pad against it as I feel this accelerates the wear of the pad.

When I am ready for the next section to be polished I will simply add the dimed sized drops of product without the pad conditioner as the pad has been in use and is seasoned.

Doing it this way will get me through half of a hood, a fender, a door, or trunk lid depending on panel size. After I have completed polishing half of the hood or the fender with multiple section passes I will then clean my pad in a pad washer and spin them dry on my rotary and set it aside face down on a mf towel to dry and will grab a fresh dry pad and condition it for use for the next panel.

I rotate 2-3 pads this way of the same color per compounding or polishing step to allow the others to dry while each pad is in use. This way after each panel I always have a fresh clean pad to use.

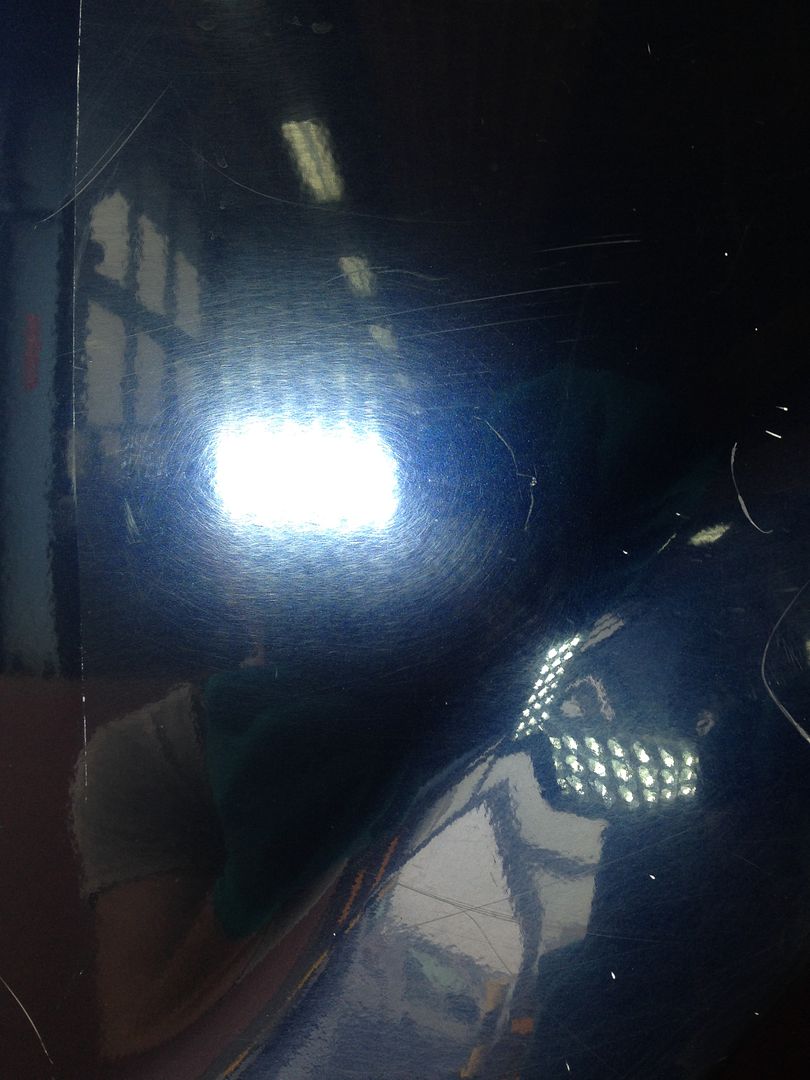
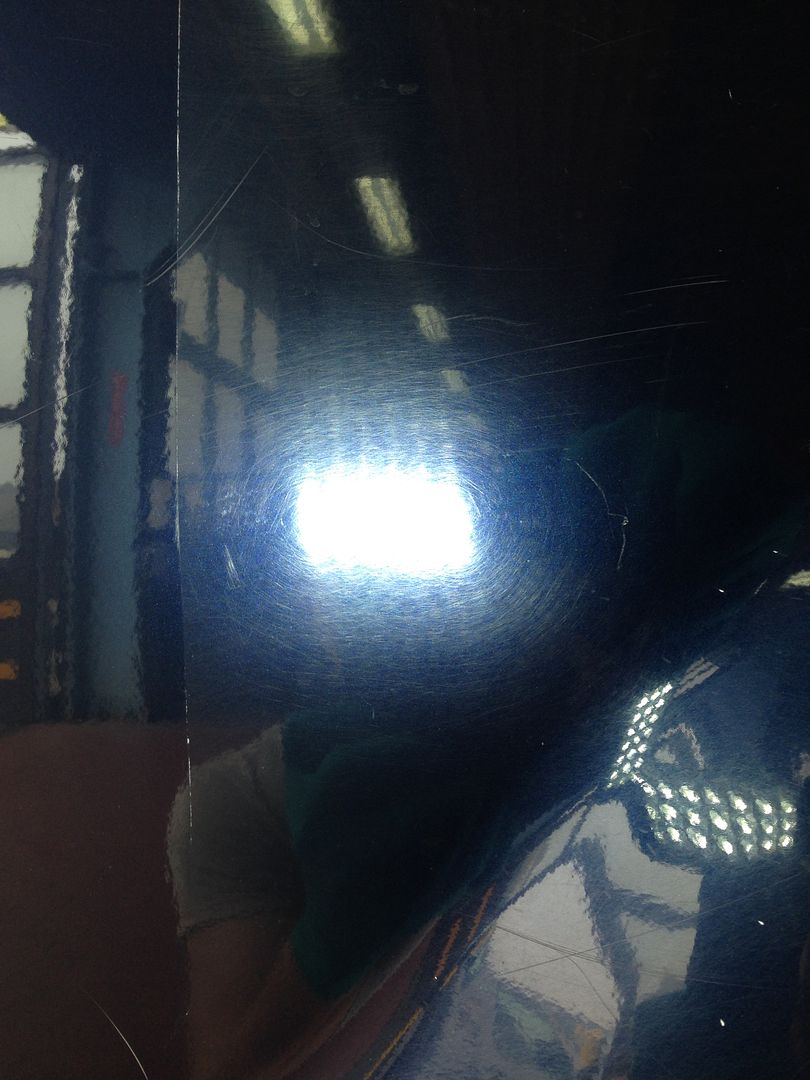
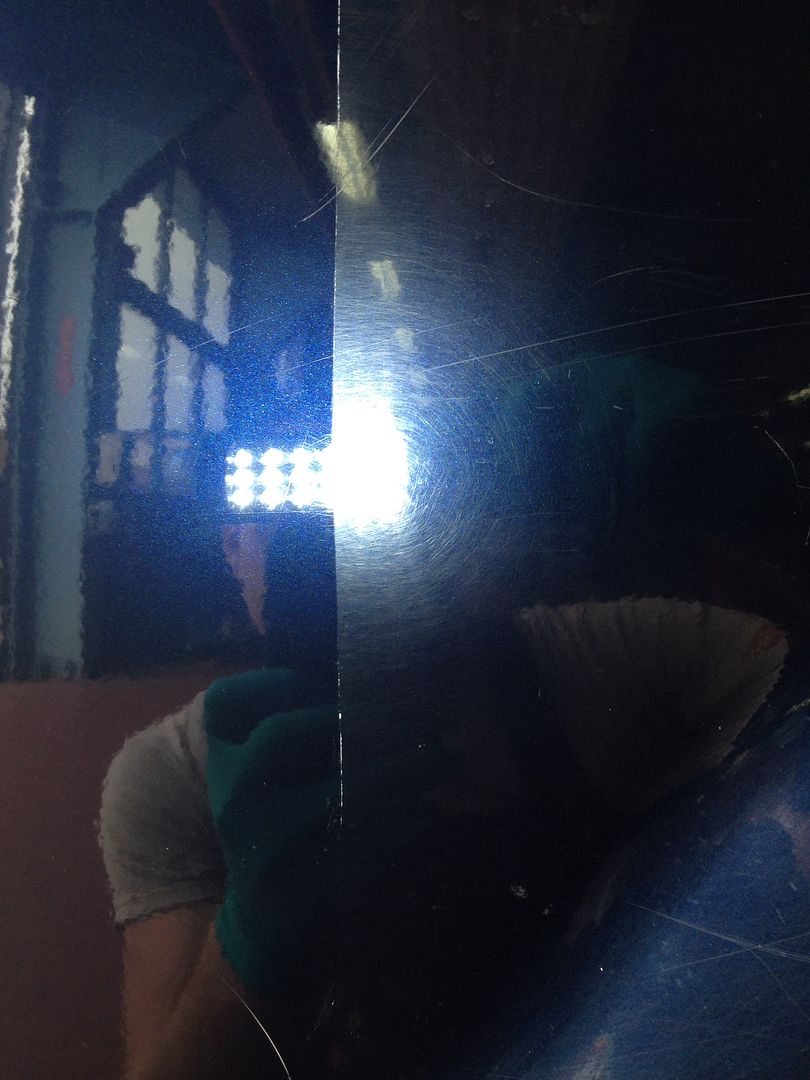
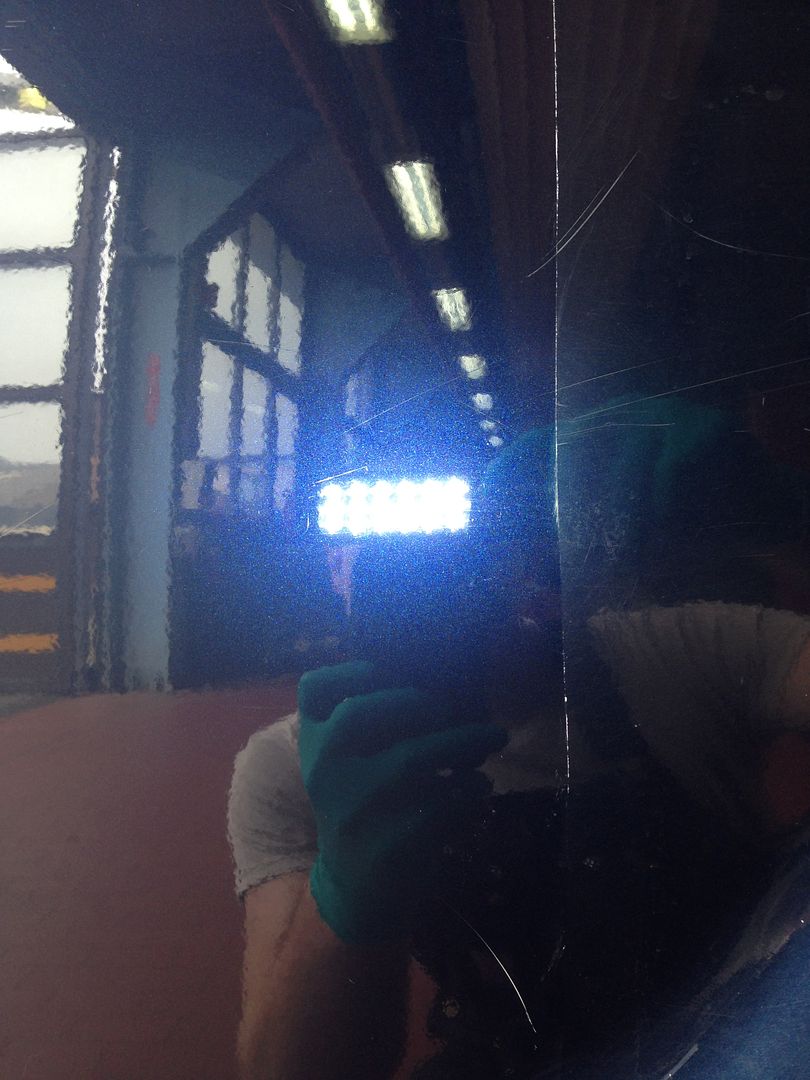
Below are a few pictures showing 50/50 results using the PE14 and “Smack Technique”. Correction was done with the Blue Hybrid and FG400 with speed 3. Polishing was with the White Hybrid and SF4000 using speed 5. This is the bedside of a 2005 Ford F-250. Pictures taken with iPhone.
EDE4CA06-2F63-4B9C-B5E3-C6DC44B0C3DE_zpsng4ui5ey.jpg


70C28735-37C1-4426-A56B-D724CBA39AFB_zps3vq9nvsw.jpg


F180F350-1F07-40C7-B19D-6B816C01A408_zps93codcai.jpg


E8790F21-7213-4BE5-AA58-05E0AD6E6392_zps19mwxoby.jpg


2AA977AC-A02B-436F-B396-D0C736427BD2_zpsdpy9ocds.jpg


F0D580E2-D7ED-462D-ACA0-6C0F33128C1E_zpsgrxlcum9.jpg


D7DDDB56-0C90-465A-9193-A56AAF279A52_zps6ppxcd5v.jpg


999ED8B1-4DEE-487E-B11E-EA9DB17D2AB6_zpschwzvsvk.jpg


Using a different light source.

14E11D28-B775-460E-B552-FA1164E72F91_zpskh7leqxf.jpg


9986E01D-1DFF-4D15-A31A-1BCE9E2B6649_zpstntgig9m.jpg


BA9E0927-8267-4C7E-804B-599A29D9924B_zpspib4miar.jpg


D322A218-0E66-4552-B261-4039C277DA77_zps7acmioq5.jpg


E2E40269-591A-4BDC-8608-CC1F355E6FF4_zps86hkpm0w.jpg


:)
 
Thanks for the "smack technique"...... but better yet, THANK YOU for you service to our country my friend!
 
Nice work Mike and thanks for sharing the "Smack Technique". :xyxthumbs:
 
Great! I'm a believer (and supporter) of Smack's Technique for Flex 3401, Hybrid pads (not exclusively, but mainly) and Menzerna polishes.

This was a game changer for me since I'm being able to get 1-steps to my customers in a high standard. No more struggling with low correction ratio, or not so good finish, and the huge issue I was facing with Menzerna polishes, the 'PITA' wipe off.

Learning to use this technique made the fully/correctly worked product a breeze to remove.

It's great to hear it works also on PE-14. Although I haven't got a rotary yet, I feel confident when I get one I have a solid point to start,

Thanks a lot for all you've done sharing this technique (at least for me, but also many I've seen reporting the same here), it took my results to a whole new level.

It's just good to point out, depending on car you'll be working on and severity of defects, some slight adaptations may be needed (more/less speed, adjust in pressure and arm speed, etc.).

It's just an advice to, after executing the 'crude technique' on a test spot, try to fine-tune it when needed, since we all know there's nothing like a 'cake receipt' that will cover everything. The more you use it, the more proficient you'll be at tuning it to the higher level results possible, specially for 1-steps.

Kind Regards.

Hey Rafael,

Thanks for taking the time to share your thoughts on what I have shared. When this technique has been perfected it is easy to transfer between machines.

Also this a good starting point and like you have stated their is no "Cake Recipe" for all vehicles. Adapting to what you are working on as well as your goals will determine the route that is needed.

No matter what pad choice or polish choice, the "Smack Technique" can be used either way.

:props:
 
Feels good to halo free on a rotary eh?? Very good write up and explanation!
 
Excellent write-up Mike, thanks for sharing!
 
Mike... I've said it once and I'll say it again... We need a Smack Book. All of your Smack Techniques bound (or e-bound, if it is a ebook) for all to see. I know we would all love it, but since they're on this forum and (hopefully) live forever, I suppose it is just as good.

Thanks for the technique! When I get a rotary I know that I will be using this technique to hone my skill. Happy detailing!

Great idea mate !
 
Thanks for sharing this mike. I've used the "smack technique" on the last 3 suv's I've polished, pf2500 on white pads for a range rover and land rover and fg400 on white pads for an escalade. All 3 times I've used the pe14 for the tight spots with a 4" CCS spot buffs pad and whatever polish I was using. I tended to use a slower speed On the rotary, 900-1200 for the polishing then 600 for the final 2 passes with just machine weight. I found the results to match the correction I got on the larger panels with the 3401.

Only question I have, are these holograms in these pictures or is this just an anomaly from the light source?

hepehazy.jpg


I don't see what looks like holograms in the pics illuminated with the multi led light source.

I would also like to see I "smack techniques" book in the near future. 8-)


Sent from my iPad using Tapatalk
 
Also anything that needs to be taped off including panels that are not level with each other should be taped as you don’t want a pad being spun by a rotary potentially burning the edges of panels. Mike just wrote an in depth article on this that I would like to share here if it’s ok with him.

How to tape-off a car before machine polishing

Perfectly okay with me. Rotary buffers are a very different animal than DA polishers and if you're not careful you can burn through paint on a corner, edge or raised body line so taping off these areas is very important.

You also don't want to "catch" the edge of something like a mirror or wiper blade or antenna as the spinning pad on a rotary buffer can grab these things and damage them very quickly.


When I get to the last 2 passes I ease up and only use the weight of the machine to finish.

And that's where polishing paint become an art form instead of just a simple grinding process. It's the little techniques that can make a huge difference.


After the section was compounded or polished my method to cleaning the pad “on the fly” is to brush the face of the pad with a pad brush or mf towel while the pad is at rest. I don’t hold the brush and spin the pad against it as I feel this accelerates the wear of the pad.

The most important thing though, no matter how you do it, is to clean your pad often, even after each section. Otherwise you'll be grinding both the paint you removed that is now on the face of your buffing pad and the spent product that is on the face of your buffing pad back into the paint on the next section.

I'm more of a fan of laying down a strip of product called a bead of product onto a panel and then using the 10 @ 10 Technique for picking up the product but placing drops of product onto a pad works to.

In fact, when buffing out a boat you pretty much have to place the product onto the face of the pad as the hull of a boat isn't vertical but tapered inward and that makes using the 10 @ 10 Technique pretty difficult at best.

And just like working with dual action polishers of any type, when working with rotary buffers, more pads are better, especially if you want to do any type of finishing or jewelling work.


Great tips Mike, thanks for sharing and like you, I really like the Hybrid pads not just for the Flex 3401 but also for the Flex PE14.

If you want to use the 5" Hybrids on a rotary remember you need to get a 4" backing plate as that is the diameter of the velcro material on the back of the 5" Hybrids.

Smaller pads on rotary buffers are easier to control and also make learning how to use a rotary buffer a lot easier.

:dblthumb2:
 
Mike... I've said it once and I'll say it again... We need a Smack Book. All of your Smack Techniques bound (or e-bound, if it is a ebook) for all to see. I know we would all love it, but since they're on this forum and (hopefully) live forever, I suppose it is just as good.

Thanks for the technique! When I get a rotary I know that I will be using this technique to hone my skill. Happy detailing!

Hey Ryan,

Wonder how I would go about doing this? May have to start doing some digging on this.

Thanks for following along.

Great idea mate !

:xyxthumbs:

Thanks for sharing this mike. I've used the "smack technique" on the last 3 suv's I've polished, pf2500 on white pads for a range rover and land rover and fg400 on white pads for an escalade. All 3 times I've used the pe14 for the tight spots with a 4" CCS spot buffs pad and whatever polish I was using. I tended to use a slower speed On the rotary, 900-1200 for the polishing then 600 for the final 2 passes with just machine weight. I found the results to match the correction I got on the larger panels with the 3401.

Only question I have, are these holograms in these pictures or is this just an anomaly from the light source?

hepehazy.jpg


I don't see what looks like holograms in the pics illuminated with the multi led light source.

I would also like to see I "smack techniques" book in the near future. 8-)


Sent from my iPad using Tapatalk

That's great to hear Eric!

Acutally I wiped the panel again with Eraser and a mf before taking the pictures with the LED light source. I too noticed the halo effect after the first pictures were taken.

Perfectly okay with me. Rotary buffers are a very different animal than DA polishers and if you're not careful you can burn through paint on a corner, edge or raised body line so taping off these areas is very important.

You also don't want to "catch" the edge of something like a mirror or wiper blade or antenna as the spinning pad on a rotary buffer can grab these things and damage them very quickly.


And that's where polishing paint become an art form instead of just a simple grinding process. It's the little techniques that can make a huge difference.


The most important thing though, no matter how you do it, is to clean your pad often, even after each section. Otherwise you'll be grinding both the paint you removed that is now on the face of your buffing pad and the spent product that is on the face of your buffing pad back into the paint on the next section.

I'm more of a fan of laying down a strip of product called a bead of product onto a panel and then using the 10 @ 10 Technique for picking up the product but placing drops of product onto a pad works to.

In fact, when buffing out a boat you pretty much have to place the product onto the face of the pad as the hull of a boat isn't vertical but tapered inward and that makes using the 10 @ 10 Technique pretty difficult at best.

And just like working with dual action polishers of any type, when working with rotary buffers, more pads are better, especially if you want to do any type of finishing or jewelling work.


Great tips Mike, thanks for sharing and like you, I really like the Hybrid pads not just for the Flex 3401 but also for the Flex PE14.

If you want to use the 5" Hybrids on a rotary remember you need to get a 4" backing plate as that is the diameter of the velcro material on the back of the 5" Hybrids.

Smaller pads on rotary buffers are easier to control and also make learning how to use a rotary buffer a lot easier.

:dblthumb2:

Thanks for the feedback Mike. Some great advice shared.

I love the Hybrids on either machine!

:props:
 
Ok, so looks like you are just seeing aberrations from the polishing oils. I get that problem with menz polishes too, nothing a quick IPA wipe won't take care of then.


Sent from my iPad using Tapatalk
 
Dear Eric,

I plentiful understand what you're talking about. From here, they may look like both holograms, or 'polishing oils aberration' when exposed to light.

However, in some situations, it may not be any of the above alternatives.

If you take another look at the picture in question, and try to notice the defects on the 'unpolished area', you may find similar pattern light distribution in what looks like 'deeper but fine' scratches altogether with swirls and deep scratches all over the area.


Although this may not be the case since Smack's eraser seemed to solve the issue, I've faced similar effect where those 'concentrated fine scratches' were giving an hologram-like appearance to some areas even after removing many of defects and using finishing polish afterwards.

That said, if you cannot get rid of such 'pattern' of fine deep scratches, you may end up having an hologram-like effect even when using a DA polisher. But that will not necessarily means 'you instilled them'. Got my point?

Take a look at a picture I have in my album:
claymarbefore.png


If you notice, the pattern of fine deep scratches were all around, and in some parts of this car, I was able to get rid of majority of gross defects, but not all of those fine I'm talking about.

This is a very specific point, but just to be aware it may look instilled holograms when in fact the defects were there even before start polishing the area.

The minimized appearance of this defects may be enough to the standard of general DD needs. I mean, I'll try to finish it down even finer, and after that, let it be. Assumedly that scratches are not detailer's fault, but negligent customer who let the car achieve a so bad shape, in the case I used in example, in less than an year of use.

Here's my 50/50 shot on that particular paint I've showed above, using Flex 3401 and SF4000 on white polishing pad (and sure, Smack's technique for 3401).


You (an expert in the field) can easily notice the reminiscent fine defects I'm talking about. Had I instilled them? Pretty sure not. They were still there, 'masked' by other horrendous defects.

Also, they are not the kind of micro-marring we generally see, and after many finishing approaches with the softest pads, products and technique, they were still seen (by the trained eye under proper light condition).

If I was to remove them, my approach would be to remove even more clear coat in order to level them as well. I've not done it since the improvement was great overall, and being a DD doing an 1-step for coating, that was decent to customer's expectations. For a car that will probably suffer the same kind of 'aggression' after leaving my garage, the more paint, the better.

Curiously, after coating cure that really fine defects looked 'filled' since when I put the car under the sun for customer evaluation (I was worried at first), none of the defects showed up, and finish looked perfect.

Then I started bragging myself, and all that thing hahahaha

Hope that helps if any day you face some similar pattern.

Kind Regards.
 
That is very interesting what you have pointed out Rafael. Now I want to go back to the truck and and bring along my DSLR as well as my machines to re polish different sections of that truck.

The truck is a Gov't vehicle which served as my test bed and I will attack the other side armed with my tools and capture what I can with my DSLR.
 
Here's my 50/50 shot on that particular paint I've showed above, using Flex 3401 and SF4000 on white polishing pad (and sure, Smack's technique for 3401).


Holy...that's the correction ability of SF4000 using a polishing pad?
6-8 Passes?
 
Back
Top