Wet sanded fully, but still some orange peel

James35

New member
Joined
Jun 1, 2011
Messages
10
Reaction score
0
Using Mike's Wolfgang Twins tutorial, I wet sanded fully, and it's certainly much much better, but I still have some orange peel.

I spent 2 nights learning how to do this. The first night on the quarter panel of the Equinox, I was cautious, checking my work often as I went. I used 2000 grit until all of the shiny spots were completely gone. Then progressed to 2500, then 3000, then used the Wolfgang twins with a Porter Cable 7424XP. Turned out great. Reflections are awesome, but still had some orange peel.

2nd night, I did a door, and sanded a bit more aggressively. I spent about 3 hours sanding. It turned out about that same. When initially sanding with 2000, do I need to go harder/longer even though all of the shiny is gone? The reflection does look similar to the last pics in Mike's tutorial, maybe a tad worse. Am I expecting too much?
 
Last edited:
Be very careful when wet sanding with 2k. If you sand with too much pressure you might pass the clear coat.

I was working on a used car at dealership and I was wet sanding a scratch out with 2k with medium pressure and the clear coat was gone.....
 
I too have wetsanded my paint till absolute uniform haze, but when I compound and polish it to perfection, the reflections seem immaculate from like a distance of 2-3 feet, but from up close(really close) I can make out the texture in the reflections!!

The reflections are not as perfect as in the factory painted panels!!

Quite frustrating really :confused:
 
I have found that 2000grit dosent really remove orange peel. It seems to flatten it out and not really remove it. I have always started from 1200grit or 1000grit. I have even gone down to 800grit sometimes. Ive never wetsanded factory orange peel since the clear is really thin. Yes you can remove a small amount but you will leave very thin clear that wont protect much.
 
I have found that 2000grit dosent really remove orange peel. It seems to flatten it out and not really remove it. I have always started from 1200grit or 1000grit. I have even gone down to 800grit sometimes. Ive never wetsanded factory orange peel since the clear is really thin. Yes you can remove a small amount but you will leave very thin clear that wont protect much.
:iagree:just wetsand to remove scratches or other defects, not orange peel.
 
Orange peel removal is dangerous. I recommend leaving it alone.
 
There is orange peel under the clear as well, as the paint is sprayed the same way as the clear. Once you sand flat you will be as good as it will get. The E90 M3 we did had horrible orange peel under the clear :(
 
I wonder if that is it, because my clear is flattened. It makes sense, and if that is the case, no sense in going more aggressive with the sanding.
 
Saw this thread, thought I'd add some stuff from anuther forum... pretty nice read, or at least I think it's good.

Not trying to be keen or sly, just can't link.

Anyway, here's some stuff I wrote.
This does go to leveling the surface as opposed to smoothing, or refining.

To follow... Im the MAN
 
You can also create waviness in the clearcoat by using a D.A. for sanding. When going back and forth in the same area, you can create low spots on the end of the stroke. Similar to painting something, if you have are spraying and going back and forth without turning the paint off at the end of each stroke you can get runs on both ends, and looks something like this. |------| when painting. Using a block will prevent this from happening.


John

I'd have to agree with John on the long block sanding doing a better job than a DA at leveling off the paint. It takes a lot more time and may not be suitable for all panels shapes, but when time is not an issue and I want the paint to be as flat as can be, I will use a block by hand as much as possible.

I do like to finish it off with the DA though and on most my jobs I'll just reach for the DA.


Trying out the Mirka Abranet Soft right now....me likey! Thanks BuffDaddy!
IMG_0876.jpg


IMG_0878.jpg

Rasky I have been through alot of different sanding abrasives in the last few months. First trizact and then norton and now I'm on the Mirka set up as well and love it! Great for DA use. I'm with you for sure on the block sanding by handing though.

Waviness? Maybe a variance in orange peel/flatness, but I don't see how you can create waviness in clear from a using DA? We're talking a difference in thinkness of probably less than 5 microns. Something this minute can't even be detected with your eye. OTOH, when doing body work, yes. Most painters hand sand. Even usually on blend panels, but we're talking thicknesses that are visable.

More...
 
Now we're talking.... THIS is a thread!!!

Leveling in the sanding world means to minimize variances in the high and low spots of the sanded surface. The more level the surface, the more accurate a reflection will be. This is easy to see in a typical swimming pool. If there's nothing disturbing the water, then the reflection will be pretty accurate. If the wind kicks up or someone is in the pool splashing about, the reflection is not as accurate.

I think this is understood by most folks. Orange peel removal isn't what we're discussing, but rather, creating a consistently leveled surface across a long range or large area is the goal.

I agree that hard blocks, or long blocks, typically excel for leveling.
There are specific and logical reasons for this.

In theory we could replicate similar results using a random orbital sander, but man, you'd have to be really good with a machine to do it. Plus, you'd have to be open to the idea of making a customized backing plate and interface pad.

Let's get to the fun stuff, and cover some basics for the guys that are somewhat new to this.

A sanding block or backing plate that is hard can also be flexible.

Materials such as balsa wood, plexiglass, glass, steel, and aluminum are hard. I have personally used, seen other guys use, or heard of other guys using these materials to make sanding pads.

Poke any of these materials with a sharpened pencil and the lead will break with ease, leaving the materials unaffected, or only marginally affected. This assumes there is enough thickness to withstand the assault, and most sanding blocks or backing plates are thick enough.

If the material is thin, it has the potential to flex, bend, or twist.
With the exception of glass, I think most of the listed materials will bend or twist with relative ease. As an example and to give you a visual, a typical metal ruler can bend or twist, yet handle the onslaught of a poke from a pencil lead. In fact, if you wrapped a sheet of sanding paper around a flexible metal ruler, you'd have the makings of a simple yet effective sanding block!

If we decided to use a thin steel ruler as a sanding block, we certainly could. Ideally, we would glue a long foam block onto the back of the ruler, and use the block as a handle or gripping area. For the sake of discussion, let's continue on with this idea.

We could use PSA (peel and stick adhesive) sanding sheets, or cut an appropriate length of sandpaper from a sanding roll and attach it to the ruler. I personally haven't seen too many varieties of paper at the higher grades we are discussing, so we must improvise.

We could use a thin coating of spray glue to attach sandpaper sheets to the ruler, or attach lengths of paper via duct tape, and glue that to the ruler. Of course, the paper should be trimmed to the width of the ruler, and it would be critical that the individual sheets of paper be positioned to tight tolerances in relation to each other- no overhang, no large gaps.

Note: readily available long blocks feature clamping systems that allows us to attach lengths of sandpaper to the block at each end. Other blocks are hook and loop compatible, while still others are smooth faced to easily accept PSA style papers.

Once we found the best way to mount the paper to our ruler, we could use any length ruler as a hard but flexible sanding block. 12", 18", 24", 36", and even 48" rulers are readily available.

By using the longest ruler that would work on our sanding project, we could affect a whole lot of peaks at once, and level them to the same overall height. These areas, when polished, would reflect in tandem. Even if we didn't completely remove all of the orange peel, we would still see a more accurate reflection across the surface.

A sanding block or backing plate that is soft will more readily contour to the nuances of a surface.

If we took our ruler block and mounted a thin piece of foam to the sanding side of the ruler and then attached the sandpaper the foam, it's almost guaranteed that we would not be able to level the surface to the same degree as a ruler without the foam.

But, if we wish to make our sanding job easier to accomplish... or if we're working on panels that do not allow us to use ruler-length sanding blocks... or if we would rather not create a laser-level surface... or if the surface needed sanding only to remove very fine texturing and dirt nibs (including dirt in the lower lying levels of an orange peeled texture), then we would probably be happier using a sanding block featuring resiliency, squishiness, and conformability.

This is why most hand sanding blocks are short and soft.
Human hands aren't all that long either, so there's a bit of logic behind the sizing.

With all this being said: Could a DA machine outfitted with a sanding disc level as well as hand sanding?

Certainly, but only as good as an equal length hand block, and the block would have to feature the same characteristics (hardness, stiffness, cushioning, etc.)

In other words, if we are sanding with a 6" diameter disc and using a machine featuring a 5/16" stroke, then our sanding disc will effectively level an area measuring 6-5/16" in diameter. This assumes we don't move the machine at all, but instead hold it in place as it runs.

If we removed the disc from the backing plate and placed it onto a hand sanding pad made of the same material as the backing plate, and then moved the hand pad no more than 5/16" in a back and forth pattern that mimicked the movement made by a DA sander, we would create a very similar sanding result.

But, if we happened to be using a backing plate or hand pad that offered cushioning, resiliency, or contourability, the machine would likely offer up a bit more leveling ability.

Simply put, if the machine moved the sanding disc at a higher rate of speed than your hand could, there would be less time available for the pad to adjust its position in relation to the paint surface. To more easily understand this, imagine driving over a very bumpy road at 5 MPH, and then again at 50 MPH. There's simply not as much time for the suspension to react to the bumps, so the tires would likely not be as well planted as you traveled across the bumps.

Oh man, this is a lot to write in a hurry... I hope it is making sense so far.
I'm gonna go ahead post this, then add some diagrams on the next post.
 
O-kay.

Some diagrams that may help, and more discussion.

This one compares a long block to a short and long stroke sander.

long-board-diagram-4-web-1300x936copy.png


If you want to see a clearer shot of it, I have a pdf version on my site.

The type of backing material a sheet or disc features can also affect leveling.

To be clear, the backing is the piece of material that the sanding media is attached to.

Several types of backing materials are used to make backings for discs, and the type of material is a BIG deal in terms of how the disc performs.

In general... if we have two discs featuring identical backings, except one has a backing that is thicker than the other, and we are using a backing plate that is soft and cushiony:

The disc with the thinner backing will level to a lower degree, but contour to a higher degree.
The disc with the thicker backing will level to a higher degree, but contour to a lesser degree.

The harder the backing plate, the less of an issue backing thickness becomes.

Now, here's where things get a bit tricky.
Some discs feature a piece of foam placed between the backing material and the attachment material. Most times, the foam increases contourability at the expense of leveling ability. But really, the characteristics of the sanding disc's backing determines how much an effect the foam has on sanding.

Super thick and stiff backing?
The disc may flex well, and follow curves and complex panel shapes, but it may not contour to every nuance of the surface, such as orange peel.

Super thin and pliable backing?
The disc may follow every nuance of the surface and follow curves and complex panel shapes, but may not level the paint surface.

What if machine speed is maximized?
The effects of foam may be minimized.

Check out these discs featuring foam:

Mirka Abralon:
Tremendous contouring ability, wide range of grades. These are a kick to use, can be used at high or low speed. for me, low speed is better because the sanding pattern is smooth, and the abrasive particles stay attached to the disc longer. Higher speed offer a tiny bit more leveling, and can keep the disc cleaner, as rotational forces fling debris from the disc more readily than slow speeds.

abralon-600.jpg


Magnified shot:
abralon-magnified.jpg


Mirka Abranet Soft:
Excellent contouring ability at low speed, fantastic leveling ability at high speed. Compared to discs that use paper or film backings, the net material allows water to pass through (like treads on a tire. So, you can sand with water, use higher speed if desired, yet hydroplaning is not an issue.

abranet-soft-600.jpg


Magnified shots:
net-mesh-magnified-800.jpg


Meguiar's Unigrit 3000 Foam Finishing Disc:
Unmatched finishing capability... it's like having thousands of super soft abrasive squeegees gliding across the paint! Virtually no ability to level, but at this point, you should be refining the surface to shorten buffing time rather than worrying about additional leveling.

unigrit-s6f3000-mag-800.jpg


Some diagrams comparing film, net, and cloth backed discs.

film-disc-contour-1300x388copy.jpg


abralon-vs-film-contour-1300x413copy.jpg


mesh-discs-vs-film-1300x553copy.jpg


About film or paper backed discs:
Film or paper backed discs generally feature maximum leveling potential, but when used with water, they tend to float or hydroplane rather easily. This leads to inconsistent sanding results, as some areas may be sanded perfectly while others are barely affected by the sanding disc. Once the water is displaced, the disc, oftentimes spinning at a rapid clip (due to a lack of frictional resistance) makes a crash landing atop the paint surface. This leads to pig-tailing, gouging, or scouring.

I hope this info didn't miss the mark, or stray too far from it.
I find this all to be so interesting, and there are lots of things to consider.

The biggest thing that limits our ability to use hard-backed backing plates has to do with user technique. If while sanding we happen to tilt the machine even slightly off kilter, the edge of the disc can dig into the paint. This can create some pretty dastardly sanding marks, especially if we're using coarse grades of discs. That's why most backing plates made for sanding discs tend to be soft and pliable.

Now... think you're pretty good at handling a machine?
Why not make your own backing plate/interface pad combo?

Get a stiff backing plate, and attach a foam interface pad to it. Then, get ahold of a piece of Plexiglas, cut it to the size of the disc, and attach Velcro® hook material to both sides. Slap on your disc of choice, and get to sanding!

The foam interface would help to minimize user-applied tilt variances, so if you happened to get the machine a bit off kilter, the interface would compensate for it. This setup would be ideal for flat panels, but terrible for curved or complex shaped panels.
 
Kevin,

So we talked about paint leveling on the bodyshop side of things, what if we look at paint leveling on the detailing side of things. Generally speaking Im not talking about a level surface as in orange peel removal, but as in complete scratch and defect removal. The old theory of compounding with a wool pad and then refining to remove the wool the coming back to remove holograms has obviously been changed with product development and game changing abrasives whether they would be liquid or foam. Now let me talk about my experiance with the Abralon system that you highly speak of. One thing I should say is that, I should have purchased it sooner and listened to you.

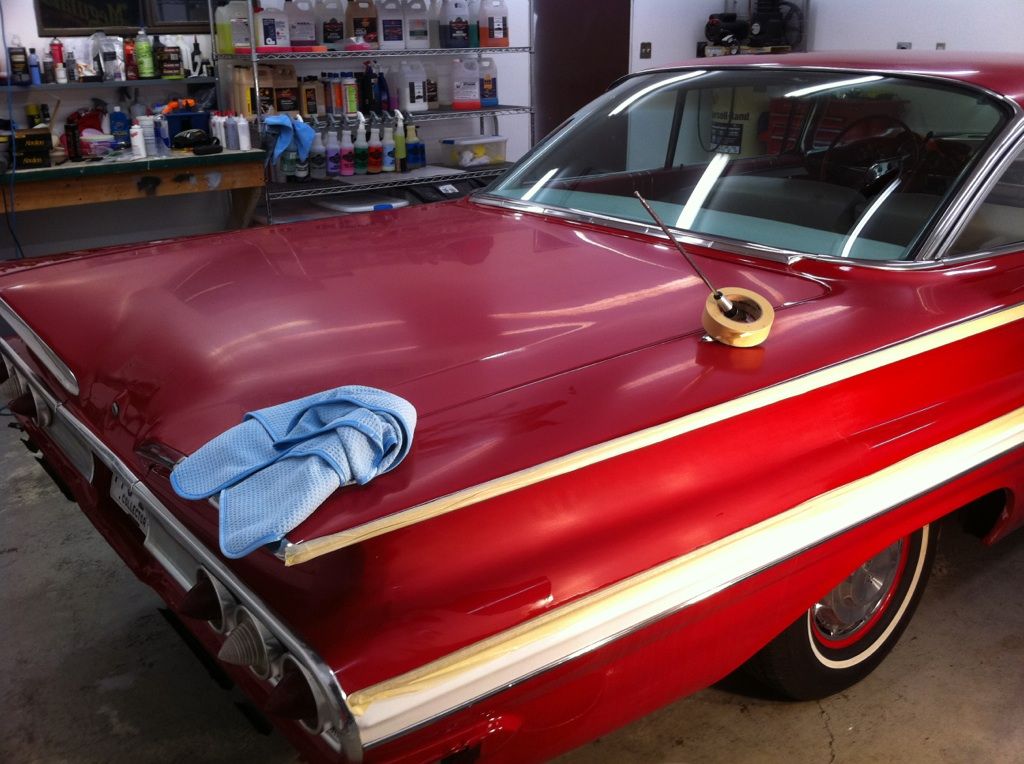
So were are working on a car where the general defects ( swirls, rids, waterspot etching, and so on. ) The defects are deep and will take some time to level. Is it safer to sand them or polish them.

From experiance, I find that certain abrasives will safelty remove less clear then the old school traditional methods. Persay what if the abrasive is Mirka abralon in 4000 grit on soft paint. The 4000 grit may remove defects cooler and safer then opposed to a so called "buffing the paint" Now on the flip side of things on harder paint. 4000 grit abralon may not remove the swirls and a heavier abrasive may be needed such as 2000 grit or even something like your personal favorite Kevin, Surbuff and M101 or should I say m105. :biggrin: In theory paint is being leveled no matter which way you like to do it. What if we could changed the rules of thinking even further and almost entirely remove any polishing, or knock it down to only one step of polishing. Which can be done! Im sure you know this. :bow Whats stopping us as detailers to look into finer papers likes 6000, 8000, 12000 grit? Virtually allowing us to use a super fine polish to remove the sanding defects. Obvious a factor that would come into play would be interface, pad pressure, rotation speed, and such. What would you find safer and and a whole lot more fun to do?

Lets take a paper like 12000 girt, and add water to the mix. Thinks its possible to hydroplane a film disc across the paint to create a almost final shine? Just something running threw my head as thoughts and playing around happens. could we see the day of polish liquids be virtually gone? Keep in mind a few years ago if you said you could correct paint without a rotory I would have laughed at you! Now today I find my rotory collecting dust more and more.

So when does the madness stop. Is it these crazy thoughts that become a reality into game changing products? I guess only time will tell.

Barry, your mind runs as fast as your fingers type.
Let me break this down in sections, and give my opinion that way.

Kevin,
So we talked about paint leveling on the bodyshop side of things, what if we look at paint leveling on the detailing side of things. Generally speaking Im not talking about a level surface as in orange peel removal, but as in complete scratch and defect removal.

I hope we can agree to reserve the term leveling for those instances when we want to minimize the peak and valley variances of a paint surface. This way, discussions about leveling or truing of the surface won't get overly confusing for newbies.

At least for the remainder of this discussion:

To level a surface means to minimize the peak and valley variances of the surface.
Orange peel, waviness, and long, level sanding marks shall be categorized here.

To refine a surface means to minimize or eliminate unwanted elements from the surface other than those listed above.
Elements include scratches, pinhole-sized divets, or etching marks (isolated low spots).

These definitions are as distinct as I can think to make them right now.

I wish to make the distinction because we could feasibly refine or eliminate the imperfections from an orange peeled surface without eliminating its curvy peaks and valleys landscape.

In other words, if you said to me:

Barry: Kevin, see that sandy desert out yonder?

Kevin: Yes Barry.

Barry: If I asked you to level it with this flat shovel, how would you do it?

Kevin: I would take shovels full of sand from the flowing hills, and place them into the valleys until the surface was flat.

Barry: And if I asked you to refine the desert landscape, what would you do?

Kevin: Well Barry, I would take my flat shovel and pat the sand flat until it all of the sand grains were tightly packed together.

Barry: You're hired!
:dig


The old theory of compounding with a wool pad and then refining to remove the wool the coming back to remove holograms has obviously been changed with product development and game changing abrasives....

... Whats stopping us as detailers to look into finer papers likes 6000, 8000, 12000 grit, effectively allowing us to use a super fine polish to remove the sanding defects...


Nothing, except technology, and a company that sees the potential for financial gain in making a product for this specific purpose.

Suppose you made sheets and discs for us?
Better yet, what if you only made sanding squares, 1"x1"? :mmph:
Call 'em Barry Squareys or something like that.

Hey, squares make it easier for me to explain this stuff. :typing:

What might occur as we use the squares?
What would be the factors that limit sanding performance?

I'm thinking this through as I type, so take it all with a grain of salt. :hairpull

No scientific data or research going on at my desk. :pray1:

These two factors pop into my head: Pressure points and void areas.

Pressure points.

Instead of grading Barry Squareys by grit size, you use a rating system that identifies your sheets by how many grains each one uses.

These are perfect grains by the way- all exactly the same and shape.
Pyramid shaped I suppose, with the base of the pyramid attached to the square.

Taking into account the machine's weight and user applied pressure, your engineers determine that each sanding square can withstand 1 pound of downward pressure before the sheet crumbles.

In real-world sanding, too much pressure causes sanding particles to dislodge.
We don't have a problem with sandpaper crumbling, thank goodness for that!

Therefore:
The 4-grain square would have .250 pounds of pressure atop each grain.
The 8-grain square would have .125 pounds of pressure atop each grain.
The 16-grain square would have .0625 pounds of pressure atop each grain.
The 32-grain square would have .03125 pounds of pressure atop each grain.
The 64-grain square would have .015625 pounds of pressure atop each grain.
The 128-grain square would have .0078125 pounds of pressure atop each grain.

This goes on and on to whatever degree you want it to.

But, there comes a point when there's very little pressure placed upon each grain, so cutting power is virtually nil. In fact, each grain barely cuts into the paint.

Suppose you place the maximum amount of grains you can possibly fit onto your sheet, and the number is virtually uncountable. In fact, the surface is so tightly packed with abrasive pyramids, it feels as smooth as a piece of glass. You magnify the face of the sheet under a microscope, you realize that the sanding face of the sheet even looks as smooth as a piece of glass!


Void areas.

With so little space available between the grains:

Where is the abraded paint going to go?
If you happen to wet sand, where is the water going to go?

This could be a problem, eh?

If the residue immediately suffocates cutting power by coating the abrasive pyramids, your sanding squares would offer very short lived cutting power.

If the water had no channels to enter, the sanding square would simply hydroplane until the water was eventually pushed aside.

Would there be a suction problem, causing the square to stick to the surface like a suction cup?

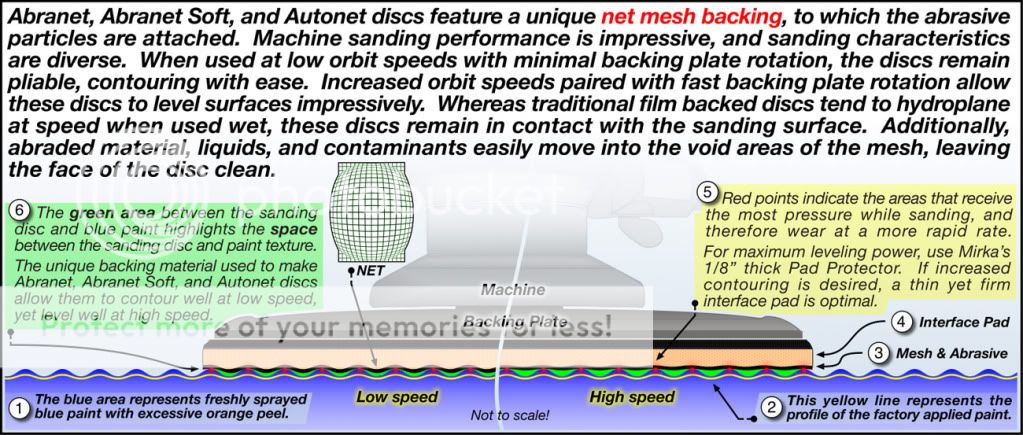
Interesting. Perhaps not a great analogy, but I hope that it makes a little bit of sense. At some point, it seems to me that we'd have to use a mesh backing, or a pin-holed film backing, or some sort of material that would allow water and abraded paint residue to evacuate the area between the disc and the paint.

Vacuuming? A slurry and pump system? Perhaps.

In the case of sanding discs, maybe the abrasives could be lined up like straight spokes on a wheel?
Perhaps curved in a spiral fashion? Or just in straight and parallel lines? Hundreds or thousands of them?

I think someday we'll see discs and buffing pads that work in a manner similar to stone polishing flexible diamond discs. Hard yet flexible pads impregnated with diamond grains, or some sort of abrasive. Envision the way paint cleansing clay works.

We'd use them along with a mist-on lube, or water.

Is it possible to hydroplane a film disc across the paint to create an almost final shine? Just something running threw my head as thoughts and playing around happens. could we see the day of polish liquids be virtually gone?

You're wondering if we could somehow fill the low points of the paint with water or some other filler, so that only the high points remain, and the disc will only affect those points?

I think we discussed something similar to this a while back.
In that discussion, I mentioned this:

"In reference to water or lubricating agents in general:
Since liquids are not easily compressed (most times they are deemed to be not compressible for simplicity sake), the layer of liquid might cause the pad to "float" or ride atop the liquid to some degree. If the pad also features a layer of liquid spread across it, the net effect might be one that sees only minimal contact between the pad and paint surface. Consequently, only the highest of points of the paint surface are being affected, and the newly formed paint surface would lack sharp or inconsistently shaped features.

To envision this, imagine that you are going to skip a rock across a pond of water, and the water is at rest (so its surface is basically flat). The pool of water has small pieces of grass sticking through the top, and you want to cut a path through the grass so that it is flush with the water level. You sharpen the edge of the rock so it will cut through, and you make sure when you throw the rock, it has a lot of rotational speed.

This scenario is very similar to what is likely occurring during your "burnishing" step when you polish paint with a finishing polish. In this case, the pond water represents the liquid covering the paint, the grass blades represent the high points of paint that your pad is going to "cut through", and the rock represents your buffing pad. Not a perfect analogy, but I hope you get the gist of the comparison."
 
You know, it's really hard to shoot orange peel. I must have tried a dozen different techniques with my camera. Anyway, here are some pics.
And to answer someone's question, I hand sanded this like Mike's tutorial.
 
Kevin Brown....:urtheman:

like always, providing some awesome and very helpful information like always!
 
Kevin thanks for taking the time to school us with your wealth of knowledge :)
 
Wow thanks for the loads of knowledge Kevin Sir!

:urtheman: :dblthumb2:
 
I only do a orange peel removal for some body shop and painter. I tell them to spray 3 coat of clear. I will never wet sand a factory paint for orange peel. You have to sand too much and sometime you will still have orange peel. It get real scary when you are sanding a clear coat that much.........
 
Back
Top