Navigation
Install the app
How to install the app on iOS
Follow along with the video below to see how to install our site as a web app on your home screen.
Note: This feature may not be available in some browsers.
More options
Style variation
You are using an out of date browser. It may not display this or other websites correctly.
You should upgrade or use an alternative browser.
You should upgrade or use an alternative browser.
which is the best way to get rid water spots?
- Thread starter Abram86
- Start date
Mike Phillips
Active member
- Dec 5, 2022
- 51,004
- 6
Re: which is the best way to get rid
Before you can remove water spots you must first understand which type they are as the type will determine what it takes to remove them.
From an article I wrote...
How to remove water spots by hand
Water spots are a very common problem for automotive finishes and the tricky part is removing them without instilling swirls and scratches back into the paint at the same time. So let’s take a look at how to remove water spots by hand.
First you need to determine which type of water spots you have,
Step by Step Procedures for removing Type I Water Spots by Hand
Different types of water spots are removed differently, so it’s important to try to diagnose which type of water spot you have first as this will help you understand the removal process and products and tools needed. The easiest type of water spots to remove are Type I and the most difficult to remove are Type II and Type III
Pictures
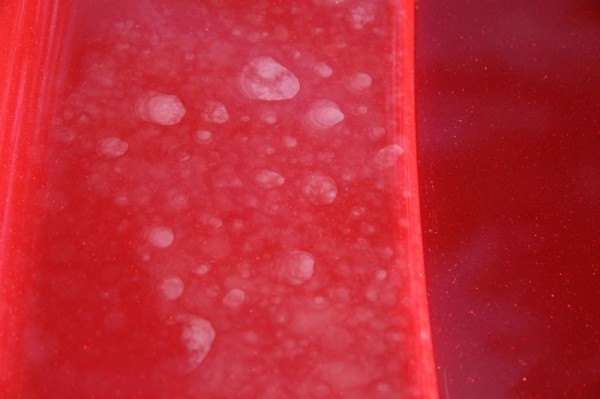
Type I Water Spots
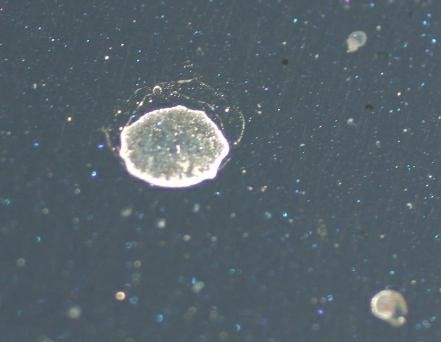
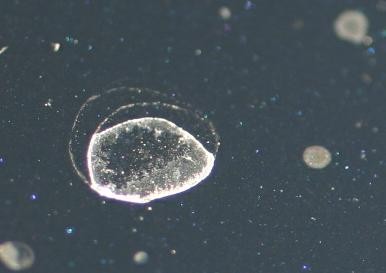
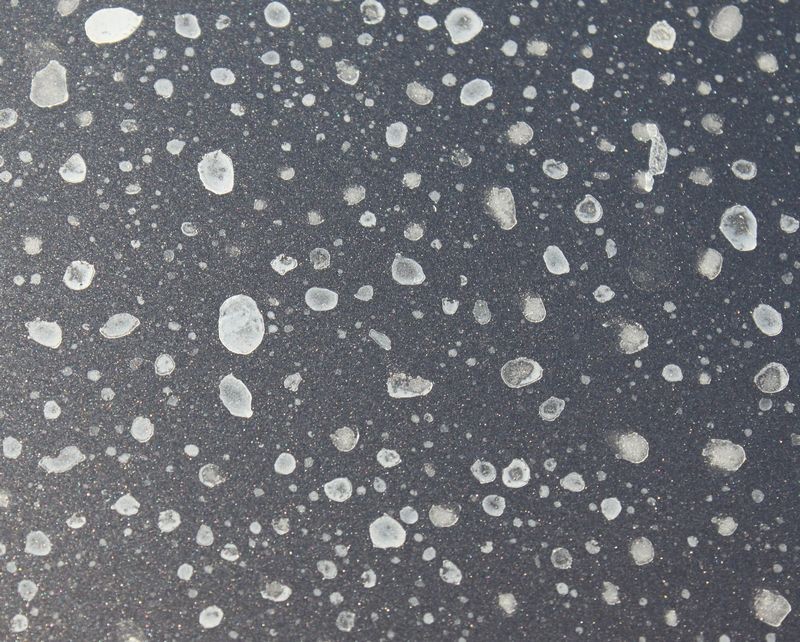
Type II Water Spots
I took this photo myself when I helped Alex Fong from Corvette Forum remove a zillion Type II Water Spots out of the clear coat finish on his Corvette.
Photo Courtesy of MeguiarsOnline.com
Here's a close-up of the same photo, if you look closely you can see the edges are angled downward as this is an actual etching "into" the clear paint.
Type III Water Spots
How to remove water spots by hand
Step-1 Wash and dry vehicle
Thoroughly wash and dry your car’s finish and in most cases any topical water spots/mineral deposits will loosen and then rinse off, this is key because you want to remove as much of any mineral deposits or other physical contaminants off the paint so you can then see what remains and will need more attention in order to remove. You also don’t want to rub any mineral deposits or other related particles over the paint so washing and drying is the first step.
Step 2 - Inspect the paint visually and physically
After you have washed and dried the vehicle, next visually inspect the paint and physically inspect the paint.
Optional - Acid Bath = Distilled White Vinegar
After inspecting the paint, if you still see and feel water spots you’re your car’s finish, and you’re fairly certain these water spots are mineral deposits left by hard water, then it’s possible a simple solution of vinegar gently wiped over the paint will remove them or most of them.
Hard water is water that has a high concentration of dissolved minerals, mainly magnesium and calcium. The acid in vinegar can help to break the bond between the minerals and the paint so the minerals will wipe or wash off. If you want to try the vinegar approach, it’s important to first wash and dry the car so that normal loose dirt is removed so you don’t grind it into the paint when wiping the paint with vinegar solution.
Step 3 – Clay the paint using detailing clay
If after the above, washing and drying, and/or giving the paint an acid bath, if you still see and feel water spots on the paint then the next step will be to try to remove them using detailing clay. Claying removes above surface bonded contaminants and this includes any mineral deposits or other physical particulates left on the surface from water spotting.
Remember that because these minerals will tend to be hard particles, it’s important to knead your clay often to expose a fresh working side to clay with.
Video How to use detailing Clay
Step 4 – Use a hand applied compound, polish or paint cleaner
After claying, if you still see marks in the paint where the water spots were previously, this is common and a sign that the water spots have actually etched the paint (to some level), and the way to remove these marks or impressions is to gentle abrade the paint with a compound, polish or paint cleaner.
Because these etchings are below the surface, clay will not remove them because detailing clay only remove contaminants bonded onto the top of the surface.
The way you remove below surface defects is you gently abrade the paint in an effort t level the surface. To remove below surface defect by hand you’ll need a clear coat safe compound, polish or paint cleaner. Some paint cleaners are non-abrasive in that they do not contain any ingredients with the intended purpose of physically abrading the surface. If the marks left behind in the paint are very shallow, sometimes a light paint cleaner, with the help of your applicator pad and a little passion behind the pad can remove faint marks. How hard or soft, the paint is will also a huge factor as to how easy or difficult it is to remove the water spot marks.
Product Options for removing light or shallow water spot marks
Usually the type of etching or mark left by a Type I Water Spot is very shallow so they are fairly easy to remove. So in keeping with the philosophy of,
"Use the least aggressive product to get the job done"
There are two groups below, the first group of products would be considered the least aggressive product to consider starting with, if the water spots are more serious than shallow, light, slight marks or impressions in the paint, then consider one of the more aggressive products in the Compound and Polish category.
Paint Cleaners at Autogeek.net
Pinnacle Paintwork Cleansing Lotion
Wolfgang Paintwork Polish Enhancer
3M Scratch Remover
Dodo Juice Lime Prime Lite Cleaner Glaze
Dodo Juice Lime Prime Pre-Wax Cleanser Polish
Duragloss PreCleaner
1Z Einszett Paint Polish
Four Star Ultimate PreWax Cleanser
Griot's Garage Fine Hand Polish
Liquid Glass Pre-Cleaner
Meguiars SCRATCH X 2.0
Meguiars SwirlX Swirl Remover
Mothers California Gold Pre-Wax Cleaner
Mothers California Gold Scratch Remover
P21S Gloss Enhancing Paintwork Cleanser
Poorboy's World Professional Polish
SONAX Premium Class Paint Cleaner
SONAX Paint Cleaner
Hand Applied Compounds and Polishes
Pinnacle Advanced Swirl Remover
Pinnacle Advanced Finishing Polish
Wolfgang Finishing Glaze
Menzerna Micro Polish PO 87MC
Menzerna Super Finish (Nano) PO 106 FA
Menzerna Intensive Polish PO 91E
Menzerna Polish PO85RD
Menzerna Final Finish PO85U
Meguiar’s Ultimate Compound
Meguiar’s Clear Coat Safe Rubbing Compound
Meguiar’s Clear Coat Safe Polishing Compound
Meguiar’s ScratchX
Meguiar’s SwirlX
Meguiar’s M105 Ultra-Cut Compound
Meguiars 205 Ultra Finishing Polish
Meguiar's M82 Swirl Free Polish
Meguair's M09 Swirl Remover 2.0
Meguiars M02 Fine Cut Cleaner
Meguiar's M80 Speed Glaze
3M Super Duty Rubbing Compound
3M Perfect-It ll Rubbing Compound Fine Cut
Poorboy's World SSR1 Light Abrasive Swirl Remover
Poorboy's World SSR2 Medium Abrasive Swirl Remover
Poorboy's World SSR 2.5 Medium Super Swirl Remover
Poorboy's World SSR 3 Heavy Duty Compound
How to remove Type II Water Spots by Hand
Type II Water Spots are etchings or craters in the paint and neither detailing clay nor vinegar is going to remover these types of below surface defects.
To remove a Type II Water Spot by hand follow Step 4 above after first washing, drying and claying the vehicle.
Note: Even though claying won’t remove Type II Water Spots, before hand or machine applying any type of paint care product to an automotive finish the car needs to be washed, dried and clayed as a “Best Practice”. Claying is the most effective way to remove above surface bonded contaminants and this should always be done before polishing if a physical inspection reveals the paint needs to be clayed.
How to remove Type III Water Spots Hand
Type III Water Spots are usually faded spots on single stage paints but can sometimes be milky looking spots on clear coat paint systems.
When it comes to removing Type II water Spots the limiting factor is how deep the spot penetrates into the actual film build of the top coat. You remove Type III Water Spots in the same manner you remove Type II Water Spots but if the fading or staining goes too deep you won’t be able to completely remove it safely.
To remove a Type III Water Spot by hand follow Step 4 above after first washing, drying and claying the vehicle.
On older single stage paints, because these types of paints are very porous can easily have a stain penetrate fairly deep into the paint and completely removing deep defects is always risky, so use caution.
For antique single stage paints, I always recommend pre-treating the paint with #7 Show Car Glaze to in essence put some oils back into the paint and thereby refreshing the paint and making it more workable or polishable. Plus the oils will help to restore rich color and counter the fading, whitening effect.
Seal the paint with a coat of beauty and protection
After removing the water spots to your satisfaction it's important to apply a coating of wax or a paint sealant.
By there very nature, compounds, polishes and paint cleaners don't provide any protection like you think of when you think of a car wax or paint sealant so be sure to apply either a coat of a quality wax or paint sealant to lock in the shine and restore a show room new finish.
Normally after pre-cleaning paint with some type of compound, polish, or paint cleaner you would use a finishing wax or finishing paint sealant and not a cleaner/wax or cleaner/sealant. Here's a list of all the different types of waxes and sealants at Autogeek.net
How To Choose The Right Wax or Paint Sealant for your Detailing Project
:xyxthumbs:
What is a good way to get rid of water spots? Im working on a black vehicle but after drying and not being fast enough water spots formed. Will spray way work?
Before you can remove water spots you must first understand which type they are as the type will determine what it takes to remove them.
From an article I wrote...
How to remove water spots by hand
Water spots are a very common problem for automotive finishes and the tricky part is removing them without instilling swirls and scratches back into the paint at the same time. So let’s take a look at how to remove water spots by hand.
First you need to determine which type of water spots you have,
Type I Water Spots
Type I Water Spots are primarily a mineral or dirt deposit laying on the surface of paint. Type I Water Spots can be the results of minerals suspended in city water or well water that are left behind after the water evaporates off the finish. This can happen by washing a car but not drying the water off the paint or if a sprinkler goes off next to the car covering the car with water drop that are not dried off the paint. Type I Water Spots can also be dirt or pollution particles left behind after water from rain or inclement weather evaporates of the finish. Type I Water Spots can also be Type II Water Spots in that the water can leave both a deposit on the surface and an etching in the finish. Another way people describe mineral deposits is to refer to them has Hard Water spots, or spot left by “hard water.
Type II Water Spots
Type II Water Spots are actual etchings or craters in the paint because something corrosive in a water source has landed on the paint and was not removed before a portion of the paint was eaten or dissolved by the corrosive substance.
Type III Water Spots
Type III Water Spots are spots that look faded or dull and are found primarily found on single stage paints after a water source lands on and then pools on the paint and is usually left to dwell on the surface for some measure of time before it evaporates or is wiped-off the surface. Type III Water spots can also happen to clear coat finishes too but it’s not as common because I Type III Water Spot is either a stain or fading. Clear coats don’t stain as easily as single stage paints because they are not as porous or permeable. Clear coats can’t technically fade because they are clear to start with, there’s no color to fade.
Step by Step Procedures for removing Type I Water Spots by Hand
Different types of water spots are removed differently, so it’s important to try to diagnose which type of water spot you have first as this will help you understand the removal process and products and tools needed. The easiest type of water spots to remove are Type I and the most difficult to remove are Type II and Type III
Pictures
Type I Water Spots
Type II Water Spots
I took this photo myself when I helped Alex Fong from Corvette Forum remove a zillion Type II Water Spots out of the clear coat finish on his Corvette.
Photo Courtesy of MeguiarsOnline.com
Here's a close-up of the same photo, if you look closely you can see the edges are angled downward as this is an actual etching "into" the clear paint.
Type III Water Spots
How to remove water spots by hand
Step-1 Wash and dry vehicle
Thoroughly wash and dry your car’s finish and in most cases any topical water spots/mineral deposits will loosen and then rinse off, this is key because you want to remove as much of any mineral deposits or other physical contaminants off the paint so you can then see what remains and will need more attention in order to remove. You also don’t want to rub any mineral deposits or other related particles over the paint so washing and drying is the first step.
Step 2 - Inspect the paint visually and physically
After you have washed and dried the vehicle, next visually inspect the paint and physically inspect the paint.
Visual Inspection
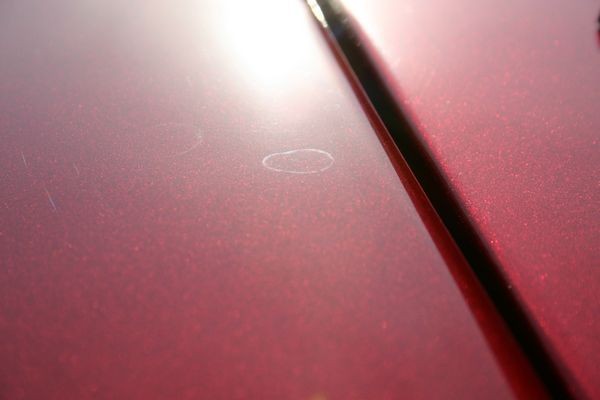
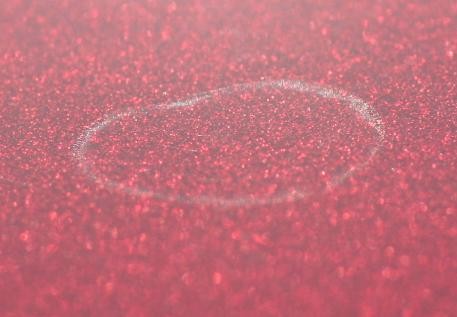
Often times Type I Water Spots will leave an impression in the paint, it’s usually very slight but visually noticeable. Florescent lights and sunlight are usually very good at highlighting subtle water spot impression left behind in the paint. Also note I used the word “in” when I described these water spot impressions, this is key because these impression are a type of etching or mark “in” the paint and that means in order to remove the impression you’re going to have to use a product that abrades the paint.
Physical Inspection
Next physically inspect the paint and you do this by feeling the surface with your clean hand. Often times your hands can detect what you eyes cannot see, so feel the paint with your clean hand, the paint should feel smooth and glassy, if you feel a textured surface then chances are good that not all of the mineral deposits were removed by washing.
Optional - Acid Bath = Distilled White Vinegar
After inspecting the paint, if you still see and feel water spots you’re your car’s finish, and you’re fairly certain these water spots are mineral deposits left by hard water, then it’s possible a simple solution of vinegar gently wiped over the paint will remove them or most of them.
Hard water is water that has a high concentration of dissolved minerals, mainly magnesium and calcium. The acid in vinegar can help to break the bond between the minerals and the paint so the minerals will wipe or wash off. If you want to try the vinegar approach, it’s important to first wash and dry the car so that normal loose dirt is removed so you don’t grind it into the paint when wiping the paint with vinegar solution.
Step 3 – Clay the paint using detailing clay
If after the above, washing and drying, and/or giving the paint an acid bath, if you still see and feel water spots on the paint then the next step will be to try to remove them using detailing clay. Claying removes above surface bonded contaminants and this includes any mineral deposits or other physical particulates left on the surface from water spotting.
Remember that because these minerals will tend to be hard particles, it’s important to knead your clay often to expose a fresh working side to clay with.
Video How to use detailing Clay
Step 4 – Use a hand applied compound, polish or paint cleaner
After claying, if you still see marks in the paint where the water spots were previously, this is common and a sign that the water spots have actually etched the paint (to some level), and the way to remove these marks or impressions is to gentle abrade the paint with a compound, polish or paint cleaner.
Because these etchings are below the surface, clay will not remove them because detailing clay only remove contaminants bonded onto the top of the surface.
The way you remove below surface defects is you gently abrade the paint in an effort t level the surface. To remove below surface defect by hand you’ll need a clear coat safe compound, polish or paint cleaner. Some paint cleaners are non-abrasive in that they do not contain any ingredients with the intended purpose of physically abrading the surface. If the marks left behind in the paint are very shallow, sometimes a light paint cleaner, with the help of your applicator pad and a little passion behind the pad can remove faint marks. How hard or soft, the paint is will also a huge factor as to how easy or difficult it is to remove the water spot marks.
How to use a hand applied abrasive polish or paint cleaner by hand
- Always work clean
- Use a clean, soft foam applicator pad, I really like these,
CCS Red Wax/Sealant Applicator Pads 2 Pack
Because they are fairly thick so the spread out the pressure of your fingers better than thinner versions.
(I like thinner versions for applying finishing waxes and sealants because then I'm not pushing hard so don't need the thickness).
- Work on a cool surface in the shade
- Work a small area at a time, about 8" to 10" squarish or so...
- Use an "ample" amount of product, don't under-use and don't overuse to the point that you hyper-lubricate the surface but use enough to keep the surface lubricated throughout the process. I would use a teaspoon to a tablespoon of product, usually a tablespoon's amount to start with because your pad is dry when you start and some of the product is going to go into the pad, and after breaking in your pad then cut down to about a teaspoon's amount of product.
- Hold your hand flat to the pad, not vertical, the idea is to not put pressure ONLY on your fingertips but over the face of your fingers to avoid Fingermarks
- Spread the product out over the area you're going to work
- Work the product for about a minute, don't work till the product is dry, but it should go from an opaque film to a clear film
- Wipe off before residue dries
Before going over an entire panel or an entire car, first do a "Test Spot" and make sure you're getting the results you want and hope for. If you can't make one small area look good with your choice of product, pad and "your technique" then you'll be glad you only worked on a small section to start with or to test and not went over the entire panel or car.
- When you move on to a new area overlap a little into the previous area
When working on clear coats by hand to actually "remove" defects, technique is just as important as your choice of product and pad, (pad = application material).
So do a Test Spot first.
Also, read the manufactures directions and follow them as the above is just a general guideline. The manufacture always knows their products best.
Product Options for removing light or shallow water spot marks
Usually the type of etching or mark left by a Type I Water Spot is very shallow so they are fairly easy to remove. So in keeping with the philosophy of,
"Use the least aggressive product to get the job done"
There are two groups below, the first group of products would be considered the least aggressive product to consider starting with, if the water spots are more serious than shallow, light, slight marks or impressions in the paint, then consider one of the more aggressive products in the Compound and Polish category.
Paint Cleaners at Autogeek.net
Pinnacle Paintwork Cleansing Lotion
Wolfgang Paintwork Polish Enhancer
3M Scratch Remover
Dodo Juice Lime Prime Lite Cleaner Glaze
Dodo Juice Lime Prime Pre-Wax Cleanser Polish
Duragloss PreCleaner
1Z Einszett Paint Polish
Four Star Ultimate PreWax Cleanser
Griot's Garage Fine Hand Polish
Liquid Glass Pre-Cleaner
Meguiars SCRATCH X 2.0
Meguiars SwirlX Swirl Remover
Mothers California Gold Pre-Wax Cleaner
Mothers California Gold Scratch Remover
P21S Gloss Enhancing Paintwork Cleanser
Poorboy's World Professional Polish
SONAX Premium Class Paint Cleaner
SONAX Paint Cleaner
Hand Applied Compounds and Polishes
Pinnacle Advanced Swirl Remover
Pinnacle Advanced Finishing Polish
Wolfgang Finishing Glaze
Menzerna Micro Polish PO 87MC
Menzerna Super Finish (Nano) PO 106 FA
Menzerna Intensive Polish PO 91E
Menzerna Polish PO85RD
Menzerna Final Finish PO85U
Meguiar’s Ultimate Compound
Meguiar’s Clear Coat Safe Rubbing Compound
Meguiar’s Clear Coat Safe Polishing Compound
Meguiar’s ScratchX
Meguiar’s SwirlX
Meguiar’s M105 Ultra-Cut Compound
Meguiars 205 Ultra Finishing Polish
Meguiar's M82 Swirl Free Polish
Meguair's M09 Swirl Remover 2.0
Meguiars M02 Fine Cut Cleaner
Meguiar's M80 Speed Glaze
3M Super Duty Rubbing Compound
3M Perfect-It ll Rubbing Compound Fine Cut
Poorboy's World SSR1 Light Abrasive Swirl Remover
Poorboy's World SSR2 Medium Abrasive Swirl Remover
Poorboy's World SSR 2.5 Medium Super Swirl Remover
Poorboy's World SSR 3 Heavy Duty Compound
How to remove Type II Water Spots by Hand
Type II Water Spots are etchings or craters in the paint and neither detailing clay nor vinegar is going to remover these types of below surface defects.
To remove a Type II Water Spot by hand follow Step 4 above after first washing, drying and claying the vehicle.
Note: Even though claying won’t remove Type II Water Spots, before hand or machine applying any type of paint care product to an automotive finish the car needs to be washed, dried and clayed as a “Best Practice”. Claying is the most effective way to remove above surface bonded contaminants and this should always be done before polishing if a physical inspection reveals the paint needs to be clayed.
How to remove Type III Water Spots Hand
Type III Water Spots are usually faded spots on single stage paints but can sometimes be milky looking spots on clear coat paint systems.
When it comes to removing Type II water Spots the limiting factor is how deep the spot penetrates into the actual film build of the top coat. You remove Type III Water Spots in the same manner you remove Type II Water Spots but if the fading or staining goes too deep you won’t be able to completely remove it safely.
To remove a Type III Water Spot by hand follow Step 4 above after first washing, drying and claying the vehicle.
On older single stage paints, because these types of paints are very porous can easily have a stain penetrate fairly deep into the paint and completely removing deep defects is always risky, so use caution.
For antique single stage paints, I always recommend pre-treating the paint with #7 Show Car Glaze to in essence put some oils back into the paint and thereby refreshing the paint and making it more workable or polishable. Plus the oils will help to restore rich color and counter the fading, whitening effect.
Seal the paint with a coat of beauty and protection
After removing the water spots to your satisfaction it's important to apply a coating of wax or a paint sealant.
By there very nature, compounds, polishes and paint cleaners don't provide any protection like you think of when you think of a car wax or paint sealant so be sure to apply either a coat of a quality wax or paint sealant to lock in the shine and restore a show room new finish.
Normally after pre-cleaning paint with some type of compound, polish, or paint cleaner you would use a finishing wax or finishing paint sealant and not a cleaner/wax or cleaner/sealant. Here's a list of all the different types of waxes and sealants at Autogeek.net
How To Choose The Right Wax or Paint Sealant for your Detailing Project
:xyxthumbs:
swanicyouth
New member
- Mar 3, 2011
- 9,388
- 0
Nothing much to add after that ^
theblob640
New member
- Mar 4, 2013
- 550
- 0
There's going to be a new product by CarPro you can try if you want to wait.
swanicyouth
New member
- Mar 3, 2011
- 9,388
- 0
The real question is... what can you do to prevent them or lessen them?
Wash with DI water as the final rinse. Don't let tap water dry on the car.
JHL88
New member
- Mar 17, 2013
- 1,137
- 0
Wash with DI water as the final rinse. Don't let tap water dry on the car.
Bingo!
 rops:
rops:Mike Phillips
Active member
- Dec 5, 2022
- 51,004
- 6
Will spray way work?
If the spots are actually mineral deposits the wax might loosen them and then cause them to scratch the paint. (Might).
If the spots are now imprint rings, you usually have to use some type of fine polish to remove the etching.
If the spots are actual craters in the paint then polishing and perhaps compounding for sure.
There are a couple of liquid water spot removers on the market that work well for mineral deposts or what a lot of people call hard water spots....
Check this out....
Using Vinegar to remove water spots
Water Spots
 s
s
Vinegar
A common recommendation for removing water spots is to wipe the paint with vinegar, they kind you find in a kitchen pantry. If the water spots are in fact mineral deposits sitting on the top of the paint then this may work but you won't know until you try.
How Vinegar Works - (If and when it works)
Common cooking vinegar or food grade vinegar is a weak form of acetic acid, which is has low pH. Mineral deposits are just that, minerals that are either dissolved in water or embodied in water and when the water evaporates it leaves the physical mineral behind on the surface.
There are different types of minerals in water but one of the most common is Calcium Hydroxide. Calcium Hydroxide has a high pH, if the mineral deposits on your car's paint are Calcium Hydroxide, then the low pH Acetic Acid in the Vinegar will act to neutralize the high pH of the Calcium Hydroxide and either dissolve the minerals or break their bond to the paint and at that point you would be able to wipe them off the surface.
If the hard water spots are some other type of mineral deposits, then there's a good chance the acetic acid in the vinegar will have no effect and in a worse case scenario cause more harm than good. This is why in the forum world you'll often read accounts from some people where they share how great vinegar worked for them in their situation but then you'll read accounts by other people where the vinegar had no effect.
The problem with using Vinegar is that the acetic acid will act to remove any wax or paint sealant previously applied to the paint, wiping a waxed finish with vinegar certainly won't add more protection and what's the opposite of adding?
The other problem with using vinegar is that in and of itself it doesn't provide any extra lubricating ability outside of being a liquid. So using it with some type of cloth, for example a microfiber towel will not be as gentle as using a product formulated by a chemist specifically to be wiped over polished finish. And if fact if there are physical minerals on the surface then wiping them off without some type of added lubricity could in fact lead to scratching of the finish.
The two products show above, Duragloss 505 and Meguiar's M47 are manufactured by reputable companies and I'm confident the chemists have taken into account everything involved with creating a product for Joe Consumer to potentially wipe a clear coated finish to remove mineral deposits.
Remember clear coat paints are scratch-sensitive, that is they scratch easily. I think it's safe to assume that any product created by a reputable company for wiping off mineral deposits will include both lubricating agents plus glossing agents along with their proprietary ingredients for forcing the minerals to release their bond to the surface.
Key Benefits
The lubricating agents help prevent potential scratching from the minerals on the surface and the glossing agents restore a just detailed look to the finish.
These two included features to the products are important to car owners even thought most car owners probably don't even know they want and need these benefits from the product.
Vinegar offers neither of these benefits.
My recommendation
If you find you have what I call Type I Water Spots, that is what the world generically refers to as Hard Water Spots or Mineral Deposits, then obtain one of the two products listed in this article, especially if the spotting is an ongoing problem and give them a try. Other safe options would be to try a spray detailer, (at least it offers lubricating and glossing features), or try washing the car using a high lubricity car wash.
If you do opt to try vinegar, test first to a small area. Dampen a clean, soft microfiber towel with vinegar, place it on the affected area and allow it to remain for a few seconds so it can soften and hopefully dissolve the mineral deposits, then gently wipe the surface. This would be a safer approach then wiping dry paint with dry mineral deposits bonded to the surface.
Important
If you use vinegar to remove water spots, plan on re-applying some type of wax or paint sealant afterwards to restore any protection removed from the acetic acid.
")
Mike Phillips
Active member
- Dec 5, 2022
- 51,004
- 6
Specialty products for removing "some" types of water spots
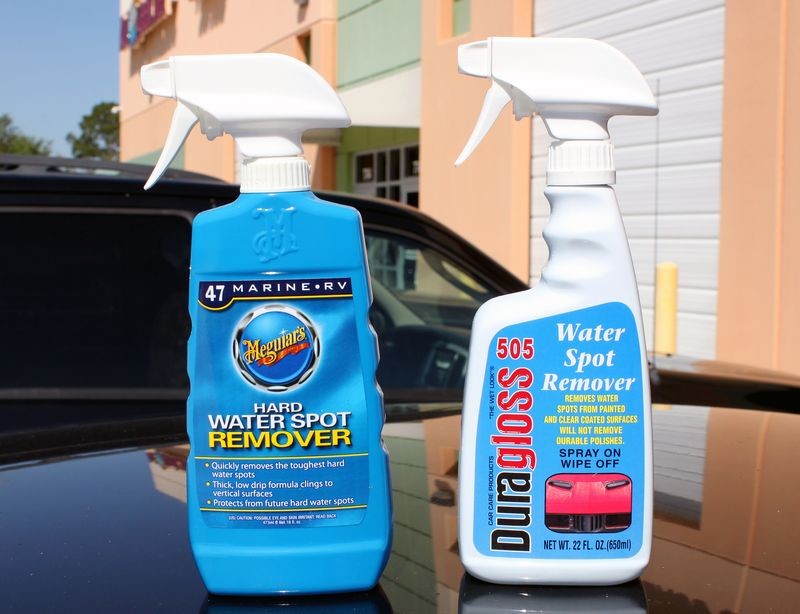
Meguiar's and Duragloss both make water spot removers that may work for Type I Water Spots.
Note: While Duragloss recommends their product for automotive finishes, Meguiar's only recommends their product for Marine and RV surfaces, so take this into consideration when choosing and using a product outside the manufactures recommendations.
I have successfully used M47 on automotive paints to remove mineral deposits but that does not mean it will work for you on your car for the type of mineral deposits or water spots on your car's finish. Always do a Test Spot and make sure you're getting the results you want and hope for.
Type I Water Spots = Topical
These are Mineral Deposits or what people commonly call "Hard Water Spots". It's the minerals in water that people are referring to when they use the word "hard" in the term "Hard Water Spots.
Type I Water Spots are primarily a mineral or dirt deposit laying on the surface of paint. Type I Water Spots can be the results of minerals suspended in city water or well water that are left behind after the water evaporates off the finish. This can happen by washing a car but not drying the water off the paint or if a sprinkler goes off next to the car covering the car with water drop that are not dried off the paint.
Type I Water Spots can also be dirt or pollution particles left behind after water from rain or inclement weather evaporates of the finish. Type I Water Spots can also be Type II Water Spots in that the water can leave both a deposit on the surface and an etching in the finish.
How To Remove
Type I Water Spots can usually be removed by washing or wiping the pant clean using a normal car wash, rinseless wash, waterless wash or spray detailer. There are also specialty products just for this including,
Specialty Products for removing water spots,
- Duragloss 505 Water Spot Remover
- Meguiar's M47 Marine-RV Hard Water Spot Remover
Duragloss 505 Water Spot Remover
The first sentence in the product description on the back of the Duragloss label reads,
Formulated to easily remove water spots caused by impurities, (CALCIUM), in water.
Duragloss states it can be used for automotive finishes and it won't remove durable polishes. My guess is they are using the word "polishes" generically to mean waxes, paint sealants or coatings, not abrasive products used to remove swirls and scratches. Duragloss calls all their paint sealants polishes. See the chapter on polishes for more information.
Meguiar's M47 Marine-RV Hard Water Spot Remover
The first sentence in the product description on the back of the Meguiar's label reads,
Specifically formulated to chemically break down and remove hard water Minerals off the surface.
When I worked for Meguiar's the common question about this product is can it be used on automotive paints and the company answer at that time was all the field testing was done on Marine surfaces in Marine environments.
My experienced guess is that it won't in and of itself harm a clear coat surface.
Two comments...
The average person doesn't know the difference between a topical mineral deposit, (Type I Water Spot), or a sub-surface etching, (Type II Water Spot), and the average Joe Consumer buying this product to use on a modern clear coat to try to remove Type II Water Spots would be let down as they don't understand you would have to abrade the paint with a compound to remove Type II, thus they designate a product like this to the Marine market. Just my guess.
Flash Gordon
Well-known member
- Feb 6, 2010
- 11,412
- 434
What is a good way to get rid of water spots? Im working on a black vehicle but after drying and not being fast enough water spots formed.
Will spray way work?
Are you sure the water spots were not there before the wash? If they devoloped after the wash; pull the car in the shade and re-rinse
swanicyouth
New member
- Mar 3, 2011
- 9,388
- 0
I've used the Duragloss Water Spot Remover and it works pretty well on FRESH water spots. However, it has a strange chemical smell, (like an alcohol) - so I'm pretty sure it removes WAX.
Old water spots - you gotta polish them away.
Old water spots - you gotta polish them away.
Radarryan
New member
- Nov 9, 2012
- 778
- 0
Just to add, CarPro is coming out with a water spot remover (there is a thread on it. Also, there is a video of it on the CarPro website). I think that the product is designed for glass coatings, but that's because, I'm told, water spots form easier in coatings. Furthermore, if you use abrasives to remove the water spots, you may remove the coating. That's why this product is hotly awaited. Just wanted to add...
lawrenceSA
New member
- Feb 7, 2012
- 1,713
- 0
What are you using to actually dry the paint with - a drying towel or (heaven forbid) the devils cloth aka the chamois?
Flash Gordon
Well-known member
- Feb 6, 2010
- 11,412
- 434
Maybe im calling them wrong. Its more like little spots that are barely visible even after I've hurried and dried the vehicle.
Have you tried polishing them out? Are you sure they were not there before? Sounds like to me we are dealing with something other than water spots
Mike Phillips
Active member
- Dec 5, 2022
- 51,004
- 6
Maybe im calling them wrong. Its more like little spots that are barely visible even after I've hurried and dried the vehicle.
Can you take a picture of them?
Here's an article I wrote with some tips and techniques to capture pictures of defects in and on car paint.
How to photograph and capture swirls in the sun

LOTS more pictures in the actual article as well as tips and techniques.
icture: icture: icture: icture: icture: