FrankS
Active member
- Jul 7, 2013
- 1,560
- 0
2013 Smart Car Detail
Little Background
About 2 years ago I was paying someone to wash & wax my car for about $50 because I didn't have the time. Eventually I began to have more time and wanted to begin doing it myself. I was looking for a buffer to apply wax on my car instead of doing it by hand and wanted a quicker way. So I began to search on the internet for a good buffer. Eventually I came across Autogeek.net. After some looking around I set my sight on the Flex 3401. It was probably more than I needed but I wanted the best at the time. After talking with Nick at AG, he also suggested the Flex 3401.
At that time I couldn't tell you the difference between a compound and a polish. But after finding AG and the forum (AGO) I was hooked and the rest is history. I think I have been converted to an Auto Geek!
Since that time I began detailing, not only my car but family, friends, neighbors and co-workers but this will be my 1st complete write-up.
The car is my brother-in-law's 2013 Smart Car which he's had for about a year. It's also the smallest car I've done so far. :xyxthumbs:
Before Shots


Wheels & Tires
Used Wolfgang Uber Wheel Cleaner (like the foaming action) and a Recessed Lug Nut Wheel Cleaning & Polishing brush.

Mothers Wheel Brush

Used Daytona Speed Jr. Master Wheel Brush to clean the inside of the wheel barrel.

Also used a Wheel Woolie. The Daytona brush was able to get into places that the Wheel Woolies couldn't.
On the other hand the Daytona brush has a tendency to splatter due to the bristles.
Make sure you use eye protection when using the Daytona. Got some splatter in my face even though I was trying to be careful.
I like the scrubbing ability of the Wheel Woolies. Each has their place.

Used the Daytona Speed Master Pro Wheel Brush & Meguiar's APC+ diluted 4:1 for the wheel wells.
I tried using the Mothers Fender Well Brush but it wouldn't fit between the tire and the well.

Used Iron X after the wheels were cleaned to decontaminate and remove iron-containing particles.

Iron X doing its work. Turns purple as it removes iron-containing particles.

There were still some embedded particles in the wheel after the first use of the Iron X on the part of the rim where my finger is pointing.

Sprayed Iron X again and scrubbed with the Wheel Woolie. Repeated about 2 or 3 times until the embedded particles were removed.

Used Tuf Shine Tire Cleaner and Mothers Tire Brush for the tires. Repeated the process about 2 or 3 times until the tires were thoroughly cleaned.

Used DP Gloss Tire Gel for the tire dressing. Normally Tuf Shine Tire Clearcoat is my go-to dressing but I wanted to use up the DP Tire Gel.

One coat of the DP Gloss Tire Gel gave the tires a nice shine.
I actually dressed the tires right before the car polishing step but wanted to show it here.

Car Wash & Decontamination
Pre-wash soaking with Iron X Snow Foam. Let it dwell for a few minutes, rinsed and foamed again with CG Citrus Wash Red.

Two Bucket Method with CG Citrus Wash Red.

Montana 10" Boars Hair Brush attached to a Shur-Line adjustable extension pole. Pole was purchased at HD.

Sprayed Iron X on car after it was rinsed off and while it was still wet.
Note: Iron X Snow Soap which was used as the pre-wash is more of a maintenance soap.
As you can see Iron X is removing iron-containing particles that the Snow Soap didn't remove.

Iron X working on the hood.

Washed the car again after the Iron X, rinsed and did the baggie test to check for above surface contaminants. Quite a bit of contaminants were there.

Used the Flex 3401 with the medium grade Nanoskin Autoscrub 6 Inch Foam Pad and Nanoshock as the lubricant to remove the above surface contaminants.

Polishing Step
Inspected the condition of the paint after decontaminating with the Nanoskin Autoscrub system and wiping off with a microfiber (MF) towel.
It's difficult to see the defects on silver paint but what I managed to see was some light swirls.
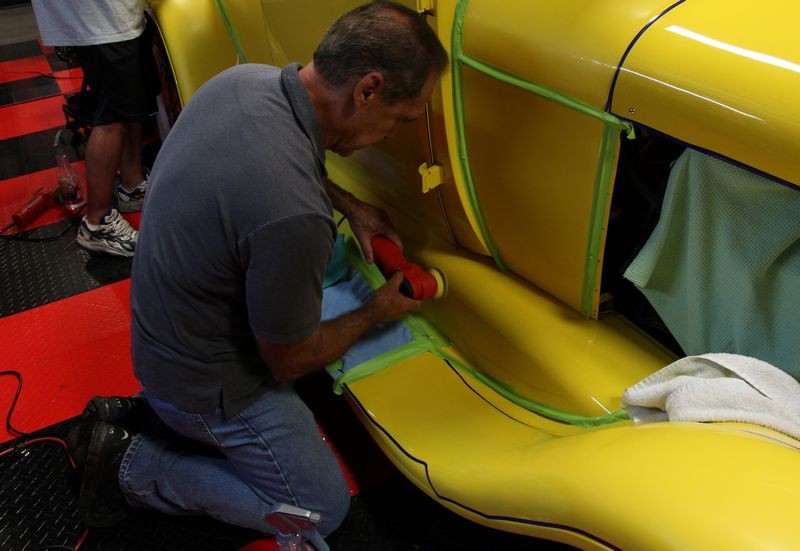
I went with the Flex 3401 with a 5" White Hybrid Polishing Pad on a 4" backing plate and WG Finishing Glaze.

Coating Step
DP Coating Prep Polish was used with the Flex 3401 with a Black 5" Hybrid Finishing Pad to prepare the paint for coating.

DP Paint Coating was applied to the paint using the Gold Wax Finger Pocket.

BL Diamond Surface Coating was applied to the wheels and headlights.

Glass
Glass was cleaned with Stoners Invisible Glass on the inside and Stoners Invisible Glass with Rain Repellent on the outside.
Interior
Interior was in good condition just needed to be vacuumed, dusted and a few spots wiped down with Meguiars APC+ diluted at 10:1.
After Shots


Special Thanks
I would like to give credit where credit is due and special thanks to:
Mike Phillips for his informative and outstanding videos and posts and also for the opportunity to get some hands on experience at the Thursday nights Show Car Garage Makeovers.
Nick at AG for answering my emails and giving me excellent product recommendations.
AGO Forum Members for sharing their detail sessions, product reviews, tips and experiences.
")
Little Background
About 2 years ago I was paying someone to wash & wax my car for about $50 because I didn't have the time. Eventually I began to have more time and wanted to begin doing it myself. I was looking for a buffer to apply wax on my car instead of doing it by hand and wanted a quicker way. So I began to search on the internet for a good buffer. Eventually I came across Autogeek.net. After some looking around I set my sight on the Flex 3401. It was probably more than I needed but I wanted the best at the time. After talking with Nick at AG, he also suggested the Flex 3401.
At that time I couldn't tell you the difference between a compound and a polish. But after finding AG and the forum (AGO) I was hooked and the rest is history. I think I have been converted to an Auto Geek!
Since that time I began detailing, not only my car but family, friends, neighbors and co-workers but this will be my 1st complete write-up.
The car is my brother-in-law's 2013 Smart Car which he's had for about a year. It's also the smallest car I've done so far. :xyxthumbs:
Before Shots
Wheels & Tires
Used Wolfgang Uber Wheel Cleaner (like the foaming action) and a Recessed Lug Nut Wheel Cleaning & Polishing brush.
Mothers Wheel Brush
Used Daytona Speed Jr. Master Wheel Brush to clean the inside of the wheel barrel.
Also used a Wheel Woolie. The Daytona brush was able to get into places that the Wheel Woolies couldn't.
On the other hand the Daytona brush has a tendency to splatter due to the bristles.
Make sure you use eye protection when using the Daytona. Got some splatter in my face even though I was trying to be careful.
I like the scrubbing ability of the Wheel Woolies. Each has their place.
Used the Daytona Speed Master Pro Wheel Brush & Meguiar's APC+ diluted 4:1 for the wheel wells.
I tried using the Mothers Fender Well Brush but it wouldn't fit between the tire and the well.
Used Iron X after the wheels were cleaned to decontaminate and remove iron-containing particles.
Iron X doing its work. Turns purple as it removes iron-containing particles.
There were still some embedded particles in the wheel after the first use of the Iron X on the part of the rim where my finger is pointing.
Sprayed Iron X again and scrubbed with the Wheel Woolie. Repeated about 2 or 3 times until the embedded particles were removed.
Used Tuf Shine Tire Cleaner and Mothers Tire Brush for the tires. Repeated the process about 2 or 3 times until the tires were thoroughly cleaned.
Used DP Gloss Tire Gel for the tire dressing. Normally Tuf Shine Tire Clearcoat is my go-to dressing but I wanted to use up the DP Tire Gel.
One coat of the DP Gloss Tire Gel gave the tires a nice shine.
I actually dressed the tires right before the car polishing step but wanted to show it here.
Car Wash & Decontamination
Pre-wash soaking with Iron X Snow Foam. Let it dwell for a few minutes, rinsed and foamed again with CG Citrus Wash Red.
Two Bucket Method with CG Citrus Wash Red.
Montana 10" Boars Hair Brush attached to a Shur-Line adjustable extension pole. Pole was purchased at HD.
Sprayed Iron X on car after it was rinsed off and while it was still wet.
Note: Iron X Snow Soap which was used as the pre-wash is more of a maintenance soap.
As you can see Iron X is removing iron-containing particles that the Snow Soap didn't remove.
Iron X working on the hood.
Washed the car again after the Iron X, rinsed and did the baggie test to check for above surface contaminants. Quite a bit of contaminants were there.
Used the Flex 3401 with the medium grade Nanoskin Autoscrub 6 Inch Foam Pad and Nanoshock as the lubricant to remove the above surface contaminants.
Polishing Step
Inspected the condition of the paint after decontaminating with the Nanoskin Autoscrub system and wiping off with a microfiber (MF) towel.
It's difficult to see the defects on silver paint but what I managed to see was some light swirls.
I went with the Flex 3401 with a 5" White Hybrid Polishing Pad on a 4" backing plate and WG Finishing Glaze.
Coating Step
DP Coating Prep Polish was used with the Flex 3401 with a Black 5" Hybrid Finishing Pad to prepare the paint for coating.
DP Paint Coating was applied to the paint using the Gold Wax Finger Pocket.
BL Diamond Surface Coating was applied to the wheels and headlights.
Glass
Glass was cleaned with Stoners Invisible Glass on the inside and Stoners Invisible Glass with Rain Repellent on the outside.
Interior
Interior was in good condition just needed to be vacuumed, dusted and a few spots wiped down with Meguiars APC+ diluted at 10:1.
After Shots
Special Thanks
I would like to give credit where credit is due and special thanks to:
Mike Phillips for his informative and outstanding videos and posts and also for the opportunity to get some hands on experience at the Thursday nights Show Car Garage Makeovers.
Nick at AG for answering my emails and giving me excellent product recommendations.
AGO Forum Members for sharing their detail sessions, product reviews, tips and experiences.