Detailing a 1954 Chevy Bel Air

Right, products to be used are as follows:

Turtlewax waterless wash
Auto finesse citrus pre-wash
Bilt Hamber clay bar & lube
Auto finesse imperial wheel cleaner
Collinite 476s wax
Auto finesse Satin Trye gel
Auto finesse revive trim dressing
Auto finesse mint rims wheel wax
Auto finesse mercury metal polish
Auto finesse crystal glass cleaner
meguires #7 show car glaze
Sonus chrome polish
Menzerna PF2400
Menzerna PF2500
Menzerna SF4000
Lake country red, cyan, orange pads

I also have at my disposal the following products:

Valet pro citrus pre wash
Valet pro snow foam
Tardis
Iron-X
Werkstat acrylic system
Schol S3 polish
Auto Finesse Revitalise kit, including pads.

Following Mikes comments about old cars and trapped water, i decided to go with the Turtlewax waterless wash kit. If I need to, I will spray with AF Citrus power first to loosen the dirt.

Next up is to clay the entire car, glass & chrome. Clean the wheels and then apply Megs#7 and leave to soak over night.

Following morning will be a wipe down to get rid of the excess #7, followed by polishing the paintwork - this is the part I am most concerned about and maybe Mike can offer some guidance :xyxthumbs:

Unfortunately I don't own and can't get access to a paint depth gauge, therefore i need to be very careful with my pad/polish combo. Based on the products I have, what would be the best combo to start with? (I intend to test the combo on the paintork behind the fender, as seen in the previous pictures)

After polishing the paint, I will use the old pads to polish the chrome work and glass.

Finish wise, I purchased the collinite wax as I believe it is a good quality,hard wearing, long lasting LSP, however I also have auto Finesse Illusion wax ( I love Auto Finesse products :dblthumb2:) plus the Werkstat acrylic kit at my disposal. Any suggestions as to which would be best for this beautiful car?

As per the list above, I have what I think is a list of very good products which I intend to use and several others that I could use if required.

As always, thanks very much for any help and advice.

Regards, Craig
 
Any suggestions at all guys? I really don't want to ruin this lovely car! I will always start with the least aggressive combination and I think it will have to make do with a 1 step polish/refine so Im looking for the best pad/polish combo to achieve this with the kit I have available. :xyxthumbs:
 
Good weekend - Bad weekend!!

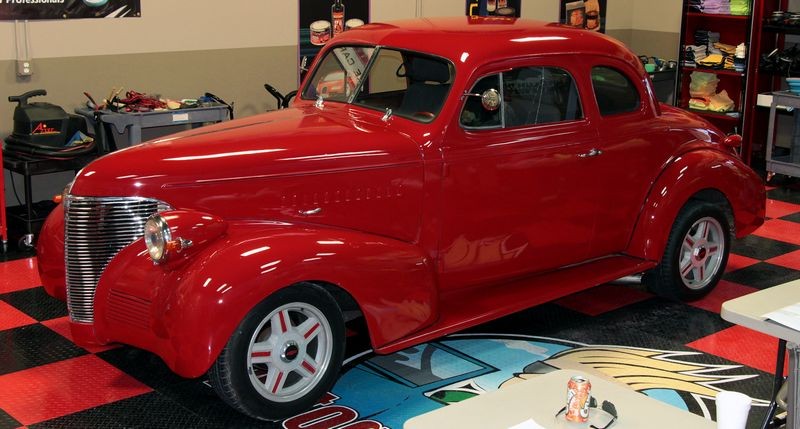
So, 7am Friday morning I set off in order to do the detail on this beautiful car. Lovely sunny day and no rain forecast for the whole weekend - which is very rare in the north west UK.

When I arrived at my friends house, he had already moved the car outside and removed all the chrome from the body, leaving me a lovely bare car to work on.

The removal of all the chrome and seeing the body work up close and outside unfortunately revealed the true condition of the paint. The majority of the paint on lower half, especially around the trim, was quite badly rusted through. The entire wheel arches were starting to rust and there are quite literally dozens and dozens of stone chips. This, coupled with the worn paint that I already knew about made me think about what could be realistically achieved with this beautiful car. So, after discussing the condition of the car with my friend, it was decided that I would just give the car a good clean and polish as best I could, rather than trying to correct the paintwork and my friend has now said that he is going to look into getting a re-spray done.

So, before I set to work, I took loads of pictures of the car so that I could compare the before and after shots.

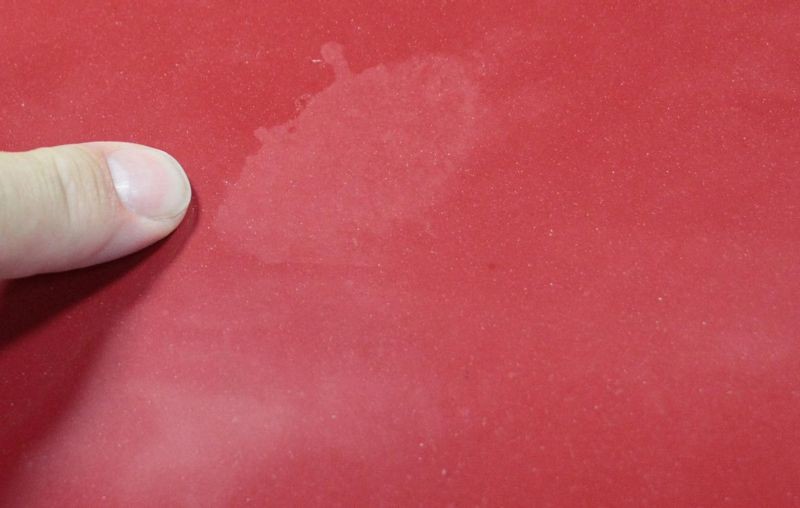
Despite what appeared from a few feet away to be relatively clean paint, it was actually very dirty up close. I gave the car a good wash and then spot tested a small area near the rear fender with ironX. Once I was happy that it wasn't going to further damage the paint, i sprayed it all over the car and waited and WOW, it looked like someone had been slaughtered. The iron bleeding was insane, so much contamination that it was unbelievable. The car was then washed again and then dried off carefully.

Next it was taking inside and clayed all over. This in itself brought out some shine to the car, which had obviously dulled over the years in the hot Kansas sun. After claying all over, the car was then soaked in a heavy layer of Megs number 7 and left to soak overnight.

Ok, Ok I hear you say, but where are the pictures??? Bear with me, that's part of the story.

Saturday was spent with the DA and various combinations of pads & polish. As I said previously, the paint was actually in a poor condition and the limited time i had with the car meant that I decided a full correction was out of the question, so it was just a matter of doing the best I could to make the car look better until my friend can get a re spray done.

SHOW ME THE PICTURES, WHERE'S THE PICTURES - I hear you say.

Sunday was spent polishing the chrome with the DA and I was really impressed with the results. All the chrome was then put back on the car and the rubber window seals were treated and the tyres dressed with Megs endurance tyre gel and after three full days the car was looking much better, so much so that my friend's wife couldn't believe the difference.

After standing back and admiring the work, I took loads of pictures of the car so that I could come home and upload them onto Auto Geek, so that I could show you lovely people the fruits of my labour - and that's when it all went horribly wrong!!

My SD card was corrupted and the pictures were gone :mad::mad::mad::mad::mad:

I can't believe it, I am absolutely gutted. I have spent the last dozen or so hours trying to recover the lost files but the card is beyond recovery. Luckily my son came along with me on Friday and took some on his own camera, which I have asked him to email to me then I can put them up. I will also ask my friend to take some more and do the same so with any luck I may be able to upload some.

After all the help and advice from you guys, I was desperate to be able to show the results of my work on what is a truly lovely car. Hopefully I will be back later with at least a few photos to show!
 
My SD card was corrupted and the pictures were gone :mad::mad::mad::mad::mad:


So sad to hear this, especially since you did a great job of getting the "before" pictures.


I can't believe it, I am absolutely gutted. I have spent the last dozen or so hours trying to recover the lost files but the card is beyond recovery. Luckily my son came along with me on Friday and took some on his own camera, which I have asked him to email to me then I can put them up.

I will also ask my friend to take some more and do the same so with any luck I may be able to upload some.

Well the good news is you can ALWAYS get the "after" pictures. That's the point of my article here,

The power in the after shots is created in the before shots

Mike Phillips said:
Also, after you polish out a neglected car you can ALWAYS get the after shots, just walk out to the garage and take some pictures. But you can NEVER go back in time to take the "before shots.


So anytime you can share some "after" pictures I know I for one would like to see the fruit of your labor.


:dblthumb2:
 
Hi everyone, well despite the initial problems with the photographs, I have finally managed to recover several "during" shots.

After trying the baggie test on the paintwork I could feel a LOT of contamination on the paint, so I decided to try a test spot of paintwork with IronX. After spot testing a small part behind the removed rear fender, I decided that it was safe to use the product on the rest of the car - This is what happened


vkjb.jpg


c0d5.jpg


I couldn't believe the amount of contamination present!

kx3l.jpg


This is the condition of a lot of the lower half of the paintwork

wxt8t.jpg


As per my previous posts, it was decided that a full correction wasn't going to be worth it due to the condition of paint. My friend realises that the car does indeed need a respray!

Anyway, I carried on, on the understanding that I would do the best I could given the condition of the body work.

After decontamination, the car was fully clayed, washed again and dried off. It was then taken inside and taped off ready for a machine polish.

73tp.jpg


The final task on day one was to put a heavy layer of Megs No7 all over the paint and leave it to soak in overnight.


au95.jpg


Unfortunately, this is where most of the photos I took have been lost so I don't have an shots of the 2 days polishing that I did!

After removing the Megs No7, the paintwork was machine polished with a combination of Lake Country pads and Menzerna Polishing compounds. I managed to correct some of the swirls in the paint during the polishing procedure but it had already been decided that a full correction was beyond what was achievable given the overall condition of the paint/body work.

Whilst the chrome fenders and decorations were off, they were also machine polished using the old pads I had previously used on the bodywork.

These final shots were taken by my friend, the owner of the car, a few days after the work had been completed. Whilst I was a bit disappointed with what I had been able to achieve, he was more than happy. Judge for yourself. The car was finished with a coat of Collinite wax for a bit of protection, followed by a coat of Auto Finesse Illusion show wax for a bit of a shine.


bepp.jpg


qbeos.jpg


j8ku.jpg


9z96.jpg


uj9u.jpg


Well, those are the results of three days work. I really enjoyed the experience of working on this car and would love to do something similar in future. It certainly isn't up to the standard of Mike's results and I would have loved to get some better results but hey, maybe next time.
 
The 54 looks a lot better.I think you did the best the paint can offer.:dblthumb2:
 
Hi Craig,

I think it came out great! Especially considering the condition of the paint before you worked on the car.

I wrote this article a few years ago which explains exactly what you did....

"Taking your car's paint to it's maximum potential"


In fact, your 1954 Chevy Bel Air project is a text book example of how to take a car's paint to it's maximum potential.


Nice save! Best of all, the owner can proudly drive this classic Chevy around amaze everyone. Moving forward, he should maintain the paint with a once or twice yearly polishing with the #7 and then seal again with wax.


Thanks for doing all the extra work to retrieve the pictures for the benefit of this forum and your thread for the future.


:dblthumb2: :dblthumb2: :dblthumb2:

Hi guys,

Thanks for the great comments and feedback. To say I enjoyed working on this car is an understatement, it was an amazing experience and one that I will look back on fondly.

Mike, thanks so much for taking so much time to provide such detailed and excellent advice, it made a very daunting project easier to deal with.

Thanks all for your help and advice, I will be sure to check back regularly and promise to post future projects on here :xyxthumbs:

Kind regards, Craig.
 
Hi guys,

Thanks for the great comments and feedback. To say I enjoyed working on this car is an understatement, it was an amazing experience and one that I will look back on fondly.

I agree. I love restoring the paint on classics with neglected single stage paint. Even better was teaching this as a part of my last class....


Pictures: Detailing Classes at Autogeek - May 2014


Before

1939_Chevy_Coupe_Detail_Class_Car_023.jpg


1939_Chevy_Coupe_Detail_Class_Car_024.jpg


1939_Chevy_Coupe_Detail_Class_Car_004.jpg


1939_Chevy_Coupe_Detail_Class_Car_009.jpg


AFter

May_2014_Detailing_Class_016.jpg


Students

May_2014_Detailing_Class_015.jpg


Mike, thanks so much for taking so much time to provide such detailed and excellent advice, it made a very daunting project easier to deal with.

No problemo, take a lot of satisfaction in teaching others the art of polishing paint...


Thanks all for your help and advice, I will be sure to check back regularly and promise to post future projects on here :xyxthumbs:

Kind regards, Craig.

Already looking forward to your future projects.


:dblthumb2:
 
Back
Top