Looks like its past the point of no return or just severely oxidized? Can it be fixed?

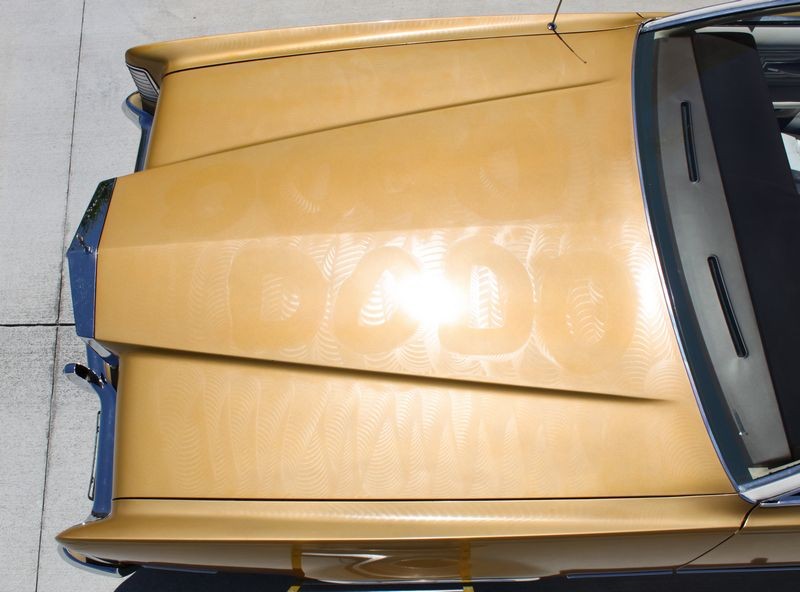
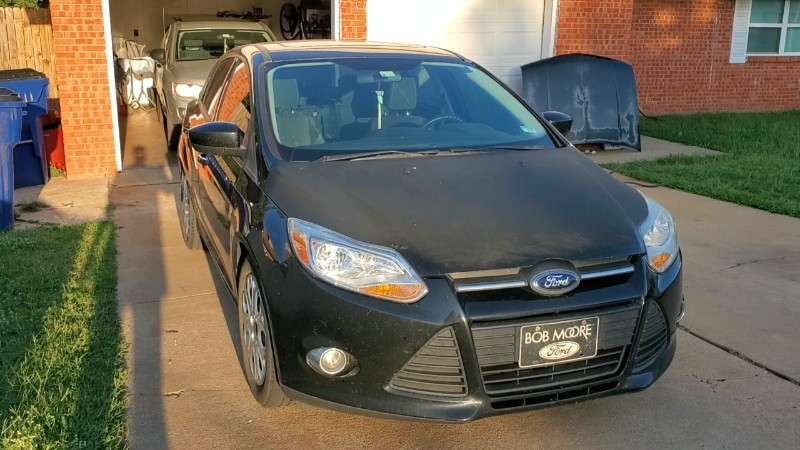
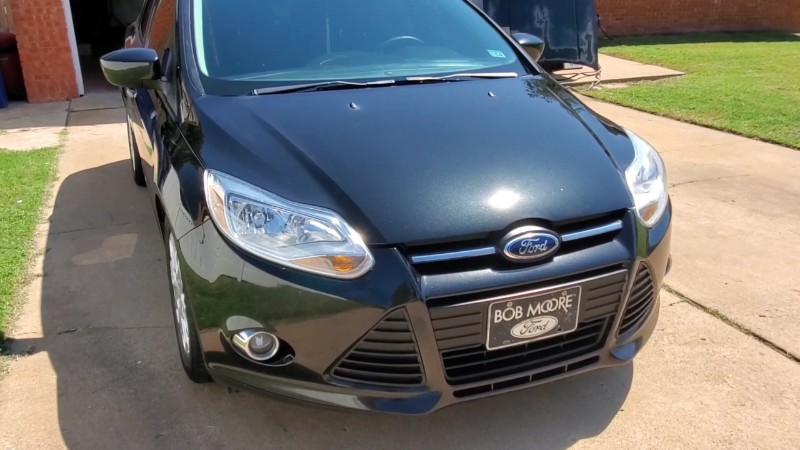
My sister-in-law's hood appears to be suffering from severe oxidation or possible clear coat failure.

This looks like the point of no return for me but I would like a 2nd opinion please.

If it can be fixed, what would be the recommended fix for this?


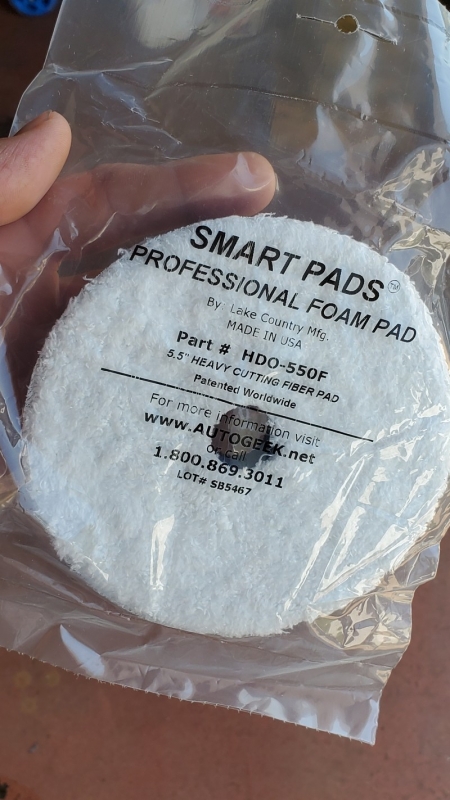
Also for those that might not know, the three categories Jacob listed are in my how-to book, The Complete Guide to a Show Car Shine.

Paint Condition Categories


This is a chapter in my how-to book. It's just one little nugget of information you'll find in the book.

Page 37 - Paint Condition Categories

Page37ofBook.jpg


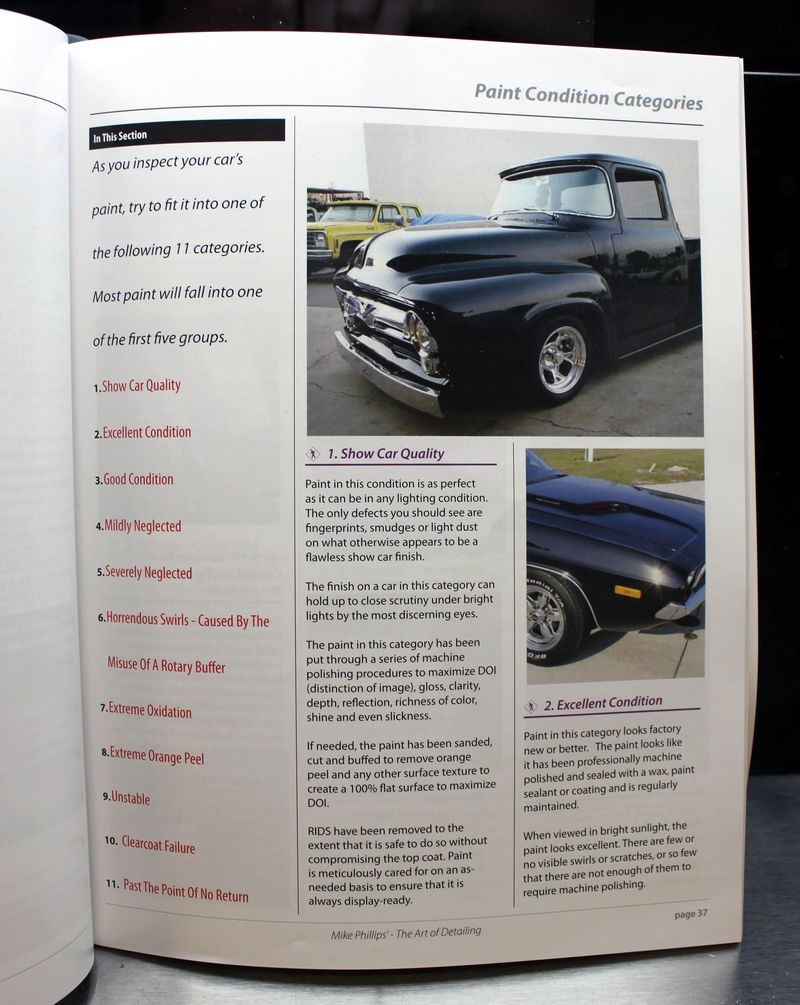
Using the guide below, inspect the paint on your car or cars, trucks, SUVs, etc. And then post which category you think each vehicle matches.


1: Show Car Quality

Paint in this condition is as perfect as it can be in any lighting condition. The only defects you should see are fingerprints, smudges or light dust on what otherwise appears to be a flawless show car finish.

The finish on a car in this category can hold up to close scrutiny under bright lights by the most discerning eyes.

The paint in this category has been put through a series of machine polishing procedures to maximize D.O.I, gloss, clarity, depth, reflection, richness of color, shine and even slickness.

If needed, the paint has been sanded, cut and buffed to remove orange peel and any other surface texture to create a 100% flat surface to maximize D.O.I.

RIDS have been removed to the extent that it is safe to do so without compromising the top coat. Paint is meticulously cared for on an as needed basis to ensure that it is always display ready.


2: Excellent Condition

The paint in this category looks factory new or better than factory new.

The paint looks like it has been professionally machine polished and sealed with a wax, paint sealant or coating and is regularly maintained.

When viewed in bright sunlight, the paint looks excellent, that is there are few or no visible swirls or scratches or so few that there's not enough of them to require machine polishing.

The paint has few or no swirls, scratches or any other visible paint defects outside of RIDS.


3: Good Condition

Light swirls, scratches, water spots and oxidation.

When viewed in bright sunlight, the paint should look pretty good overall except that it has light or shallow looking cobweb swirls and scratches throughout the paint. Any water spot problems should be shallow imprint type stains common to Type I Water Spots, certainly not deep craters like Type II or Type III where the paint is physically stained.

Paint in this condition would require one or two polishing steps before a finishing wax could be applied to bring the quality to Excellent or Show Car Quality.


4: Mildly Neglected

Normal day-in, day-out wear-n-tear and minimal appearance maintenance outside of the occasional car wash. Paint in this condition has medium to light swirls, scratches, water spots and oxidation.


Cobweb Swirls and Scratches
When viewed in bright, overhead sunlight there are cobweb swirls and scratches evenly instilled throughout the entire finish but they're likely instilled through improper washing and drying techniques, which means the depth of these defects won't be as deep as the swirls and scratches in a severely neglected finish. The swirls are not inflicted by a rotary buffer. The remedy is still the same except you might be able to use a less aggressive pad or product.

Water Spots
Paint with Type I Water Spots or shallow Type II Water Spots that are more imprints than they are craters falls into this category.

Oxidation, Staining and Surface Impurities
If the car being evaluated is a daily driver, is parked outside 24/7 and has not been regularly polished and/or waxed for a few years then chances are good it has light oxidation and staining of the paint with some type of roadgrime or a build-up of impurities or some type of topical contamination that does not wash or wipe-off.


5: Severely Neglected

Paint in this condition has deep swirls, scratches, water spots and oxidation. Paint in this condition has normal day-in, day-out wear-n-tear plus no real regular maintenance. Vehicles in this category are rarely washed on a regular basis and when they are washed they are washed improperly or taken through automatic car wash.


Cobweb Swirls and Scratches

Paint that is severely neglected means that when viewed in bright, overhead sunlight, there are so many swirls and scratches that the paint has an overall hazy appearance which blocks your view of the true color.


Water Spots

Paint that is in the severely neglected category can have Type I, Type II and Type III water spots on all horizontal panels and even the vertical panels if caused by a sprinkler or some type of water spray.


Severe Oxidation

Paint in this category has oxidized to the point where the surface has a uniform dull appearance to the horizontal surfaces and to some extent the vertical panels. Clear coats do oxidize but usually slower than single stage paints and don't normally get the whitish, chalky appearance with a rough texture common to old, neglected single stage lacquers and enamels.


6: Horrendous Swirls - Caused by the misuse of a rotary buffer

This category is primarily for cars that have been improperly buffed-out using a rotary buffer leaving the finish inflicted with rotary buffer swirls, holograms or buffer trails.
(Whatever term you like, they all mean the same thing).


The severity of the swirls can range from shallow to deep depending upon the pad and product used with the rotary buffer as well as technique or lack thereof.

The normal three culprits for paint in this condition are,


Dealer Installed Swirl Option
Body shop Installed Swirl Option
Detailer Installed Swirl Option


Sad but true, the people in this industry that are supposed to know how to properly buff out a car normally either don't know or don't care. The results are the same and that's a swirled out car finish that someone else will have to undo.


7: Extreme Oxidation

Paint is this category is primarily associated with traditional single stage lacquer and enamel paints and normally found cars built before 1980. Extreme Oxidation means the paint has deteriorated to the point that it has a chalky, whitish appearance.

Paint in this category is typically antique or original. It can be a re-paint, but it would be an older re-repaint. Paint with extreme oxidation can be saved by carefully removing the dead, oxidized paint and rejuvenating with polishing oils the remaining paint. After polishing the color is restored and remains even when exposed to sunlight. If the color fades away then this is an indicator that the paint has become unstable.


8: Extreme Orange Peel

Paint in this category is primarily re-paints from body shops, dealerships or do-it-yourselfer garage paint jobs. It doesn't normally include factory orange peel because factory orange peel is a given for new cars and truck and due to how thin the top coat is on a factory paint job there's a certain amount of risk you have to accept if you choose to remove the factory orange peel while re-paints will tend to have enough material that the problem can be safely corrected via sanding and buffing.


9: Unstable

This category is for older, single stage paints that have been exposed to the sun for a long enough period of time that the pigments have become unstable. That is even if you remove the oxidation and gorge the paint with some type of polishing oils, any original color that is restored is only a temporary fix and when the paint is exposed to the sun or after a few days pass the color fades back to where it was before you started.


10: Clear Coat Failure

Clear coat failure is the point in which the top clear layer of paint has either de-laminated from the basecoat and is peeling off. Clear coat failure can also be when the clear layer of paint has deteriorated to the point where it's turning a whitish color in the beginning stages to full blown deterioration where it has turned white and is flaking off and the car look like it has a severe rash.


11: Past the point of no return

Paint in this condition will be a paint job that falls into one of the above categories but it is so far gone that nothing you pour out of a bottle or scoop out of a can from any company will fix it.


:)
 
The above was in my first how-to book, The Art of Detailing


Then when I updated it and came out with The Complete Guide to a Show Car Shine, I added another category. So now there are 12 Paint Condition Categories, not 11 categories.

The added category was

#10 Beginning Clearcoat Failure


And the reason why is becasue it is a condtioin of paint and it's very different than actual clearcoat failure.


Clear as mud?


:)
 
Then when I updated it and came out with The Complete Guide to a Show Car Shine,

I used to have that book, actually the signature edition. I don't know what I did with it. I need to buy another copy.

If it's not too late - tape-off the hood like this and then buff out just one side.

It's actually not too late at all Mike! I really lucked out on this one as it turns out I ordered the grey heavy cutting pad with my last order from AG which has not arrived yet. My DA is actually not a forced rotation though. I was mistaken about that. :props:

I'd jump right to a compound and a cutting pad, even a FIBER cutting pad. If the fiber pads or even the foam cutting pad leaves any micro-marring or pad haze, you can always clean it up with a less aggressive foam pad and product.

Once again I lucked out here. I actually have a bottle of 3D One. My plan is to compound with the 3D one then panel wipe with Sonax Glass Cleaner, as that is what I have available, after that I will finish it with the BLACKFIRE One Step, then top with 3D Cherry Wax.

Mike, thank you so much for taking the time to help me out and leave such valuable, and wonderfully DETAILED information. I'm sure this will be incredibly valuable to any one who reads it.

I am very confident in this project now. I can assure you I am reading and studying all of the information, and I can't even begin to express my gratitude.

This is going to help me boost my reputation so much!
 
The above was in my first how-to book, The Art of Detailing


Then when I updated it and came out with The Complete Guide to a Show Car Shine, I added another category. So now there are 12 Paint Condition Categories, not 11 categories.

The added category was

#10 Beginning Clearcoat Failure


And the reason why is becasue it is a condtioin of paint and it's very different than actual clearcoat failure.


Clear as mud?


:)
Yes sir! Absolutely clear!

Sent from my SM-G975U using Autogeekonline mobile app
 
Looking forward to seeing how this turns out.

I'm not going to be let down however if you cannot save the paint. I've seen worse looking paint saved though so there is hope.


Also - sometimes it helps to get up high to get the right shot.


From this thread,


The Secret to Removing Oxidation and Restoring a Show Car Finish to Antique Single Stage Paints


In the forum world you'll often read people talking about getting the "Sun Shot" , that's where they pull their project car out into the sun to show there are no swirls in the paint.

The below shot is kind of like the "Sun Shot", but I call it the "Fun Shot" because I was just having some fun with the Dodo name in wax.

I used a rubberband to hold a Cobra Indigo Microfiber Bonnet over a 3" Griot's Garage Polishing Pad on a DA Polisher and took the wax off only where the word DODO was spelled out and then pulled the car into the sun for a "Fun Shot".

The Sun Shot Fun Shot
Behemoth2016.jpg


Yep, this is how you get the high overhead shot, you have to get up in the air a little ways...

Behemoth2017.jpg


:)

I remember that photo! I believe this was one of your first posts you referred me to, I was looking into polishing up a Lincoln Mark V Diamond Jubilee. Unfortunately the paint was past the point of no return, but I still learned a lot! I'm so glad you brought this up! I will use this thread as my guide to document how it goes either way. Should I start a new thread in the show and shine section, or just add the results and documentation to this thread?

I am definitely planning on a sun shot! I won't forget to pack my ladder!

Also I am curious as to what speed I should use on my free spinning DA for both the 3D One and the Blackfire One Step? It doesn't have speeds like 5 or 6, instead the speed ranges from 2,000 to 5,500. My next line of polishers will be the FLEX Line. I can't wait to get the BEAST and also I will also be happy to get my hands on some of Griot's polishers as well. We will just call this one Brand X since it's not sold in the AG store.

That Lincoln turned out absolutely stunning!
 
I am definitely planning on a sun shot! I won't forget to pack my ladder!

A step stool is usually good enough.

I needed a ladder to get up high enough to capture the entire hood and get the DODO writing in the wax just right with the sun the way it was.


Also I am curious as to what speed I should use on my free spinning DA for both the 3D One and the Blackfire One Step?

It doesn't have speeds like 5 or 6, instead the speed ranges from 2,000 to 5,500.

Good questions. And I'm sure you're read this somewhere on the forum but for you and everyone that will read this into the future.


When using ANY BRAND of free spinning random orbiatl polisher the pad MUST ROTATE in order to do any paint correction. MUST ROTATE.

If the pad is not rotating then it's just jiggling or vibrating against the panel and you're wasting your time. So mark the side of the backing plate AND the sides of your pads to make it easy for your eyes to monitor pad rotation. Crank up the speed and even max the tool out if that's what's needed to maintain pad rotation.

How to Monitor Pad Rotation? Mark Your Buffing Pads

Mark-your-pads_001.JPG


Video: Mark your backing plate to make it easy to see pad rotation


MarkYourBackingPlate01.jpg


My next line of polishers will be the FLEX Line. I can't wait to get the BEAST and also I will also be happy to get my hands on some of Griot's polishers as well. We will just call this one Brand X since it's not sold in the AG store.

That Lincoln turned out absolutely stunning!

No problemo and thanks.


:)
 
A step stool is usually good enough.

I needed a ladder to get up high enough to capture the entire hood and get the DODO writing in the wax just right with the sun the way it was.


Good questions. And I'm sure you're read this somewhere on the forum but for you and everyone that will read this into the future.


When using ANY BRAND of free spinning random orbiatl polisher the pad MUST ROTATE in order to do any paint correction. MUST ROTATE.

If the pad is not rotating then it's just jiggling or vibrating against the panel and you're wasting your time. So mark the side of the backing plate AND the sides of your pads to make it easy for your eyes to monitor pad rotation. Crank up the speed and even max the tool out if that's what's needed to maintain pad rotation.

How to Monitor Pad Rotation? Mark Your Buffing Pads

Mark-your-pads_001.JPG


Video: Mark your backing plate to make it easy to see pad rotation


MarkYourBackingPlate01.jpg


No problemo and thanks.


:)
Roger that brother! Thanks!!!

Sent from my SM-G975U using Autogeekonline mobile app
 
Normally I practice and preach,

Use the least aggressive process

But from the appearance of the paint on this car and knowing the history

reallybadpaint_01.jpg


I'd jump right to a compound and a cutting pad, even a FIBER cutting pad. If the fiber pads or even the foam cutting pad leaves any micro-marring or pad haze, you can always clean it up with a less aggressive foam pad and product.


I'd say go for it. I'm a fan of topping, even wrote an article about it years ago. Actually back in 2011. In the article I share the "formula" I used to use back when I detailed full time AND before all the cool brands and products were invented that we use today.


Topping - Definition - How to Top also called Topping

An early car wash and detail shop
SimonizeModelT.jpg


An early auto repair shop that offers detailing
SimonizeModelAm.jpg


I hope you find counting out your section passes when buffing out entire cars saves you time.


:dblthumb2:
Well I'm now waiting on the Lake Country HDO Fiber Cutting pad as it is on back order. The last three pads I was waiting on from my last order are now on their way! I feel like this one project is helping me to grow my tool, microfiber, and pad selection substantially. My detailing knowelege has grown as well! How do you like my new pad box? I'm kind of proud of where this adventure has taken me.

I've now got one other polishing job lined up. As you can see I now use the Kwazar as my sprayer for the Sonax Glass Cleaner AKA clay lubricant and it's color coded too.

The professional image these new tools and products have created for me is a very powerful statement as well. So even if the hood doesn't turn out I'll be well prepared with the tools and products necessary to pour my passion into people's vehicles, and create my artform.
87734b066a975588d7d49aa0e5ff5722.jpg
e82d36e11c6055346322d47e7d0171cb.jpg


Sent from my SM-G975U using Autogeekonline mobile app
 
But from the appearance of the paint on this car and knowing the history

reallybadpaint_01.jpg


I'd jump right to a compound and a cutting pad, even a FIBER cutting pad. If the fiber pads or even the foam cutting pad leaves any micro-marring or pad haze, you can always clean it up with a less aggressive foam pad and product.


Mike,

The final element needed to conduct the mission arrived today.


Be looking forward to a full write up when I get done. I'll be using all I've learned in this thread and more! I'm so exited that the day is getting closer to being able to get this thing knocked out! They drop it off Friday night and then I get up early Saturday and pour my passion into this thing.

Initially I was planning on Just polishing the hood and waxing after the wash, iron decon, and clay process, but now I think I'll get a little practice in and go ahead and do a one step polish on the rest of the car. This way I'm even more ready for my challenge in the middle of the month. Even though I'm donating the detail to her as a gift since her and Uncle Tyler are new parents my goal is to now blow them away.
 
If it were me....

One step and towel. Hand rub and see what happens. From that you can decide how to hit it.

My gut says---white finishing pad at first then move up to a polishing pad.

Reason is that most times, I'm able to get the oxidation down a lot through the washing, decontamination and claying phase.

Have fun and let us know how it went!

Tom
I most definitely will brother!

Sent from my SM-G975U using Autogeekonline mobile app
 
I just spent hours typing up a really nice Show N Shine article all for it to be deleted. I must have hit the wrong button or something. I don't know when I'll have the time to sit down and re write it so here are the results.

It took a fiber cutting pad, 3D One, followed up with a foam heavy compounding pad, BF One Step, a polishing pad, then topped with 3D Cherry wax.


A very special thank you to Mike and all who helped in this endeavor.

One day I'll have that article re written. I didn't want to keep you all waiting any longer.
 
WOW!!! Huge save!

Work to be proud of Jacob:applause:
 
Wow!

I can't believe you saved the paint on this car!


Here's the money shot!


In freaking credible!


Nice work Jacob!


:bowdown:

Mike,

I can't believe it either. It was like magic. I can't even begin to express how greatful I am for yourself, the forum, the products and the pads. This is proof of what you said,

"You never know until you try."

This car was truly a, "Diamond in the rough." As you say in your book. I had a hard time not getting lost in the metallic black.

I totally remember that article each time I detail a vehicle. I even repeat it in my head,

"The power in the after shots is created in the before shots"

That's a great article.


:)
 
Awesome! You dat man now!

Beautiful, beautiful job!

Tom
 
Back
Top