DFB
Well-known member
- Aug 12, 2019
- 5,072
- 3,357
- Thread starter
- #2,541
Ranger Wildtrak Detail 2025
The Wildtrak was last polished and coated in January 2023, the Can Coat EVO performed beyond expectations, easily lasting about 15-months. For a coating “lite” with a 12-month durability claim, and considering the car is parked outdoors 24/7, you really can’t ask for more really. I do wonder if the Capro Essence primer polish played a part in this.
I’ve been meaning to get this project done for months now, actually, more like a year. Last winter and into early spring, I was just too burnt out. I was also holding off on projects until my long service leave started, which flowed into my new cars arrival and following detail series, then a stint in hospital and recovery, then the polishing workshop, then the XR8 detail, then Christmas, then the Wildtrak’s body repairs…………………..all the while continuing to run my own business. Excuses, excuses………………….so, here we are, time to get this vehicle back to shape.
Decontamination & Prep Work -
This project began last week with a partial decontamination via an iron remover and clay treatment. Today, I foamed the car down with Carpro Lift, rinsed, then foamed with KCx Reactivation Shampoo.

Carpro Lift mid-dwell..................

This was my first use of Reactivation Shampoo, which an acidic soap designed to revive ceramic coatings, in particular breaking down and neutralizing mineral content. Obviously, there is no ceramic coating to revive here, but considering the vehicle sits outside in all conditions, the removal of potential mineral content is worthy endeavour. RS will also help strip away the spray sealants and drying aid’s I’ve used to limp the car through until now. This soap is pretty strong, so rather than eyeballing it, I made sure to measure this one out, 50ml in the bucket and 60ml to 940ml in the foam cannon.
Now, those quantities might sound a little anemic, and I've noticed GSF won't foam very well at similar suggested dilutions. But pleasingly, RS foams brilliantly at those numbers while also being exceptionally slick. It does have a rather strange aroma though, much like a bathroom shower cleaner.

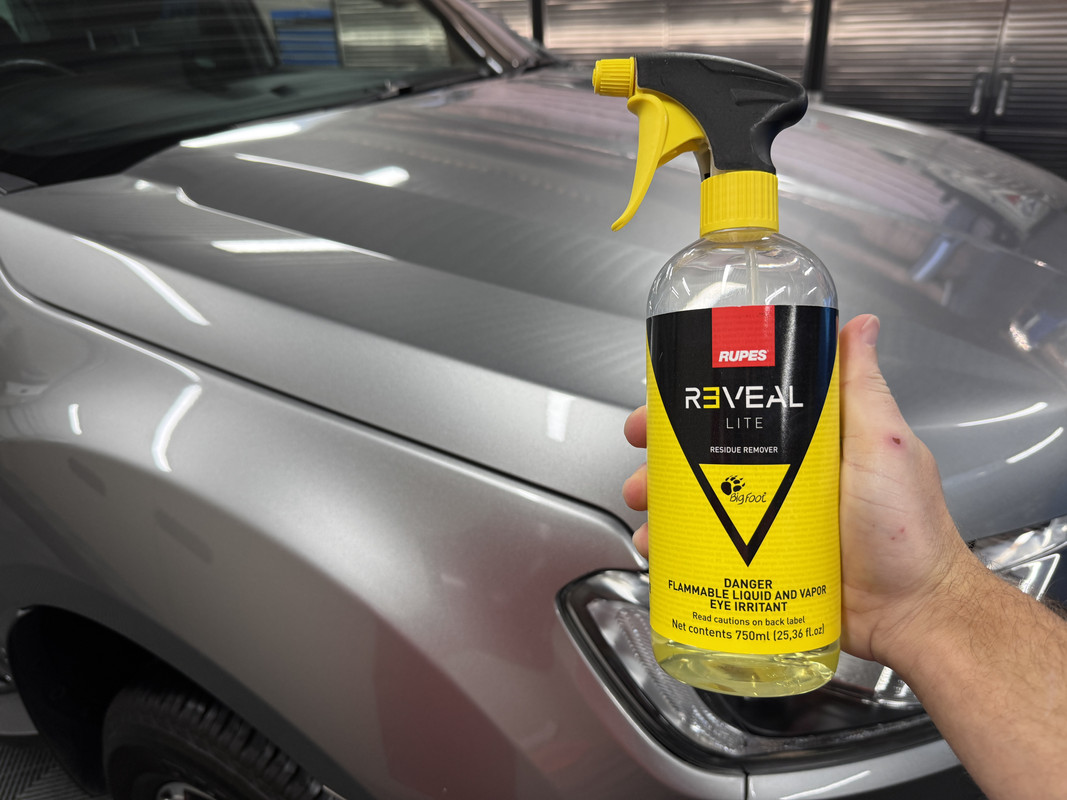
With the car rinsed for the final time, I used the blower to remove as much water as possible, then went around with a large drying towel and Rupes Reveal Lite to finish the decon step. The Reveal also helps evaporate the moisture, especially helpful considering how flat the paint after the strip washing. At this point, the paint was squeaky clean!
The final step was to go around taping up various trims, some of which were treated with Solution Finish earlier this year. You can see I also taped the glass side of the trim while I was at it as I planned to polish the glass too.

Products Used In this Step -
- Gyeon Iron Remover
- Economax Clay Mitt
- Gyeon Clay Lube (Diluted 5:1)
- Carpro Lift (Alkaline)
- Koch Chemie Reactivation Shampoo (Acidic, Diluted 15:1)
- Rupes Reveal Lite
- Carpro Masking Tape
Polishing –
The goal for polishing wasn't for an all-out correction, just a refresh. My father couldn't care less about flawless paint, so I was not about to spend days using multiple steps or even trying various compound and pad combinations. I went straight to the ShineMate blue foam with Carpro Essence. Why? Because Essence does a few things at once, such as being relatively mild, in fact it uses the same abrasives as another favourite of mine, Carpro Reflect. However, Essence also leaves behind a layer of Si02, in effective priming the surface for a coating. That Si02 also has the ability to fill certain defects, which is kinda cheating but considering the goal, I really don't care. And finally, it's stupid easy to work with, doesn't dust and is a dream to wipe off.

A couple of tips when using Essence -
- Like any "all-in-one" type polish, you need to be mindful of what that CAN do to your pads and towels.................
- As you finish with each pad, put it straight into a bucket with water and APC, microfiber detergent or an alkaline soap such as Lift. Don't put them straight into water as you will make things worse.
- With your towels, you can be a little less anal, but be sure to wash them straight after your polishing session. If you can't wash them ASAP, put them into separate bucket of water with APC/detergent/soap and allow them to soak till you can.
- In both cases, you are avoiding the sealant from setting up in the fibres of the towel or foam material, in turn rendering them useless.
- For more cutting performance, run more passes to fully cycle the abrasives.
- For more filling ability, short cycle by spreading rapidly over the section and then completing a single set of passes.
- Essence is said to be best with a light foam finishing pad, and especially good on a microfiber finishing pad. In my case, I know it works well with the intermediate level ShineMate blue foam pad.

You will also see P&S Clarity Creme on the cart, that was teamed with a Rupes Coarse Wool pad on the LHR75 Pneumatic. There weren't really any scratches to deal with, I just wanted to deep clean the glass. Clarity Creme is brilliant at doing this, especially on an aggressive pad like that.
There were a few isolated scratches here and there that needed more than what Essence is capable of doing. For that I used Griot's Fast Correcting Creme on the iBrid Nano. Wow, that stuff is brilliant! Once again, I'm left wondering why that brand has been left on the bench for the Australian market. And yes, the headlights needed polishing AGAIN, so much for the special Opti-Coat headlight coating, which barely lasted 4-months of the supposed 12-month claim.
I also had some company today, no doubt wondering when it was time for walkies. At one point I had the front passenger door open, which obviously meant it was time for walkies and had him attempting to climb in.............sorry for the false hope buddy, maybe tomorrow.

Products Used In This Step -
- Carpro Essence
- Griot's Fast Correcting Creme
- P&S Clarity Creme
- ShineMate Blue Foam (4-inch and 6-inch sizes)
- Rupes DA Coarse Wool (3-inch size)
- Rupes DA Fine Foam (2.5-inch size)
- TRC Creature Edgeless
- Rupes Claw Pad Tool
- Rupes iBrid Nano Long Neck (2-inch backing plate)
- Rupes LHR75 (3-inch backing plate)
- Rupes HLR15 (5-inch backing plate)
After removing all of the tape and a quick wipe over with a damp towel to remove the dust created by Clarity Creme, I covered the car with two microfiber blankets and called it a day. Tomorrow, a more thorough wipe down with Eraser, followed by the coating.
The Wildtrak was last polished and coated in January 2023, the Can Coat EVO performed beyond expectations, easily lasting about 15-months. For a coating “lite” with a 12-month durability claim, and considering the car is parked outdoors 24/7, you really can’t ask for more really. I do wonder if the Capro Essence primer polish played a part in this.
I’ve been meaning to get this project done for months now, actually, more like a year. Last winter and into early spring, I was just too burnt out. I was also holding off on projects until my long service leave started, which flowed into my new cars arrival and following detail series, then a stint in hospital and recovery, then the polishing workshop, then the XR8 detail, then Christmas, then the Wildtrak’s body repairs…………………..all the while continuing to run my own business. Excuses, excuses………………….so, here we are, time to get this vehicle back to shape.
Decontamination & Prep Work -
This project began last week with a partial decontamination via an iron remover and clay treatment. Today, I foamed the car down with Carpro Lift, rinsed, then foamed with KCx Reactivation Shampoo.
Carpro Lift mid-dwell..................
This was my first use of Reactivation Shampoo, which an acidic soap designed to revive ceramic coatings, in particular breaking down and neutralizing mineral content. Obviously, there is no ceramic coating to revive here, but considering the vehicle sits outside in all conditions, the removal of potential mineral content is worthy endeavour. RS will also help strip away the spray sealants and drying aid’s I’ve used to limp the car through until now. This soap is pretty strong, so rather than eyeballing it, I made sure to measure this one out, 50ml in the bucket and 60ml to 940ml in the foam cannon.
Now, those quantities might sound a little anemic, and I've noticed GSF won't foam very well at similar suggested dilutions. But pleasingly, RS foams brilliantly at those numbers while also being exceptionally slick. It does have a rather strange aroma though, much like a bathroom shower cleaner.
With the car rinsed for the final time, I used the blower to remove as much water as possible, then went around with a large drying towel and Rupes Reveal Lite to finish the decon step. The Reveal also helps evaporate the moisture, especially helpful considering how flat the paint after the strip washing. At this point, the paint was squeaky clean!
The final step was to go around taping up various trims, some of which were treated with Solution Finish earlier this year. You can see I also taped the glass side of the trim while I was at it as I planned to polish the glass too.
Products Used In this Step -
- Gyeon Iron Remover
- Economax Clay Mitt
- Gyeon Clay Lube (Diluted 5:1)
- Carpro Lift (Alkaline)
- Koch Chemie Reactivation Shampoo (Acidic, Diluted 15:1)
- Rupes Reveal Lite
- Carpro Masking Tape
Polishing –
The goal for polishing wasn't for an all-out correction, just a refresh. My father couldn't care less about flawless paint, so I was not about to spend days using multiple steps or even trying various compound and pad combinations. I went straight to the ShineMate blue foam with Carpro Essence. Why? Because Essence does a few things at once, such as being relatively mild, in fact it uses the same abrasives as another favourite of mine, Carpro Reflect. However, Essence also leaves behind a layer of Si02, in effective priming the surface for a coating. That Si02 also has the ability to fill certain defects, which is kinda cheating but considering the goal, I really don't care. And finally, it's stupid easy to work with, doesn't dust and is a dream to wipe off.
A couple of tips when using Essence -
- Like any "all-in-one" type polish, you need to be mindful of what that CAN do to your pads and towels.................
- As you finish with each pad, put it straight into a bucket with water and APC, microfiber detergent or an alkaline soap such as Lift. Don't put them straight into water as you will make things worse.
- With your towels, you can be a little less anal, but be sure to wash them straight after your polishing session. If you can't wash them ASAP, put them into separate bucket of water with APC/detergent/soap and allow them to soak till you can.
- In both cases, you are avoiding the sealant from setting up in the fibres of the towel or foam material, in turn rendering them useless.
- For more cutting performance, run more passes to fully cycle the abrasives.
- For more filling ability, short cycle by spreading rapidly over the section and then completing a single set of passes.
- Essence is said to be best with a light foam finishing pad, and especially good on a microfiber finishing pad. In my case, I know it works well with the intermediate level ShineMate blue foam pad.
You will also see P&S Clarity Creme on the cart, that was teamed with a Rupes Coarse Wool pad on the LHR75 Pneumatic. There weren't really any scratches to deal with, I just wanted to deep clean the glass. Clarity Creme is brilliant at doing this, especially on an aggressive pad like that.
There were a few isolated scratches here and there that needed more than what Essence is capable of doing. For that I used Griot's Fast Correcting Creme on the iBrid Nano. Wow, that stuff is brilliant! Once again, I'm left wondering why that brand has been left on the bench for the Australian market. And yes, the headlights needed polishing AGAIN, so much for the special Opti-Coat headlight coating, which barely lasted 4-months of the supposed 12-month claim.
I also had some company today, no doubt wondering when it was time for walkies. At one point I had the front passenger door open, which obviously meant it was time for walkies and had him attempting to climb in.............sorry for the false hope buddy, maybe tomorrow.
Products Used In This Step -
- Carpro Essence
- Griot's Fast Correcting Creme
- P&S Clarity Creme
- ShineMate Blue Foam (4-inch and 6-inch sizes)
- Rupes DA Coarse Wool (3-inch size)
- Rupes DA Fine Foam (2.5-inch size)
- TRC Creature Edgeless
- Rupes Claw Pad Tool
- Rupes iBrid Nano Long Neck (2-inch backing plate)
- Rupes LHR75 (3-inch backing plate)
- Rupes HLR15 (5-inch backing plate)
After removing all of the tape and a quick wipe over with a damp towel to remove the dust created by Clarity Creme, I covered the car with two microfiber blankets and called it a day. Tomorrow, a more thorough wipe down with Eraser, followed by the coating.


")