Jeweling is a term that Todd Helme coined awhile ago.
Actually, Todd Helme states he did not coin the term. See
post #5
Todd Helme DID make the term popular.
I'm very good at giving due credit where credit is due. If fact in my how-to book, both the first and second edition I give you credit for the KBM.
In his words and from what I recall...
He wanted to define ultra-fine polishing with a specific term so he could gauge how long it would be before other guys started to use it.
Obviously, it didn't take long to catch on.
What I wrote in
post #15 is that
Todd made the term popular in the forum world, due credit where credit is due...
For guys like us, it's the same as final polishing to the finest degree.
I've always just called it
finish polishing but jewelling is good too...
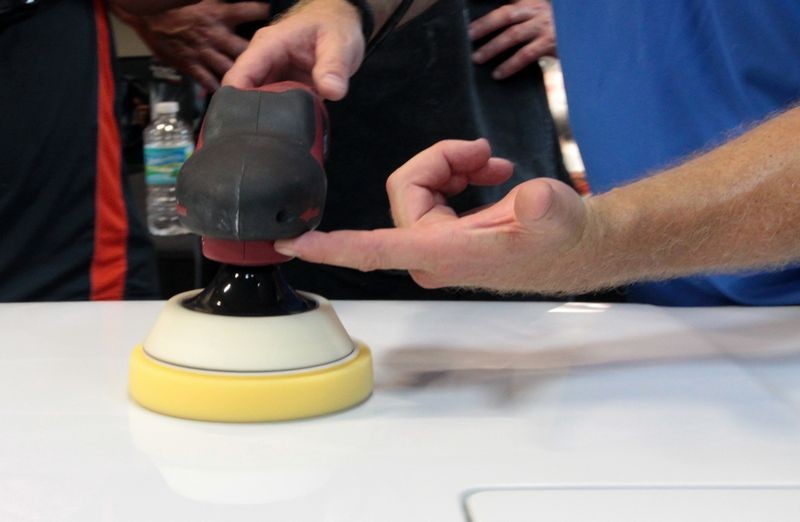
Jeweling with my rotary is always done with slooowwwweeeerrrr speeds than my correction/cutting steps.
I'm going to now try that with negative pressure using Mike's finger technique.
You want to use a soft touch....
Less than the weight of the machine
This is showing that we're actually using a little bit less than the weight of the machine for the last few passes for this section.
I always used the weight of the machine as the lightest pressure applied. I can now lift slightly and still let the ultra fine pad and product work continue to work a little more gloss.
If you pay attention, you'll see that as your jewelling pad becomes wet with product it will collapse because it loses its rigidity... you need to switch to a clean, dry jewelling pad when this happens or you will HAVE to use the weight of the machine.
I always say...
Polishing paint is an art form not a grinding process. It requires the human elements of care and passion for the task at hand it's not simply a step 1, step 2, step 3 process.
That is in the context of
taking a car's paint to it's maximum potential.
Hmmm...you jeweled with the new product from Menzerna...is that the one that is a secret??
Yes. I love this product. It's probably not what most of you would consider a true jewelling polish but what I saw with my eyes was as I worked the product over the paint the paint become so crystal clear and wet looking and to me this is the goal of jewelling.
Or did I miss an announcement??
I don't think it's been announced yet on this forum at least.
Thank you for the information Mike.
Always a pleasure... here's something I wrote to put jewelling in context of the big picture for those that might not have a lot of multiple-step complete buff-outs under their belt....
The jewelling step is done after machine polishing, it's an EXTRA step. If a person is doing great work to start with, then after the first machine polishing step the paint should already look pretty damn good.
Jewelling is to "try" to squeeze just a little more gloss and shine out of already great results. THEREFORE you won't see any dramatic before and after shots, the differences will be subtle. IF the differences are dramatic that means the person doesn't know what they're doing in the first place.
Most pro detailers I know that would do a multiple-step process to a car's finish would do this,
- Wash or wipe the car clean - You cannot inspect dirty paint
- Inspect the paint visually and tactically
- If above surface bonded contaminants are discovered, REMOVE THEM FIRST before machine polishing - Get them off the surface
- IF the paint has below surface defects, then do a TEST SPOT, determine what is needed to remove the defects using the least aggressive products and approach so that you remove the defects while leaving the most paint on the car. That's professionalism at its core.
IF, and those are two capital letters, IF the paint needs compounding, then compound it. If not then use a less aggressive polish like a Medium Cut Polish or a Fine Cut Polish, whatever it takes to get the job done. Categories of products are defined on page 79 of my how-to book.
- Normal Process - Compound & Polish: If the paint was compounded, then AFTER the paint is compound a Pro would then machine polish to remove any haze or swirls left by the machine compounding step. AT THIS POINT, assuming the Pro knows what they are doing and are using good pads, good products and good technique, the paint should look pretty damn good, even GREAT.
- Jewelling - A THIRD Machine Step: AS AN OPTION, a Pro or an enthusiast could jewel the paint. A Pro would only do it if they were being paid for their time because it means re-buffing the entire car or the major gloss panels. Time is money. A pro might do this to build their reputation or maintain their reputation but again, time is money.
- An enthusiast on the other hand working on their own car has all the time in the world and can work on their own car for free. That said, after compounding and polishing, or if you only have to "polish" the paint, after either approach the paint should already look pretty damn good. Thus... no dramatic before and after.
Make sense? Jewelling is the third machine polishing step. This means a LOT of time overall and the jewelling step can't be rushed so imagine after machine compounding and machine polishing, taking the time to machine polish a third time.
And for this third time you have to WORK CLEAN. That means you need to have thoroughly wiped off any previous residues off the surface AND out of all the edges, cracks and crevices so there's no potential for these built-up residues to be pulled into the jewelling step while buffing. This takes even more time.
It's really hard to capture subtle differences at this level, at this degree of perfection with a camera. Heck it's hard to see it with the naked eye in person.
My guess is for the majority of people, the idea of jeweling the paint on their own cars or for a customers car is completely hypothetical because in practice we're talking about adding an extra 2, 3, even 4 hours to an already long job.
In the video below,
- I sanded the car twice.
- I compounded the car once with a rotary buffer.
- I machine polished the car once with a rotary buffer.
- I machine polished a second time with a dual action polisher.
- I machine applied the wax.
In-between each step I carefully wiped off all residues so they would not contaminate the next step. (Working Clean)
I did this job in about 12 hours and I would never recommend to anyone to try to do this type of work this fast.
How to wet sand a car
[video=youtube_share;5zDuFzvKSAI"]How to wet sand a car[/video]
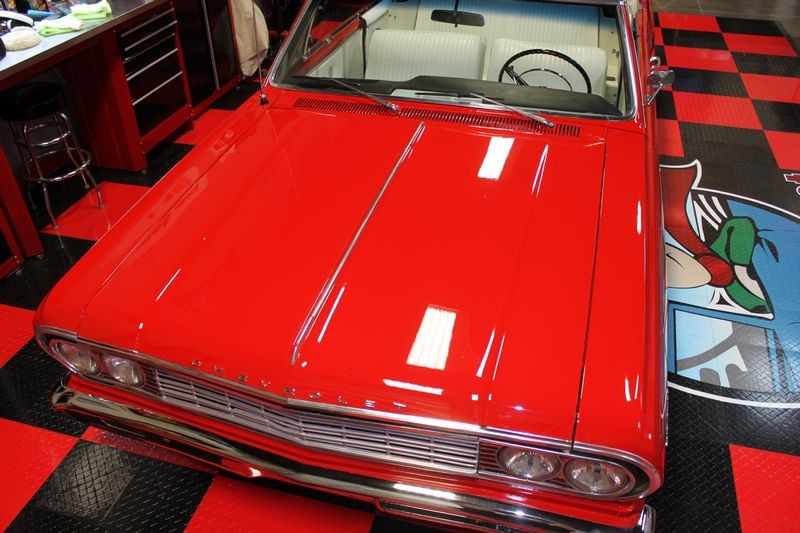
To ensure a hologram free finish forever for my third polishing step I switched over to a DA Polisher. This could also be considered a jewelling step as I used a soft foam finishing pad, perfect technique and a fine cut polish.
The results matched the work performed....
In the garage....
In full sun...
More pictures here....
How to wet sand a car - Time Lapse Video
Jewelling, Finish Polishing, Final Polishing, etc. the big picture is to work clean, use your best technique, use a fine cut to ultra fine cut polish and a soft foam pad.
Then pour your heart into it....
")

 rops:
rops: