Wills.WindowsAndWheels
New member
- Oct 31, 2009
- 1,682
- 0
Ok time for my second write up in a week. You guys have been keeping me busy!
This time around we tackled an 07' Charger...Lime color...nick named "Dodge-Zilla"!
Here is a little history on Dodge-Zilla. Scott (the owner), like most owners of sweet cars, is pretty crazy about the appearance of his ride. When he first contacted me he said the sides all looked nice and glossy, but the roof didn't have the mirror finish and that it felt rough.
Well to me, right away that spelled 'bonded contaminants'. He later went on to tell me that it was basically a garage queen and everytime he took it out, as soon as he got home he'd hit it with *gasp* The Duster! Noooo Scott no! Yes it was true...a duster along with QD was what he had been using over the years to keep it clean...no washing.
So everybody, say hello to Dodge-Zilla:

So after talking to him about how we'd go about getting it to ALL look like glass again, I explained that after washing that a clay bar would be needed to remove all of the bonded contaminants since dusting and quick detail sprays don't take car of all the lovely fall out, tree sap and all the other goodies that land and end up on our cars. We also told him about Optimum No Rinse since he lives in pretty tight quarters and doing an all out wash isn't exactly easy (thus the reason for the duster and quick detail sprays).
So we got there, looked it over...the sun was still behind his building when we first arrived, but i could see with our swirl light that it definitely needed a polish out badly. So, we got to work. First washing it down with ONR. Wasn't really dirty to be honest, just light dust. The real bad stuff was afterwards when we had to break out the clay.
You see, the roof, it felt like sandpaper, seriously. The sides you could feel SOME, but nothing more than what you'd typically feel. The hood and trunk were also in pretty bad shape. So while i worked away with the clay using ONR as my lube spray, my sister worked on cleaning up the rims and tires.
After the claying was complete, the sun finally came up over the building...and out here its STILL freakin' hot (was about 90 that day) so of course we had to get it back in the garage asap (and boy was it TIGHT in there!) because working on paint in the sun is, as we all know....a 'no no'.
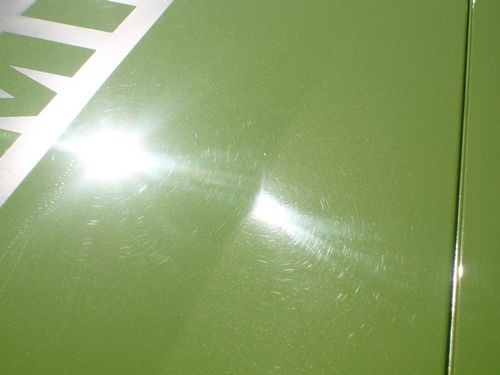
But while it was still out in the sun, i got a few good swirl pictures to show the true condition of the paint. Take a look:

The roof swirls weren't horrible. Probably was impossible to scratch the paint much more since it had a good layer of contaminants protecting it lol.
The HOOD however was not so forgiving:

A little closer...

The Quarter Panel

The OTHER quarter panel:

Ah yes, thats what we were looking for. Dodge-Zilla was beat up pretty badly by the Duster, but its ok...we came to the rescue *que super hero music*
So we broke out our gear. Flex 3401, Griots, some 5" Meguiars Microfiber pads and some D300 compound. Primed the pads up and tried out a test spot.
Test spot, as always so far with the D300 (knock on wood) showed excellent correction. We had to of course be careful along the vinyl decals since you don't want to get compound on them or under the edges.
So we went to work buffing away. Scott came out after a little over an hour or so and was surprised to see we were not quite half way done. You see he'd never had any paint correction done so this was new to him. He was impressed with what he saw already to say the least...loved that the paint felt smooth again rather than gritty. He complimented us on what he saw so far and then went back inside.
A few minutes later we look up just in time for icture:...yeah he snuck back down and snapped a picture of us in the middle of buffing the paint lol. Needless to say he was pretty amped up about how the car was turning out...which in all honesty makes us that much more joyous to be doing it.
Now here's the thing, we were in a condo complex...narrow streets with 2 story buildings around us...and the sun goes from east to west pretty fast now, so we didn't have a lot of time for full sun pictures, but we did manage to grab a few after turning the car around to get the back half into the shade so we could buff it out (yes the garage was pretty tight like i said, one half of the car at a time lol)
So here we are in the sun. Remember, we took THIS:
and made it into THIS:

Oh yeah baby, its lime time!
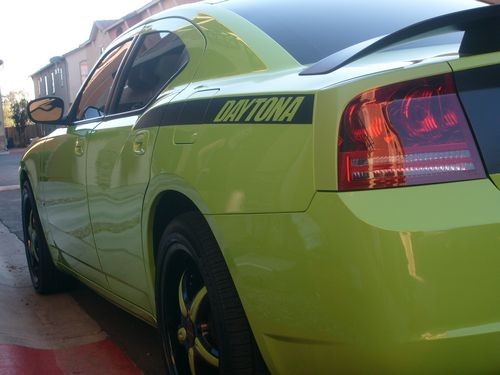
Also grabbed a shot of the quarter panel in the sun too:

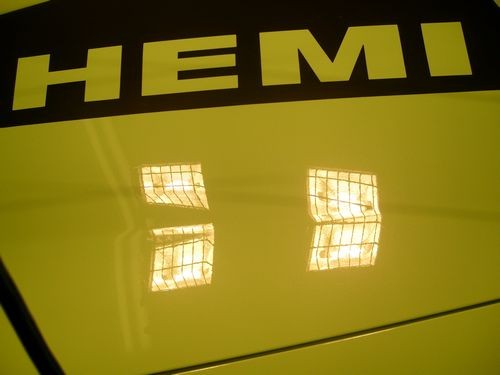
Its got a Hemi (LOVED the sound of this car).
And the roof looked sweet as well:

Note these were taking JUST after compounding with Megs D300. We hadn't even applied the finishing wax yet (D301).
We continued working on the back half, getting it up to par with the front. By the time we finished of course the sun was well behind the west buildings so no further sun shots were possible. BUT, thats why God gave us halogens!
Here we go:

Yes, it felt as slick as it looks!
It was still Dodge-Zilla but minus the scaly feeling paint!
Here is another angle of the same panel:

Pretty...
Also a couple of halogen shots of the hood:

Yes sir, its back on track now.
This picture i managed to grab when the sun was just barely peeking between a couple buildings...it came through just perfectly onto the roof:

Sorry but, is that cool or is that cool?
We applied D301 finishing wax and carefully removed it...then fired it up, backed it out of the garage and pulled in onto the street. When i got out of the car Scott was on the balcony looking down asking "Is it ok for me to come and see it now!" Of course i told him to come on down and take a look...but from what he said, the view of it up on the balcony was just as nice :dblthumb2:
So after the three of us circled the car a few times i went ahead and snapped a few beauty shots...cause you know, i gotta do the beauty shots. A few sweet reflection shots too of courserops:
So here you are folks:

Its pretty good when the paint on the trunk reflects just as well as the rear windshield!
This was a nice hood reflection shot. I love how the reflection just kind of rolls over the curves of the hood (you can see it even better in the video at the end of the post)

A close up reflection shot....lookin' all liquid:

Here is one of the hood shots i got in the sun earlier...but i wanted to save it till now just because its so cool

Its mean and green

The other side:

And of course a shot from the back:
Scott told us he's taking it to a show on Saturday. He said usually his friends with the $20k paint jobs win, but hey...lets see if the Lime can pull one out with its beautifully polished paint.
So, there you have it...Dodge-Zilla resurrected!
One last shot...Dodge-Zilla ready to come out of its cave:

Hope you all enjoyed the write up. And good luck to Scott tomorrow at the show!
For those of you who want to really see the transition of before to after, check out the video:
[video=youtube_share;nnAMQVBZo1g"]Windows and Wheels Details 07' Lime Charger - YouTube[/video]
This time around we tackled an 07' Charger...Lime color...nick named "Dodge-Zilla"!
Here is a little history on Dodge-Zilla. Scott (the owner), like most owners of sweet cars, is pretty crazy about the appearance of his ride. When he first contacted me he said the sides all looked nice and glossy, but the roof didn't have the mirror finish and that it felt rough.
Well to me, right away that spelled 'bonded contaminants'. He later went on to tell me that it was basically a garage queen and everytime he took it out, as soon as he got home he'd hit it with *gasp* The Duster! Noooo Scott no! Yes it was true...a duster along with QD was what he had been using over the years to keep it clean...no washing.
So everybody, say hello to Dodge-Zilla:
So after talking to him about how we'd go about getting it to ALL look like glass again, I explained that after washing that a clay bar would be needed to remove all of the bonded contaminants since dusting and quick detail sprays don't take car of all the lovely fall out, tree sap and all the other goodies that land and end up on our cars. We also told him about Optimum No Rinse since he lives in pretty tight quarters and doing an all out wash isn't exactly easy (thus the reason for the duster and quick detail sprays).
So we got there, looked it over...the sun was still behind his building when we first arrived, but i could see with our swirl light that it definitely needed a polish out badly. So, we got to work. First washing it down with ONR. Wasn't really dirty to be honest, just light dust. The real bad stuff was afterwards when we had to break out the clay.
You see, the roof, it felt like sandpaper, seriously. The sides you could feel SOME, but nothing more than what you'd typically feel. The hood and trunk were also in pretty bad shape. So while i worked away with the clay using ONR as my lube spray, my sister worked on cleaning up the rims and tires.
After the claying was complete, the sun finally came up over the building...and out here its STILL freakin' hot (was about 90 that day) so of course we had to get it back in the garage asap (and boy was it TIGHT in there!) because working on paint in the sun is, as we all know....a 'no no'.
But while it was still out in the sun, i got a few good swirl pictures to show the true condition of the paint. Take a look:
The roof swirls weren't horrible. Probably was impossible to scratch the paint much more since it had a good layer of contaminants protecting it lol.
The HOOD however was not so forgiving:
A little closer...
The Quarter Panel
The OTHER quarter panel:
Ah yes, thats what we were looking for. Dodge-Zilla was beat up pretty badly by the Duster, but its ok...we came to the rescue *que super hero music*
So we broke out our gear. Flex 3401, Griots, some 5" Meguiars Microfiber pads and some D300 compound. Primed the pads up and tried out a test spot.
Test spot, as always so far with the D300 (knock on wood) showed excellent correction. We had to of course be careful along the vinyl decals since you don't want to get compound on them or under the edges.
So we went to work buffing away. Scott came out after a little over an hour or so and was surprised to see we were not quite half way done. You see he'd never had any paint correction done so this was new to him. He was impressed with what he saw already to say the least...loved that the paint felt smooth again rather than gritty. He complimented us on what he saw so far and then went back inside.
A few minutes later we look up just in time for
icture:...yeah he snuck back down and snapped a picture of us in the middle of buffing the paint lol. Needless to say he was pretty amped up about how the car was turning out...which in all honesty makes us that much more joyous to be doing it.Now here's the thing, we were in a condo complex...narrow streets with 2 story buildings around us...and the sun goes from east to west pretty fast now, so we didn't have a lot of time for full sun pictures, but we did manage to grab a few after turning the car around to get the back half into the shade so we could buff it out (yes the garage was pretty tight like i said, one half of the car at a time lol)
So here we are in the sun. Remember, we took THIS:
and made it into THIS:
Oh yeah baby, its lime time!
Also grabbed a shot of the quarter panel in the sun too:
Its got a Hemi (LOVED the sound of this car).
And the roof looked sweet as well:
Note these were taking JUST after compounding with Megs D300. We hadn't even applied the finishing wax yet (D301).
We continued working on the back half, getting it up to par with the front. By the time we finished of course the sun was well behind the west buildings so no further sun shots were possible. BUT, thats why God gave us halogens!
Here we go:
Yes, it felt as slick as it looks!
It was still Dodge-Zilla but minus the scaly feeling paint!
Here is another angle of the same panel:
Pretty...
Also a couple of halogen shots of the hood:
Yes sir, its back on track now.
This picture i managed to grab when the sun was just barely peeking between a couple buildings...it came through just perfectly onto the roof:
Sorry but, is that cool or is that cool?
We applied D301 finishing wax and carefully removed it...then fired it up, backed it out of the garage and pulled in onto the street. When i got out of the car Scott was on the balcony looking down asking "Is it ok for me to come and see it now!" Of course i told him to come on down and take a look...but from what he said, the view of it up on the balcony was just as nice :dblthumb2:
So after the three of us circled the car a few times i went ahead and snapped a few beauty shots...cause you know, i gotta do the beauty shots. A few sweet reflection shots too of course
rops:So here you are folks:
Its pretty good when the paint on the trunk reflects just as well as the rear windshield!
This was a nice hood reflection shot. I love how the reflection just kind of rolls over the curves of the hood (you can see it even better in the video at the end of the post)
A close up reflection shot....lookin' all liquid:
Here is one of the hood shots i got in the sun earlier...but i wanted to save it till now just because its so cool
Its mean and green
The other side:
And of course a shot from the back:
Scott told us he's taking it to a show on Saturday. He said usually his friends with the $20k paint jobs win, but hey...lets see if the Lime can pull one out with its beautifully polished paint.
So, there you have it...Dodge-Zilla resurrected!
One last shot...Dodge-Zilla ready to come out of its cave:
Hope you all enjoyed the write up. And good luck to Scott tomorrow at the show!
For those of you who want to really see the transition of before to after, check out the video:
[video=youtube_share;nnAMQVBZo1g"]Windows and Wheels Details 07' Lime Charger - YouTube[/video]
") ?
?