jlb85
New member
- Mar 31, 2008
- 734
- 0
2006 Audi A8-L Brilliant Black Multi-Step + 1992 Porsche 911 Vert Amazon Green - by AutoLavish
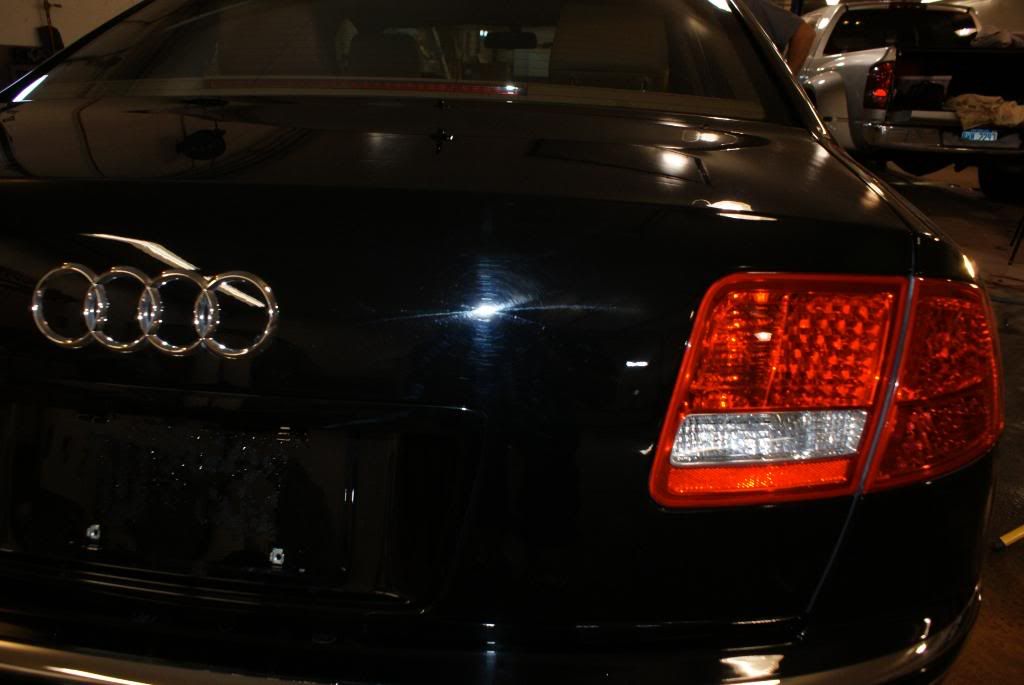
This gorgeous A8L was purchased recently with only 10k miles on the odometer. Before the sale, the vehicle was cleaned pretty good. The interior was immaculate. The new owner contacted us to perfect it, and make the exterior look as good as the rest of the car. He knew it had some swirls, and wanted it to be perfect. We expected a 2 step polish.
Let me assure you, this is a BIG car. Looks are deceiving. The doors are about 4 feet wide, all 4. The trunk is as big as many hoods. The roof is wide enough to have to struggle to reach the middle. But oh what a feeling working on it. It feels like quality. More than the typical Audi. We have worked on many, and I have a B6 A4. But the give (or lack thereof) of the panels as you press against them, the silkiness of the paint, the muted solidity of the car made it a pleasure to work on. Not that we don't enjoy all cars we work on, but this one felt special. Kinda weird. I have always wanted an A8L in black (you know, when I grow up), so this was bliss.
In the cold of winter, we usually ask clients to bring the car to my place to be able to work around the weather. My garage is insured, and set up for detailing year round. However, the owner lives 2.5 hours away. But he mentioned he had a place we could work out of, heated and spacious, well lit and comfortable. We agreed on making the trip out to Grand Rapids in early January, as soon as we got back from our trip to Puerto Rico (yep, hot and humid one day to extreme cold the next). The morning was about 15 degrees out.
Upon arrival, the new owner had already washed and clayed the vehicle. After a quick inspection, we called it good and went straight to taping and masking.

We started to unpack our supplies from TDR and set up wires, hoses, and lighting. Luckily, the shop had decent lighting...
Using the single halogen was enough to see these easily:


using just the camera flash:


We had our work cut out for us! But this is going to look awesome once polished!

The vehicle had been washed and clayed prior to our arrival, so we proceeded straight to masking.


We split up the door into a few sections and started testing various polishing combinations...


50/50 with one pass of M205 on a Meg's Black pad via Makita Rotary:

50/50 with one pass if Menzerna Intensive Polish on a Megs Black pad:

50/50 with Menzerna IP on Green LC Constant Pressure pad:


OMG could this paint get even blacker?

The paint was extremely soft. We needed something that would correct pretty good but not leave much pad trails. The idea was to use a medium polish on a softer pad, then refine with a finishing polish on the PC. Menzerna IP was chosen since it finished down well enough to be able to refine with FF106 and the PC. It would take a few passes of IP/green, but we preferred to take a little extra time here to make things quicker in the end.
Working it:

After first stage of compounding:


Some areas were very bad, and required some extra work as evidenced by the severe buffer trails...

Looking better after some refining...

More IP on the other side:

We were able to correct most of the RIDS and 100% of the swirls for an overall 95% correction. The RIDS the vehicle had were very deep, with the passenger side worse than the drivers side.
After compounding, Marc finessed the finish with Menzerna Final Finish on a Yellow 3M Germany pad on the Porter Cable 7424 DA, which took care of any buffer trails.
This gorgeous A8L was purchased recently with only 10k miles on the odometer. Before the sale, the vehicle was cleaned pretty good. The interior was immaculate. The new owner contacted us to perfect it, and make the exterior look as good as the rest of the car. He knew it had some swirls, and wanted it to be perfect. We expected a 2 step polish.
Let me assure you, this is a BIG car. Looks are deceiving. The doors are about 4 feet wide, all 4. The trunk is as big as many hoods. The roof is wide enough to have to struggle to reach the middle. But oh what a feeling working on it. It feels like quality. More than the typical Audi. We have worked on many, and I have a B6 A4. But the give (or lack thereof) of the panels as you press against them, the silkiness of the paint, the muted solidity of the car made it a pleasure to work on. Not that we don't enjoy all cars we work on, but this one felt special. Kinda weird. I have always wanted an A8L in black (you know, when I grow up), so this was bliss.
In the cold of winter, we usually ask clients to bring the car to my place to be able to work around the weather. My garage is insured, and set up for detailing year round. However, the owner lives 2.5 hours away. But he mentioned he had a place we could work out of, heated and spacious, well lit and comfortable. We agreed on making the trip out to Grand Rapids in early January, as soon as we got back from our trip to Puerto Rico (yep, hot and humid one day to extreme cold the next). The morning was about 15 degrees out.
Upon arrival, the new owner had already washed and clayed the vehicle. After a quick inspection, we called it good and went straight to taping and masking.
We started to unpack our supplies from TDR and set up wires, hoses, and lighting. Luckily, the shop had decent lighting...
Using the single halogen was enough to see these easily:
using just the camera flash:
We had our work cut out for us! But this is going to look awesome once polished!
The vehicle had been washed and clayed prior to our arrival, so we proceeded straight to masking.
We split up the door into a few sections and started testing various polishing combinations...
50/50 with one pass of M205 on a Meg's Black pad via Makita Rotary:
50/50 with one pass if Menzerna Intensive Polish on a Megs Black pad:
50/50 with Menzerna IP on Green LC Constant Pressure pad:
OMG could this paint get even blacker?
The paint was extremely soft. We needed something that would correct pretty good but not leave much pad trails. The idea was to use a medium polish on a softer pad, then refine with a finishing polish on the PC. Menzerna IP was chosen since it finished down well enough to be able to refine with FF106 and the PC. It would take a few passes of IP/green, but we preferred to take a little extra time here to make things quicker in the end.
Working it:
After first stage of compounding:
Some areas were very bad, and required some extra work as evidenced by the severe buffer trails...
Looking better after some refining...
More IP on the other side:
We were able to correct most of the RIDS and 100% of the swirls for an overall 95% correction. The RIDS the vehicle had were very deep, with the passenger side worse than the drivers side.
After compounding, Marc finessed the finish with Menzerna Final Finish on a Yellow 3M Germany pad on the Porter Cable 7424 DA, which took care of any buffer trails.


")