Navigation
Install the app
How to install the app on iOS
Follow along with the video below to see how to install our site as a web app on your home screen.
Note: This feature may not be available in some browsers.
More options
Style variation
You are using an out of date browser. It may not display this or other websites correctly.
You should upgrade or use an alternative browser.
You should upgrade or use an alternative browser.
DFB's Garage
- Thread starter DFB
- Start date
DFB
Well-known member
- Aug 12, 2019
- 5,000
- 3,198
- Thread starter
- #2,202
Some parts arrived for the Victa 18 today.
After getting my mowing run done, I was going to save rebuilding the carb for tomorrow, well, I couldn't resist.................
Over the last week, I couldn't begin to tally the number of hours I have been online reading and researching these early Victa's. For the most part, it's been to track down parts, but also to figure out how these things work. I've quickly determined that Victa were making so many of these things that often parts would be superseded without notice. Also consider how old these things are, the possibility of parts being replaced as needed without staying with original style parts is a high possibility. This especially applies to the air inlet tubing, filter and choke arrangement, more on that later. Having said all that, mine appears to be pretty faithful to how it left the factory.
I've also been seeking out workshop manuals, which I've found very useful in regard to the carburetor, I've never rebuilt one like this before.

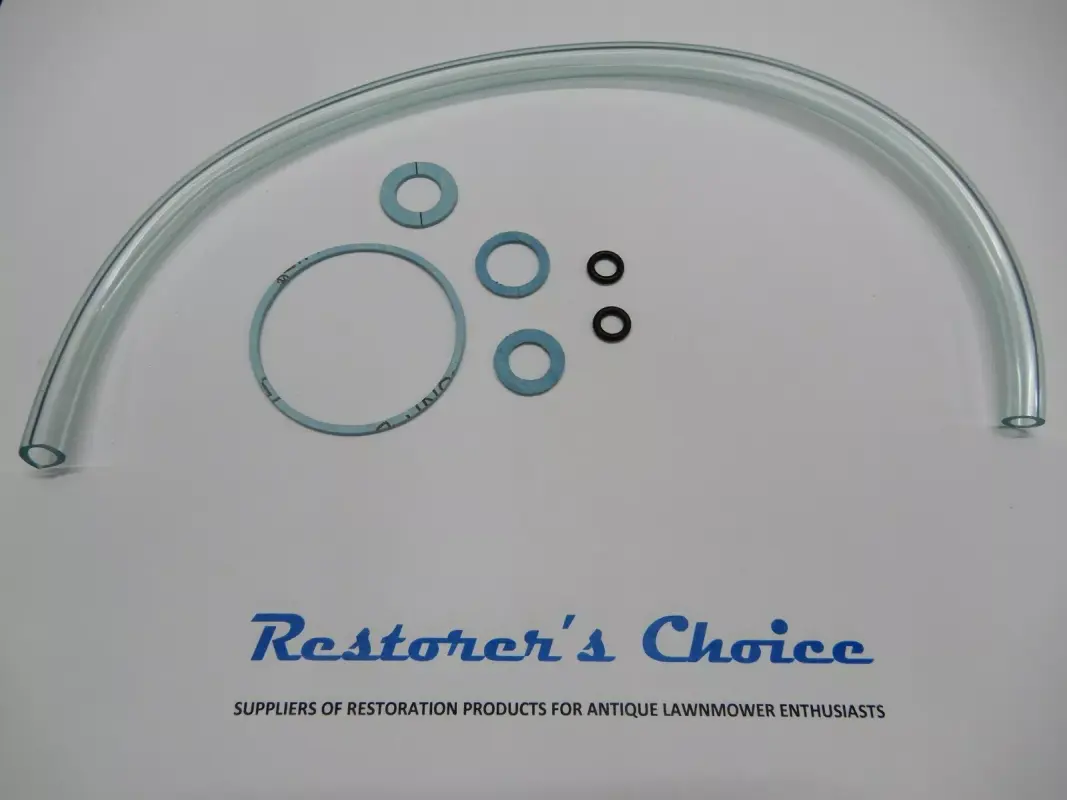
To my surprise and delight, replacement gaskets are available for these Victa 3F carburetors. Several kits are available depending on what version of the carb you have, again there were changes along the way. Once you know which carb kit you need, you then chose which material you want to go with.
The standard 0.8mm orange/red fibre gaskets are the OEM spec, which are desirable for those restoring a machine to factory original.
https://www.ebay.com.au/itm/3535543...xhx58VYfgVF0lFhn11n5MgRFnP|tkp:Bk9SR8ywl82RZQ
The kit I chose has the 1.0mm blue fibre gaskets, which were designed to be softer and provide superior sealing on machines with wear or those that are still in regular use.
https://www.ebay.com.au/itm/3527548...FNOu0ixabDjYUqG8iMdoE+xwE=|tkp:Bk9SR6T7zM2RZQ
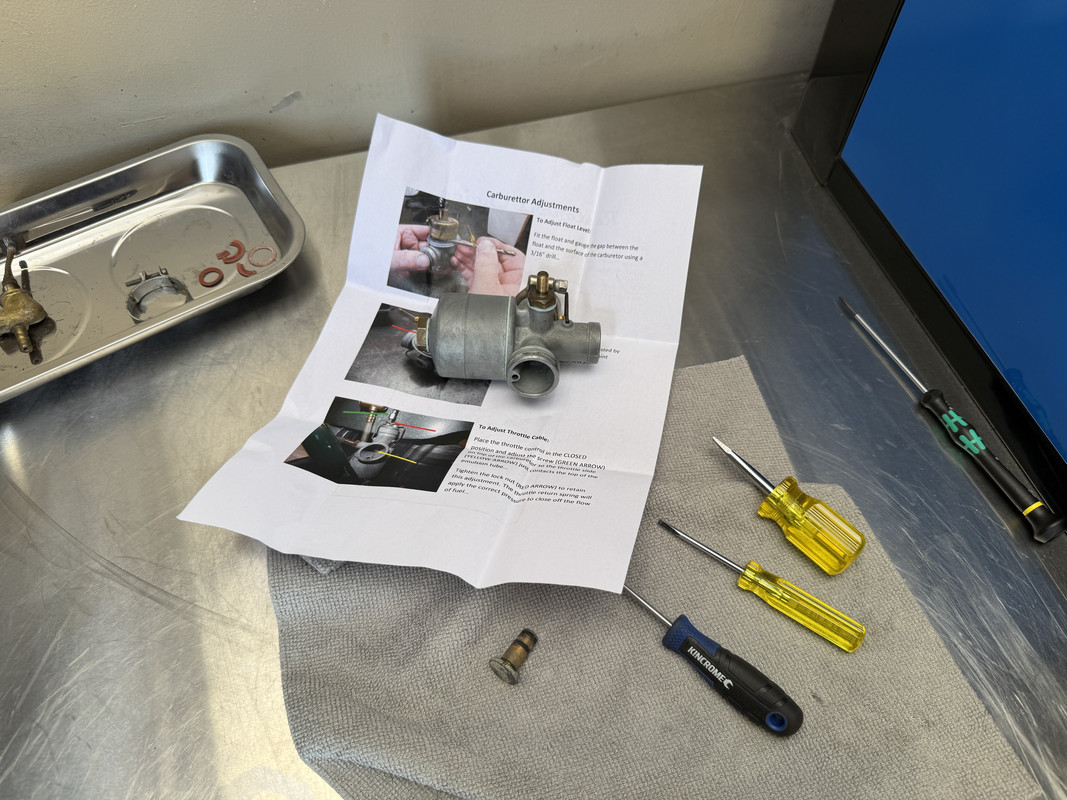
With the carb fully disassembled and cleaned, putting it back together was far less daunting than I was expecting. Helping the situation, the seller of the kit includes an instruction sheet. In my case, I didn't need to make an adjustment to the float level, which must be set at 3/16" (4.78mm) between the top of the float and the carb body. If an adjustment was needed, you'd gently bend the float lever to achieve the desired gap.
Being such fiddly work, I didn't take many images. This one displays the carb put back together, save for the throttle spring and top cap, which will be done once the carb is back on the machine and the cable reinstalled.
Next, the fuel tap. The carb kit includes two replacement o-rings for the inner slide, the originals were hard as a rock.

New o-rings installed, the slide was then reinserted into the brass body, followed by the holding screw. Initially, the new o-rings make the movement very tight, but with a bit of working, they free up and begin to function properly.

After rinsing out the tank with carb spray, I then reinstalled the tap, which are a tapered thread and go in very tight. Some fuel in the tank verified no leaks from the fitting or past the o-rings. Sucess!
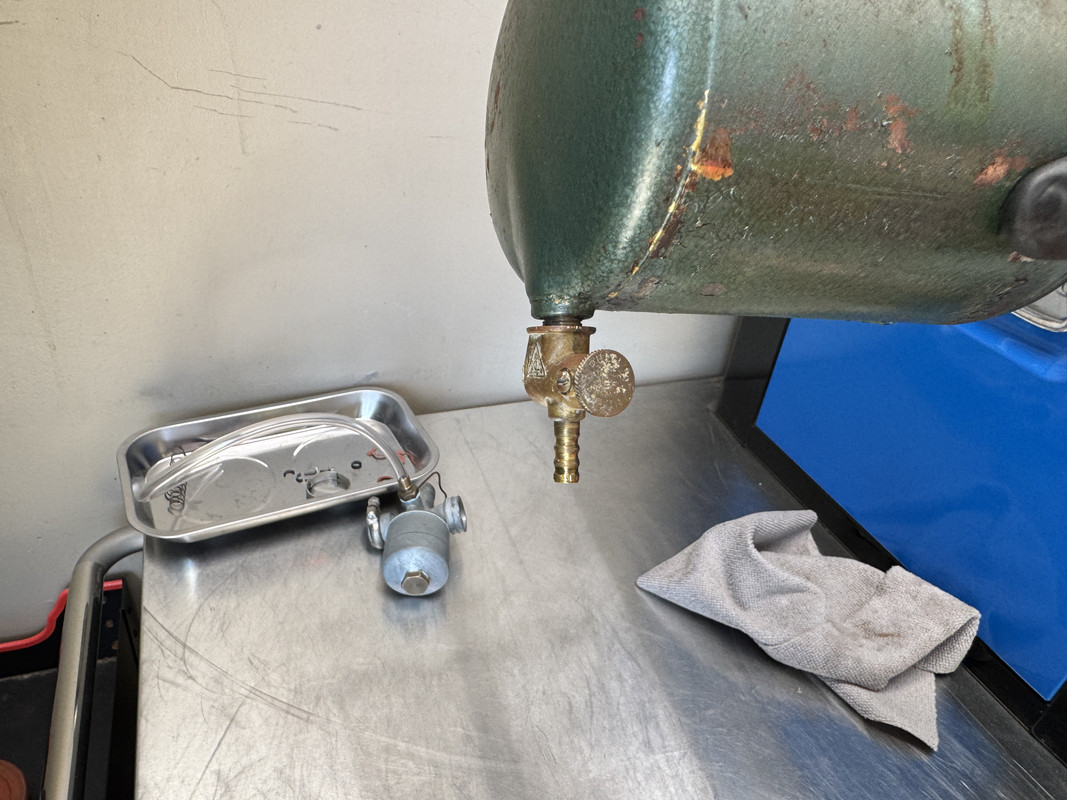
I then connected the new fuel line included in the kit, turned on the tap and filled the carburetor bowel with fuel. I even gave the tickler and tickle to verify it was working. Again, success! No leaks.

Super pleased to get this step completed, let's just hope it works as it should.
Still to do -
- Refit the carb to the machine, re-install and adjust throttle spring, cable and cap.
- Figure out what I'm going to do with the broken choke/run lever function. The switch on mine has been broken, meaning selection of choke/run is not possible without removing the air filter cap. Those air filter assemblies are hard to find and most of them are broken like mine.


Also, those round air filters are no longer available, of which I've tried to find an alternative, but dimensions need to be very similar to work properly in the housing.

At the moment, I have an idea on how to modify the choke insert and rig up a makeshift switch. With the switch missing, the central choke insert simply pops out, so I'm thinking of cutting off the shaft, drilling out the centre of the cap, then use a long bolt to replace the shaft. I'm hesitant to butcher a relatively rare part, but its broken anyway, so what do I have to lose?

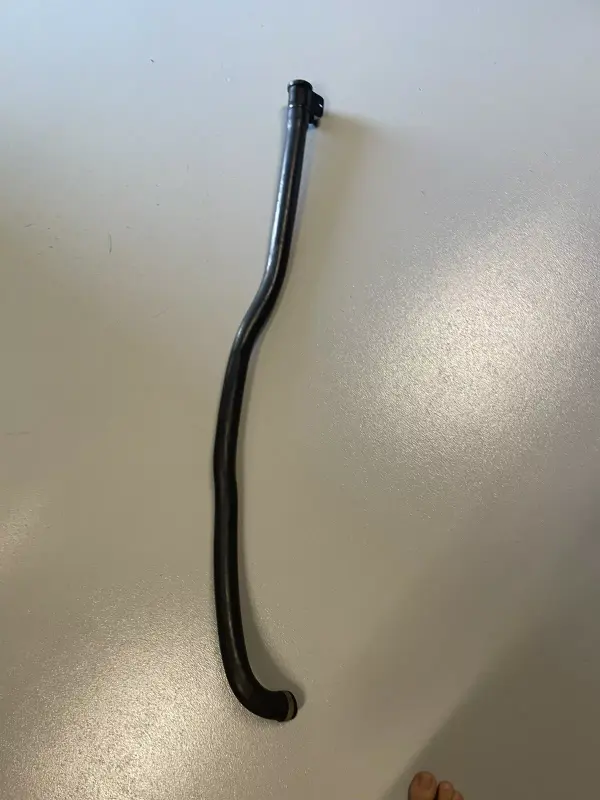
- Also of concern is the rubber intake tube. Considering the above, I went ahead and bought a long tube and the basic filter body, which Victa dealers were retrofitting to machines once those round air filters became NLA in the 1970's. The trouble here is there isn't a choke integrated on this particular one.
So, I'll decide on what setup I use depending on how my repairs pan out on the original choke switch.
The reason why I'm putting so much emphases on this aspect of the project is the filter assembly is necessary to the correct running of the engine. In effect, the carb needs restriction up stream to help form the right air-fuel ratio.
- Sorting out the blade situation. I ordered a replacement blade carrier disk and a set of NOS blades. However, the blades don't come with the bolts, nuts and washers. I just spent 30 minutes trying to remove the old blades from the old carrier, not necessarily to re-use, but to have something to match up with when I go shopping. I ended up having to cut the face of the bolt off as they were so worn down that I couldn't get a socket on them to stop it from spinning.
This blade arrangement is needlessly over complicated, with bolt, sleeve, washers and cupped washers. So, I'll see what the local bolt place can do for me.

So, things are progressing, I'm kinda hoping to get it to run tomorrow.
After getting my mowing run done, I was going to save rebuilding the carb for tomorrow, well, I couldn't resist.................
Over the last week, I couldn't begin to tally the number of hours I have been online reading and researching these early Victa's. For the most part, it's been to track down parts, but also to figure out how these things work. I've quickly determined that Victa were making so many of these things that often parts would be superseded without notice. Also consider how old these things are, the possibility of parts being replaced as needed without staying with original style parts is a high possibility. This especially applies to the air inlet tubing, filter and choke arrangement, more on that later. Having said all that, mine appears to be pretty faithful to how it left the factory.
I've also been seeking out workshop manuals, which I've found very useful in regard to the carburetor, I've never rebuilt one like this before.
To my surprise and delight, replacement gaskets are available for these Victa 3F carburetors. Several kits are available depending on what version of the carb you have, again there were changes along the way. Once you know which carb kit you need, you then chose which material you want to go with.
The standard 0.8mm orange/red fibre gaskets are the OEM spec, which are desirable for those restoring a machine to factory original.
https://www.ebay.com.au/itm/3535543...xhx58VYfgVF0lFhn11n5MgRFnP|tkp:Bk9SR8ywl82RZQ
The kit I chose has the 1.0mm blue fibre gaskets, which were designed to be softer and provide superior sealing on machines with wear or those that are still in regular use.
https://www.ebay.com.au/itm/3527548...FNOu0ixabDjYUqG8iMdoE+xwE=|tkp:Bk9SR6T7zM2RZQ
With the carb fully disassembled and cleaned, putting it back together was far less daunting than I was expecting. Helping the situation, the seller of the kit includes an instruction sheet. In my case, I didn't need to make an adjustment to the float level, which must be set at 3/16" (4.78mm) between the top of the float and the carb body. If an adjustment was needed, you'd gently bend the float lever to achieve the desired gap.
Being such fiddly work, I didn't take many images. This one displays the carb put back together, save for the throttle spring and top cap, which will be done once the carb is back on the machine and the cable reinstalled.
Next, the fuel tap. The carb kit includes two replacement o-rings for the inner slide, the originals were hard as a rock.
New o-rings installed, the slide was then reinserted into the brass body, followed by the holding screw. Initially, the new o-rings make the movement very tight, but with a bit of working, they free up and begin to function properly.
After rinsing out the tank with carb spray, I then reinstalled the tap, which are a tapered thread and go in very tight. Some fuel in the tank verified no leaks from the fitting or past the o-rings. Sucess!
I then connected the new fuel line included in the kit, turned on the tap and filled the carburetor bowel with fuel. I even gave the tickler and tickle to verify it was working. Again, success! No leaks.
Super pleased to get this step completed, let's just hope it works as it should.
Still to do -
- Refit the carb to the machine, re-install and adjust throttle spring, cable and cap.
- Figure out what I'm going to do with the broken choke/run lever function. The switch on mine has been broken, meaning selection of choke/run is not possible without removing the air filter cap. Those air filter assemblies are hard to find and most of them are broken like mine.
Also, those round air filters are no longer available, of which I've tried to find an alternative, but dimensions need to be very similar to work properly in the housing.
At the moment, I have an idea on how to modify the choke insert and rig up a makeshift switch. With the switch missing, the central choke insert simply pops out, so I'm thinking of cutting off the shaft, drilling out the centre of the cap, then use a long bolt to replace the shaft. I'm hesitant to butcher a relatively rare part, but its broken anyway, so what do I have to lose?
- Also of concern is the rubber intake tube. Considering the above, I went ahead and bought a long tube and the basic filter body, which Victa dealers were retrofitting to machines once those round air filters became NLA in the 1970's. The trouble here is there isn't a choke integrated on this particular one.
So, I'll decide on what setup I use depending on how my repairs pan out on the original choke switch.
The reason why I'm putting so much emphases on this aspect of the project is the filter assembly is necessary to the correct running of the engine. In effect, the carb needs restriction up stream to help form the right air-fuel ratio.
- Sorting out the blade situation. I ordered a replacement blade carrier disk and a set of NOS blades. However, the blades don't come with the bolts, nuts and washers. I just spent 30 minutes trying to remove the old blades from the old carrier, not necessarily to re-use, but to have something to match up with when I go shopping. I ended up having to cut the face of the bolt off as they were so worn down that I couldn't get a socket on them to stop it from spinning.
This blade arrangement is needlessly over complicated, with bolt, sleeve, washers and cupped washers. So, I'll see what the local bolt place can do for me.
So, things are progressing, I'm kinda hoping to get it to run tomorrow.

DFB
Well-known member
- Aug 12, 2019
- 5,000
- 3,198
- Thread starter
- #2,204
Starting on the Victa 18 this morning, I fitted a replacement blade disk in anticipation of getting the engine running. I'm waiting for a set of bolts to arrive, so the blades will go on later.

Next, I reinstalled the fuel tank, followed by refitting the carburetor, throttle and a temporary intake. From here, I trimmed the new fuel line to length and connected it up, then added some fuel to the tank. Time for the moment of truth.
Fuel tap on, throttle opened halfway, a pull of the starter and ziiiiiing, she was alive. This initial off camera run was super promising, taking a moment to clear its throat but was eventually started to run nice and strong. I then shut it off and set up the camera and things went downhill. The engine just wouldn't run clean.....................
After that video, it only got worse until it wouldn't restart. I pulled the plug and it seemed quite dry, so I'll have to dig into the carb again. The plug itself was quite worn but was delivering some spark, I have a replacement Champion N21 on the way so I'll see if that helps the matter.
I have to say, I'm a little disappointed, but that's what you get playing with old vintage stuff. I'm fairly sure its fuel related as it was running very well initially and the engine has excellent compression. I do also wonder if having the incorrect intake is playing a part too.
Brrr
Well-known member
- Jun 19, 2022
- 354
- 290
More pictures of your feet Deyon

DFB
Well-known member
- Aug 12, 2019
- 5,000
- 3,198
- Thread starter
- #2,206
Well, well, well.................................... 
Despite the bad news that the house air conditioning system is fu.ked and needs total replacement as we approach 42-degrees (107f) on Monday, I did have some luck today. Garage therapy and a lovely mild summer day, a blissful recipe!
Working on the Victa 18 yesterday was a mixture of pleasure and pain. Getting the carburetor refitted and fueled up, then getting the engine to fire off for the first time in decades was very satisfying. But then the frustration of it getting more and more erratic to the point where it wouldn't refire. Very deflating. Rather than pulling it all to bits right then and there, I decided to put it aside and let things cool, both me and the machine.
Initially, I assumed it was a fueling problem. The engine would rev up, then break down, rev up and choke............rinse and repeat. Thinking about it, the fact I could get it to rev right up indicated it was getting enough fuel to do so. Changing tact, I removed the spark plug and immediately noticed what the problem was................................

"There's your problem......." a spark plug well out of spec.
With the plug lead still connected and the turned over, I was getting an erratic blue and orange spark. I then removed the wire and connected it to another plug, this delivered nice blue spark. So yeah, it just wasn't getting enough or consistent spark.
As luck would have it, the brand-new plug I ordered showed up this morning. This Champion N21 plug, and its alternatives, are not a commonly stocked these days, so I had to order it rather than popping down to the auto store.
Champion N21 Plug fits Early Victa 125 2 Stroke Motors Rotomo & 18 Special's

Included in that order was a new spark plug boot, the original crumbled in my fingers when I needed to remove the plug wire to access the fuel tank.
Spark Plug Cover fits Victa 2 Stroke Lawn Mowers Brushcutters Chainsaws

With the fuel turned on, throttle half way, the rope pulled once, then twice..................off she went, settling into a nice stable idle. Once it was warmed up, I cracked the throttle open and ziiiiiiiiiiinnnng, that classic 2-stoke scream! After several restarts spread over a few hours, it seems like I have the engine running well. So, a simple spark plug solved the problem.
Reinvigorated, I therefore decided to keep fettling.....................
The original owner had used electrical tape to secure the throttle cable to the handle.............yeah, that's not DFB-Spec! So, I went and tracked down some vintage cable clips. Even though they came from an eBay store selling vintage bicycle parts, these ones are for a Scott Bonner and work just as well on the little Victa.
Scott Bonnar Clutch Cable Clips X 4 fit 7/8" & 1" Tubing | eBay

In preparation, I actually stripped the remains of the fabric sheath surrounding the cable for a cleaner look. These clips really tidy up the look of the mower, as well as solving the issue I was having with the throttle lever popping the retainer out of place, thus preventing the cable from functioning properly. A double win here!")

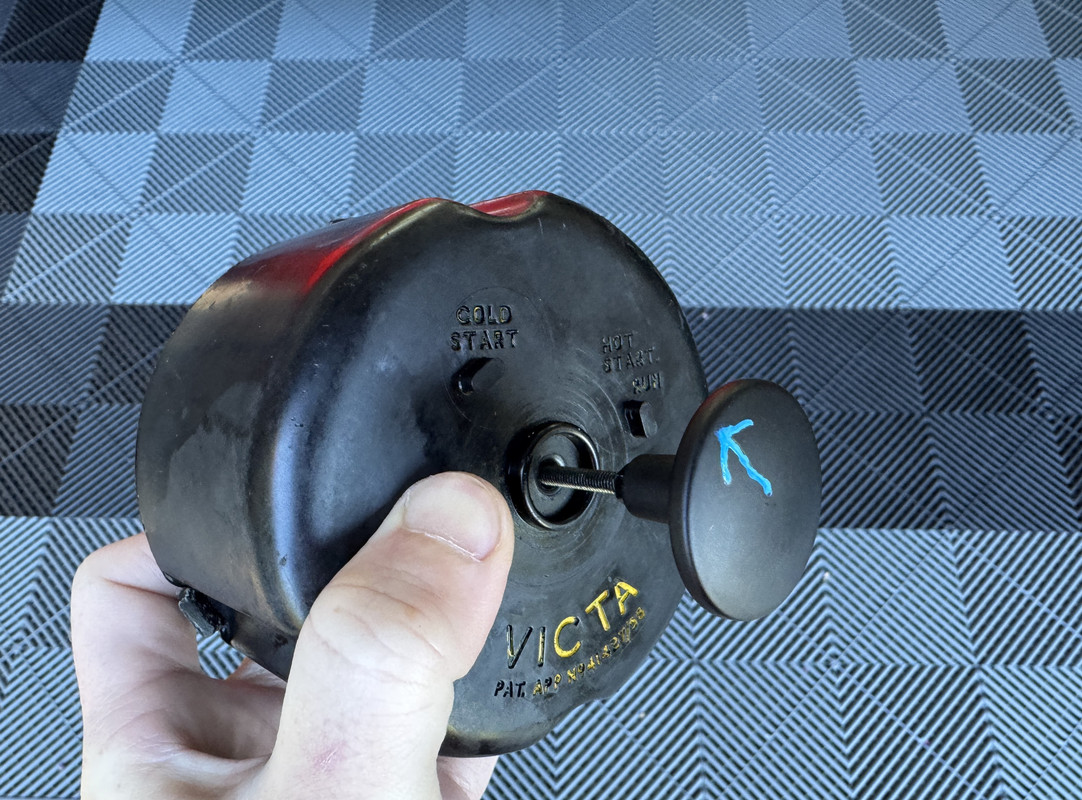
I also had a play around with the choke selector on the original pod filter housing. For this, I cut the leg off the choke, drilled out the circular piece then inserted an 80mm M4 bolt, locking it in place with a nut and washers. I then double-nutted the bolt about halfway down to set the correct height and installed the refurbished choke into the housing. Next, I installed another nut to help lock a small doorknob in place for the selector. I then orientated the choke into the lower housing and marked the knob for direction. I'm just waiting for the correct size tube and I'll give it a whirl. The reality is, the engine is starting pretty easy without a choke.
Pinnacle M4 x 80mm Black Ruspert® Round Head Bolts And Nuts - 6 Pack - Bunnings Australia
Taskmaster 30mm Matte Black Cabinet Knob - Bunnings Australia
The tidied-up cables and temporary cable ties for the intake tube have really smartened up the look..................

Still to come, some blade bolts so that I can actually cut some grass. And the above-mentioned correct intake tube so that I can make it look right. I also need to put an inline fuel filter on it. From there, I'll have to figure out the height adjusters. But.........................I'm super happy to have revived this piece of Australian history.
Despite the bad news that the house air conditioning system is fu.ked and needs total replacement as we approach 42-degrees (107f) on Monday, I did have some luck today. Garage therapy and a lovely mild summer day, a blissful recipe!
Working on the Victa 18 yesterday was a mixture of pleasure and pain. Getting the carburetor refitted and fueled up, then getting the engine to fire off for the first time in decades was very satisfying. But then the frustration of it getting more and more erratic to the point where it wouldn't refire. Very deflating. Rather than pulling it all to bits right then and there, I decided to put it aside and let things cool, both me and the machine.
Initially, I assumed it was a fueling problem. The engine would rev up, then break down, rev up and choke............rinse and repeat. Thinking about it, the fact I could get it to rev right up indicated it was getting enough fuel to do so. Changing tact, I removed the spark plug and immediately noticed what the problem was................................
"There's your problem......." a spark plug well out of spec.
With the plug lead still connected and the turned over, I was getting an erratic blue and orange spark. I then removed the wire and connected it to another plug, this delivered nice blue spark. So yeah, it just wasn't getting enough or consistent spark.
As luck would have it, the brand-new plug I ordered showed up this morning. This Champion N21 plug, and its alternatives, are not a commonly stocked these days, so I had to order it rather than popping down to the auto store.
Champion N21 Plug fits Early Victa 125 2 Stroke Motors Rotomo & 18 Special's
Included in that order was a new spark plug boot, the original crumbled in my fingers when I needed to remove the plug wire to access the fuel tank.
Spark Plug Cover fits Victa 2 Stroke Lawn Mowers Brushcutters Chainsaws
With the fuel turned on, throttle half way, the rope pulled once, then twice..................off she went, settling into a nice stable idle. Once it was warmed up, I cracked the throttle open and ziiiiiiiiiiinnnng, that classic 2-stoke scream! After several restarts spread over a few hours, it seems like I have the engine running well. So, a simple spark plug solved the problem.
Reinvigorated, I therefore decided to keep fettling.....................
The original owner had used electrical tape to secure the throttle cable to the handle.............yeah, that's not DFB-Spec! So, I went and tracked down some vintage cable clips. Even though they came from an eBay store selling vintage bicycle parts, these ones are for a Scott Bonner and work just as well on the little Victa.
Scott Bonnar Clutch Cable Clips X 4 fit 7/8" & 1" Tubing | eBay
In preparation, I actually stripped the remains of the fabric sheath surrounding the cable for a cleaner look. These clips really tidy up the look of the mower, as well as solving the issue I was having with the throttle lever popping the retainer out of place, thus preventing the cable from functioning properly. A double win here!
I also had a play around with the choke selector on the original pod filter housing. For this, I cut the leg off the choke, drilled out the circular piece then inserted an 80mm M4 bolt, locking it in place with a nut and washers. I then double-nutted the bolt about halfway down to set the correct height and installed the refurbished choke into the housing. Next, I installed another nut to help lock a small doorknob in place for the selector. I then orientated the choke into the lower housing and marked the knob for direction. I'm just waiting for the correct size tube and I'll give it a whirl. The reality is, the engine is starting pretty easy without a choke.
Pinnacle M4 x 80mm Black Ruspert® Round Head Bolts And Nuts - 6 Pack - Bunnings Australia
Taskmaster 30mm Matte Black Cabinet Knob - Bunnings Australia
The tidied-up cables and temporary cable ties for the intake tube have really smartened up the look..................
Still to come, some blade bolts so that I can actually cut some grass. And the above-mentioned correct intake tube so that I can make it look right. I also need to put an inline fuel filter on it. From there, I'll have to figure out the height adjusters. But.........................I'm super happy to have revived this piece of Australian history.
Tasmania
Well-known member
- Jan 12, 2017
- 1,572
- 875
Are you going to 2k clear coat it? Or getting it fully restored etcWell, well, well....................................
Despite the bad news that the house air conditioning system is fu.ked and needs total replacement as we approach 42-degrees (107f) on Monday, I did have some luck today. Garage therapy and a lovely mild summer day, a blissful recipe!
Working on the Victa 18 yesterday was a mixture of pleasure and pain. Getting the carburetor refitted and fueled up, then getting the engine to fire off for the first time in decades was very satisfying. But then the frustration of it getting more and more erratic to the point where it wouldn't refire. Very deflating. Rather than pulling it all to bits right then and there, I decided to put it aside and let things cool, both me and the machine.
Initially, I assumed it was a fueling problem. The engine would rev up, then break down, rev up and choke............rinse and repeat. Thinking about it, the fact I could get it to rev right up indicated it was getting enough fuel to do so. Changing tact, I removed the spark plug and immediately noticed what the problem was................................
"There's your problem......." a spark plug well out of spec.
With the plug lead still connected and the turned over, I was getting an erratic blue and orange spark. I then removed the wire and connected it to another plug, this delivered nice blue spark. So yeah, it just wasn't getting enough or consistent spark.
As luck would have it, the brand-new plug I ordered showed up this morning. This Champion N21 plug, and its alternatives, are not a commonly stocked these days, so I had to order it rather than popping down to the auto store.
Champion N21 Plug fits Early Victa 125 2 Stroke Motors Rotomo & 18 Special's
Included in that order was a new spark plug boot, the original crumbled in my fingers when I needed to remove the plug wire to access the fuel tank.
Spark Plug Cover fits Victa 2 Stroke Lawn Mowers Brushcutters Chainsaws
With the fuel turned on, throttle half way, the rope pulled once, then twice..................off she went, settling into a nice stable idle. Once it was warmed up, I cracked the throttle open and ziiiiiiiiiiinnnng, that classic 2-stoke scream! After several restarts spread over a few hours, it seems like I have the engine running well. So, a simple spark plug solved the problem.
Reinvigorated, I therefore decided to keep fettling.....................
The original owner had used electrical tape to secure the throttle cable to the handle.............yeah, that's not DFB-Spec! So, I went and tracked down some vintage cable clips. Even though they came from an eBay store selling vintage bicycle parts, these ones are for a Scott Bonner and work just as well on the little Victa.
Scott Bonnar Clutch Cable Clips X 4 fit 7/8" & 1" Tubing | eBay
In preparation, I actually stripped the remains of the fabric sheath surrounding the cable for a cleaner look. These clips really tidy up the look of the mower, as well as solving the issue I was having with the throttle lever popping the retainer out of place, thus preventing the cable from functioning properly. A double win here!
I also had a play around with the choke selector on the original pod filter housing. For this, I cut the leg off the choke, drilled out the circular piece then inserted an 80mm M4 bolt, locking it in place with a nut and washers. I then double-nutted the bolt about halfway down to set the correct height and installed the refurbished choke into the housing. Next, I installed another nut to help lock a small doorknob in place for the selector. I then orientated the choke into the lower housing and marked the knob for direction. I'm just waiting for the correct size tube and I'll give it a whirl. The reality is, the engine is starting pretty easy without a choke.
Pinnacle M4 x 80mm Black Ruspert® Round Head Bolts And Nuts - 6 Pack - Bunnings Australia
Taskmaster 30mm Matte Black Cabinet Knob - Bunnings Australia
The tidied-up cables and temporary cable ties for the intake tube have really smartened up the look..................
Still to come, some blade bolts so that I can actually cut some grass. And the above-mentioned correct intake tube so that I can make it look right. I also need to put an inline fuel filter on it. From there, I'll have to figure out the height adjusters. But.........................I'm super happy to have revived this piece of Australian history.
DFB
Well-known member
- Aug 12, 2019
- 5,000
- 3,198
- Thread starter
- #2,208
Ok, for those waiting for the detailing content to return, well here we go.............................................sorry guys, I know lawn mowers aren't car detailing.
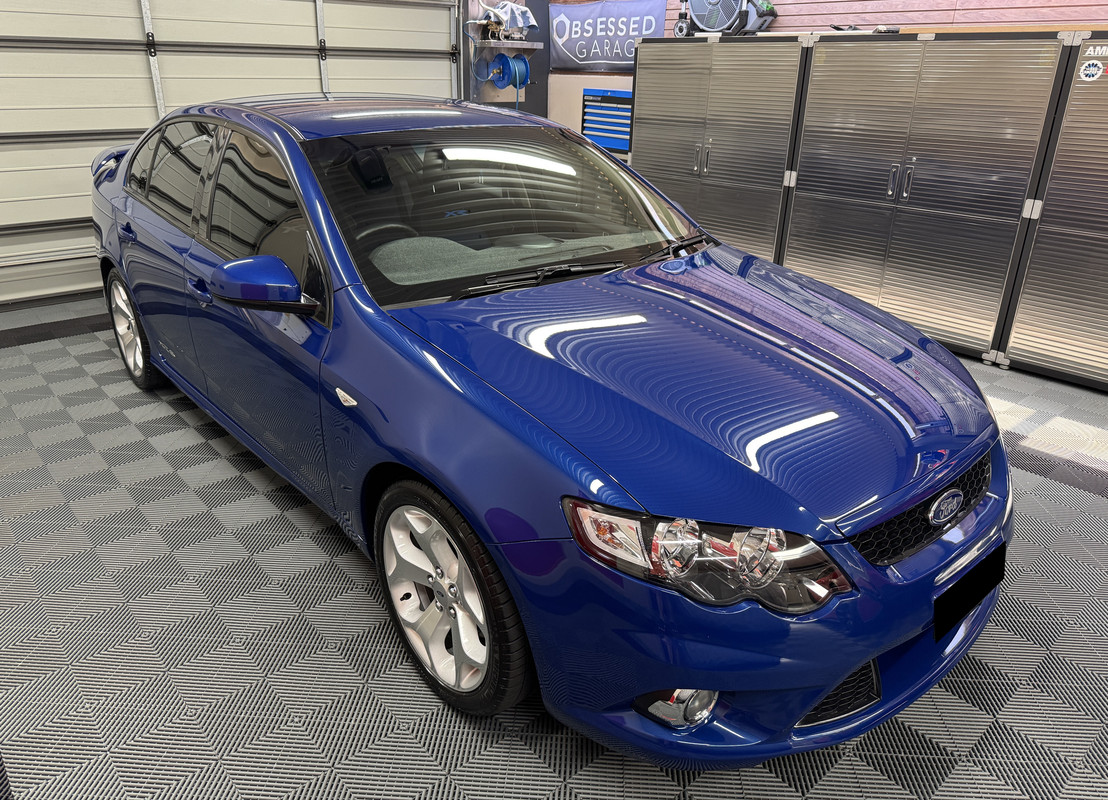
After finishing up on the Victa, I was feeling super pumped and felt like indulging in a little detail therapy. In line today, the blue rocket.
In the cannon today, the thoroughly delightful Shine Supply Shift. Out of all the soaps in my collection, I regard this one to be the mildest. As we know, Reset can be a little aggressive, likewise Megs Hyper Wash and NV Snow. Shift on the other hand is a great for light maintenance washing, providing great lubrication, plenty sudsy foam and just enough cleaning ability. I also love the coconut lime fragrance. Shift was used on the wheels and paint, and a little Brake Buster for the tyres.

Wash media today was the TRC Cyclone Mini......................

Drying aid was, you guessed it, ADS Amplify, which I also used on the door jambs. Next, the engine bay was wiped down with ECH20, followed by the wheels with Amplify. Tyres coat a coat of Swissxax Pneu. For the interior, a very quick once over with ADS Pilot. For the exterior glass, I went with Opti-Coat Glass Clean & Protect, which is on another page when compared to Carpro ClarifyPhobic, not streaking or special treatment required.

Back to spec and ready for its cover.
After finishing up on the Victa, I was feeling super pumped and felt like indulging in a little detail therapy. In line today, the blue rocket.
In the cannon today, the thoroughly delightful Shine Supply Shift. Out of all the soaps in my collection, I regard this one to be the mildest. As we know, Reset can be a little aggressive, likewise Megs Hyper Wash and NV Snow. Shift on the other hand is a great for light maintenance washing, providing great lubrication, plenty sudsy foam and just enough cleaning ability. I also love the coconut lime fragrance. Shift was used on the wheels and paint, and a little Brake Buster for the tyres.
Wash media today was the TRC Cyclone Mini......................
Drying aid was, you guessed it, ADS Amplify, which I also used on the door jambs. Next, the engine bay was wiped down with ECH20, followed by the wheels with Amplify. Tyres coat a coat of Swissxax Pneu. For the interior, a very quick once over with ADS Pilot. For the exterior glass, I went with Opti-Coat Glass Clean & Protect, which is on another page when compared to Carpro ClarifyPhobic, not streaking or special treatment required.
Back to spec and ready for its cover.
DFB
Well-known member
- Aug 12, 2019
- 5,000
- 3,198
- Thread starter
- #2,209
Are you going to 2k clear coat it? Or getting it fully restored etc
I'm thinking of just putting a clear coat on it, if I restored it, I'd be inclined to not use it..................and where's the fun in that, I already have too many garage ornaments.
")
Big Dave
Well-known member
- Jan 7, 2018
- 3,969
- 2,588
Gloss or matte? I've seen old cars sprayed with gloss to preserve the patina, it looks a little weird sometimes if there's any bare metal showing.I'm thinking of just putting a clear coat on it, if I restored it, I'd be inclined to not use it..................and where's the fun in that, I already have too many garage ornaments.
DFB
Well-known member
- Aug 12, 2019
- 5,000
- 3,198
- Thread starter
- #2,211
Gloss or matte? I've seen old cars sprayed with gloss to preserve the patina, it looks a little weird sometimes if there's any bare metal showing.
The original hammer-tone Avocado Green wasn't all that glossy, so I'd probably go for matte or satin clear. I think you are right, it would look silly having glossy rust.
Klasse Act
Well-known member
- Feb 21, 2012
- 27,813
- 2,902
Deyon...maybe pick up a lotto ticket and get one of THESE

Sent from my SM-G991U using Tapatalk


Sent from my SM-G991U using Tapatalk

Big Dave
Well-known member
- Jan 7, 2018
- 3,969
- 2,588
My favourite analogy for most companies, is that they are like a tree full of monkeys, the monkeys at the top of the tree look down and only see smiling faces, while those at the bottom of the tree look up and all they see are arseholes.Hmmm...........................

DFB
Well-known member
- Aug 12, 2019
- 5,000
- 3,198
- Thread starter
- #2,216
Despite the heat today, which as I type is sitting on 41-degrees on its way to 42, I still managed to get in some detailing.
With it being quite dry and windy over the week, the Ranger's white paint was looking quite dull from a layer of dust. A trip to the green waste facility didn't help things.
For the wheels, tyres and paint, I decided to use P&S Wide Open.

Drying Aid was a product I keep forgetting to use, Optimum Instant Detailer & Gloss Enhancer. This is a product that doesn't shout about itself via a fancy bottle or label, an enticing colour or fruity scent, it just makes paint slick and glossy. Considering the heat out there today, I was surprised how easily it worked.
https://detailingshed.com.au/produc...1&_sid=6f4c902d4&_ss=r&variant=39264423936159

The tray and door jambs were wiped down with DIY Waterless Wash, glass via KCx, interior got the InnerQD treatment.
At the previous wash 12 days ago, I used ADS Ghost for the first time. As a recap, this was the result...............

The tyres on this occasion had a layer of dust on the very outer rim of the sidewall from the trip to the tip, most of which was removed by a simple rinse. It was also interesting to see the hydrophobics created by Ghost. Instead of hitting the rubber with a tyre cleaner, I decided to just give them a scrub with the Wide Open shampoo mentioned earlier. Dried, this is what they looked like.....................


There was some degradation around the outer rim, which is understandable given it makes contact with the road, but hopefully you can see the rest of the sidewall has hung on very well. While I certainly didn't need to, I gave the tyres a very light brush over with ADS Tire+ to top them off.
Contrary to what some people seem to think, this post was NOT sponsored or paid for by a detailing company.
With it being quite dry and windy over the week, the Ranger's white paint was looking quite dull from a layer of dust. A trip to the green waste facility didn't help things.
For the wheels, tyres and paint, I decided to use P&S Wide Open.
Drying Aid was a product I keep forgetting to use, Optimum Instant Detailer & Gloss Enhancer. This is a product that doesn't shout about itself via a fancy bottle or label, an enticing colour or fruity scent, it just makes paint slick and glossy. Considering the heat out there today, I was surprised how easily it worked.
https://detailingshed.com.au/produc...1&_sid=6f4c902d4&_ss=r&variant=39264423936159
The tray and door jambs were wiped down with DIY Waterless Wash, glass via KCx, interior got the InnerQD treatment.
At the previous wash 12 days ago, I used ADS Ghost for the first time. As a recap, this was the result...............
The tyres on this occasion had a layer of dust on the very outer rim of the sidewall from the trip to the tip, most of which was removed by a simple rinse. It was also interesting to see the hydrophobics created by Ghost. Instead of hitting the rubber with a tyre cleaner, I decided to just give them a scrub with the Wide Open shampoo mentioned earlier. Dried, this is what they looked like.....................
There was some degradation around the outer rim, which is understandable given it makes contact with the road, but hopefully you can see the rest of the sidewall has hung on very well. While I certainly didn't need to, I gave the tyres a very light brush over with ADS Tire+ to top them off.
Contrary to what some people seem to think, this post was NOT sponsored or paid for by a detailing company.
DFB
Well-known member
- Aug 12, 2019
- 5,000
- 3,198
- Thread starter
- #2,217
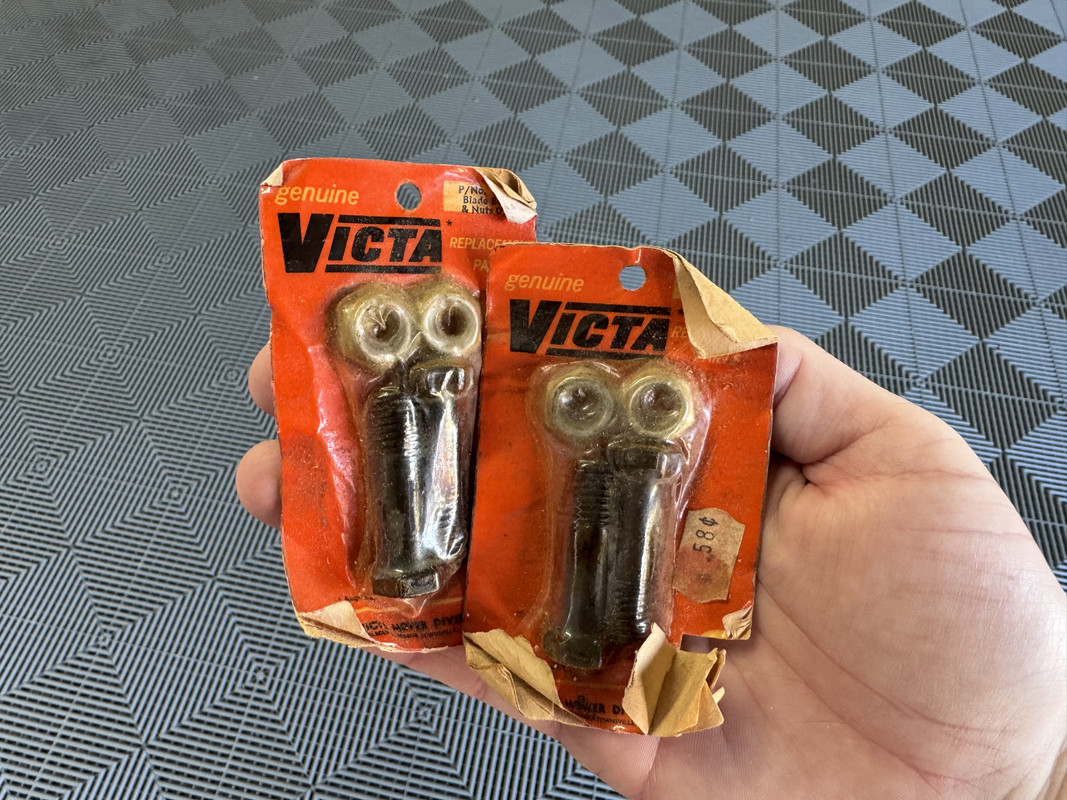
Some NOS parts arrived this morning. Check out the original price on those bolts! I certainly paid more than 0.58c for them! These shoulder bolts then allowed me to fit the NOS blades.

Now, in my haste to order parts for this machine, I ended up buying the wrong blade disk, which meant the blade bolts wouldn't clear the muffler pan. So, after cutting off the old blade bolts, I inspected the original rusty blade disk for damage, then fitted the blades up to it instead. I'll just on-sell the one I bought.
So, the Victa cut its first grass in decades......................
I have to admit though, I am kinda scared to use this thing at full steam, it revs super high and those blades are quite thin.
Now, after this I actually removed the blade carrier again. Despite the nylock nuts being on super tight, the blades had too much play, which you can hear on shut down. What I'm trying to do here is make 70-year-old technology work the best I can with what I have available. Finding NOS washers and washer cups is impossible, which is needed to limit the amount of swing the blades can achieve. I do realize they are supposed to do this, but not to the extent I was happy with. In the end, I got them firmed up how I like using the old cups and new washers.
I also need to get the deck height sorted for my lawns. I've figured out how to adjust the deck, but it's a tooled procedure that requires the engine off to do safely. I will also fit an inline fuel filter as the in-tank item isn't cutting it. I will also fit the original filter pod with a short intake hose I tracked down.
I had two passes by today say how cool this thing is, and like a proud "grandson" (it's just too old for me to be its fatherly figure), I couldn't help but proudly agree. It's not perfect, it's go a few battle scars, its noisy and kinda dangerous.......................but oh-so full of character.
So, while there is some tinkering still left to do, but I'd consider this old Victa recommissioned!


Tasmania
Well-known member
- Jan 12, 2017
- 1,572
- 875
For the ride on mower I wear shorts long sleeve shirt a hat hearing protection and safety glasses when the grass is dry.Yes, thank goodness. I did spear my hand messing about getting those blades installed though.
Plus like a face sock the type people wear when fishing so i don't get sunburnt and it stops the grass going up the snozz.
Wipper shinper i add long pants and gloves.
The neighbours get this bloke in to brush cut and he's in shorts AFL type and even takes phone calls at the same time! I said his skin must be like leather or a woman's face that smokes
 3 packs a day.