Work continued on the Sprint 375 rebuild this morning. With the hard work done yesterday, it was all about putting it back together.
I didn't fully disassemble this engine, the exercise was simply to replace the rings and see what that got me. Apart from burning oil, the engine started easily and was strong running. Despite working it to near death, it was always well maintained with fresh oil and clean air filters. If you can imagine a teenage DFB, well I looked after that engine like one of my cars today!
I hope you can tell the sentimental tone so far, because that is how I feel about this mower. It started my mowing business in my early teens and went on to make me a LOT of money over many years. Even after upgrading to bigger and better machines, I would often take this mower with me, its just so light and easy to use. It owes me nothing, and so I have kept it as a reminder of my youth. I haven't taken it on a job for a very long time now, but it gets the occasional run on my own lawns.
To be clear here, these engines were basically a throw-away item, rebuilding one is not an economically viable proposition. So unless you are sentimental like me and have the time and desire to do so, then you would be better served replacing the engine with a long block for as little as $250. In my case, I used about $70 in parts, a $40 puller, a $60 ring compressor and $20 for ring pliers, so yeah, an extra $60 would have bought me a new engine.
 Briggs & Stratton 3.75hp (575EX Series) Lawnmower Engine – Small Engine Warehouse Australia
Parts for this partial rebuild involved piston rings, and the associated gaskets and seals. I decided to use OEM Briggs & Stratton rings, then aftermarket head and sump gaskets, and a new Stens lower crank seal.
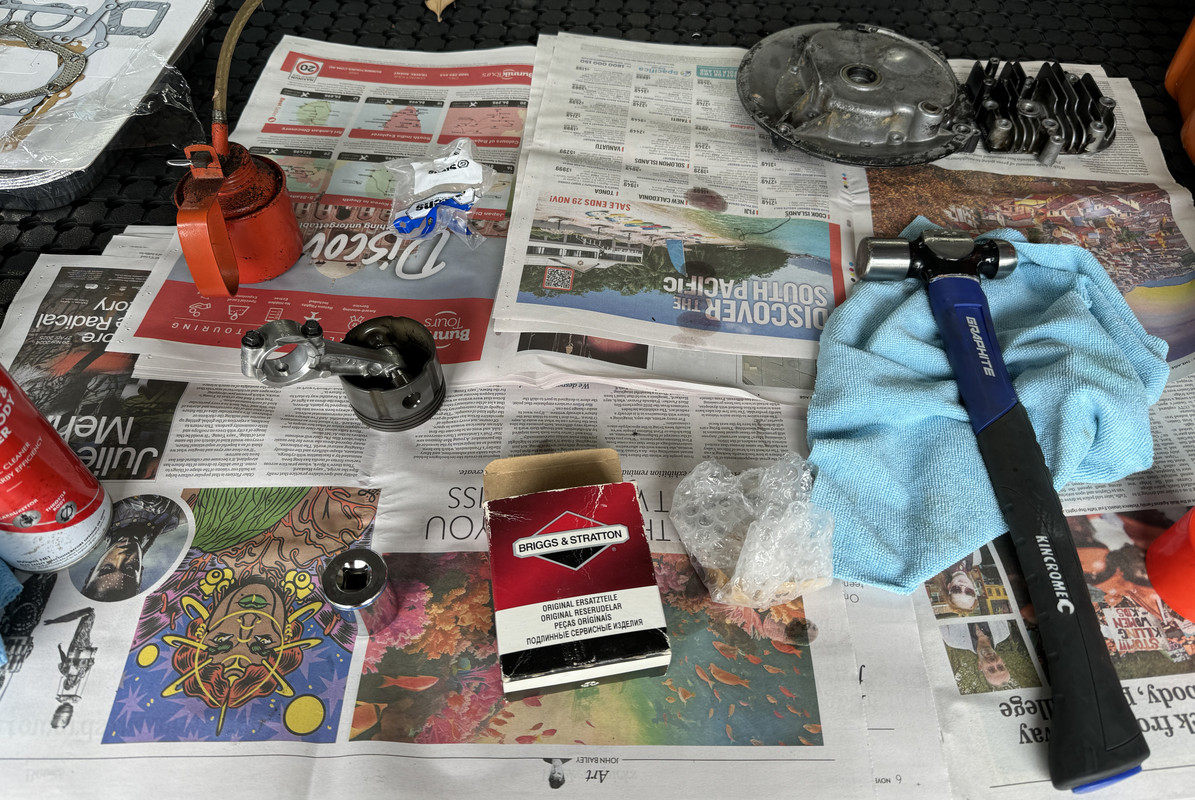
The first thing I did today was to remove the camshaft, lifters and crankshaft cam gear out of the crankcase to provide better access for reassembly. I didn't want to mess with these, but they simply lift out so easily that there was no reason not to. I then cleaned and inspected these parts and set them aside for later. The lifters and (plastic) cam had minimal wear, remarkable considering how much work this engine has done.
After giving everything a final clean down, including the cylinder and crankcase, I started by installing the new oil seal on the sump. I then lubed the piston and installed the piston rings, the hardest being the two-piece lower oil control ring which fought me a little. After each ring went on, I staggered the end gaps and clamped it in the ring compressor, which was a little tricky but I got there. Time for everything to go back together!
First up, installing the piston and rod back into the cylinder. After applying oil to the cylinder, the conrod big end and more on the piston, I lined up the piston and ring compressor with the cylinder, then gently tapped the piston down with the handle of my hammer. I don't know if its just me, but I love the tap-tap-tap sound of a piston being installed into a cylinder. The conrod was then lined up with the crankshaft, both with plenty of assembly oil. I then installed the end cap, again well oiled, then torqued in increments to 11.3 Nm. A quick spin over verified my work.
Next, re-installing the lifters, oiled for good measure. These simply slide back into place, the oiled camshaft then drops into its recess in the block, holding the lifters in place. The oiled crankshaft timing gear slides onto its key, making sure to rotate the crank first to align the timing marks on the gear and camshaft. The camshaft driven oil slinger then drops onto the top of the camshaft.
It was then time to start sealing the engine back up. The gasket kit comes with several paper sump gaskets in differing thickness, I just went with the standard 0.015" item. With the gasket lined up and held with the dowels in the block, I then oiled the crankshaft and oil seal and gently tapped the sump back down till it was nicely seated and flush. I then went around re-installing the sump bolts, firstly winding them down until they seated. Working in a cross pattern, the bolts were torqued down in increments to the 10.17 Nm spec, re-checking a few times to make sure it was all down square.
Next, the cylinder head. Using two of the bolts to hold the new gasket in place, I lined the head up with the block and wound the bolts down until they seated. With the rest of the bolts seated, I then torqued them to 16 Nm, again working in a cross pattern and in increments till the spec was achieved. The supporting bracket was then re-secured and the spark plug installed.
Old worn rings, head gasket and oil seal.

Getting the engine back on the mower deck took a little patience to align the three bolts and adaptor plate. I then re-installed the blade boss and blade carrier, then connected the throttle cable. With 600ml of fresh Penrite SAE30 mineral oil in the sump and fuel in the tank, it was time to fire it up, fire it up, fire it up, fire it up...............................(sorry, a
Taryl Fixes All reference).
After priming, the engine took three pulls to fire, accompanied by a small plume of smoke as the assembly oil burnt away, followed by some minor lingering smoke. I have to admit, I was a little concerned my efforts hadn't been completely successful at this point, however it was only a gentle waft rather than a constant stream, indicating that it was simply oil in the muffler burning off. After leaving the engine to run for 10 minutes, it was running clean, clear and strong...........no smoke!
I DID IT!!

Apart from solving the smoking habit, the most noticeable result of this project was how much compression the engine now has, evident from the extra effort required to pull the engine over.
My biggest fear in the lead up to do this repair was getting everything back together in the right place. But this engine is so bloody simple, that when I stepped back and thought about it yesterday, it's almost impossible to put it back together the wrong way. The piston and rod assembly can only go one way, otherwise you wouldn't have access to the end cap bolts. The camshaft, lifters and timing gear are all recess fit, making it simple to remove and re-install correctly.
As I said earlier, you would never rebuild one of these engines unless its something you really wanted to do, simply because of the throwaway society we live in. And a small engine shop wouldn't want to do it either, the argument being that parts and labor to do so would probably buy you two brand new engines!
But that was not the point here. I wanted to do this for sentimental reasons, but also out of curiosity. As a bonus, I got to learn how to use a puller and piston ring compressor, while also putting my tools to good use. As a learning experience, I would call it a success. But to have also achieved the desired result, as in no more smoking, well that makes me very happy.
(Sorry about the lack of photos for this project. I was covered in oil and filth, which I didn't want all over my camera or phone, and I was also focused on the task at hand.)


 ️
️