Griot's and a Corvette?

bodavenport

New member
Joined
Jul 9, 2008
Messages
263
Reaction score
0
Does the new Griot's have enough grunt to polish out 2004 Corvette Clear using 5.5 pads? I have a few orange edge 4 inch pads?
Question # 2
Will I have to step up to M205 and 105 to get it done? I have some other polishes that I have been happy with but this will be my first corvette as I am a Mustang guy and I was referred by a mutual friend
 
C5 paint is usually VERY tough to work with -- notoriously hard clear to polish. The GG polisher MIGHT have enough power depending on how bad the defects are, but you'll definitely need 105.

Personally any time I have a C5 to do I jump straight to either my Flex DA or Rotary.
 
Does the new Griot's have enough grunt to polish out 2004 Corvette Clear using 5.5 pads? I have a few orange edge 4 inch pads?
Question # 2
Will I have to step up to M205 and 105 to get it done? I have some other polishes that I have been happy with but this will be my first corvette as I am a Mustang guy and I was referred by a mutual friend
Do a test section and you will know.
 
Vettes are harder clears ... I would use Wolfgang Twins, Menzerna SIP and Nano, or Megs 105/205 preferably with 5.5 inch pads and a 5 inch backing plate.
 
Just like Ron mentioned a test spot is going to be your answer.Plus you need to decide how much correction are you trying to achive.My vette laughed at my Pc and flex it was rotary all the way.105/205/85rd
 
Just like Ron mentioned a test spot is going to be your answer.Plus you need to decide how much correction are you trying to achive.My vette laughed at my Pc and flex it was rotary all the way.105/205/85rd

My uncle's '04 is that same way. It's one of the LeMans commemorative cars and had been severely hacked by the dealer he bought it from (used). Correction on that car was absolutely ridiculous.
 
Does the new Griot's have enough grunt to polish out 2004 Corvette Clear using 5.5 pads? I have a few orange edge 4 inch pads?
Question # 2
Will I have to step up to M205 and 105 to get it done? I have some other polishes that I have been happy with but this will be my first corvette as I am a Mustang guy and I was referred by a mutual friend

No, I tried it and you will need a rotary and purple wool to start. Then you can finish with the GG
 
Do you think that 5.5 purple wool on the GG would make a dent in it? I do not have a rotary so I would have to farm that part out but that is a possibility.
 
I would deff give it a shot. The orange 5.5 took oit about 60-70 percent of defects so the purple wool would prob do alot better then fallow with orange and white
 
Corvette clear?

Mike in your prof. opinion and experience does the GG version 2 have enough grunt to polish out a swirled corvette (04) with the purple foamed wool or would a yellow cutting pad even touch it? I guess I am going to have to step up to M105/205 for this one but might have to just pass on it if my equipment will not cut it.
 
Re: Corvette clear?

Yes.

The "factory" clear paint on most newer Corvettes including any C4's I've worked on are notoriously hard but that doesn't mean you can't use a D.A. Style polisher to remove swirls and scratches, in fact I've worked with every Corvette Club in Southern California and taught many of each clubs members exactly this, that is how to use a DA Polisher to remove swirls and scratches and that was using first generation Porter Cable polishers, which don't have near as much ability to keep a pad rotating as the GG or the new PC or Megs units.

This was also using Meguiar's 6.5" pads and products like M83 and M80

We've come so far since those day....

The Griot's Garage Random Orbital Polisher acts like a rotary buffer in that as long as you use good technique, that is keep the pad flat to the surface, it will rotate and oscillate the pad at the same time and you can't stop it.

This is what a rotary buffer does, rotates a pad and you can't stop it. The benefit is the GG because it's oscillating won't but in Rotary Buffer Swirls, Holograms or Buffer Trails at the same time you're working the tool.

For speed purposes, the more aggressive pads will remove paint faster, but you can also use both light cutting foam pads and even polishing pads, just use good technique and that is basically hold the pad flat, move the polisher slowly and apply firm pressure.

Like shown here,


How to do a Section Pass using a Dual Action Polisher - Key to Removing Swirls


How to Remove Swirls and Scratches using the Porter Cable 7424XP


:)
 
Re: Corvette clear?

One thing worth mentioning,

Before tackling the entire car, first do a Test Spot and make sure you can make one section look GREAT before going over the entire car.

The Test Spot should include your complete polishing process as that IS the process, not just the cutting or correction step.

On some paint systems, using an aggressive foam pad with an abrasive product will remove the defects, (that's what you want), but will leave behind micro-marring in the paint due to the oscillating action of the tool.

Some people panic at this step but then find out re-polishing the paint with a less aggressive pad and product will remove the haze or micro-marring.

So test you system, that is the pads, products, process, (process = too), and of course your personal skills, ability and experience, (these are factors too), and see if you can create the kind of results you're looking for, if not post back here what you're seeing and we will do our best to see you through to success.


:)
 
Re: Corvette clear?

They might as well call it kryptonite. I pretty much use wool on every Corvette that I touch. Depends on the customer's expectations, but they usually don't mind spending the money on their baby.


John
 
You know I'm reading this thread and thinking...

"Didn't I just reply to this thread but I don't see my post?


And then I find a duplicate with a different title.

Here's the deal... you only need to post a "Topic" once to a forum. Posting a topic twice, even with a different "Subject" can cause confusion. I'll combine this thread with the other thread.


Thank you!


:)
 
Okay, I've merged the two threads...


I'll stick by what I posted...

I've removed the swirls and taught other Corvette owners how to remove swirls with first generation Porter Cable Polishers and 6.5" pads for at least 7 years while working as the class instructor at Meguiar's in Irvine, California.

If the swirls in a modern Corvette can be removed using the less effective first generation PC Polisher, 6.5 pads and DAT products like M83 and M80 then it you will be able to do it using a GG ROP with more aggressive pads and SMAT products.

For what it's worth, UC is just about as aggressive as M105 and and others that have used both thing it's a lot more user friendly as far as buffing cycle and wipe-of goes.

Buffing Cycle = The amount of time a product stays workable and effective on the surface.

The key to using a DA Polisher to remove defects out of any clear coat is simply using good technique.

I wrote this years ago on MOL but it still applies today...

Tips & Techniques for using the G110, G100, G220 and the PC Dual Action Polisher

After teaching hundreds of classes here at Meguiar's, there are some common mistakes most people make when trying to remove swirls and scratches with a dual action polisher. Most of them have to do with technique.


Here's a list of the most common problems
  1. Trying to work too large of an area at one time.
  2. Move the polisher too fast over the surface.
  3. Too low of speed setting for removing swirls.
  4. Too little pressure on the head of the unit.
  5. Too much pressure on the head of the unit so the pad quits rotating.
  6. Not keeping the pad flat while working your product.
  7. Too much product, too little product.
  8. Not cleaning the pad often enough.
Here's a list of the solutions in matching order,
  1. Shrink your work area down, the harder the paint the smaller the area you can work. The average area should be and average of about 16" by 16" up to 20" by 20" or so. You have to do some experimenting, (called a Test Spot), to find out how easy or how hard the defects are coming out of your car's paint system and then adjust your work area to the results of your Test Spot.
  2. For removing defects out of the paint you want to use what we call a Slow Arm Speed. It's really easy to move the polisher too quickly because the sound of the motor spinning fast has a psychological effect to for some reason want to make people move the polisher fast. Also the way most people think is that, "If I move the polisher quickly, I'll get done faster", but it doesn't work that way.
  3. When first starting out many people are scared of burning or swirling their paint, so they take the safe route of running the polisher at too low of a speed setting, again... this won't work. The action of the polisher is already g-e-n-t-l-e, you need the speed and specifically the pad rotating over the paint as well as the combination of time, (slow arm speed), together with the diminishing abrasives, the foam type, and the pressure to remove small particles of paint which is how your remove below surface defects like swirls or scratches. It's a leveling process that's somewhat difficult because the tool is safe/gentle while in most cases, modern clear coat paints are harder than traditional single stage paints and this makes them hard to work on. This is also why people get frustrated, they don't understand paint technology, all they know is their paint swirls easy and getting the swirls out is difficult and thus frustrating.
  4. For the same reason as stated in #3, people are scared, or perhaps a better word is apprehensive, to apply too much pressure and the result of too little pressure is no paint is removed thus no swirls are removed.
  5. Just the opposite of item #4, people think that by pushing harder on the polisher they can work faster and be more aggressive, but the truth is the clutch in the tool is a safety mechanism to prevent burning and will cause the pad to stop rotating, thus less cleaning or abrading action and once in a while this will lead a person to then post on the forum something like this, "Hey my pad doesn't rotate". There needs to be a balance of enough pressure to remove defects and keep the pad rotating but yet not too much pressure as to stop the rotating action. This balance is affected by a lot of things, things like type of chemical, some chemicals provide more lubrication and the pad will spin easier, curved surfaces or any raise in body lines will tend to stop the pad from rotating. This is where experience on how to address these areas comes into play or you do the best you can and move on. It's not a perfect tool, nor a perfect system, but it's almost always better than working/cleaning by hand.
  6. Applying pressure in such a way as to put too much pressure to one side of the pad will cause it to stop rotating and thus decrease cleaning ability.
  7. Too much product over lubricates the surface and this won't allow the diminishing abrasives to do their job plus it will increase the potential for messy splatter as well as cause pad saturation. Too little product will keep the pad from rotating due to no lubrication and there won't be enough diminishing abrasives to do any work. Again it's a balance that comes with experience, or another way of saying this would be it's a balance that comes with hours of buffing out a car to learn what to do and what not to do. Information like what you're reading here is just an edge to decrease your learning curve. Hope this is helping.
  8. Most people don't clean their pad often enough and most of the time the reason for this is because they don't know they're supposed to clean their pad often and they don't know how to clean their pad. Again, that's why this forum is here to help you with both of these things. You should clean your pad after every application of product or every other application of product, your choice, most of the time cleaning your pad after every other application of product works pretty well. It enables you to work clean and enables the foam pad, the polisher and the next application of fresh product too all work effectively. How to clean your pad will be addressed below sooner versus later, but not at the time of this posting. (Sorry, I'm behind a keyboard, not a video camera
The first 4 are the most common. Can't tell you how many times we hear a comment like this from someone in the garage after demonstrating the correct technique


Again, at Detail Fest, I removed swirls and scratches with an audience watching using a Porter Cable DA Polisher, a 5.5" orange light cutting pad and Wolfgang TSR, so if this system approach will work then it should be no problemo using the GG with either 5.5" or 6.5" pads and more aggressive products.

Just follow the basics!

:dblthumb2:


And here's that post, taken from page 2 of this thread,

http://www.autogeekonline.net/forum/auto-detailing-101/24685-sip-nano-much-better-than-tsr-fg-2.html


I had a black C5 Corvette at Detail Fest that the owner brought into the new detail bay and used Wolfgang TSR with the Porter Cable and removed 95% of the swirls so that only the deeper RIDS were left in the paint.

Did this moving the DA very slowly and giving the pad/product/oscillating action plenty of time to work or abrade the paint. I might have used a polishing pad too but off-hand I don't remember.

Of course more aggressive products will do the job faster, in this case the owner had never used a machine before and wanted something that would be easy for a beginner to use without making any mistakes.

M105 was introduced after M86 and M86 was Meguiar's version of System One, which was for all practical purposes, the product that made popular the idea of a one liquid system where you use the same chemical or liquid and adjust the pad to make the product more or less aggressive.

This idea works with M86, D151, M205 and actually any product that abrades it's just with SMAT products you can stop anytime in the process because you don't have to wait for the abrasives to break down since the abrasives in SMAT products don't break down like DAT products.


For more information on SMAT products, check out these to article,

The SMAT Pack - Everything you ever wanted to know about Meguiar's SMAT products...


Also, Ultimate Compound is a VERY capable compound almost as aggressive as M105 and most people find it a lot more user friendly with a DA Polisher than M105.


The Aggressiveness Order of SMAT Products - This might surprise you!
SMATaggressivenessOrder.jpg


I've posted this before and here it is again, I was hoping at SEMA/NACE last year Meguiar's was going to introduce a new and improved version of M105 but they didn't, that said I'm confident they're aware of the feed back people post about short buffing cycle, dusting and difficulty in removal in some environments. It also could be if the product is improved it will be a formula tweak with no fanfare.

The only time I've personally had any problem with M105 was in the middle of summer in very hot and dry heat in horrible working conditions, other than that I've had good luck with it.


:)


And here was the follow-up post for rwrite who was there...

Mike, if I remember correctly you were using a white polishing pad on the C6. The owner even stated it was a night and day difference.


The GG ROP has a surprising amount of power, it should handle your Corvette with no problems at all.

If you want to insure you remove all the swirls and scratches then get selection of the new Surbuf pads, I've been VERY impressed with their ability to cut clear using a DA Polisher.


Surbuf MicroFinger Buffing Pads now at Autogeek!


Surbuf R Series 4 Inch Buffing Pads 2 Pack
Surbuf R Series 5.5 Inch Buffing Pads 2 Pack
Surbuf R Series 6.5 Inch Buffing Pads 2 Pack

We were shooting a video on how to Machine Damp Sand using Meguiar's Unigrit #3000 Foam Finishing Discs and then how to remove your sanding marks using a rotary buffer and took a moment to show that if you choose, you can also use a DA Polisher with Surbuf MicroFinger buffing Pads to remove shallow sanding marks like those left by the #3000 Unigrit Foam Finishing Discs and a compound.

Just to note, for years now, the question about whether the you can use a DA Polisher, like the Porter Cable 7424XP, the Meguiar's G110v2 or the Griot's Garage ROP to remove sanding marks out of modern clear coat paint has been a hot topic.

While there are a number of factors involved that affect a "Yes" or "No" answer, generally speaking you can remove light or shallow sanding marks out of clear coat finished using a DA Style Polisher with their Free Rotating Spindle Assemblies for drive mechanisms, you just need to use the right pads, products and techniques. Top Coat Hardness is a huge factor when it comes to determining whether or not a DA Style Polisher can remove sanding marks and this will vary between cars.

While the most effective way is still by using a direct drive, rotary buffer with a cutting pad and a compound, especially if you sanding down an entire car, we demonstrated using the Surbuf MicroFinger Buffing Pads with a SMAT product like M105 you can easily remove a controlled sanding mark pattern, in this example, #3000 Unigrit Foam Finishing Papers by Meguiar's were used. Autogeek will have the new Unigrit Foam Finishing Discs very soon. Stay tuned for an upcoming article on this topic.

Surbuf MicroFinger Buffing Pads
SandingMarkRemovalWSurbuf000.jpg


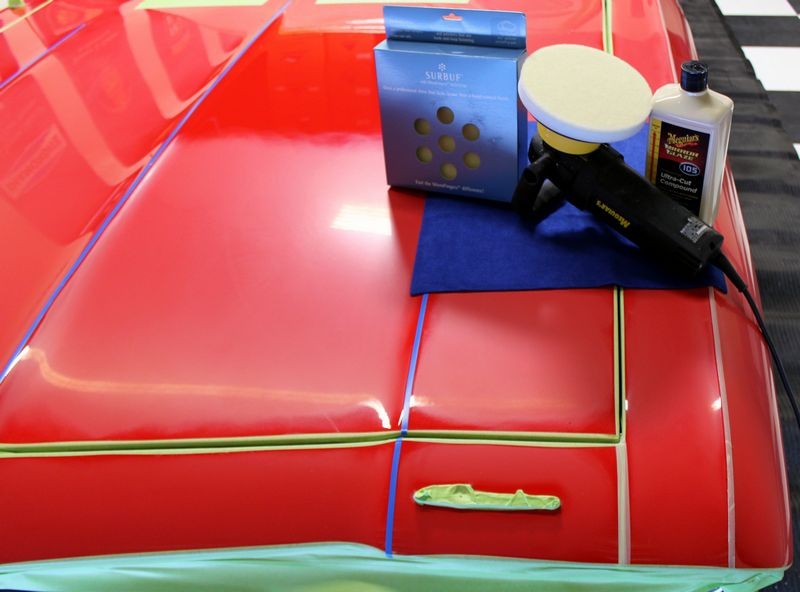
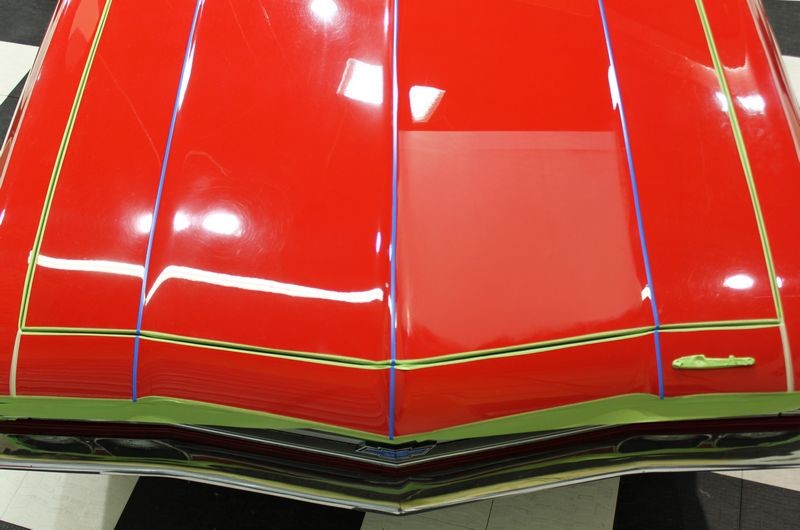
This is our project car. This is a restored and mild hotrod 1969 El Camino with a custom basecoat/clearcoat finish. The fit and finish of the panels is excellent and the paint application came out very nice, there are a few leftover sanding marks in the paint and rotary buffer swirls including arc scratches probably from an abrasive particle being trapped between the pad and the paint. Our goal is to remove all the below surface defects and restore a true show car shine.
SandingMarkRemovalWSurbuf001.jpg


We moved the car out into the sun where the bright overhead sunlight can reveal the true condition of the paint.
SandingMarkRemovalWSurbuf002.jpg


redelcamino_029.jpg


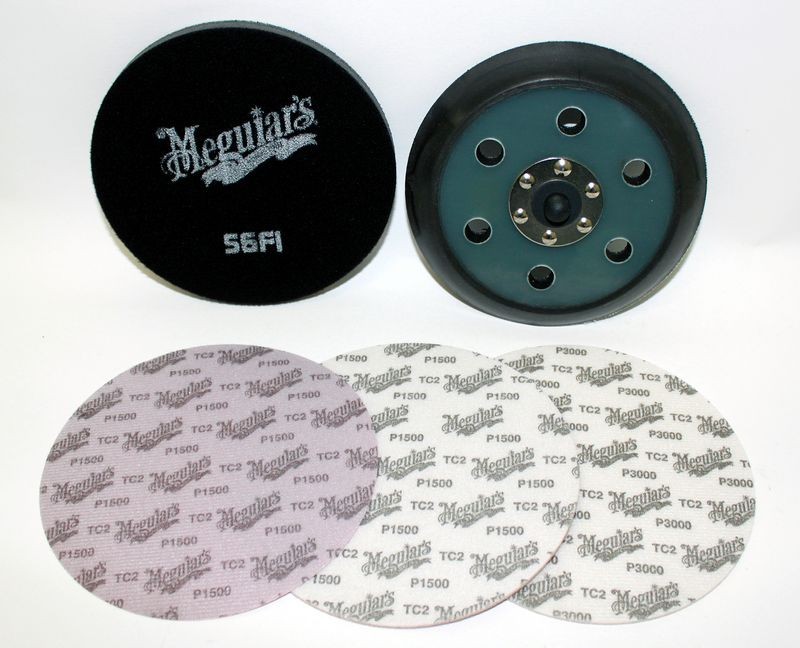
Next we'll Machine Damp Sand the deep swirls and scratches until the surface is flat using the new Meguiar's Unigrit Professional Finishing System.
UnigritFinishingSystem000.jpg


The section below was sanded using the #3000 Unigrit Foam Finishing Disc on the Meguiar's G110v2 on the 5.0 Speed Setting for about 5-6 Section Passes.
SandingMarkRemovalWSurbuf003.jpg


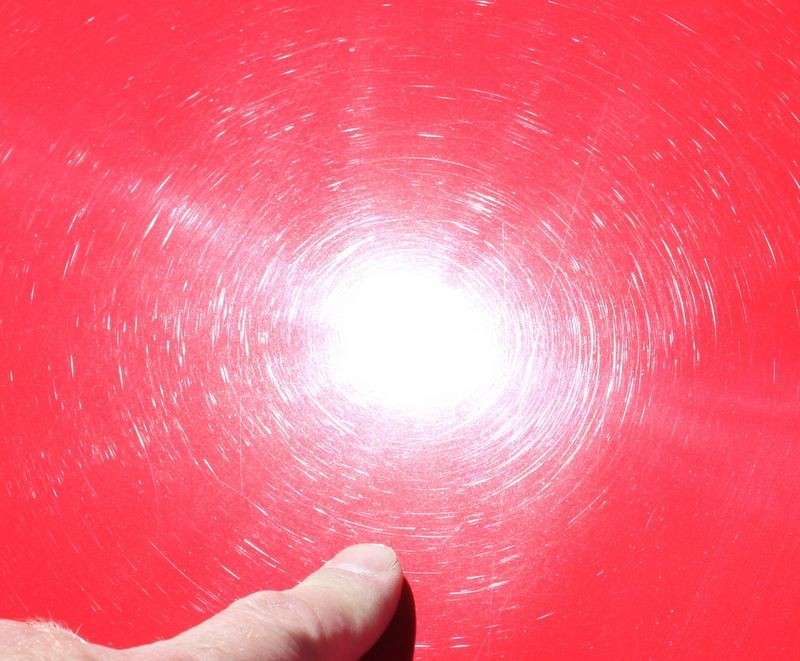
We moved the car back out into the sun to show just how flat of a sanding mark pattern the Unigrit Foam Finishing Papers leave behind and this is because of the Unigrit particle size and distribution of these particles over the face of each disc; two very important factors that make removing sanding marks quick and easy.
SandingMarkRemovalWSurbuf004.jpg


A very flat or matte appearance
In person, the paint actually has a sheen to it as it's just a quick step away from a polished look because the sanding marks are so shallow and flat...
SandingMarkRemovalWSurbuf005.jpg


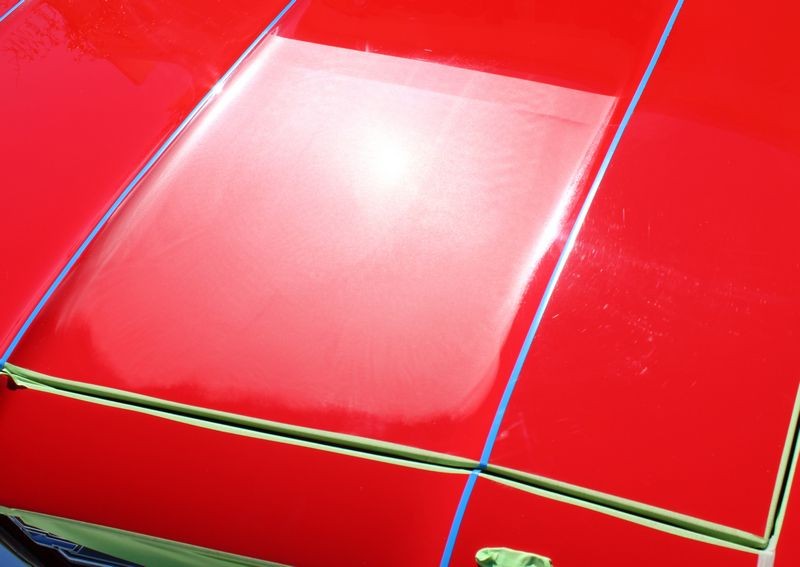
Back in the garage under the lights, you can see the Damp-Sanded area and the swirls and scratches in the rest of the paint.
SandingMarkRemovalWSurbuf006.jpg


Here are the results after Machine Compounding using the Surbuf MicroFinger Buffing Pads on the Meguiar's G110v2 on the 6.0 Speed Setting with M105 Ultra Compound for about 5-6 Section passes.

We followed this with M205 Ultra Finishing Polish on a W9207 Foam Finishing pad on the 5.0 Speed Setting using the G110v2 for about 4 passes with medium pressure and then two more section passes with just a little more than the weight of the machine to keep the pad flat to the surface. The results you see here are only after polishing with M205, there is no wax or paint sealant applied at this point.

The test section was also wiped clean using straight Mineral Spirits to remove any residual polishing oils.
SandingMarkRemovalWSurbuf007.jpg


SandingMarkRemovalWSurbuf008.jpg


SandingMarkRemovalWSurbuf009.jpg


Note the Dime in this picture carefully placed onto the paint
SandingMarkRemovalWSurbuf010.jpg


Close-up to show there are no sanding marks left on the surface, no tick marks or haze. There is a spec of dust just to the lower left hand corner off to the side of the dime that we left there to show just how close we are to the paint when taking this picture. This paint is LSP ready.
SandingMarkRemovalWSurbuf011.jpg


On the Autogeek.net Website

Surbuf R Series 4 Inch Buffing Pads 2 Pack
Surbuf R Series 5.5 Inch Buffing Pads 2 Pack
Surbuf R Series 6.5 Inch Buffing Pads 2 Pack
 
Sorry for the multiple posts but in other forums I am associated with if you do not post in multiple areas you do not get very many responses, thanks for the merger.
 
Sorry for the multiple posts but in other forums I am associated with if you do not post in multiple areas you do not get very many responses, thanks for the merger.

No problemo...

On a well run, active forum one thread and a well written subject will get you most if not all the information you need.


Note this isn't directed at you but for everyone that will read this thread into the future... (I try to write for the future, not just the present thread)

How to write a good title for your thread


:)
 
I have an assortment of 5.5 inch pads, (2 yellow cutting pads, 1 six inch cutting pad edge 200, four medium polishing pads and a few white/blue finishing pads) and I can get ultimate over the counter, so you feel as though given time and technique we will be able to polish out 90-95% of defects? Purple foamed wool will not be necessary? I will have a day and a half to complete this job if I accept it, if I take it I plan on completing it.
 
I have an assortment of 5.5 inch pads, (2 yellow cutting pads, 1 six inch cutting pad

I don't like to make predictions unless I'm standing over the car with you in the same garage and I just finished doing a test spot and am now inspecting the results....

That said, with the yellow cutting pads and M105 on the GG ROP... yes. You'll want to clean your pads often however you can. I would simply get some terry cloth towels and a nylon brush and use the clean your pad on the fly technique.


Do a Test Spot when you first get possession of the car. Lay down a strip of painter's tape and ONLY work on one side of it. Work some M105 with a yellow foam cutting pad on the 5.0 to 6.0 speed setting for 5-6 section passes and as long as you still have a wet film on the surface, bring your pressure up a little and make a few more finishing passes.


Then check your results.

If it looks good, move forward. If the swirls are removed but the paint has micro-marring then do the polishing step and inspect again. If it looks good then move forward.

If it doesn't look good after this step, the post back here what you're seeing.


:)
 
Back
Top