Guide to taping off a car

I have another article on taping-off, I'll see if I can dig it up.

The taping-off video is actually very "detailed", and instead of reading text and looking at pictures you can sit back and watch and listen...

List of Autogeek's Show Car Garage Online Classes


I had my friend Sam's Porsche back to use in this video...

1994BlackPorscheOC012.jpg


1994BlackPorscheOC014.jpg


1994BlackPorscheOC015.jpg


:)
 
Here's a Lotus Elise I buffed out for a video I made with Richard Lin
2LotusTape10.jpg


2LotusTape11.jpg


2LotusTape3.jpg


2LotusTape71.jpg


2LotusTape5.jpg


2LotusTape6.jpg


2LotusTape05.jpg


2LotusTape06.jpg


Kind of a related tip...


The Soft Flannel Bed Sheet Tip
I like to cover up the engine on special interest cars and especially show cars or restored cars where the engine and engine compartment are clean enough to eat off of. The reason for this is because it's all to easy for stray splatter from either wet-sanding or machine compounding and polishing to spray onto the engine and engine compartment and cleaning these areas can be difficult and very time consuming.

Here's a video I made a number of years ago that explains why to cover an engine and shows my method of using a clean, soft flannel bedsheet to carefully cover and protect the engine. You can also do this for trunks and interiors if you're working on a convertible with the top down or off the car.

Covering the motor on the Panic Parrot
[video=youtube_share;sE_0W-VXjR4]- Covering the motor on the Panic Parrot with a flannel bedsheet[/video]


The Panic Parrot - 1950 Studebaker Starlight Coupe

Keeping it covered, keeps the engine clean...

PPFrontShot1.jpg


PanicSpeedGlaze7.jpg


Keeping it covered means no detailing the very detailed engine afterwards...

2PanicFinished1.jpg


:)
 
And for all the lurkers into the future, here's a related topic...

The Beach Towel Tip


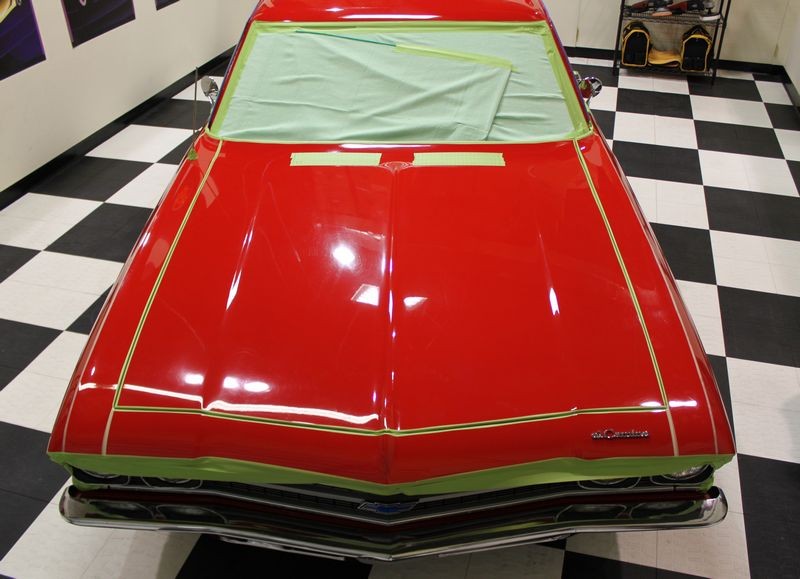
Here's a tip I use on some cars I detail to cover and protect the plastic surrounding the wiper arms at the back edge of the hood of cars, just before the windshield.

Beach Towels tend to be longer in one direction than the average bath towel; on average, beach towels run around 60" or 70" in length. Where this comes in handy over a bath towel is that your average car, truck or s.u.v. windshield is around 5' to 6' across so a Beach Towel is usually long enough to cover and protect the plastic, wiper arms, and glass in one fell swoop whereas the average bath towel falls short.


See if you can relate...
Sometimes it seems like splatter, that is the little white dots of product that land on the glass can be some of the hardest little things to remove 100%, not to mention time-consuming. So with this technique you can avoid the hassle entirely.

This tip is mostly for working with rotary buffers as they will tend to sling-out splatter more than machines like the Flex 3401, the Cyclo and DA Polishers like the Porter Cable.

I have seen people lift these other non-rotary buffers off hoods while the pad is still spinning at a high rate of speed and completely cover a windshield with splatter so it does happen. See these threads,

Here's a tip... don't lift the pad off the paint till you've turned the polisher off and the spinning pad has slowed down...

What not to do when detailing a car!


I know detailers that never tape-off or cover anything up and that's okay too, it's personal preference and it could be that you're just incredibly careful as well as incredibly good at this craft. It could also mean the cars you're working on it won't matter if you do get spatter into hard to detail areas.


For the rest us, here's how you use a Beach Towel to cover-up and protect areas you don't want to get splatter onto or into and then have to "detail" these areas and components later, after the polishing and waxing is over.


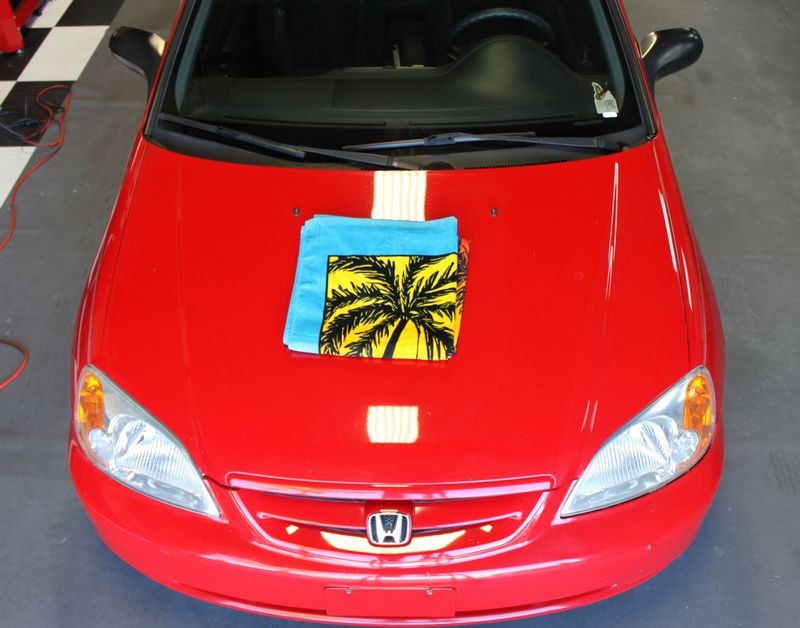
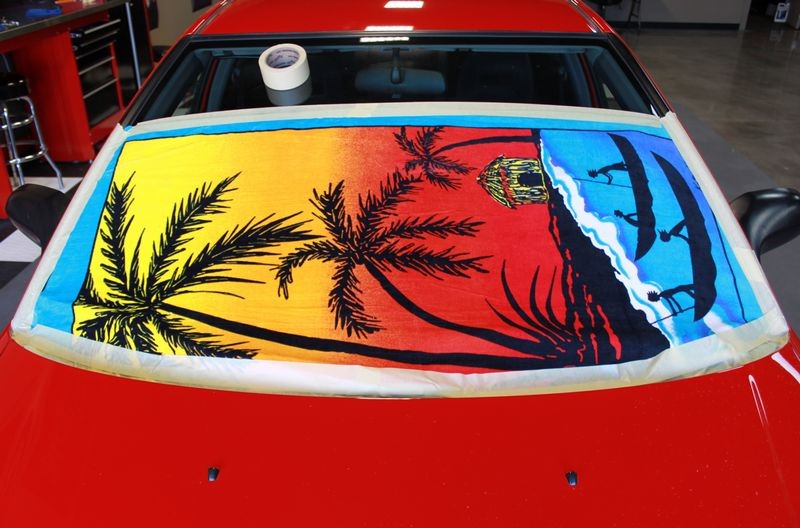
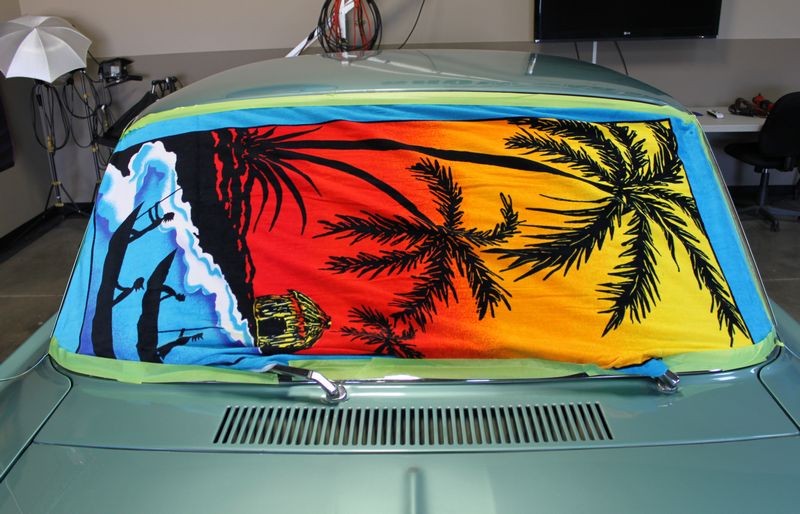
This is a stylish Beach Towel I found at Walgreens for around $6.00, my normal towel is white and ugly so I thought this would make for a more fun how-to article. Just to note you could also use paper or plastic, whatever works for you... I like Beach Towels for a number of reasons that paper and plastic don't offer but I have used both plastic, (2 mil painter's drop cloths), and paper, (usually newspaper but painter's masking paper works great too).


BeachTowelTip000.jpg


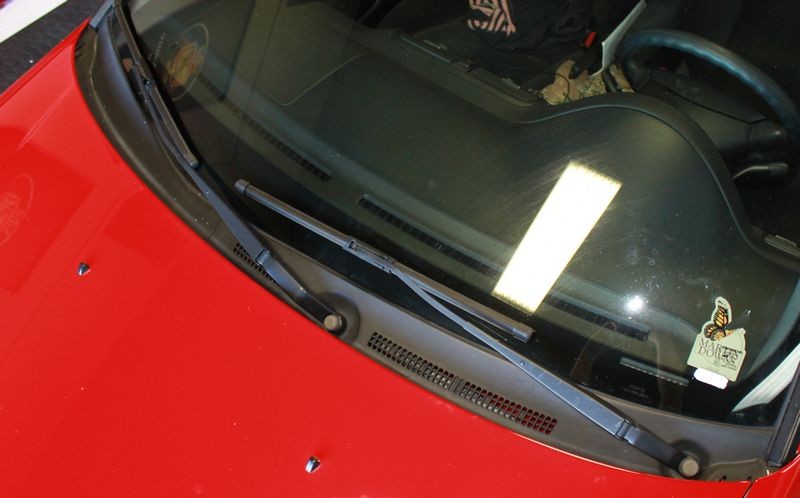
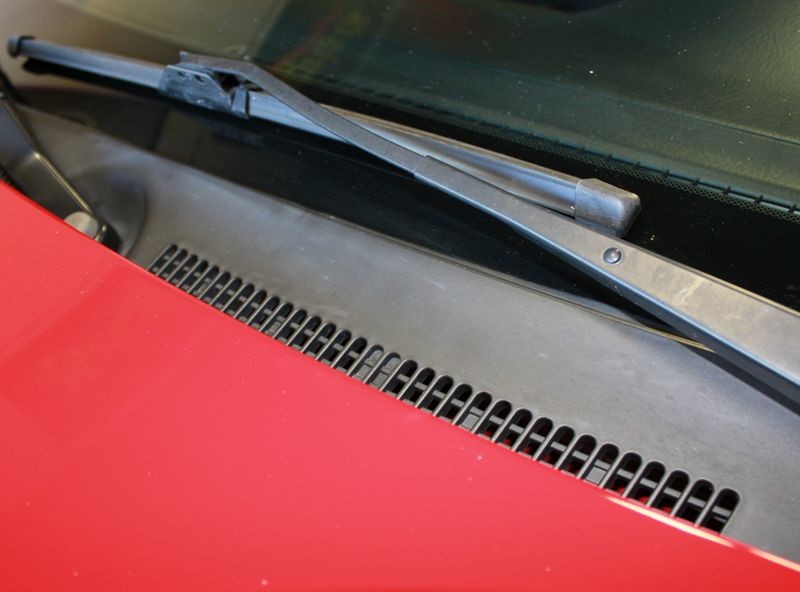
Here's the area I'm talking about that you want to cover up on modern cars, they often have plastic material with grill or vent openings that if you get splatter onto and into these areas it can be difficult and time consuming to remove.
BeachTowelTip001.jpg


In most cases, if you're restoring the paint on someone's daily driver, not only is the paint neglected but the plastic is neglected meaning it's weathered, dried and dull and it seems like splatter really likes to stick hard to plastic in this condition.

If you do get splatter on these areas, it's also very unsightly and your customer might not appreciate it if you don't remove it. So with this technique, you never get splatter into and onto these areas in the first place. The old an ounce of prevention idea...
BeachTowelTip002.jpg


Not only does a Beach Towel work well for this type of job you can also re-wash it and use it again... so it's green technique...
BeachTowelTip003.jpg


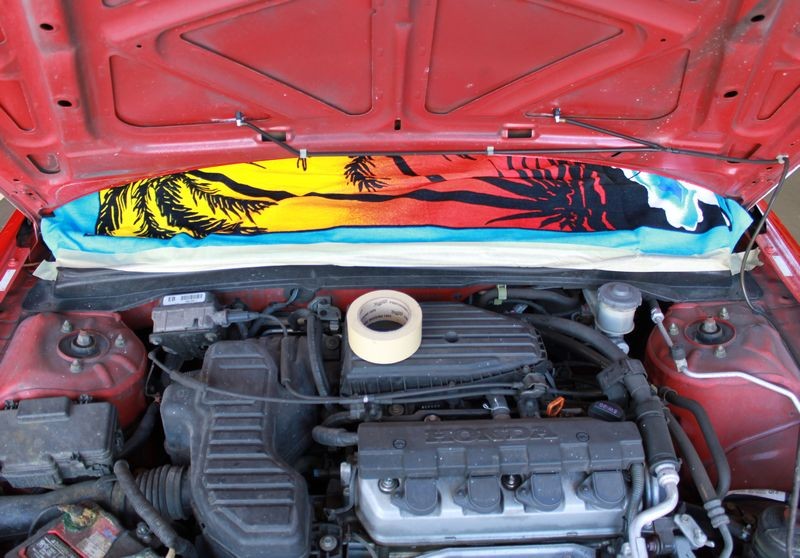
Start by opening the hood and locating a place to tape one edge of the towel too, make sure the ends of the towel don't bind in the hinge mechanism and don't place dry cloth anywhere on a hot engine where it could be a fire danger or get caught into any moving parts. In other words, use common sense.
BeachTowelTip004.jpg


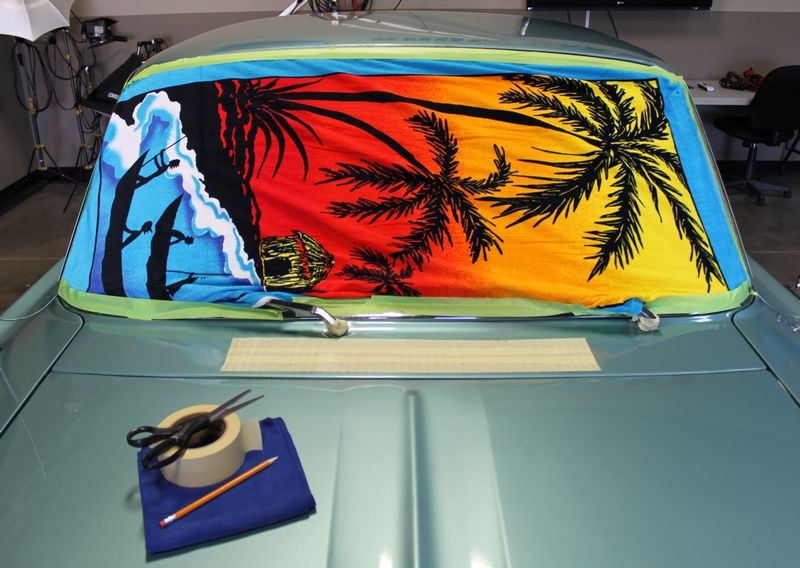
After carefully closing the hood, then use some Painter's Tape to affix the towel to the windshield so it doesn't fall down and if you're also taping off other plastic, vinyl or rubber trim, then tape-off these components accordingly.

BeachTowelTip005.jpg


In this instance the towel did not reach all the way to the top of the windshield; this is okay however because the sling and splatter is mostly an issue for the lower portions adjacent to the hood where the buffing is taking place. You can also use this for the rear window. Side windows are not usually a problem for the glass because the panels are vertical.

BeachTowelTip006.jpg


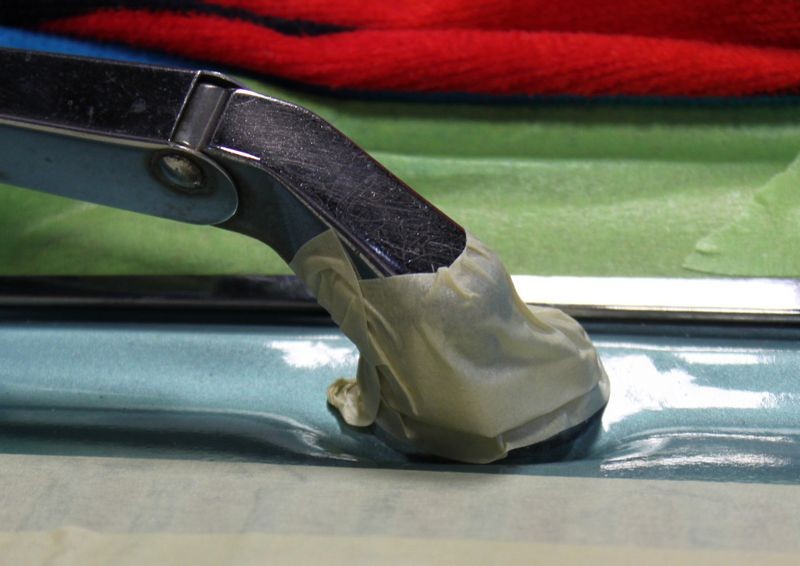
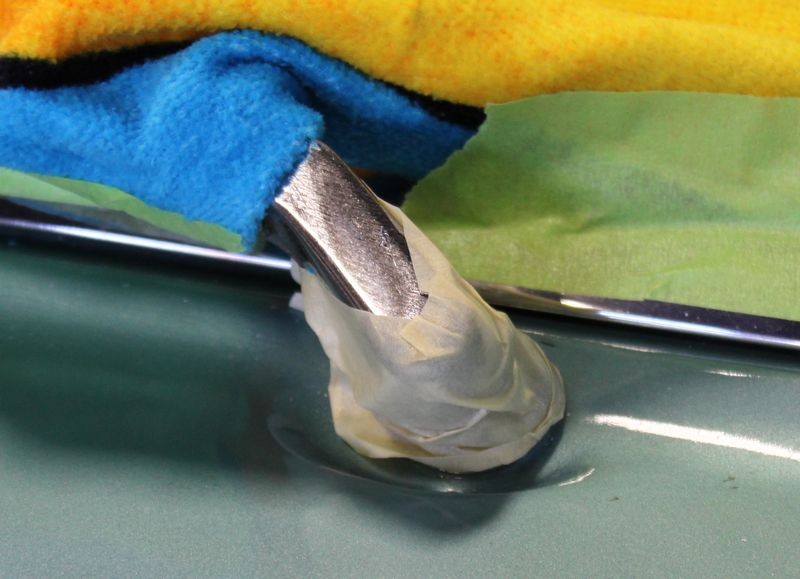
Notice how I've run a couple of strips of wide tape along where the Beach Towel meets the rear edge of the hood?
BeachTowelTip007.jpg


BeachTowelTip008.jpg


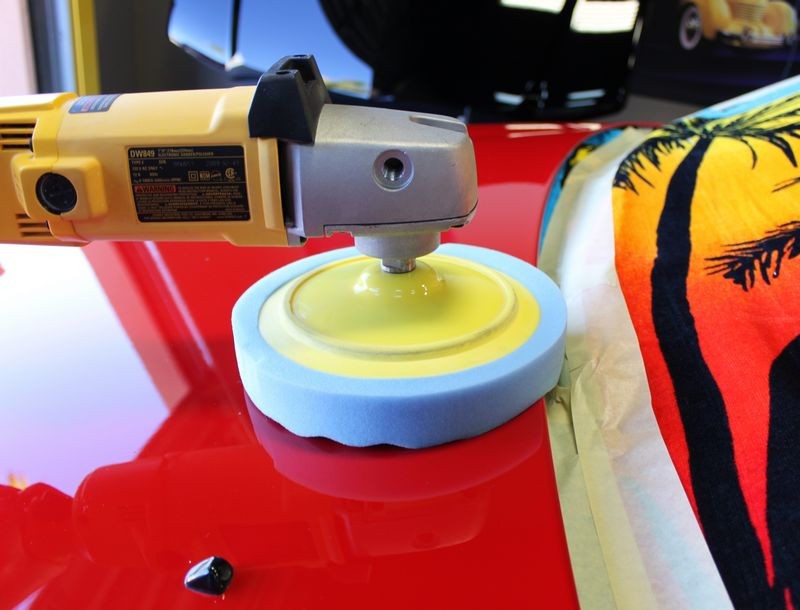
In some cases, the design of the vehicle means there's no gap or air space between the edge of the hood and the glass or wiper arm area, in these cases, you have to be careful when running your polisher not to run the buffing pad into the Beach Towel because the nap is grippy and your buffing pad could grab it and yank it into itself.

So for cars with a low or no air-gap between the paint and the area you're trying to cover up, being careful when buffing these areas is important, but I also run a couple of strips of tape across this area as a buffing pad that's lubricated with product will just bump into the tape, it won't snag it and possibly pull it off the area and into the pad.

Just an extra safety precaution, you can decide how DO or AR you want to get.

BeachTowelTip009.jpg


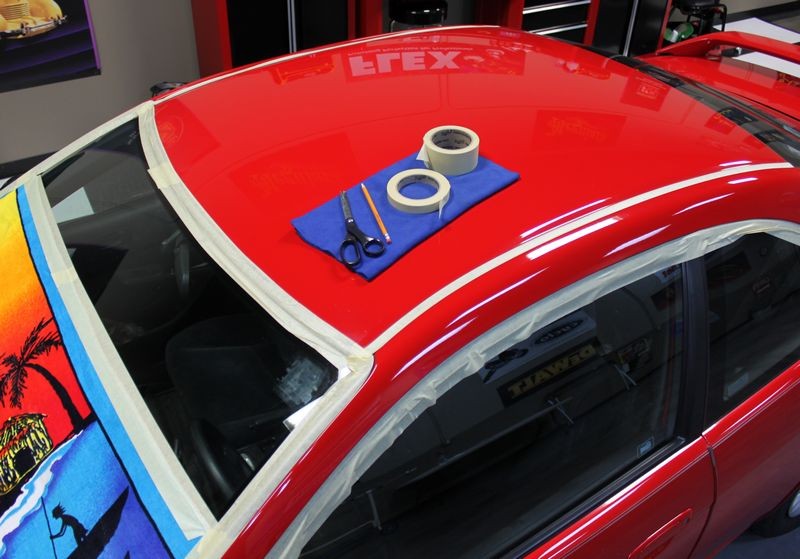
Then continue working around the car taping areas off you don't want to get compound or polish residue.
BeachTowelTip010.jpg


Classic and Antique Vehicles
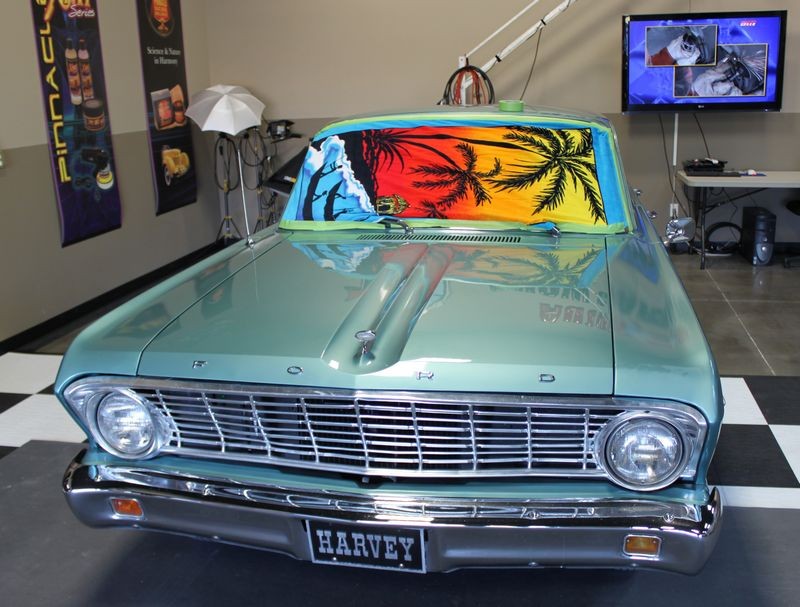
For classic cars, there's usually zero plastic around the windshield, wiper arms and edge of hood but you may still want to cover-up the windshield glass so you can use the Beach Towel Tip for classics too...
BeachTowelTip012.jpg


BeachTowelTip013.jpg


And of course... since most classics have air vent grills in front of the windshield, so Tape it off and avoid a lifetime of ugly...

BeachTowelTip014.jpg


And any other areas that you don't want to run a toothbrush or some kind of detailing brush...

"Polishing paint is polishing paint, detailing is getting the wax out of the cracks"


BeachTowelTip015.jpg


BeachTowelTip016.jpg


I've also used the extra large Guzzler Waffle Weave Drying Towels and while not always long enough to reach across 100% of a windshield, they do work as you can see in this thread,

Damp-Sanding Tools, Tips and Techniques by Mike Phillips


redelcamino_015.jpg


The Beach Towel Tip... simple and effective plus a real time saver...


On the Autogeek.net Store

Meguiars Professional Masking Tape Combo
3M Automotive Performance Masking Tape 3 Pack
The Ultimate Guzzler Waffle Weave By Cobra 28 x 44 inches
 
How much is the video AG has that covers very well the whole taping topic? Does it comes in a dvd or is a one time pay and watch?

Exotic Auto Detail via tapatalk
 
Thank you DLB and Mike for the great info. :dblthumb2:
 
Use 3M fine line blue tape for tight corners , otherwise you can stretch the tape to a contour if the curve isnt too tight.
 
Ordered video yesterday. I'm hoping I learn some tricks. I mean it's not rocket science is it ? We'll see.
 
taping a rounded corner....... Thats the trick I want to know

When you watch the video, watch for the tip for corners, it shows having a foot or two of tape pulled out away from the end where I'm attaching it, this helps you to tape around corners because there's more tape off the roll and it is better able to stretch and curve.

:)
 
Just a thought Mike, as a mechanic I have plenty of electrical tape around which works really good for stretching around corners....I don't see it having an issue with sticking to paint or other items because it does not leave a residue, I will try it on my car this weekend.
 
I don't see it having an issue with sticking to paint or other items because it does not leave a residue, I will try it on my car this weekend.

It doesn't leave a residue if you don't leave it on too long and/or if while it's on it doesn't become warm or hot.

I've used electrical black tape when that's what I had and it will work, but it can leave a sticky residue in some situations.

Let us know how it goes... if you see any issues, note how long it was on the paint and the temperatures during the detailing project.


:xyxthumbs:
 
It’s one thing to tape off and cover soft moldings and items to protect them from buffer contact, but I see way too many people getting carried away with it almost to the point of ridiculousness. It’s not like buffing is a refinish operation where every square inch of the surface that isn’t being buffed requires covering. Glass, lights and chrome are the easiest to clean and the hardness to damage so I personally feel it’s extreme overkill(not to mention a waste of materials) to cover them up. If you are using quality products, preventative workflows and doing a thorough post-polish/pre-protect wash then I say keep the taping/covering to a “bare” minimum. I prefer to tape as I go immediately re-placing my tape so that the compound doesn’t create a hard line or to avoid the adhesive from sticking to the surface.
 
Ordered video yesterday. I'm hoping I learn some tricks. I mean it's not rocket science is it ? We'll see.

It's not a DVD guys, you watch it on computer. Customer service told me this morning.
Just click on the link.
 
Here's two related articles...

TOGW = The Other Guy's Wax

"Polishing paint is polishing paint, detailing is getting the wax out of the cracks"


What you tape off and how much you tape off is personal preference...

Here's a good guideline...
Consider how hard the trim material will be to remove compound, polish or wax residue off of and let that help you decide what to tape off.

Also, some trim components are plastic and if you run the pad on a rotary buffer into the trim you can accidentally expose the plastic under the painted or pigmented portion of the trim, I've seen this a lot on Corvette emblems.


:xyxthumbs:
 
It’s one thing to tape off and cover soft moldings and items to protect them from buffer contact, but I see way too many people getting carried away with it almost to the point of ridiculousness. It’s not like buffing is a refinish operation where every square inch of the surface that isn’t being buffed requires covering. Glass, lights and chrome are the easiest to clean and the hardness to damage so I personally feel it’s extreme overkill(not to mention a waste of materials) to cover them up. If you are using quality products, preventative workflows and doing a thorough post-polish/pre-protect wash then I say keep the taping/covering to a “bare” minimum. I prefer to tape as I go immediately re-placing my tape so that the compound doesn’t create a hard line or to avoid the adhesive from sticking to the surface.

I totally agree. I do keep a masking machine on the wall of my shop that I can use to mask sections as needed, but overall I find that especially if I'm using a DA polisher which by nature minimizes splatter, there is little point in doing intensive taping. Just mask whatever section you're working on as you come to them and remove the masking right after you're done.

Especially when working on something with a delicate or fragile finish I prefer this method since I have had tape (yes, the comparatively "mild" green 3M automotive tape) pull up chrome plating, and leave adhesives behind that were difficult to remove before even though it was only in place for less than 24 hours.
 
To me it comes down to a huge variety of factors. I have gone from taping everything perfectly (like is shown in Mikes pictures) to not taping anything at all.

It comes down to countless factors. What car, how much dust the compound or polish I am using will produce, method of cleaning paint when complete, etc. etc.

I personally like to do everything like an assembly line. I don't want to lay one piece of tape and then dress half a tire and then clean a window, you get the idea. When I tape I want to get it all done at one time. Having said that I understand and appreciate the point of taping a section at a time. If I was working in certain conditions or with certain paint I can see where that would be a good idea.
 
I tend to go a little overboard on taping, but only because I hate scrubbing polish residue out of cracks or off of rubber seals. I cover the whole windshield and cowl, but thats mainly to prevent a bunch of dust and splatter from going into cowl vents and into the engine bay. I also tape pretty much every piece of black rubber molding/seal that I can see from the outside of the car. IMO it makes clean up so much easier.

I used to no tape anything and I got really tired of trying to scrub polish residue off of a ruber seal if i hit it by accident.
 
If you are using a rotary (especially for the first few times), you may consider taping very sharp contours of body panels also.
 
Back
Top