Headlight Restoration-new UV sealant idea

The surface flashes over and dries in a few minutes under "normal" conditions when the plastic headlight is suitably warm. It actually takes several hours to CURE (completely harden). On mine I shut the headlights off after about twenty minutes.

On a cool day, it also helps to park the car so the headlights face the sun. One would not do that on a hot summer day, though.
 
Hey guys, i posted before a Dodge Stratus '03 that i restored headlights off. That was my first attempt at this job.

In the last days, i did another 2 headlight restos. A Chevy Malibu '06 and a Malibu '97.

The pics speak for themselves:
 
The surface "flashes off" (dries by evaporation) in minutes. Deep-curing takes longer, perhaps hours; but I turned the headlights off after twenty minutes, figuring that moisture had been driven off by the heat after that time. If there is any sun out, it also helps to park the car so the sun shines on the headlights...but in cool weather, not in the middle of summer (the urethane will dry TOO fast and won't level out like we want it to).
 
Hi everyone!

I'm a long time lurker, first time poster (now that my account finally got authorized...)

I'm replacing one of my headlights soon and decided to practice the 60/40 method on the old one.
I started with 400, then 600, 1000, 1500 and 2000 (all wet, hand). Then a coat of OMS and finally the 60/40 mix.

Here's the sorry-ass result:

Here's the other headlight, obviously not treated:


It was looking obviously sanded after 2000 when dried, but I thought the next treatment would fix it (guess not! :)

So... what am I doing wrong?


P.S. noticed that 1 layer of masking tape isn't enough, will use 2 next time -- think someone already mentioned that

It almost looks like you didn't sand all of the old coating off. The second picture looks like there are small pieces on the lens or something. Usually when you wipe the completely sanded lens with mineral spirits, you'll see about what the lens will look like with spar on it. If it isn't clear at that stage....you might need to sand it more. It should look brand new.
 
2nd photo is after the 60/40 dried (30-40min). When I just put it on, it looks reasonably transparent, but then it turns into this.
What you're seeing in 2nd photo is bits chipped off by small particles off the highway; you can see them on the 4th photo, too. Problem is, some of them go in pretty deep (few mm) and I suspect it's not a good idea to sand down that much. Not all that big a deal, though.

When I wipe it with oms it looks clear while still wet but not when dry. Guess I'll try sanding longer with 2000
 
Hi everyone!

I'm a long time lurker, first time poster (now that my account finally got authorized...)

I'm replacing one of my headlights soon and decided to practice the 60/40 method on the old one.
I started with 400, then 600, 1000, 1500 and 2000 (all wet, hand). Then a coat of OMS and finally the 60/40 mix.

Here's the sorry-ass result:

Here's the other headlight, obviously not treated:


It was looking obviously sanded after 2000 when dried, but I thought the next treatment would fix it (guess not! :)

So... what am I doing wrong?


P.S. noticed that 1 layer of masking tape isn't enough, will use 2 next time -- think someone already mentioned that

---------------------------------------------

I only use one layer of masking tape.

When using the 50/50 mix, I wet sand up to 2000 then buff with compound (Finesse It 2) which is @ a 3000 grit. The lenses look great at this stage.

Then I clean with denatured alcohol and once dry, clean with mineral spirits.

Then the 50/50 mix goes on and 99% of the time I use a heat gun to speed the drying as most customers want to use their car once I'm finished.

To me, the better the lens looks before sealing, the better it'll look after sealing - which is why I use the buffing compound (Finesses It 2 is non-silicone based) so they lenses look like new before I seal them with the 50/50 mix.

Having said that, I'm changing over to the Light Rite sealant soon. Just picked up 6 cans and each can does 5 vehicles or 10 headlights. Offering a Lifetime Warranty not to fade or peel is attractive to customers - a $10 per car cost to me but the warranty drives more customers my way.

You can check out pics at: Headlight Restoration Phoenix and Valley Wide. and in the pics page, the 2003 Dodge RAM is my test Light Rite restoration vehicle. I will be update the site soon to reflect the Lifetime Warranty instead of the current 12 month warranty using the 50/50 mix.

I like both the 50/50 mix (anal of the finish before sealing) and Light Rite. But it seems the Light Rite Lifetime Warranty is what customers want.

Leigh
Phoenix, AZ
 
I tried a few more times today. Every time I apply the mix, it looks great for a short while, but then dries in the same pattern as it was applied - and ends up looking like it was sanded in that pattern.
Maybe I'm applying too much/too little mix or the ratio is wrong..?
Probably going to try again tomorrow

Are you absolutely sure that you are using the correct Spar? They make a few different types of finishes. The one you need to use is the Minwax Indoor/outdoor Helmsman Spar Urethane "CLEAR GLOSS". It comes in a 32oz can with a green label. It almost looks like you may have not got the "clear gloss" type...?
 
*facepalm*
Yup, it says "CLEAR SEMI-GLOSS"...
The canisters look almost identical, I should've been more careful
I think you will see a big difference now. Just make sure your sanding is adequate. You need to get all the old/new finish off. When you finish your 3000 damp sand you should be almost clear with no easily visible sanding marks.

Anxious to see your next ones.
 
Nice info....Thanks :) Thos resto's are lookin' bad-ass hotrod.....nice work:)
 
Success!

Driver side (treated):


Passenger side (not treated):


You can see the imperfections in the closeup -- dust particles, streaks -- but from 3ft away it looks good. Since I have to replace this headlight, I didn't bother with polishing (only did 2000 wet before OMS) - but doesn't look like it will be all that relevant.

One thing I'm not sure about -- I mixed about an ounce of OMS/Urethane the day before and left the mixture in the garage for a day -- does that have any ill-effects? Or does the mix stay good for a few days?
 
To tell the truth, I mixed some and kept it, to see how long it would last. I had it in a 35mm film canister. Eventually enough oxygen got inside so it hardened in the can. It took about a month. I had used it after two weeks and all was well. Not that I'd RECOMMEND doing that, but I was testing just what I could get away with.
 
Yeah, I'm wondering because I hear OMS evaporates pretty fast, so the ratio might be off the next time I use the mix...
I'll just mix less of it at a time from now on :)
 
I gave this another try on my scrap headlights since I have been using Opti-Coat to finish the lights for my customers. The problem is that the urethane mix leaves the light very sticky, it's not smooth.
 
I gave this another try on my scrap headlights since I have been using Opti-Coat to finish the lights for my customers. The problem is that the urethane mix leaves the light very sticky, it's not smooth.

If that's the case, something is going amiss with your application.
 
Yeah, I'm wondering because I hear OMS evaporates pretty fast, so the ratio might be off the next time I use the mix...
I'll just mix less of it at a time from now on :)


I use a Wendy's Frosty spoon and only mix exactly what I need when I need it. A while back I tried mixing some in a small glass jelly jar with an air tight lid. Within about a week it started turning darker colored and when I tried to apply it to a headlight.......lets just say the results were less than satisfactory and I had to wipe it off with mineral spirits and mix a new batch. From then on I only mix what I need.
 
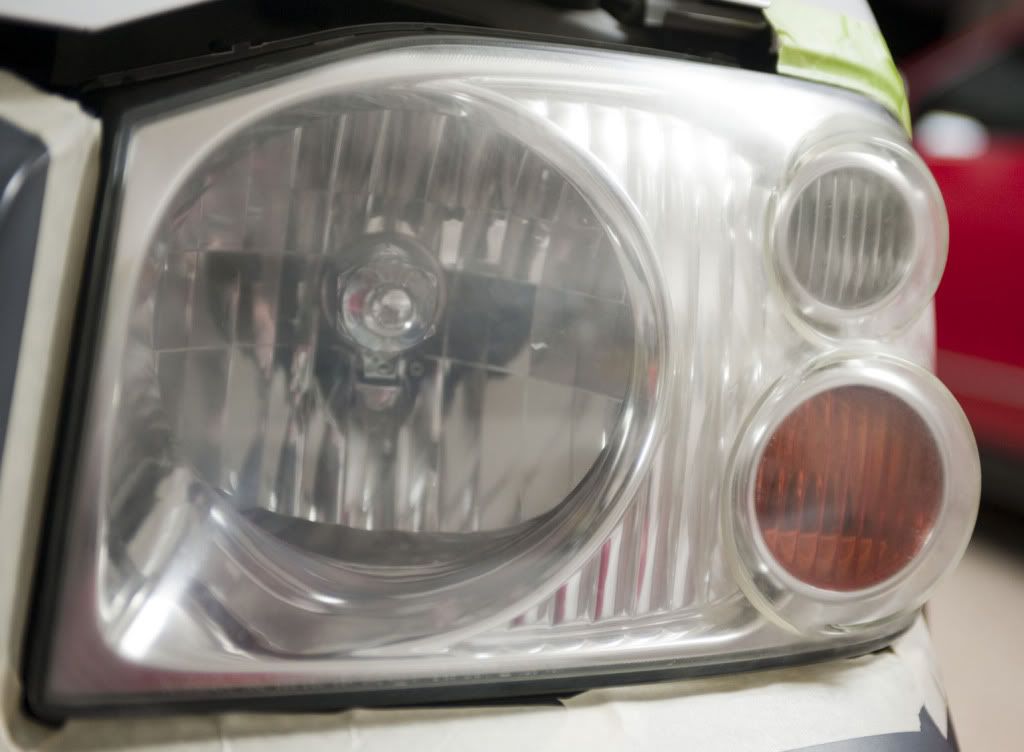
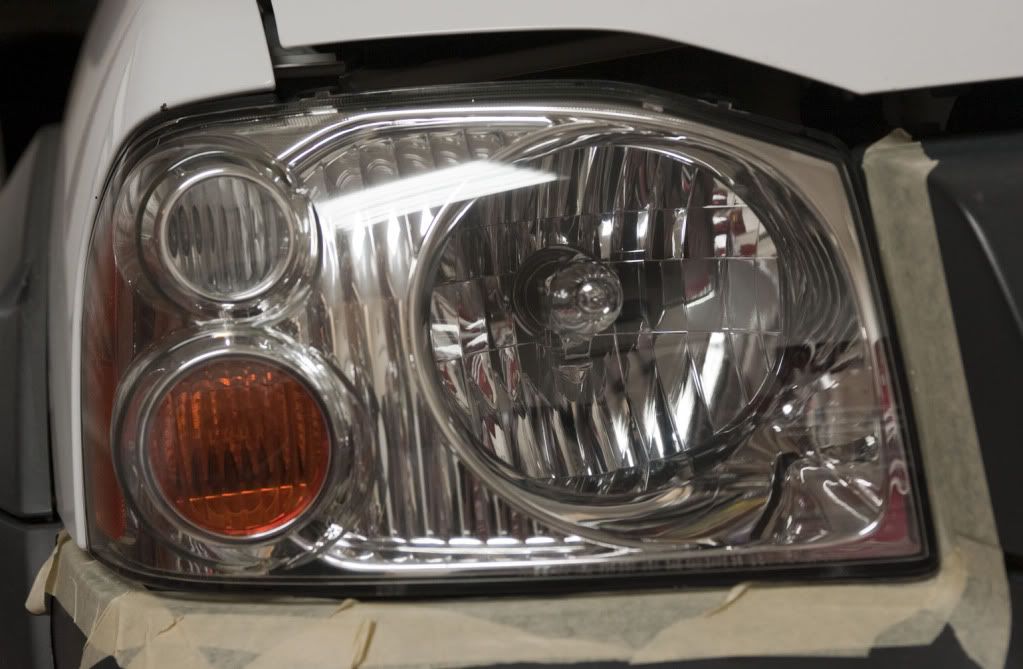
Gave this method a try on my brother in law's 2001 Nissan Frontier. About a year ago he tried to correct his lenses with the 3M headlight kit and it didn't help much. Wet sanded with 800, 1500, 2000, 2500, 3000 and no polishing. Very pleased with the results- now we'll just have to see how it holds up to an Arizona summer!

Left headlight without treatment:
Untreated.jpg


Right headlight with:
Treated.jpg
 
Back
Top