Navigation
Install the app
How to install the app on iOS
Follow along with the video below to see how to install our site as a web app on your home screen.
Note: This feature may not be available in some browsers.
More options
Style variation
You are using an out of date browser. It may not display this or other websites correctly.
You should upgrade or use an alternative browser.
You should upgrade or use an alternative browser.
Is there and easier way to remove artillary fungus?
- Thread starter Chris Thomas
- Start date

Flash Gordon
Well-known member
- Feb 6, 2010
- 11,460
- 463
These things can be a pain
I always remove the top layer with my fingernail, then during the wash process, I spray APC on the area and remove the rest with my fingernail or a mitt
I've never known the proper term for what this was. I always thought it was some weird form of tree sap
I always remove the top layer with my fingernail, then during the wash process, I spray APC on the area and remove the rest with my fingernail or a mitt
I've never known the proper term for what this was. I always thought it was some weird form of tree sap
Kristopher1129
New member
- Jan 3, 2011
- 2,861
- 0
I've always wondered what these spots were. I've never had a contamination of them so I just did what Kristopher1129 said, use my fingernail. But what about a plastic razor blade for the bulk, then using ipa, ms, paint thinner or whatever might be appropriate for the residue?
Just found this if there's anything useful: Reader's Suggestions for Removal From Cars — Artillery Fungus — Penn State Extension
I had a customer that came in once with these spots. He actually used WD40 and a plastic blade to remove some himself. When I took it inside...I could see all the spots he used the blade on. Every spot he did had marring from the blade.
I thought it was kind of strange being that it was a plastic razor blade...but this is why I've stuck with the finger nail.
Chris Thomas
Optimum Guru
- Dec 21, 2007
- 1,824
- 0
- Thread starter
- #24
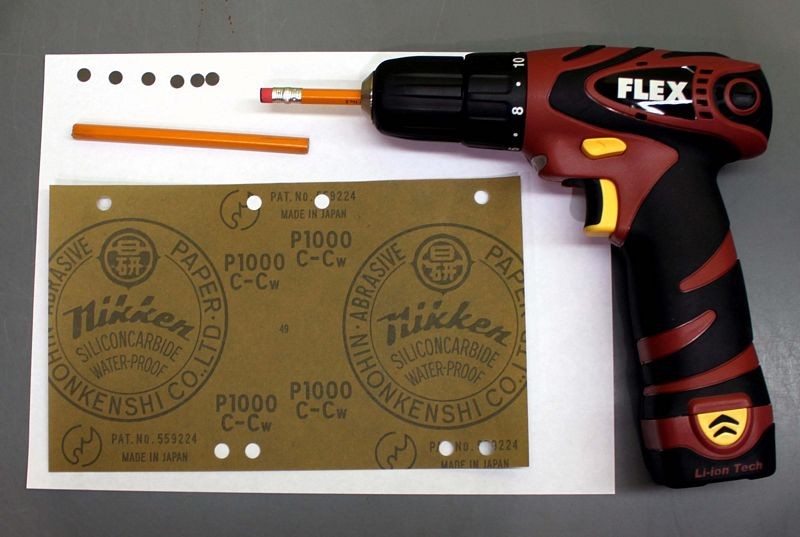
Since starting this thread two years ago, I have found that undiluted power clean will remove fresh ones, but the baked on ones still need sanding. I use a hole punch to make some 3000 grit "dots" and glue them to new pencils with erasers on the eraser end. I just lightly twist till gone then polish out the spots during the detail. The size of the dot ensures the no more clear is removed than completely necessary. It goes pretty quick this way and beats the hell out using my fingernail in a chemical.
I think I thought of this application after reading about Mike Phillips feather sanding instructions if not then I'm not sure who to give credit to.
I think I thought of this application after reading about Mike Phillips feather sanding instructions if not then I'm not sure who to give credit to.
shoeless89
New member
- Jul 18, 2010
- 1,985
- 0
Since starting this thread last year, I have found that undiluted power clean will remove fresh ones, but the baked on ones still need sanding. I use a hole punch to make some 3000 grit "dots" and glue them to new pencils with erasers on the eraser end. I just lightly twist till gone then polish out the spots during the detail. The size of the dot ensures the no more clear is removed than completely necessary. It goes pretty quick this way and beats the hell out using my fingernail in a chemical.
I think I thought of this application after reading about Mike Phillips feather sanding instructions if not then I'm not sure who to give credit to.
Thats an amazing idea!
Kristopher1129
New member
- Jan 3, 2011
- 2,861
- 0
Since starting this thread two years ago, I have found that undiluted power clean will remove fresh ones, but the baked on ones still need sanding. I use a hole punch to make some 3000 grit "dots" and glue them to new pencils with erasers on the eraser end. I just lightly twist till gone then polish out the spots during the detail. The size of the dot ensures the no more clear is removed than completely necessary. It goes pretty quick this way and beats the hell out using my fingernail in a chemical.
I think I thought of this application after reading about Mike Phillips feather sanding instructions if not then I'm not sure who to give credit to.
I think sanding is a bit extreme for removing these. I can usually clay all of them off within an hour or so. Sometimes longer on huge vehicles that are covered in them.
I can't imagine gluing sandpaper dots to a pencil, and attacking each dot would take less time than just claying, and using your nail quickly if necessary.
How long does this take you? It sounds insanely time consuming for something that is just topical. I can get even the toughest ones out with just clay, ONR, and my nail in seconds. Sanding has never even crossed my mind.
Flash Gordon
Well-known member
- Feb 6, 2010
- 11,460
- 463
I think sanding is a bit extreme for removing these. I can usually clay all of them off within an hour or so. Sometimes longer on huge vehicles that are covered in them.
I can't imagine gluing sandpaper dots to a pencil, and attacking each dot would take less time than just claying, and using your nail quickly if necessary.
How long does this take you? It sounds insanely time consuming for something that is just topical. I can get even the toughest ones out with just clay, ONR, and my nail in seconds. Sanding has never even crossed my mind.
:iagree: I've never had to resort to sanding to remove these
Chris Thomas
Optimum Guru
- Dec 21, 2007
- 1,824
- 0
- Thread starter
- #28
...IDK if the vehicle was exposed a long time or what, but these had to be sanded. The majority came off with clay, but a mark the exact size and shape of the projectile was left that could not be felt with a fingernail.
^^^Earlier in the thread I mentioned that ordinary means would not remove these. I always use the least aggressive methd to do the job...and I have LOTS at my disposal.
I think sanding is a bit extreme for removing these. I can usually clay all of them off within an hour or so. Sometimes longer on huge vehicles that are covered in them.
I can't imagine gluing sandpaper dots to a pencil, and attacking each dot would take less time than just claying, and using your nail quickly if necessary.
How long does this take you? It sounds insanely time consuming for something that is just topical. I can get even the toughest ones out with just clay, ONR, and my nail in seconds. Sanding has never even crossed my mind.
You may be dealing with fly poop. The stuff I've come across will NOT come off with clay, cleaners, fingernails, etc. The above surface part comes right off...but theres a little dot of brown that you can't feel and it won't budge. I suppose if not removed withing an appropriate amount of time it can go below surface...and you must have some magical clay if yours can go below the surface.
I keep some pencils made up so it doesn't take long at all now. I'd never dream of taking time to set that up during each vehicle...give me some credit, I'm no newb. All I can say is that you should thank God you've never gotten one in like this. Time wise, it depends on how covered the car is and I've only seen 3 that I had to resort to this method. The last two went very quickly.
As for not "being able to imagine" taking this route, necessity is the mother of invention. Any other means of sanding would take more paint than just the damaged area and take far longer to restore the gloss. So...if you have a car that claying, soaking, and fingering (pun intended) won't remove the spots, you have a not too invasive option that you didn't have to come up with. Sanding shouldn't be so taboo anyway...we all use compounds and polishes which are just liquid "sandpaper". I just wanted to remove as small an amount of clear around the spot as possible.
604_Snooze
New member
- Oct 30, 2011
- 241
- 0
will a steamer work?
Chris Thomas
Optimum Guru
- Dec 21, 2007
- 1,824
- 0
- Thread starter
- #30
will a steamer work?
Nope, tried that too.
Thanks for all the suggestions, fellas...but honestly the thread is from 2009 and I've already figured out what works for me. I hope you never see one of these for yourself and if anyone ever asks for a quote: make sure you test one or two first.
 rops: Chris@OPT
Mike Phillips
Active member
- Dec 5, 2022
- 51,004
- 7
Since starting this thread two years ago,
Lately I've seen a few threads from the past brought back to life so I've been making it a habit to check the post date of the original post and first thing I noticed was this thread was a few year old...
")
Nothing wrong with bring old threads back to life either, they usually have plenty of relevant information.
I think I thought of this application after reading about Mike Phillips feather sanding instructions if not then I'm not sure who to give credit to.
I just did an advanced search using the words pencil and drill and found where I posted the pictures for the above idea...
Need your suggestions - Final steps in Rock Chip repair
Here was my post with pictures...
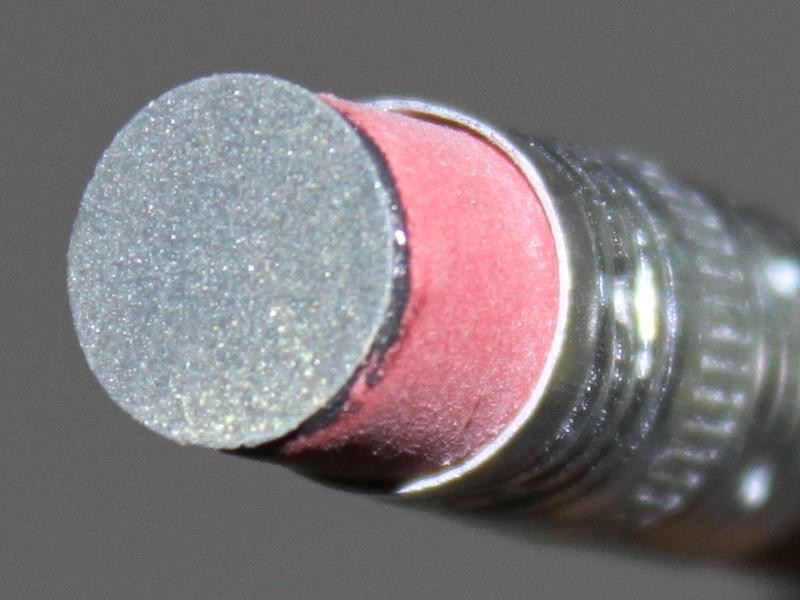
Super glue a small round piece of the sandpaper to the back of a pencil (the eraser side).
I haven't tried this yet but got the tip from Richy if I recall correctly.
I'm the last person to claim someone else's idea as my own, but here's an instance where I had a similar idea but have never tried it. In keeping with the saying,
"You don't know what you can do until you try"
- Take a hole punch, punch out some holes in some sandpaper.
- Cut a pencil down to about 2-3 inches long on the erasure side.
- Glue these onto the face of an unused pencil erasure.
- Place the pencil in a Drill.
- Carefully hold the drill in such a way to sand on top of a rock chip.
The goal is to take a ragged random shaped rock chip and turn it into a perfect circle with an even impression in the paint and now sanded clean for good adhesion.
Then apply your touch-up paint till the hole is level.
Allow to dry for about a week or two in warm temperatures.
Carefully sand the touch-up paint flat.
Remove sanding marks.
I'll give it a try on my Jimmy after the glue has dried that's holding the #1000 Grit Sandpaper to the Pencil Erasure.
I think a lower grit would actually work better, like #600 or #800 but #1000 is as low as I had at my desk.
Flash Gordon
Well-known member
- Feb 6, 2010
- 11,460
- 463
i have always wondered what those black specs were! artillary fungus huh? i havent seen a really bad case of it, but the fingernail and then scrub with a wash mitt works for me. annoying little things. i always thought it was some type of sap as well.
:iagree: I never knew the proper name either. The worst thing is, you never notice them untill after the customer is out of pocket to examine for themselves. This means you gotta spend alot of extra time for nothing (if the price is already set) and no one will know about all the extra effort involved...... its a very thankless position indeed
Yes. Artillary Fungus is a pita 4 sure
Kristopher1129
New member
- Jan 3, 2011
- 2,861
- 0
:iagree: I never knew the proper name either. The worst thing is, you never notice them untill after the customer is out of pocket to examine for themselves. This means you gotta spend alot of extra time for nothing (if the price is already set) and no one will know about all the extra effort involved...... its a very thankless position indeed
Yes. Artillary Fungus is a pita 4 sure
I agree. I HATE when a customer drops a vehicle off, and it's full of these. They always fail to mention it, or not even notice. I've spend quite a few times trying to explain what it is, and why it's so time consuming.
And what always happens? They say "ahhh, whatever...I didn't notice it anyways. Just go ahead and do what you'd normally do". Then, the detailer in all of us goes "I don't think so, buddy...they gotta go!". We do it anyways! We're nuts!
Flash Gordon
Well-known member
- Feb 6, 2010
- 11,460
- 463
I agree. I HATE when a customer drops a vehicle off, and it's full of these. They always fail to mention it, or not even notice. I've spend quite a few times trying to explain what it is, and why it's so time consuming.
And what always happens? They say "ahhh, whatever...I didn't notice it anyways. Just go ahead and do what you'd normally do". Then, the detailer in all of us goes "I don't think so, buddy...they gotta go!". We do it anyways! We're nuts!
:iagree: Ppl just don't understand the pain we go through now do they Kris?
Sure seems to me, that sanding using a drill & pencil would be a recipe for disaster. Seems to me, you would burn a hole through the clear coat with the quickness, no?
Kristopher1129
New member
- Jan 3, 2011
- 2,861
- 0
:iagree: Ppl just don't understand the pain we go through now do they Kris?
Sure seems to me, that sanding using a drill & pencil would be a recipe for disaster. Seems to me, you would burn a hole through the clear coat with the quickness, no?
That's what I was thinking. Seems like very little pressure would be too much.
If I was to even go the sanding route...I'd probably bust out the DA, or orbital sander with a 4000 grit disc and just go over the whole panel quickly. Buffing out 4000 is a piece of cake. Plus, if there's a bunch of those dots...you can make quick work of all of them.
There's something about the visual of an eraser sized sanding disc powered by something as strong as a drill that just sounds like a recipe for disaster to me.
I'm not trying to make argument...just want to make sure the right info gets out there. :dblthumb2: