Knock out painted roofs first, then tackle the rest of the car...

Joined
Dec 5, 2022
Messages
51,004
Reaction score
7
Knock out painted roofs first, then tackle the rest of the car...


1952 DeSoto - Roof has been sanded, cut, polished and waxed and is now protected with a soft flannel sheet
1951Desoto001.jpg


This topic has come up in the past on this forum and other forums so here's a quick article on a technique that I use when doing multiple-step machine polishing procedures for show car work.

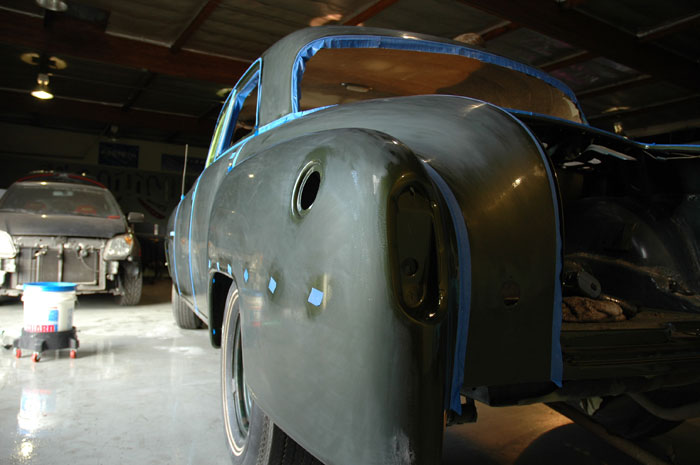
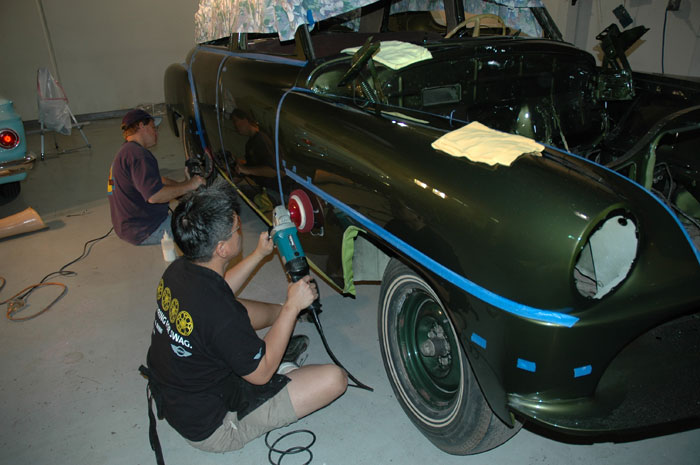
The idea is to knock out the roof from start to finish and then after the roof is completely polished and sealed, then cover it with something soft like a soft flannel bed sheet, and then tackle the rest of the car from the roof line downward.


Here's a couple reasons why to polish out the roof all the way to the wax or sealant step and then work down...


1. Reduce the potential
No chance of getting splatter on previously cleaned and polished surfaces below the roof line and then having to wipe the splatter off. This is part of "reducing the potential" for re-instilling scratches that have already been removed. While it's important to be careful and if you are careful then this isn't an issue, it's just my personal preference to know out the roof all the way to wax and not ever have to worry about wiping any kind of residue off a lower panel when moving onto any step after the first step...


2. Marketing
Doing a multiple step process to a car requires a lot of time. From the time you start to the time you've wiped the first coat of wax off could be anywhere from 10 to 12 hours to a couple of days depending upon the project.


Now follow me on this...
If while you're working on the car you have not "finished section", then you have no way to showcase your work and talent to anyone that happens by, this could be the owner or a potential customer.

If all they can see is a "work in progress", there's nothing to get too excited about...

Now if you quickly work the roof all the way to the first application and removal of the wax or paint sealant step, now anytime someone walks by and comments or asks questions about your work you can make a "Presentation".


You talking to owner or potential customer...
"Well I still have the lower portions of the car to finish but come here and check out the paint on the roof, this is how the ENTIRE car is going to look after I wipe off the last coat of wax..."
Then you carefully remove a little piece of painter's tape holding the soft, flannel sheet onto the roof and then pull the sheet back carefully and let whoever is standing there check out a perfectly polished, high gloss finish.


In my experience, anyone looking at the finished results can then usually imagine how the rest of the car is going to look and that puts the "Big Picture" together enough for them to appreciate the work you're doing even though the rest of the car maybe taped-off and covered with compound residue...


That can be pretty powerful and even more so if there's any "original" paint or un-polished sections left that you can then show them before-and-after, even more so, you can leverage this if you have a Brinkmann Swirl Finder Light handy...


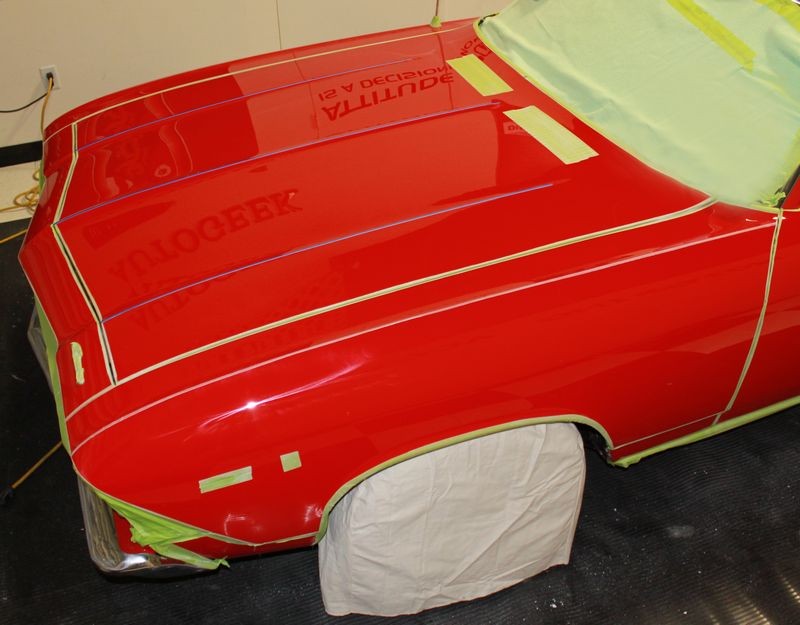
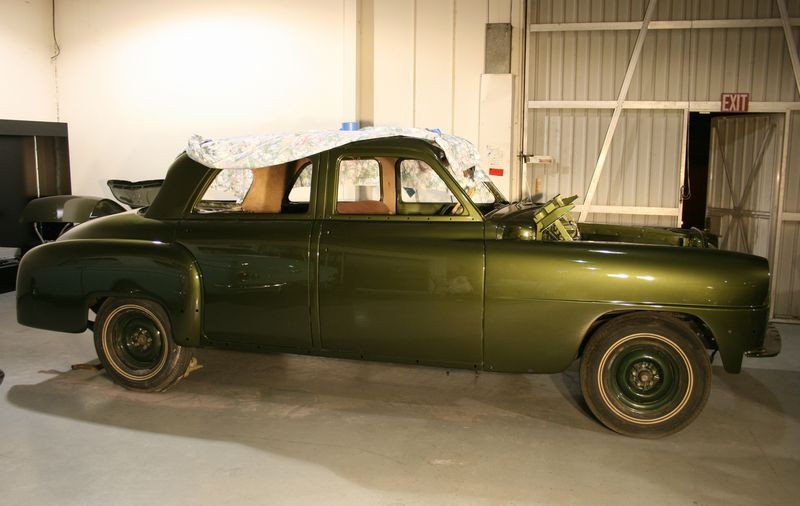
I found this picture of a 1952 DeSoto that Richard Lin and I dampsanded using Porter Cables before dampsanding was a commonly used detailing term.

The flannel bed sheet is covering the roof because at the point in time this picture was taken the paint on the roof had been sanded, compounded, machine polished twice and machine sealed. We didn't want any airborne dust landing and settling on the paint while we continued to work downward.

1951Desoto001.jpg


Of course, it goes without saying that this "style" of doing a multiple-step process to a car is "personal preference" and each person can find a way that works best for them... this is just what tends to work best for me...


:)
 
A few more pictures of the DeSoto...

1951 DeSoto - on Flickr

415305670_90ada9bc91_o.jpg


415305413_dc56b4565b_o.jpg


:xyxthumbs:

Glad i finally got to see this and why you do the roof first. Makes sense...especially the 'presentation' part to the owner or potential customer.

Question though: Whats up with the pieces of tape that you didn't sand around along the back QP in the first picture listed above...were these low spots in the paint you detected with a PT gauge or was there another reason?


My guess - those are holes in the qrtr panel for a molding or chrome trim. They are taped off to keep compound out of them.
 
Mike...this is very helpful and smart as heck! I always hate when I'm done polishing the entire car, I got to seal the paint and there's dust all over the car. Thanks for the write up and yet another priceless tip.
 
Uhhhhhhhh....you mean we're suppose to do the roof too?!?!?!? :autowash:
 
Always start from the top down.

Gravity plays a key roll in much of we do and detailing is no exception...

Another great article Mike!! :props:
 
Glad i finally got to see this and why you do the roof first. Makes sense...especially the 'presentation' part to the owner or potential customer.

The presentation part comes in real handy for a lot of reasons, so being able to show the finished results while the rest of the paint is in various states of the process can be and usually is very powerful.


Question though: Whats up with the pieces of tape that you didn't sand around along the back QP in the first picture listed above...were these low spots in the paint you detected with a PT gauge or was there another reason?


My guess - those are holes in the qrtr panel for a molding or chrome trim. They are taped off to keep compound out of them.

Joe's partly right but the primary reason the holes have tape over them is so we don't sand over the raised edge of the holes in the panel. The circular edge of the holes for where trim is attached tend to be raised as as you're sanding the panel becomes completely white with residue and it's easy to sand areas you don't want to sand because they disappear in the white slurry of sanding residue. So the tape protects the paint on the raised edges and also serves as a visual indicator as to where the holes are so you don't sand over them.

I point this same thing out in post #5 of this article,

Damp-Sanding Tools, Tips and Techniques by Mike Phillips


Mike Phillips said:
Taping-Off, Covering Up and Removing Trim
As a rule, it's a good idea to tape-off any raised hard body line for two reasons,

  1. So you don't sand over the high points
  2. Simply so you can see where they risky areas are at on a panel
1. So you don't sand over the high points
Paint will tend to be thinnest on any high point as the forces of gravity will cause the paint when it's sprayed and thus a liquid to flow downward. It only takes a few seconds of sanding on any high point, edge, corner or raised body line to either sand through the topcoat or remove enough material that when you later compound the area you go through the topcoat while compounding. So taping off high points will save you from having to repaint a panel.

2. So you can see where they risky areas are at on a panel
This one might sound kind of dumb if you've never sanded down an entire car before so let me share with you why it's important. As you're sanding, you'll create a white slurry on the panel that you can't see through. This slurry is made up of particles of paint you've removed off the topcoat, mixed with water. As it covers the panel it hides or camouflages everything under it including a high point or raised body line. By placing some tape over the area you want to avoid you create a visual indicator or reminder of where not to sand.

Here you can see where I've taped-off the edge of the gas tank door and the sheet metal surrounding the opening for the gas tank door. This will protect the edges while sanding and compounding.

Body lines taped-off
redelcamino_023.jpg


If you look carefully you can see some thin tape lines running down the center of the hood and the middle of each half-sections of the hood, these are raised body lines as a part of the styling of the hood. They are not very high off the surface and when sanding, the entire area will become white with water slurry. By taping them off I could see where they were at and if I accidentally run the sander too close to them, no worries...

Thin blue tape on top of raised body lines on the hood
DampSanding39.jpg


Grills and Vents
It's nearly impossible to get under the fresh air grill on late model cars to remove splatter residue so I always carefully tape them off. Sad to say but whoever sanded and buffed this car before me plastered the area under the tape you see here and there's no practical safe way to remove it so it will forever be an eyesore when the owner shows this El Camino

Fresh Air Grills Taped-off
redelcamino_020.jpg


Here you can see where I've taped-off any edge I didn't want to risk sanding over... and it's not that I'm not good at what I do it's because the next paint job I buy is going to be for me.

redelcamino_021.jpg


redelcamino_019.jpg


redelcamino_017.jpg


The trim is going to completely cover these holes so a little orange peel around them is just plenty of good film build for the service life of the car. If a person wanted to sand close to the holes they could do this either before or after the major portions of the panel are sanded flat.


One thing for sure, if you're ever doing a sanding project, do yourself a favor and get a 3" Griot's Mini Polisher and the 3' Unigrit sanding discs because they make sanding close around anything like body lines or trim holes fast and safe as you have a smaller footprint and because the discs are small surface area wise, they are easy to control with surgeon precision.

See here,

Dampsanding with 3" Griot's Garage Mini Polisher

mini3dampsanding013.jpg


Good question!


:xyxthumbs:
 
I'll admit I have a different process while polishing. I like the reasoning Mike gives for doing the top first and I may tweek my process a little. But here's my reasoning for doing the hood or trunk lid first.

#1) It's easiest to see the test spot on a lower level. Now Mike may do his test spot somewhere else first, and then move to the top, not sure. But I usually do all my testing on the hood or trunk lid, and then finish polishing that area. I also feel like it's easier for the customer to see the results there as well.

#2) I don't usually go all the way through polishing AND then apply wax/sealant to any one area. I don't want to dirty a pad unless I'm going to use it for the whole process. I agree that it would make that one area really stand out as a finished product, but I dislike the idea of using a pad to apply sealant and then tossing it aside to be cleaned. Even having two compounding pads in use at the same time can get tricky (your #105 pad and your #205 pad as an example). Aren't you afraid these pads may pick up extra contaminants while laying around? Maybe they could be put in a ziplock baggie while not in use? If it's a two day job I'm not sure I want to leave sealant on that original pad and then try to reuse it when it's time to seal the rest of the car. What am I missing here Mike? Or do you apply wax on the top by hand?
 
I'll admit I have a different process while polishing. I like the reasoning Mike gives for doing the top first and I may tweek my process a little. But here's my reasoning for doing the hood or trunk lid first.

#1) It's easiest to see the test spot on a lower level. Now Mike may do his test spot somewhere else first, and then move to the top, not sure. But I usually do all my testing on the hood or trunk lid, and then finish polishing that area. I also feel like it's easier for the customer to see the results there as well.

Agree.

I almost always do my test spot on a horizontal panel that I can look down on when comparing before and after results. This would be for my benefit and if I wanted to show anyone like the owner. I think I recommend this in my how-to book and always teach this in all my classes.


Exception
Once I was asked to work with two other Pro Detailers to prep a car for a TV show Pilot. The car needed to be sanded and and buffed as it had major orange peel everywhere.

The two Pros I was working with were going to simply start sanding the car down, I suggested we do a "Test Spot" first because I've come across paints so hard they couldn't be buffed, (experience is a great teacher), and I didn't want to get myself backed into an ugly situation on a TV set.

They didn't seem to use test spots as a normal practice. Once I convinced them we should and and then buff a section to make sure we could get our sanding marks out and the paint buffed to a high gloss I then suggested doing the test spot on the roof so if there was problems it wouldn't be easily visible to all the people on the set.

This was just a case of me wanting to be very cautious or normally I would have done the test spot on the hood or trunk lid. Long story short, the paint was incredibly hard, this was before M105 was introduced and Unigrit sanding discs, in other words this was before it was easy and fast to sand and buff paint. We did the wetsand, cut and buff but it wasn't fun and the show never made it to TV.


#2)
What am I missing here Mike?

Or do you apply wax on the top by hand?

Good points but to get around them just have plenty of pads on hand for the job and after machine applying the wax or paint sealant to any panel then place the pad some place where it will stay clean.


My personal preference is to do as many procedures by machine as possible... I always try to remove my any hand procedures from the project except for wiping off products...


Good questions...


:)
 
Had a question on YouTube about how to work on Monster Trucks, shared the link to this thread...

[ame=http://www.youtube.com/watch?v=WhJYFLgIjhE]Meguiars Microfiber DA Correction System - YouTube[/video]


Also recommended getting some kind of scaffolding if he's in this for the long run, like this...

Behold Behemoth! - Cleaned & Sealed with DP Poli-Coat

Washing, claying and waxing a truck this size is a little more difficult than a normal car, truck or s.u.v., luckily we have the right tools to do the job safely.
BigBad028.jpg


After washing, I drove the Behemoth into the studio where I can dry it with some waffle weave drying towels and then inspect the paint for above surface bonded contaminants.
littlestepstool.jpg


:)
 
Always start from the top down.

Gravity plays a key roll in much of we do and detailing is no exception...

Another great article Mike!! :props:

gravity is just a theory, like evolution
 
Wouldn't laying a blanket over a freshly polished surface risk marring the paint? That's why I don't like this idea.
 
Wouldn't laying a blanket over a freshly polished surface risk marring the paint? That's why I don't like this idea.

It's not a blanket, it's an old, washed a million times, soft flannel sheet.

If you were to look through enough of my posts you would see this same soft flannel sheet used for all types of projects. Here's one,

The Panic Parrot - A 1950 Studebaker Starlight Coupe
PanicSpeedGlaze7.jpg


2PanicFinished1.jpg


But hey, what's most important is for you to find a way you're comfortable with, I'm just sharing what works for me...


:xyxthumbs:
 
Back
Top