Hey Mike,
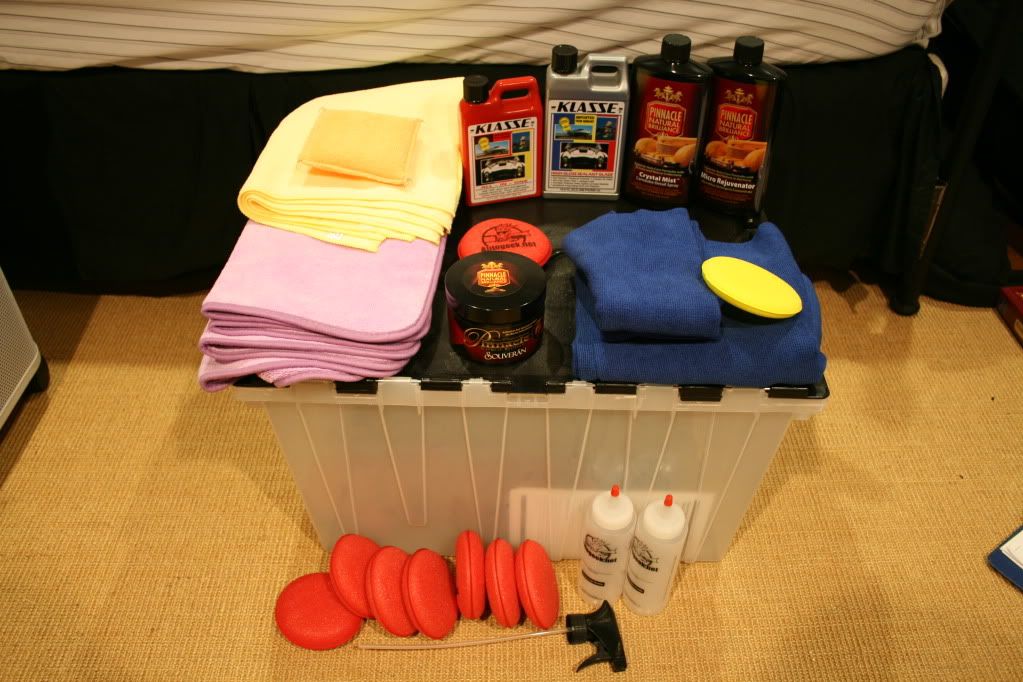
Anyway, I am really thinking about getting a PC, but I am completely overwhelmed with the different combinations of pads, compounds, sealants, glazes, etc that you can put on the car.
So my questions are:
Do you think I need a PC given my current setup? (By the way, my car is brand new and most likely will not have any deep scratches, just mainly light swirls)
If yes, what setup would you recommend?
Lastly, when do I use the PC with all of the compounds in my full detailing session?
Thanks alot Mike.
This Sunday there will be a new commercial showing on Two Guys Garage on how to use the Porter Cable, that's the "Bumper Commercial", it's 90 seconds long and it's purpose is to educate the TV audience world, (different than the forum world), what swirls are and that working by machine is easier and faster than working by hand.
After that commercial launches we will be launching our new Porter Cable 7424XP how-to video. I've been typing about how to do a Test Spot since 1994 when I first started posting to the Internet, I teach it in all my classes and Richard Lin and I demonstrated it in our DVD on how to use the PC.
Our new PC video shows step by step how to do a Test Spot using a Porter Cable 7424XP and these steps would apply to both the Griot's Garage ROP and to the Meguiar's G110v2 and any electric polisher for that matter.
So the video shows you how to use the tool, how to use the different products with the different pads. How to check your results and then if the results are good, you simply duplicate that process, over and over to the different panels of the car until you finish the entire car, at least for the swirl removing steps and the final polishing steps because for these steps you only work small sections at a time. So the Test Spot section is the same basic size section you repeat.
If you watch this video it will show you the proper techniques for removing swirls. It's really not that hard and I think I cover everything in detail.
Then when you get to the paint where you're ready to apply a wax or a paint sealant, I show how to apply a paint sealant by machine and if you choose to do it this way then you can tackle as large a section as you want, you don't limit your work area to a small section. The reason you have to work small sections at a time when removing swirls is because modern clear coat paints tend to be hard so you have to focus on a small area a time.
If your car's paint is in excellent condition with only light or shallow swirls, for the swirl removal step you still will only work small sections at a time regardless of how shallow or deep the swirls are.
Anyway, I'm had to finally have a instructional video going up on the Internet that will show how to do a Test Spot and thus how to remove swirls so I won't have to type about it with a keyboard all the time.
Also, the techniques in this video can be used with any foam pad or any chemical line that's recommended for use with a DA Polisher.
As to your question, should you get a PC?
That's up to you but I've taught thousands of people how to move their hand to apply compounds and paint cleaners to remove swirls and scratches and right after that shown them how to use a PC and almost without exception everyone wants to move up to machine polishing.
It's really not that hard to do... this is my son working some paint sealant over the Batmobile with a G110 and a finishing pad and doing a great job.
Welcome to the nut house! Black is a full time job but it is beautiful if maintained correctly. (w/ a machine)

rops:
That is a very cool picture!
Like Josh said it all depends on how deep you want to get into swirl removal.
That is a very accurate statement and a pun at the same time.
Removing swirls by machine over an average sized passenger car will take about 6 hours from the time you turn the polisher on and then finish the swirl removal step. This does not include washing, drying, claying before removing the swirls and this does not include any final machine polishing, applying a paint sealant or wax and then wiping the sealant or wax off.
You might think 6 hours is a long time but it's going to be a lot longer and require a lot more work do remove the swirls by hand. If you haven't already, read through the below thread and note in order to get machine quality results on the side I did by hand I applied the compound 3 times to each small section, the swirl remover 3 times to each small section, that's a lot of rubbing and that's only half the hood. I could have only applied the compound and swirl mark remover one time each but it would not have removed all the swirls and scratches like one application of each product did using the PC 7424XP
Man versus Machine
Thanks for all of the suggestions so far!
But do I use the PC with the 105/205 after washing and claying? If so, after using the 105/205 do I follow up with the klasse twins and a layer of souveran? Thanks again
Here's the order but note, if you're new to machine polishing, I always recommend just tackling a single panel your first time so you don't get burnt out. For example, just machine clean, polish and wax the hood on a Saturday.
Wash & Dry
Inspect paint with sense of touch and clay if needed
Inspect for swirls, if detected do a TEST SPOT
After you prove your system and technique to one small section duplicate that process over the rest of that panel or the entire car.
It's when you do your test spot you'll discover if you need to use M105 or if by chance maybe just need M205 or fill in the blank for the chemical you're using.
Normally you test the least aggressive pad and product to get the job done. If the first combination of pad and product isn't working fast enough or effectively enough then you can always substitute a more aggressive pad or product or both and test again.
You test until you dial-in a system that make the paint look GREAT to that one small section and then you duplicate that process over the rest of the car. A successful test spot give you the confidence to tackle the entire car.
The last thing you want to do is buff out your car's paint with a pad and product only to wipe the car down, pull it into the sun or inspect in good light and find out the paint doesn't look good or at least how you hoped and expected.
Once you figure out a system that works on your car you can use that system any time in the future for touch-ups, you don't have to keep doing a test spot on a car you've already figured out a successful system for.
Anytime you take on a new project, that is you tack on a car that you've NEVER worked on the paint before, then you do a Test Spot again. It's all about making sure your pads of choice, your products or chemicals of choice, your tool of choice and yes.. your skill and technique for using all of these works to make the paint look great. Then you move forward.
Better safe than sorry and I know when you read the above that it can make so much sense but I've worked with so many people that have just went out to their garage and detailed their car only to find out that after the final wipe off and inspection the paint only looked marginally better and in some cases worse.
If you read through this article you'll see that I rated the PC style polishers the easiest to learn how to use.
How to choose the right polisher for your detailing project
")