Removing Severe Water Spots

JohnB

New member
Joined
Aug 23, 2010
Messages
7
Reaction score
0
Hi Mike,

I have a 2008 Silverado with severe water spots (see my introduction thread http://www.autogeekonline.net/forum/introduce-yourself/28149-new-guy-nc.html).

I purchased the PC with the Wolfgang Duo. Today I washed and clayed the truck and then started with the Wolfgang Total Swirl Remover 3.0 on the passenger side roof. All went well until I got to the drivers side where the water spots were much worse. I needed something more aggressive than the Swirl Remover and the only things I had handy were DuPont 1500 and 3000 Polish. I tried the 1500 Polish with the Orange Pad (only have two pads, orange and gray). 1500 did not work well with the orange pad. I finally did the drivers side roof by hand with the 1500 and the hood as well. Slow process, took all afternoon to finish the roof and hood - still need to do the remainder of the truck. Hopefully only the Swirl Remover will be needed.

I have no complaints about the Swirl Remover, it was never intended to be this aggressive.

A few questions:

1. After I finish hand rubbing with 1500, do I need to use the 3000 by hand before using the Swirl Remover or is just using the Swirl Remover adequate?

2. In case I ever have this condition again, is there a pad I can use with the PC 7424XP for the DuPont 1500? (It would go a lot faster with a machine)?

Thanks for your time,
John
 
I much better combo would be the orange pad and Meguiars 105 or a Surbuf pad and 105. As far as what to follow up with, you are going to need to experiment to get the right combo of pad/polish to remove what you did by hand.
 
I used Megs Ultimate Compound with an orange 6.5" CCS pad to remove severely etched water spots from a 2002 or 2003 A4. The UC cut quickly and finished suprisingly well, so I only needed a regular polish (I think it was Opt Polish but it may have been WG FG 3.0) and a white pad to finish. DGPS3.0 was the LSP.

I used UC instead of Megs 105 as my wife's friend got it from Pep Boys on a weekend so I could finish her car, and the Megs105 arrived later that week from AG.

Similar to you, I tried both TSR with orange pads before using the UC. I also tried OPT Compound. The OPT Compound removed some of the water spots, but the water spots laughed at the TSR. TSR is fine for swirls and general defects with an orange pad and leaves a great finish for the FG3.0, but seems to have trouble with water spots and deep bird dropping etches. I have not tried a yellow pad, so that may not be a totally fair statement.

There are water spot removers that chemically dissolve water spot salts on paint and glass. I've heard that white vinegar will dissolve the salts as well. I have not tried either option so you may wish to investigate further.
 
Hi John,

First, can you clarify exactly which products you're using? Maybe the full name and even a part number of the DuPont polishes?


Second, I agree with Dana, after you hand rubbed out a clear coat finish with Dupont 1500 Polish, who knows how deep the scratches you left in the paint are? Besides the abrasiveness of the polish and/or compound, there's pressure you apply with your hand... push harder... deeper scratch...

M105 is a very aggressive compound actually formulated for the refinishing industry... it can be used by hand, DA or Rotary. Like Dana said, get some of this and some aggressive pads, keep them at 5.5" in diameter and read this,

How to maximize the ability of the 1st Generation Porter Cable Dual Action Polishers


Even though it sounds like you have a new PC you need everything working for you as this is a job for a rotary buffer...

You should be able to work out the scratches using a PC and good technique, just remember that anytime removing defects gets hard for multiple reasons, shrink the size of your work area down. Like Dana said, you're going to have to do some testing or what I alway post is you'll need to do a Test Spot and figure out what combinations of products and pads and time and number of applications it takes to get one small section perfect or to your expectations. Once you can make one small section look good you'll be ready to tackle the rest of the car.

I always recommend placing a tape line down on the panel you're doing your testing and dialing-in on because you want to have a sharp line between before and after because it makes it so much easier to gauge your success or failure.

TapeLine02.jpg


1. After I finish hand rubbing with 1500, do I need to use the 3000 by hand before using the Swirl Remover or is just using the Swirl Remover adequate?

The Wolfgang Swirl Remover isn't going to be aggressive enough or effective enough to remove the random scratches throughout your truck's finish... I will make the surface shiny but it's not going to be aggressive enough for what you're trying to do.

M105 was made to remove #1200 grit sanding marks out of fresh paint using a rotary buffer... not sure it will remove what you have going on with a DA polisher. Again, there's a huge difference between making the surface shiny and 100% defect removal. I'm not sure what your standard or expectations are because everyone is different.

2. In case I ever have this condition again, is there a pad I can use with the PC 7424XP for the DuPont 1500? (It would go a lot faster with a machine)?

Thanks for your time,
John

Give us a part number or a complete name or a picture and let me look into it... a Google search for Dupont 1500 Polish doesn't turn up much.


:)
 
I did a dark green saturn wagon last Friday. It had very bad water spots. I didn't have the backing plate for the rotary I needed so I use the Makita dual acton with orange pad, using the Meg 105. I could not get rid of all the spots on hood. I had told the owner that they may not all come out. It looked good when finished but still could see the spots at angle. They were well pleased, told them that light wet sand might get the spots off if they wanted me to try later on. This was the first polish and wax this vehicle had had in 10 years they have owned it and it sits outside. It will get the same way again so why try to make it look show room.
I have the backing plate for Makita 9227 buffer now and may have got better results had I used it. I did follow up with the 205 polish and using the same DA and white pad. I didn't have any swirls when done.
Any suggestion for a more aggressive pad to use with 9227?
 
Last edited:
Hi John,

Give us a part number or a complete name or a picture and let me look into it... a Google search for Dupont 1500 Polish doesn't turn up much.


:)

Sorry, I should have been more specific about the products I used.

The compound I used by hand is

DuPont One Step Polish 1500s. This is a professional product used in paint shops. The only number I could find that might be a part number is 2RF-010CBCS-048-0789.

The other product I have is DuPont Highlighting Glaze 3000S. The only number I could find is 2RF-001GBDS-048-0290.

Both products indicate for hand or machine application (1500 - 2200 RPM by machine - I assume rotary).

My understanding is that the 1500 and 3000 are respectively equivalent to 1500 and 3000 grit paper.

I always do compounding in straight lines (front -> back -> front) on horizontal surfaces. These were the only compounds I had on had at the time and I used them before on a 1968 Corvette I restored with good results (I did all of the body and paint work).

I guess my real question should have been about the equivalent "grit" of the Swirl Remover. If it is in the range of 3000, then there is probably no need to use the DuPont 3000 product. If it is much finer than 3000, the it may be worth the extra effort to use the DuPont 3000 or some other product I can obtain locally (I would like to finish this job today).

I do have a very old rotary, but it is only 2 speed and extreme care is required near any edges. I used if mainly for body work (sanding). The hood and roof of the Silverado have some recessed areas that I did not want to get close to with a rotary.

I am not looking for a show car finish. This vehicle lives outside, I just want it looking reasonable good without any water spots.

Thanks for all of the relies and suggestions,
John
 
Sorry, I should have been more specific about the products I used.

The compound I used by hand is

DuPont One Step Polish 1500s. This is a professional product used in paint shops. The only number I could find that might be a part number is 2RF-010CBCS-048-0789.

The other product I have is DuPont Highlighting Glaze 3000S. The only number I could find is 2RF-001GBDS-048-0290.

Both products indicate for hand or machine application (1500 - 2200 RPM by machine - I assume rotary).

My understanding is that the 1500 and 3000 are respectively equivalent to 1500 and 3000 grit paper.

I just did a google search on the 1500S One Step Polish and found a Technical Data Sheet from 2003

[FONT=TimesNewRoman,Bold]Properties[/FONT]
- Removes 600S compound marks and P1500 sand scratches, without leaving swirl marks.
- Does not dry up on the job.
- Easy clean up of residue with water.

I'm pretty connected to the paitn polishing world and just don't ever see these products talked about, I have to wonder if they're even available any longer?

Technology has chaged a lot and continues to change as I type... if these products get you to where you want to be then that's all that's important, if you ever get to where you're looking for something new to try then we can help you there too...

If the 1500s will remove 1500 grit sanding marks by machine or hand then it's an aggressive compuond and how it finishes out is the most important aspect. M105 will remove #1200 and finish out to it looks like you just waxed the paint. Big change in abrasive technology when this product was introduced.


I am not looking for a show car finish. This vehicle lives outside, I just want it looking reasonable good without any water spots.

Thanks for all of the relies and suggestions,
John


Do some testing with your Porter Cable and some of the recommendation already posted... if the PC won't do the job then you might have to switch to a rotary buffer.

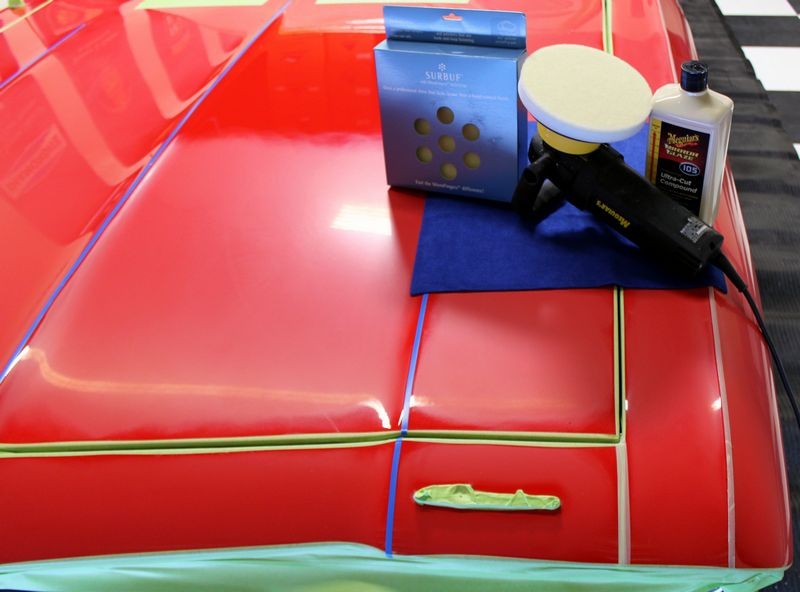
You really need to get some M105 and some 5.5" aggressive pads, either foam or the SurBuff.


Surbuf MicroFinger Buffing Pads now at Autogeek!

Surbuf R Series 4 Inch Buffing Pads 2 Pack
Surbuf R Series 5.5 Inch Buffing Pads 2 Pack
Surbuf R Series 6.5 Inch Buffing Pads 2 Pack

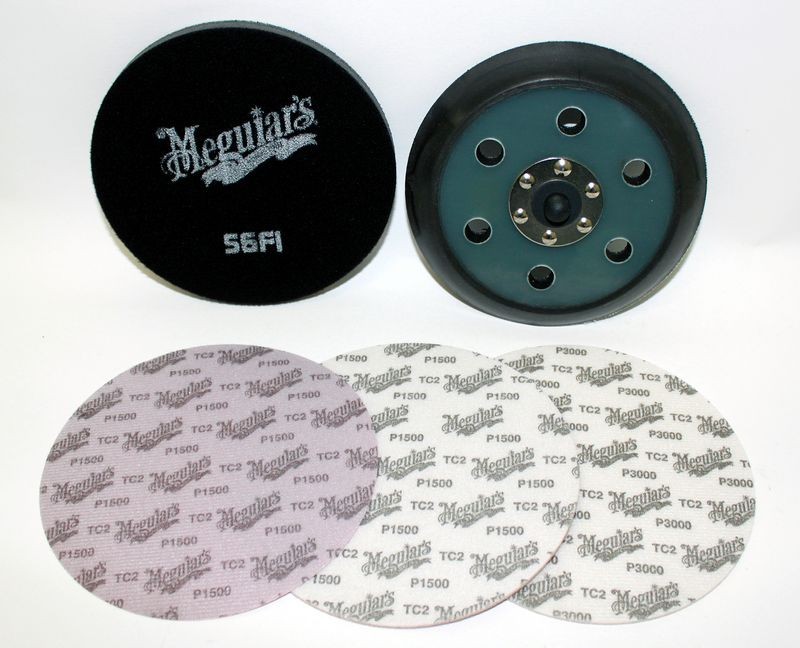
We were shooting a video on how to Machine Damp Sand using Meguiar's Unigrit #3000 Foam Finishing Discs and then how to remove your sanding marks using a rotary buffer and took a moment to show that if you choose, you can also use a DA Polisher with Surbuf MicroFinger buffing Pads to remove shallow sanding marks like those left by the #3000 Unigrit Foam Finishing Discs and a compound.

Just to note, for years now, the question about whether the you can use a DA Polisher, like the Porter Cable 7424XP, the Meguiar's G110v2 or the Griot's Garage ROP to remove sanding marks out of modern clear coat paint has been a hot topic.

While there are a number of factors involved that affect a "Yes" or "No" answer, generally speaking you can remove light or shallow sanding marks out of clear coat finished using a DA Style Polisher with their Free Rotating Spindle Assemblies for drive mechanisms, you just need to use the right pads, products and techniques. Top Coat Hardness is a huge factor when it comes to determining whether or not a DA Style Polisher can remove sanding marks and this will vary between cars.

While the most effective way is still by using a direct drive, rotary buffer with a cutting pad and a compound, especially if you sanding down an entire car, we demonstrated using the Surbuf MicroFinger Buffing Pads with a SMAT product like M105 you can easily remove a controlled sanding mark pattern, in this example, #3000 Unigrit Foam Finishing Papers by Meguiar's were used. Autogeek will have the new Unigrit Foam Finishing Discs very soon. Stay tuned for an upcoming article on this topic.

Surbuf MicroFinger Buffing Pads
SandingMarkRemovalWSurbuf000.jpg


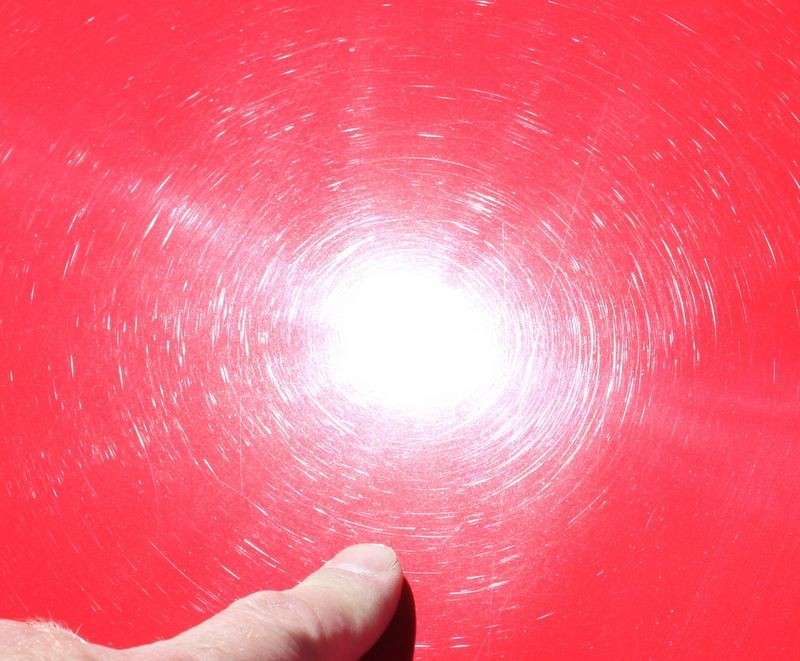
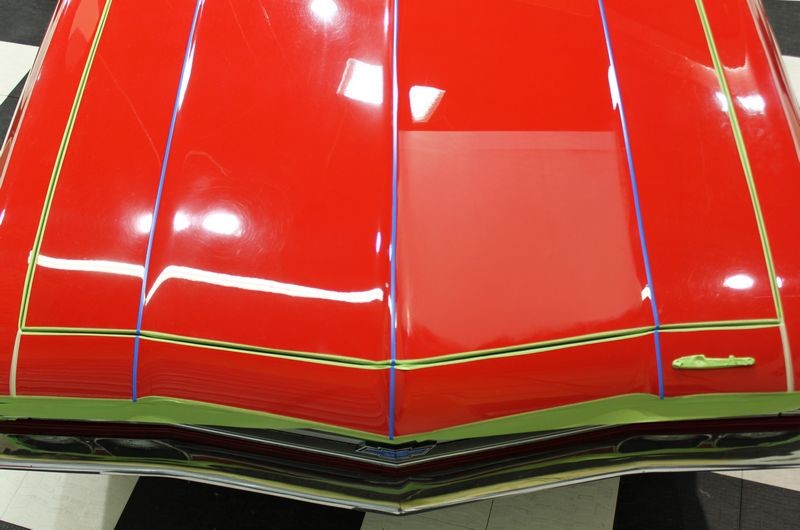
This is our project car. This is a restored and mild hotrod 1969 El Camino with a custom basecoat/clearcoat finish. The fit and finish of the panels is excellent and the paint application came out very nice, there are a few leftover sanding marks in the paint and rotary buffer swirls including arc scratches probably from an abrasive particle being trapped between the pad and the paint. Our goal is to remove all the below surface defects and restore a true show car shine.
SandingMarkRemovalWSurbuf001.jpg


We moved the car out into the sun where the bright overhead sunlight can reveal the true condition of the paint.
SandingMarkRemovalWSurbuf002.jpg


redelcamino_029.jpg


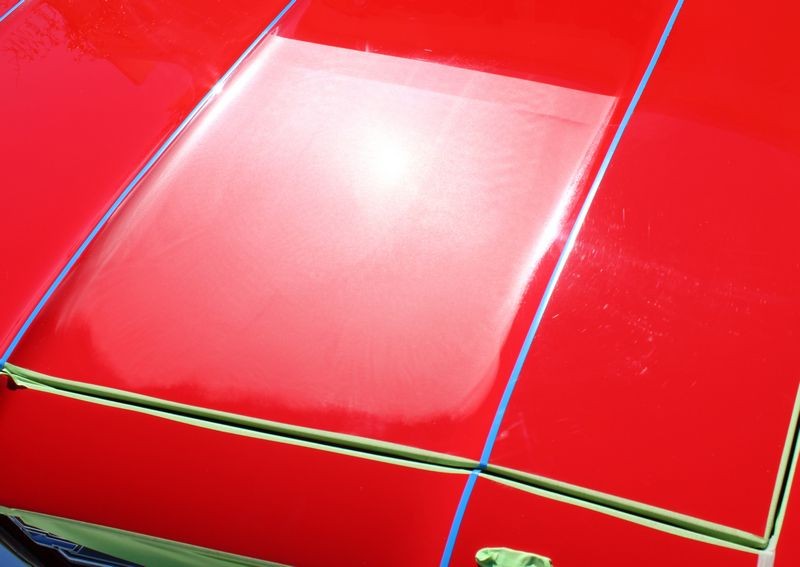
Next we'll Machine Damp Sand the deep swirls and scratches until the surface is flat using the new Meguiar's Unigrit Professional Finishing System.
UnigritFinishingSystem000.jpg


The section below was sanded using the #3000 Unigrit Foam Finishing Disc on the Meguiar's G110v2 on the 5.0 Speed Setting for about 5-6 Section Passes.
SandingMarkRemovalWSurbuf003.jpg


We moved the car back out into the sun to show just how flat of a sanding mark pattern the Unigrit Foam Finishing Papers leave behind and this is because of the Unigrit particle size and distribution of these particles over the face of each disc; two very important factors that make removing sanding marks quick and easy.
SandingMarkRemovalWSurbuf004.jpg


A very flat or matte appearance
In person, the paint actually has a sheen to it as it's just a quick step away from a polished look because the sanding marks are so shallow and flat...
SandingMarkRemovalWSurbuf005.jpg


Back in the garage under the lights, you can see the Damp-Sanded area and the swirls and scratches in the rest of the paint.
SandingMarkRemovalWSurbuf006.jpg


Here are the results after Machine Compounding using the Surbuf MicroFinger Buffing Pads on the Meguiar's G110v2 on the 6.0 Speed Setting with M105 Ultra Compound for about 5-6 Section passes.

We followed this with M205 Ultra Finishing Polish on a W9207 Foam Finishing pad on the 5.0 Speed Setting using the G110v2 for about 4 passes with medium pressure and then two more section passes with just a little more than the weight of the machine to keep the pad flat to the surface. The results you see here are only after polishing with M205, there is no wax or paint sealant applied at this point.

The test section was also wiped clean using straight Mineral Spirits to remove any residual polishing oils.
SandingMarkRemovalWSurbuf007.jpg


SandingMarkRemovalWSurbuf008.jpg


SandingMarkRemovalWSurbuf009.jpg


Note the Dime in this picture carefully placed onto the paint
SandingMarkRemovalWSurbuf010.jpg


Close-up to show there are no sanding marks left on the surface, no tick marks or haze. There is a spec of dust just to the lower left hand corner off to the side of the dime that we left there to show just how close we are to the paint when taking this picture. This paint is LSP ready.
SandingMarkRemovalWSurbuf011.jpg


On the Autogeek.net Website

Surbuf R Series 4 Inch Buffing Pads 2 Pack
Surbuf R Series 5.5 Inch Buffing Pads 2 Pack
Surbuf R Series 6.5 Inch Buffing Pads 2 Pack
 
Removing Severe Water Spots - Results

Well, I did the best I could with my water spots. I completed the project yesterday at noon time after about 2 1/2 days work. Thanks to all that offered recommendations and I plan on trying a few of them in the future.

I wanted to try the Meguiar's 105 and a smaller, more aggressive pad but I was not able to locate them locally and I wanted to finish this job. After I completed hand rubbing with the DuPont 1500S Polish, I used the Wolfgang Total Swirl Remover 3.0 on a small test area on the hood. The results looked good enough to me, so I did the entire truck with TSR 3.0. Keep in mind I did not compound the entire truck, only the drivers side roof, bed rail behind the back window, the entire hood, top of the left front fender and part of drivers door (near mirror). One of my big concerns was to have the quality of my rework look much better than the remainder of the truck. I did not want to do "too good" a job.

The vehicle:
2008 Chevrolet Silverado Z71 LTZ - Dark Ruby Red Metallic. The finish is standard production paint with the normal "Orange Peel" found on most GM trucks. This truck is not a "Garage Queen" (like my other 2 vehicles), it lives outside in the weather.

The problem:
This spring a Blue Bird started to nest in my neighbors yard in a nesting box. According to the NC Wildlife Resources Commission Blue Birds like to look at there reflections in windows and mirrors during mating season. For some reason this bird liked trucks. He would perch on my truck by the drivers side mirror or on the bed rail behind the rear mirror and envy himself while relieving himself on my truck. He spread the wealth doing the same to my neighbors Ford F150. I tried covering the mirror with a bag, but that did not deter him - he just used the drivers side window as his mirror. This went on for over a month, sometimes as many as 3-5 times a day. He would also leave me presents on my roof and hood as he flew over.

The bird checking out a nesting box in my yard - he decided he liked my neighbors better.
Bird_1.jpg


Another picture of the bird in a nearby tree.
Bird_2.jpg


A typical "Present"
IMG_5512_Large_.JPG


It is really hard to believe that such a small bird can make such a big mess!

Each time I would see the "Presents" on my truck, I hosed them off. Since the hose was connected to a water softener I did not think the water spots would etch into my clear coat. The was a BAD assumption. I did not have the time to wash and dry the truck every day.

Unfortunately, I did not take close-up photos of the water spots.

The results:

Mike's advice that the TSR 3.0 was not aggressive enough to eliminate the scratches resulting from the DuPont 1500S was correct. The good news is that the scratches are so hard to see (even in bright sunlight). The truck still looks real good. I will probably do the hood again once I get some Mequiar's 105 and some additional pads for the PC. I will try a spot on the roof first to make sure that it does not do "too good" a job eliminating the "Orange Peel"


The photos below were taken with a Canon Digital SLR with an 18 megapixel sensor. I am a novice at taking these types of photos and the "Orange peel" and metallic chips made it even more difficult. It was quite cloudy when these photos were taken.

The original photos were 5184 x 3456 ranging from 4-6 MB each and would not upload. (Not a compliant - just information). I reduced them before uploading. If you click on them to enlarge, the entire image will probably not fit on your display and you will need to scroll.

Some photos of the completed truck.
IMG_0081_2048x1365_.jpg


IMG_0080_2048x1365_.jpg


The worst water spot area was on the hood in front of the drivers side windshield.
The photo below is from that area. It was starting to sprinkle a little and you can see a small drop of water new the light cage above the 5" mark.

IMG_0075_2048x1365_.jpg


I cropped the photo above so that I could upload a photo in normal viewing resolution to reveal the scratches left behind from the 1500S polish. I always compound in a straight line, the is why the scratches are all in the same general direction. Look near the center bar of the light cage and also on the bar just below the center. As I mentioned, I can hardly see these with the naked eye. We have bright sun light today and I went and inspected this area again. I can barely see them and I know exactly where to look.

CroppedJohnPic.jpg


Thanks again for all of the recommendations.

Have a good and safe Labor Day weekend,
John
 
Hi John,

Looks good! I appreciate the update as to you progress and end-results... so often people join a forum, get information and then we never here the rest of the story...


Also, I cropped out a 800 x 600 pixel section of the original and uploaded it into your gallery and then replaced the last photo with the cropped out section.

This way people can see the residual scratches you're talking about without having to horizontal scroll.


Nice work!


:dblthumb2:
 
Also, I cropped out a 800 x 600 pixel section of the original and uploaded it into your gallery and then replaced the last photo with the cropped out section.

:dblthumb2:

Thanks Mike, changing the photo was a good idea.

Over the weekend I plan to get an order together for M105, SurBuf Pads and whatever else I can think of. That way the next time I have to clean the truck I will be ready to give M105 a shot.

Have a great weekend,
John :)
 
Back
Top